2012 MERCEDES-BENZ CLS SHOOTING BRAKE roof
[x] Cancel search: roofPage 49 of 405
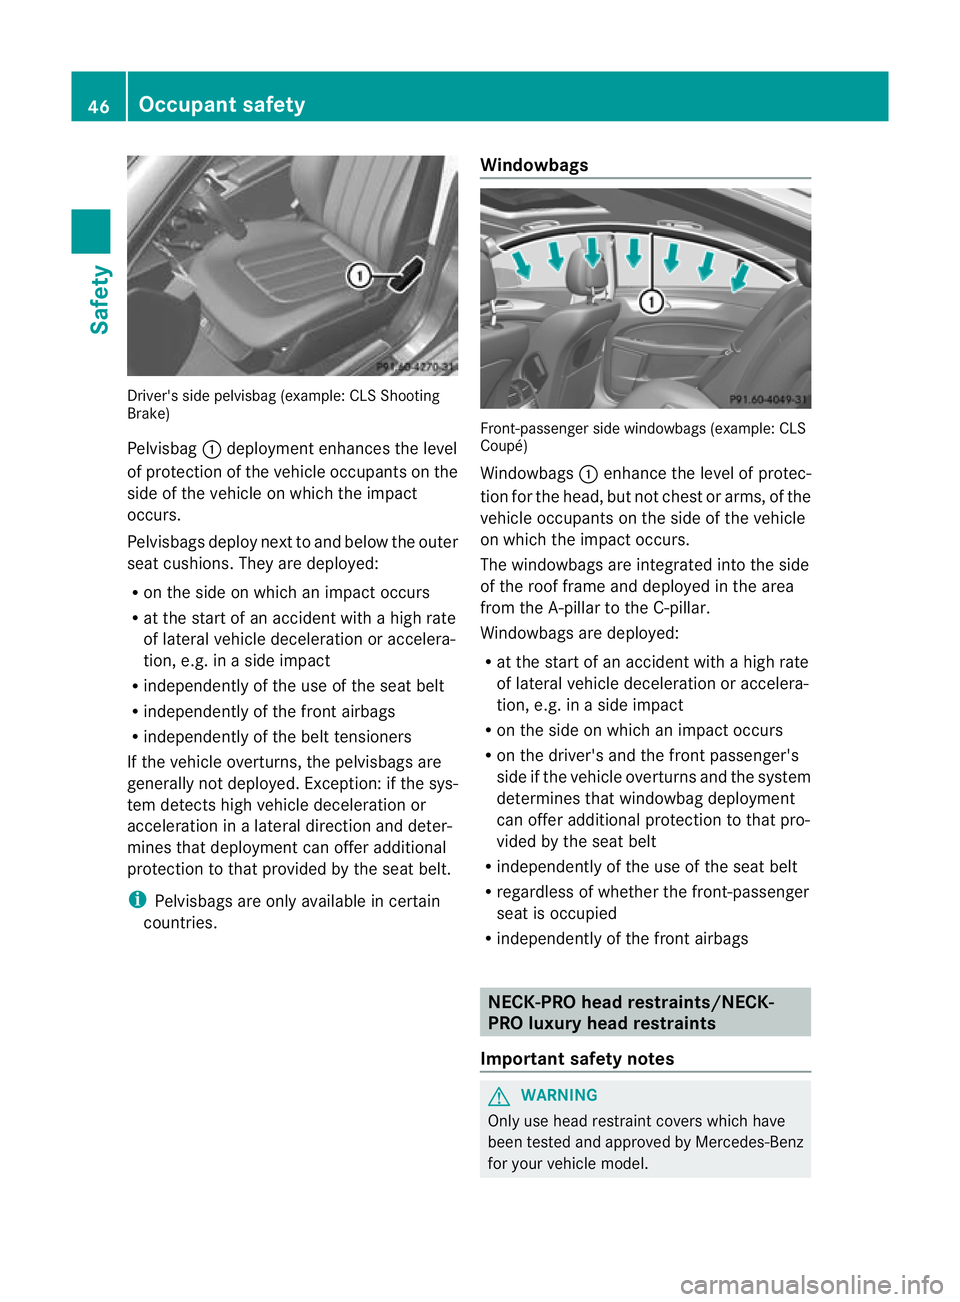
Driver's side pelvisbag (example: CL
SShooting
Brake)
Pelvisbag :deployment enhances the level
of protection of the vehicle occupants on the
side of the vehicle on which the impact
occurs.
Pelvisbags deploy next to and below the outer
seat cushions. They are deployed:
R on the side on which an impact occurs
R at the start of an accident with a high rate
of lateral vehicle deceleration or accelera-
tion, e.g. in a side impact
R independently of the use of the seat belt
R independently of the front airbags
R independently of the belt tensioners
If the vehicle overturns, the pelvisbags are
generally not deployed. Exception: if the sys-
tem detects high vehicle deceleration or
acceleration in a lateral direction and deter-
mines that deployment can offer additional
protection to that provided by the seat belt.
i Pelvisbags are only available in certain
countries. Windowbags Front-passenger side windowbags (example: CLS
Coupé)
Windowbags
:enhance the level of protec-
tion for the head, but not chest or arms, of the
vehicle occupants on the side of the vehicle
on which the impact occurs.
The windowbags are integrated into the side
of the roof frame and deployed in the area
from the A-pillar to the C-pillar.
Windowbags are deployed:
R at the start of an accident with a high rate
of lateral vehicle deceleration or accelera-
tion, e.g. in a side impact
R on the side on which an impact occurs
R on the driver's and the front passenger's
side if the vehicle overturns and the system
determines that windowbag deployment
can offer additional protection to that pro-
vided by the seat belt
R independently of the use of the seat belt
R regardless of whether the front-passenger
seat is occupied
R independently of the front airbags NECK-PRO head restraints/NECK-
PRO luxury head restraints
Important safety notes G
WARNING
Only use head restraint covers which have
been tested and approved by Mercedes-Benz
for your vehicle model. 46
Occupant safetySafety
Page 51 of 405
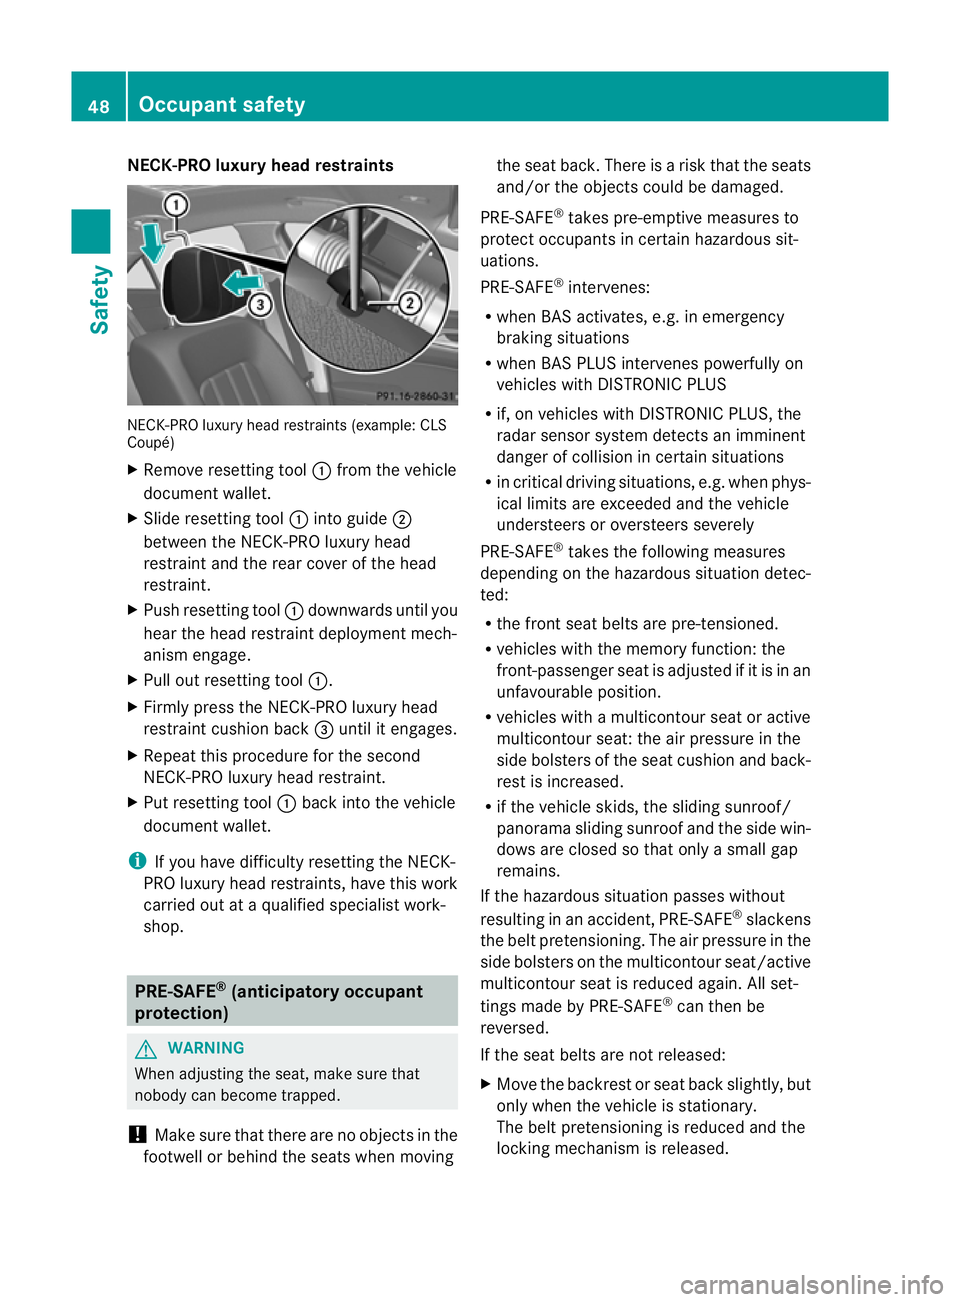
NECK-PRO luxury head restraints
NECK-PRO luxury head restraints (example: CLS
Coupé)
X
Remove resetting tool :from the vehicle
document wallet.
X Slide resetting tool :into guide ;
between the NECK-PRO luxury head
restraint and the rear cover of the head
restraint.
X Push resetting tool :downwards until you
hear the head restraint deployment mech-
anism engage.
X Pull ou tresetting tool :.
X Firmly press the NECK-PRO luxury head
restraint cushion back =until it engages.
X Repeat this procedure for the second
NECK-PRO luxury head restraint.
X Put resetting tool :back into the vehicle
documen twallet.
i If you have difficulty resetting the NECK-
PRO luxury head restraints, have this work
carried out at a qualified specialist work-
shop. PRE-SAFE
®
(anticipatory occupant
protection) G
WARNING
When adjusting the seat, make sure that
nobody can become trapped.
! Make sure that there are no objects in the
footwell or behind the seats when moving the seat back
.There is a risk that the seats
and/or the objects could be damaged.
PRE-SAFE ®
takes pre-emptive measures to
protect occupants in certain hazardous sit-
uations.
PRE-SAFE ®
intervenes:
R when BAS activates, e.g. in emergency
braking situations
R when BAS PLUS intervenes powerfully on
vehicles with DISTRONIC PLUS
R if, on vehicles with DISTRONIC PLUS, the
radar sensor system detectsani mminent
dange rofcollision in certain situations
R in critical driving situations, e.g. when phys-
ical limits are exceeded and the vehicle
understeers or oversteers severely
PRE-SAFE ®
takes the following measures
depending on the hazardous situation detec-
ted:
R the front seat belts are pre-tensioned.
R vehicles with the memory function: the
front-passenger seat is adjusted if it is in an
unfavourable position.
R vehicles with a multicontour seat or active
multicontour seat: the air pressure in the
side bolsters of the seat cushion and back-
rest is increased.
R if the vehicle skids, the sliding sunroof/
panorama sliding sunroof and the side win-
dows are closed so that only a small gap
remains.
If the hazardous situation passes without
resulting in an accident, PRE-SAFE ®
slackens
the belt pretensioning. The air pressure in the
side bolsters on the multicontour seat/active
multicontour seat is reduced again. All set-
tings made by PRE-SAFE ®
can then be
reversed.
If the seat belts are not released:
X Move the backrest or seat back slightly, but
only when the vehicle is stationary.
The belt pretensioning is reduced and the
locking mechanism is released. 48
Occupant safetySafety
Page 66 of 405
Child-proof locks
Important safety notes G
WARNING
Activate the child-proof locks for the rear
doors and the override switch for the rear
windows when childre nare travelling in the
vehicle. Otherwise, the children could open
doors or side windows while the vehicle is in
motion and injure themselves or others. G
WARNING
Do not leave children unsupervised in the
vehicle, even if they are secured in a child
restraint system. They could injure them-
selves on parts of the vehicle. They could also
be seriously or even fatally injured by pro-
longed exposure to extreme heat or cold.
Do not expose the child restraint system to
direct sunlight. Parts of the child restraint sys-
tem could heat up and the child could burn
herself/himsel fonthem.
If a child opens a door, the child or other per-
sons could be injured as a result. They could
get out and injure themselves or be injured by
a passing vehicle.
Also observe the notes on HOLD. Relevant
information can be found in the index.
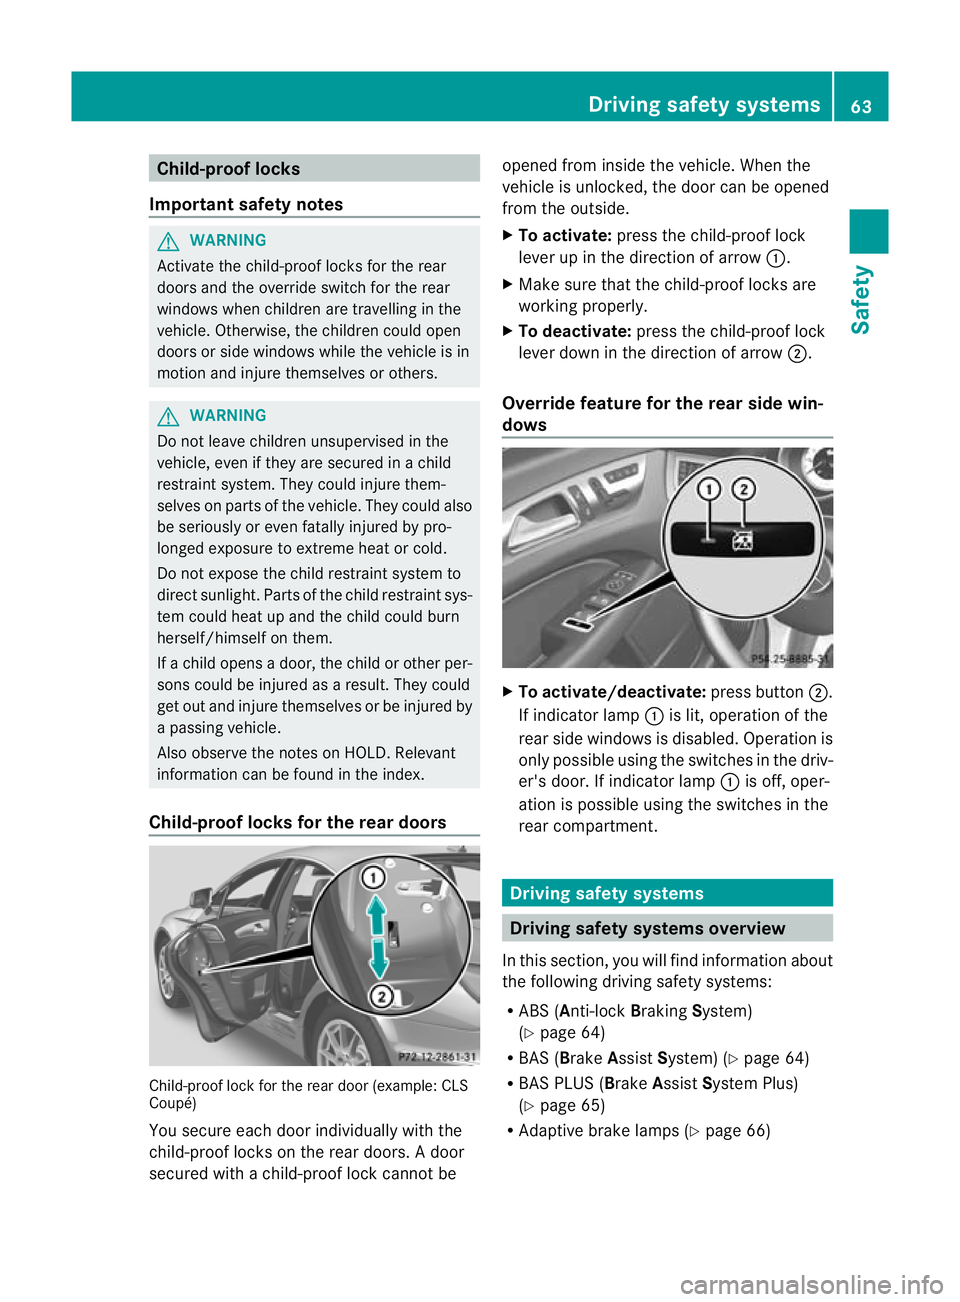
Child-proof locks for the rear doors Child-proof lock for the rear door (example: CLS
Coupé)
You secure each door individually with the
child-proof locks on the rear doors. Adoor
secured with a child-proof lock cannot be opened from inside the vehicle. When the
vehicle is unlocked, the door can be opened
from the outside.
X
To activate: press the child-proof lock
lever up in the direction of arrow :.
X Make sure that the child-proof locks are
working properly.
X To deactivate: press the child-proof lock
lever down in the direction of arrow ;.
Override feature for the rear side win-
dows X
To activate/deactivate: press button;.
If indicator lamp :is lit, operation of the
rear side windows is disabled. Operation is
only possible using the switches in the driv-
er's door. If indicator lamp :is off, oper-
ation is possible using the switches in the
rear compartment. Driving safety systems
Driving safety systems overview
In this section, you will find information about
the following driving safety systems:
R ABS (Anti-lock BrakingSystem)
(Y page 64)
R BAS (Brake AssistSystem) (Y page 64)
R BAS PLUS ( BrakeAssist System Plus)
(Y page 65)
R Adaptive brake lamps (Y page 66) Driving safety systems
63Safety Z
Page 76 of 405
Tow-away protection
Function An audible and visual alar
mis triggered if your
vehicle's angle of inclination is altered while
tow-away protection is primed. This can occur
if the vehicle is jacked up on one side, for
example.
Activating X
Make sure that:
R
the doors are closed.
R the boot lid/tailgate is closed.
Only then is the tow-away protection
primed.
X Lock the vehicle with the key or KEYLESS-
GO.
Tow-away protection is primed after
approximately 30 seconds.
To deactivate X
To switch off: unlock the vehicle with the
key or KEYLESS-GO.
Tow-away protection is switched off auto-
matically.
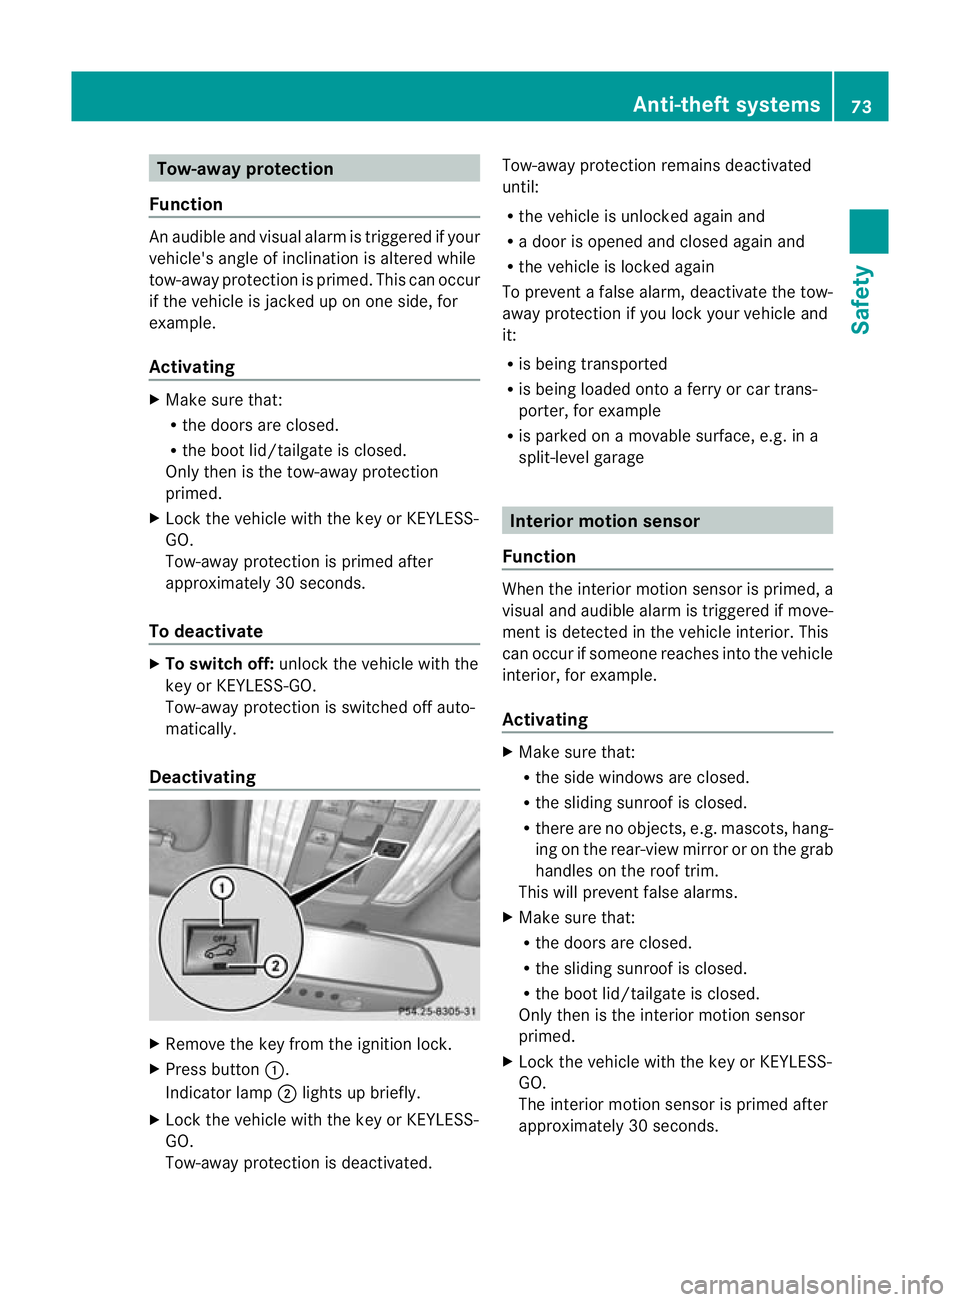
Deactivating X
Remove the key from the ignition lock.
X Press button :.
Indicator lamp ;lights up briefly.
X Lock the vehicle with the key or KEYLESS-
GO.
Tow-away protection is deactivated. Tow-away protection remains deactivated
until:
R
the vehicle is unlocked againa nd
R a door is opened and closed agai nand
R the vehicle is locked again
To prevent a false alarm, deactivate the tow-
away protection if you lock your vehicle and
it:
R is being transported
R is being loaded onto a ferry or car trans-
porter, for example
R is parked on a movable surface, e.g .ina
split-level garage Interior motion sensor
Function When the interior motion sensor is primed, a
visual and audible alarm is triggered if move-
ment is detected in the vehicle interior. This
can occur if someone reaches into the vehicle
interior, for example.
Activating
X
Make sure that:
R
the side windows are closed.
R the sliding sunroof is closed.
R there are no objects, e.g. mascots, hang-
ing on the rear-view mirror or on the grab
handles on the roof trim.
This will prevent false alarms.
X Make sure that:
R
the doors are closed.
R the sliding sunroof is closed.
R the boot lid/tailgate is closed.
Only then is the interior motion sensor
primed.
X Lock the vehicle with the key or KEYLESS-
GO.
The interior motion sensor is primed after
approximately 30 seconds. Anti-theft systems
73Safety Z
Page 77 of 405
To deactivate
X
Unlock the vehicle with the key or KEY-
LESS-GO.
The interio rmotion sensor is switched off
automatically.
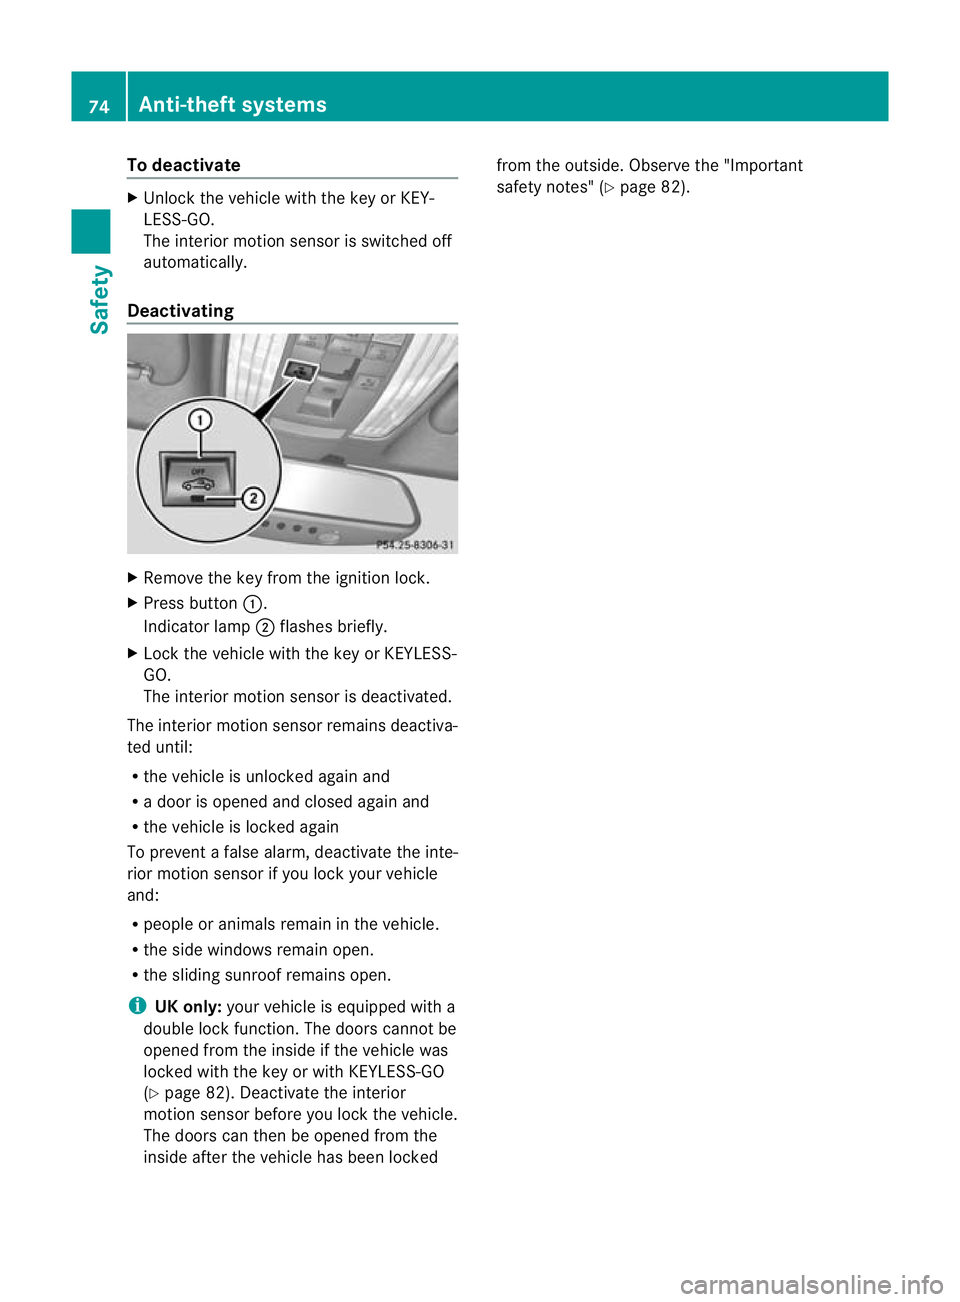
Deactivating X
Remove the key from the ignition lock.
X Press button :.
Indicator lamp ;flashes briefly.
X Lock the vehicle with the key or KEYLESS-
GO.
The interior motion sensor is deactivated.
The interior motion sensor remains deactiva-
ted until:
R the vehicle is unlocked again and
R a door is opened and closed again and
R the vehicle is locked again
To prevent a false alarm, deactivate the inte-
rior motion sensor if you lock your vehicle
and:
R people or animals remain in the vehicle.
R the side windows remain open.
R the sliding sunroof remains open.
i UK only: your vehicle is equipped with a
double lock function. The doors cannot be
opened from the inside if the vehicle was
locked with the key or with KEYLESS-GO
(Y page 82). Deactivate the interior
motion sensor before you lock the vehicle.
The doors can then be opened from the
inside after the vehicle has been locked from the outside. Observe the "Important
safety notes" (Y
page 82).74
Anti-theft systemsSafety
Page 78 of 405
Useful information
..............................76
Key ....................................................... 76
Doors .................................................... 82
Boot/luggage compartment ..............85
Side windows ...................................... 89
Sliding sunroof .................................... 92 75Opening and closing
Page 86 of 405
United Kingdom only:
if the vehicle has
been locked with the key or with KEYLESS-
GO, the double lock function is activated as
standard. It is then not possible to open the
doors from inside the vehicle. Deactivate the
interior motion senso r(Ypage 73) before you
lock the vehicle. The doors can then be
opened from the inside after the vehicle has
been locked from the outside. The anti-theft
alarm system is triggered if the door is
opened from the inside. Switch off the alarm
(Y page 72).
You can only open the rear compartment
doors from inside the vehicle if they are not
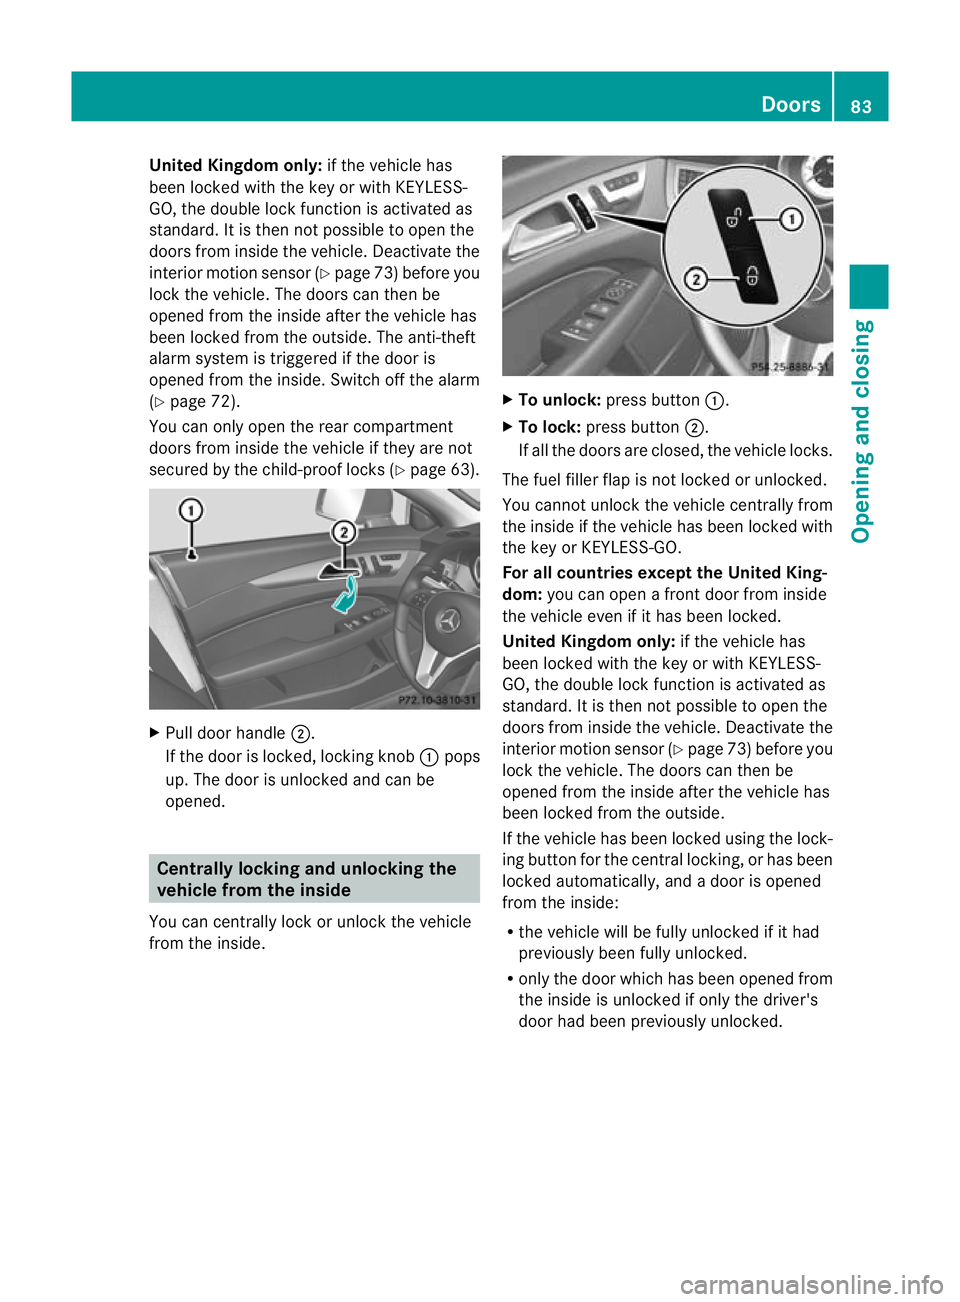
secured by the child-proof locks (Y page 63).X
Pull door handle ;.
If the door is locked, locking knob :pops
up. The door is unlocked and can be
opened. Centrally locking and unlocking the
vehicle from the inside
You can centrally lock or unlock the vehicle
from the inside. X
To unlock: press button :.
X To lock: press button ;.
If all the doors are closed, the vehicle locks.
The fuel filler flap is not locked or unlocked.
You cannot unlock the vehicle centrally from
the inside if the vehicle has been locked with
the key or KEYLESS-GO.
For all countries except the United King-
dom: you can open a front door from inside
the vehicle even if it has been locked.
United Kingdom only: if the vehicle has
been locked with the key or with KEYLESS-
GO, the double lock function is activated as
standard. It is then not possible to open the
doors from inside the vehicle. Deactivate the
interior motion senso r(Ypage 73) before you
lock the vehicle. The doors can then be
opened from the inside after the vehicle has
been locked from the outside.
If the vehicle has been locked using the lock-
ing button for the central locking, or has been
locked automatically, and adoor is opened
from the inside:
R the vehicle will be fully unlocked if it had
previously been fully unlocked.
R only the door which has been opened from
the inside is unlocked if only the driver's
door had been previously unlocked. Doors
83Opening and closing Z
Page 92 of 405
Opening
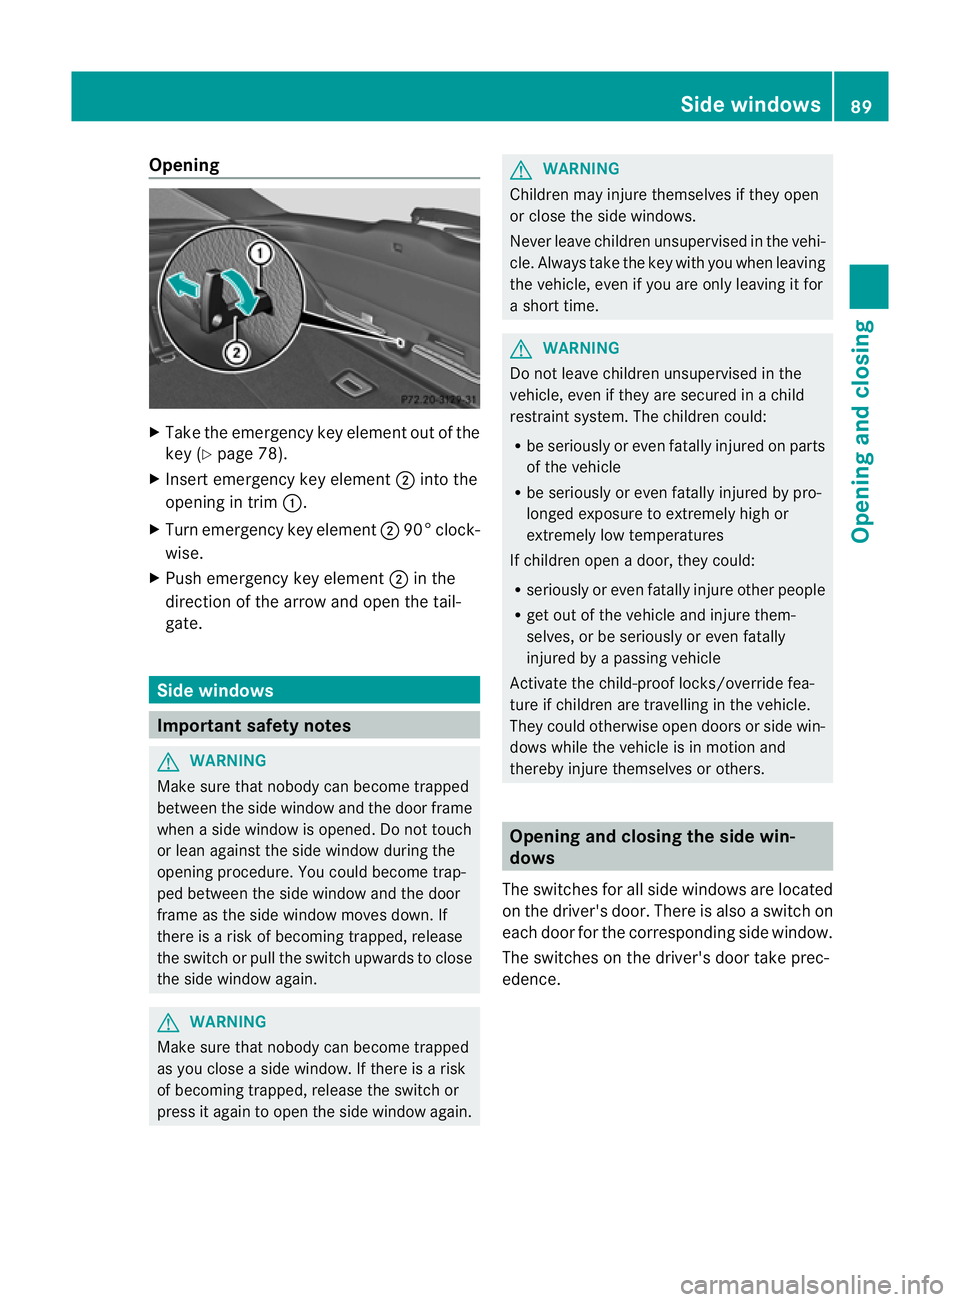
X
Take the emergency key element out of the
key (Y page 78).
X Insert emergency key element ;into the
opening in trim :.
X Turn emergency key element ;90° clock-
wise.
X Push emergency key element ;in the
direction of the arrow and open the tail-
gate. Side windows
Important safety notes
G
WARNING
Make sure that nobody can become trapped
between the side window and the door frame
when a side window is opened. Do not touch
or lean against the side window during the
opening procedure. You could become trap-
ped between the side window and the door
frame as the side window moves down. If
there is a risk of becoming trapped, release
the switch or pull the switch upwards to close
the side window again. G
WARNING
Make sure that nobody can become trapped
as you close a side window. If there is a risk
of becoming trapped, release the switch or
press it again to open the side window again. G
WARNING
Children may injure themselves if they open
or close the side windows.
Never leave children unsupervised in the vehi-
cle. Always take the key with you when leaving
the vehicle, even if you are only leaving it for
a short time. G
WARNING
Do not leave children unsupervised in the
vehicle, even if they are secured in a child
restraint system. The children could:
R be seriously or even fatally injured on parts
of the vehicle
R be seriously or even fatally injured by pro-
longed exposure to extremely high or
extremely low temperatures
If children open a door, they could:
R seriously or even fatally injure other people
R get out of the vehicle and injure them-
selves, or be seriously or even fatally
injured by a passing vehicle
Activate the child-proof locks/override fea-
ture if children are travelling in the vehicle.
They could otherwise open doors or side win-
dows while the vehicle is in motion and
thereby injure themselves or others. Opening and closing the side win-
dows
The switches for all side windows are located
on the driver's door. There is also a switch on
each door for the corresponding side window.
The switches on the driver's door take prec-
edence. Side windows
89Opening and closing Z