2012 MERCEDES-BENZ CLS SHOOTING BRAKE roof
[x] Cancel search: roofPage 329 of 405
R
Vehicles with a key:
do not remove the key from the ignition
lock. Do not open the driver's door or
front-passenger door when the engine is
switched off. Otherwise, the automatic
transmission selects park position P
automatically and locks the wheels. You
can prevent this by shifting the auto-
matic transmission to Nbeforehand.
R Vehicles with KEYLESS-GO:
do not open the driver's door or front-
passenger door when the engine is
switched off. Otherwise, the automatic
transmission selects park position P
automatically and locks the wheels.
Observe the following to make sure that the
automatic transmission stays in position N:
X Make sure the vehicle is stationary and the
ignition is switched off.
X Turn the key to position 2(Ypage 147) in
the ignition lock.
Use the key instead of the Start/Stop but-
ton on vehicles with KEYLESS-GO.
X Depress and hold the brake pedal.
X Shift the automatic transmission to posi-
tion N.
X Release the brake pedal.
X Release the electric parking brake.
X Switch off the ignition and leave the key in
the ignition lock.
You can wash the vehicle in an automatic car
wash from the very start.
Wash off excess dirt before cleaning the vehi-
cle in an automatic car wash.
After using an automatic car wash, wipe off
wax from the windscreen and the wiper
blades. This will prevent smears and reduce
wiping noises caused by residueont he wind-
screen.
Washing by hand In some countries, washing by hand is only
allowed at specially equipped washing bays. Observe the legal requirements for each indi-
vidual country.
X
Do not use hot water and do not wash the
vehicle in direct sunlight.
X Use a soft sponge to clean.
X Use a mild cleaning agent, such as a car
shampoo approved by Mercedes-Benz.
X Thoroughly hose down the vehicle with a
gentle jet of water.
X Do not point the water jet directly towards
the air inlet.
X Use plenty of water and rinse out the
sponge frequently.
X Rinse the vehicle with clean water and dry
thoroughly with a chamois.
X Do not let the cleaning agent dry on the
paintwork.
When using the vehicle in winter, remove all
traces of road salt deposits carefully and as
soon as possible.
High-pressure cleaning equipment G
WARNING
Do not use high-pressure cleaners with circu-
lar-jet nozzles (dirt grinders) to clean your
vehicle, in particular the tyres. You could oth-
erwise damage the tyres and cause an acci-
dent.
! Always maintain a distance of at least
30 cm between the vehicle and the high-
pressure cleaner nozzle. Information about
the correct distance is available from the
equipment manufacturer.
Move the high-pressure cleaner nozzle
around when cleaning your vehicle.
Do not aim directly at any of the following:
R tyres
R door gaps, roof gaps, joints etc.
R electrical components
R battery
R connectors
R lights 326
CareMaintenance and care
Page 335 of 405

Cleaning the roof lining and carpets
X
Roof lining: if it is very dirty, use a soft
brush or dry shampoo.
X Carpets: use the carpet and textile clean-
ing agents recommended and approved by
Mercedes-Benz. 332
CareMaintenance and care
Page 359 of 405
Observe the notes on the emergency spare
wheel (Y
page 377). MOExtended tyres (tyres with run-flat
characteristics)
With MOExtended tyres (tyres with run-flat
characteristics), you can continue to drive
your vehicle even if there is a total loss of
pressure in one or more tyres.
Only use MOExtended tyres in conjunction
with an activated tyre pressure loss warning
system or tyre pressure monitoring system
and only on tyres specifically inspected by
Mercedes-Benz.
Notes on driving with MOExtended tyres with
a flat tyre (Y page 337).
i Vehicles with MOExtended tyres are not
equipped with a TIREFIT kit at the factory.
It is therefore recommended that you addi-
tionally equip your vehicle with a TIREFIT kit
if you fit tyres that do not feature run-flat
characteristics, e.g. winter tyres. A TIREFIT
kit can be obtained from a qualified spe-
cialist workshop. Winter operation
General notes
Have your vehicle winterproofed at a qualified
specialist workshop at the onset of winter.
Observe the notes in the "Changing a wheel"
section (Y page 362). Driving with summer tyres
At temperatures below +7 †, summer tyres
lose elasticity and therefore traction and
braking power. Change the tyres on your vehi-
cle to M+S tyres. Using summer tyres at very
cold temperatures could cause tears to form,
thereby damaging the tyres permanently.
Mercedes-Benz cannot accept responsibility
for this type of damage. M+S tyres
G
WARNING
M+S tyres with a tyre tread depth of less than
4mma re not suitable for use in winter as they
do not provide sufficient traction. There is a
risk of accident.
M+S tyres with a tread depth of less than
4 mm must be replaced.
At temperatures below +7 †, use winter tyres
or all-seaso ntyres .Both types of tyre are
identified by the M+S marking.
Only winter tyres bearing the isnowflake
symbol in addition to the M+S marking pro-
vide the best possible grip in wintry road con-
ditions.
Only these tyres will allow driving safety sys-
tems such as ABS and ESP ®
to function opti-
mally in winter. These tyres have been devel-
oped specifically for driving in snow.
Use M+S tyres of the same make and tread
on all wheels to maintain safe handling char-
acteristics.
Always observe the maximum permissible
speed specified for the M+S tyres you have
fitted.
If you fit M+S tyres that have a lower maxi-
mum permissible speed than that of the vehi-
cle, affix a corresponding warning label in the
driver's field of vision. This can be obtained
at a qualified specialist workshop.
Under these circumstances, you should also
restrict the maximum speed of the vehicle
using permanent SPEEDTRONIC so that it
does not exceed the maximum permissible
speed for the M+S tyres (Y page 177).
When you have fitted the M+S tyres:
X Check the tyre pressures (Y page 357).
X Restart the tyre pressure loss warning sys-
tem (Y page 359).
X Restart the tyre pressure monitor
(Y page 361).
For more information on driving with an emer-
gency spare wheel, see (Y page 377).356
Winter operationWheels and tyres
Page 362 of 405
significant pressure loss in a tyre. If the speed
of rotation of a wheel changes as a result of
a loss of pressure, a corresponding warning
message will appearint he multifunction dis-
play.
The tyre pressure warning system does not
warn you of an incorrectly set tyre pressure.
Observe the notes on the recommended tyre
pressure (Y page 357).
The tyre pressure loss warning system does
not replace the need to regularly check your
vehicle's tyre pressures, since an even loss of
pressure on several tyres at the same time
cannot be detected by the tyre pressure loss
warning system.
The tyre pressure monitor is not able to warn
you of a sudden loss of pressure, e.g. if the
tyre is penetrated by a foreign object. In the
event of a sudden loss of pressure, bring the
vehicle to a halt by braking carefully. Avoid
abrupt steering manoeuvres.
The function of the tyre pressure loss warning
system is limited or delayed if:
R snow chains are fitted to your vehicle's
tyres.
R road conditions are wintry.
R you are driving on sand or gravel.
R you adopt a very sporty driving style (cor-
nering at high speeds or driving with high
rates of acceleration).
R you are driving with a heavy load (in the
vehicle or on the roof).
Restarting the tyre pressure loss warn-
ing system Restart the tyre pressure loss warning system
if you have:
R changed the tyre pressure
R changed the wheels or tyres
R fitted new wheels or tyres
X Before restarting, make sure that the tyre
pressures are set properly on all four tyres
for the respective operating conditions. The recommended tyre pressures can be
found in the table on the fuel filler flap. The
tyre pressure loss warning system can only
give reliable warnings if you have set the
correct tyre pressure. If an incorrect tyre
pressure is set, these incorrectv
alues will
be monitored.
X Also observe the notes in the sectio non
tyre pressures (Y page 357).
X Make sure tha tthe key is in posi-
tion 2(Ypage 147) in the ignition lock.
X Press =or; on the steering wheel
to select the Serv. menu.
X Press the 9or: button to select
Tyre pressure .
X Press the abutton.
The Run Flat Indicator active Restart with OK message appears in the
multifunction display.
If you wish to confirm the restart:
X Press button a.
The Tyre press. now OK? message
appears in the multifunction display.
X Press the 9or: button to select
Yes .
X Press the abutton.
The Run Flat Indicator restarted message appears in the multifunction dis-
play.
After a teach-in period, the tyre pressure
loss warning system will monitor the set
tyre pressures of all four tyres.
If you wish to cancel the restart:
X Press button %.
or
X When the Tyre press. now OK? message
appears, press the 9or: button to
select Cancel .
X Press the abutton.
The tyre pressure values stored at the last
restart will continue to be monitored. Tyre pressure
359Wheels and tyres Z
Page 386 of 405
This is the case:
R
if they cause a change of the vehicle type
from that for which the vehicle's general
operating permit was granted
R if other road users could be endangered
R if the emission or noise levels are adversely
affected.
Always specify the vehicle identification num-
ber (VIN) (Y page 384) and the engine num-
ber (Y page 385) when ordering genuine
Mercedes-Benz parts. Vehicle electronics
Tampering with the engine electron-
ics
G
WARNING
Always have work on the engine electronics
and related components carried out at a quali-
fied specialist workshop. Otherwise, the vehi-
cle's operating safety could be affected.
! Only have work carried out on the engine
electronics and its associated parts, such
as control units, sensors and connector
leads, at a qualified specialist workshop.
Vehicle components may otherwise wear
more quickly and the vehicle's operating
permit may be invalidated. Retrofitting two-way radios and
mobile phones (RF transmitters)
G
WARNING
Incorrect retrofitting of RF transmitters can
cause the vehicle electronics to malfunction.
The vehicle's operating safety and thus your
own safety are impaired.
Have aftermarket radio frequency transmit-
ting equipment installed at a qualified spe-
cialist workshop. G
WARNING
Incorrect retrofitting of RF transmitters can
lead to increased electromagnetic radiation in
the vehicle interior. Using an exterior aerial
takes into account current scientific discus-
sions relating to the possible health hazards
that may result from electromagnetic fields.
Have aftermarket radio frequency transmit-
ting equipment installed at a qualified spe-
cialist workshop.
! The operating permit may be invalidated
if the instructions for installation and use of
RF transmitters are not observed.
In particular, the following conditions must
be complied with:
R only approved wavebands may be used.
R the maximum permissible output in
these wavebands must be complied with.
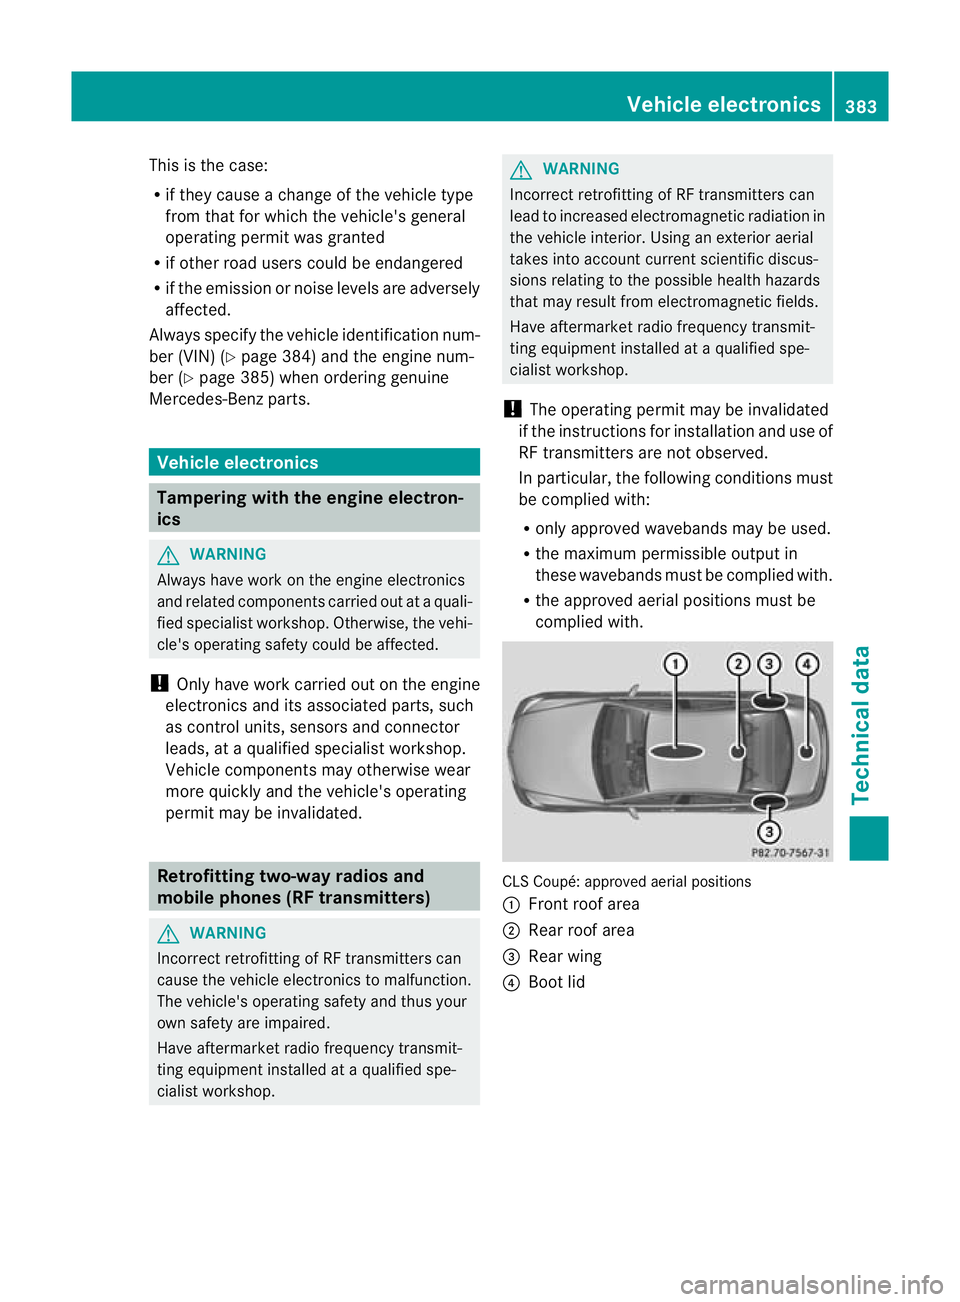
R the approved aerial positions must be
complied with. CLS Coupé: approved aerial positions
:
Front roof area
; Rear roof area
= Rear wing
? Boot lid Vehicle electronics
383Technical data Z
Page 387 of 405
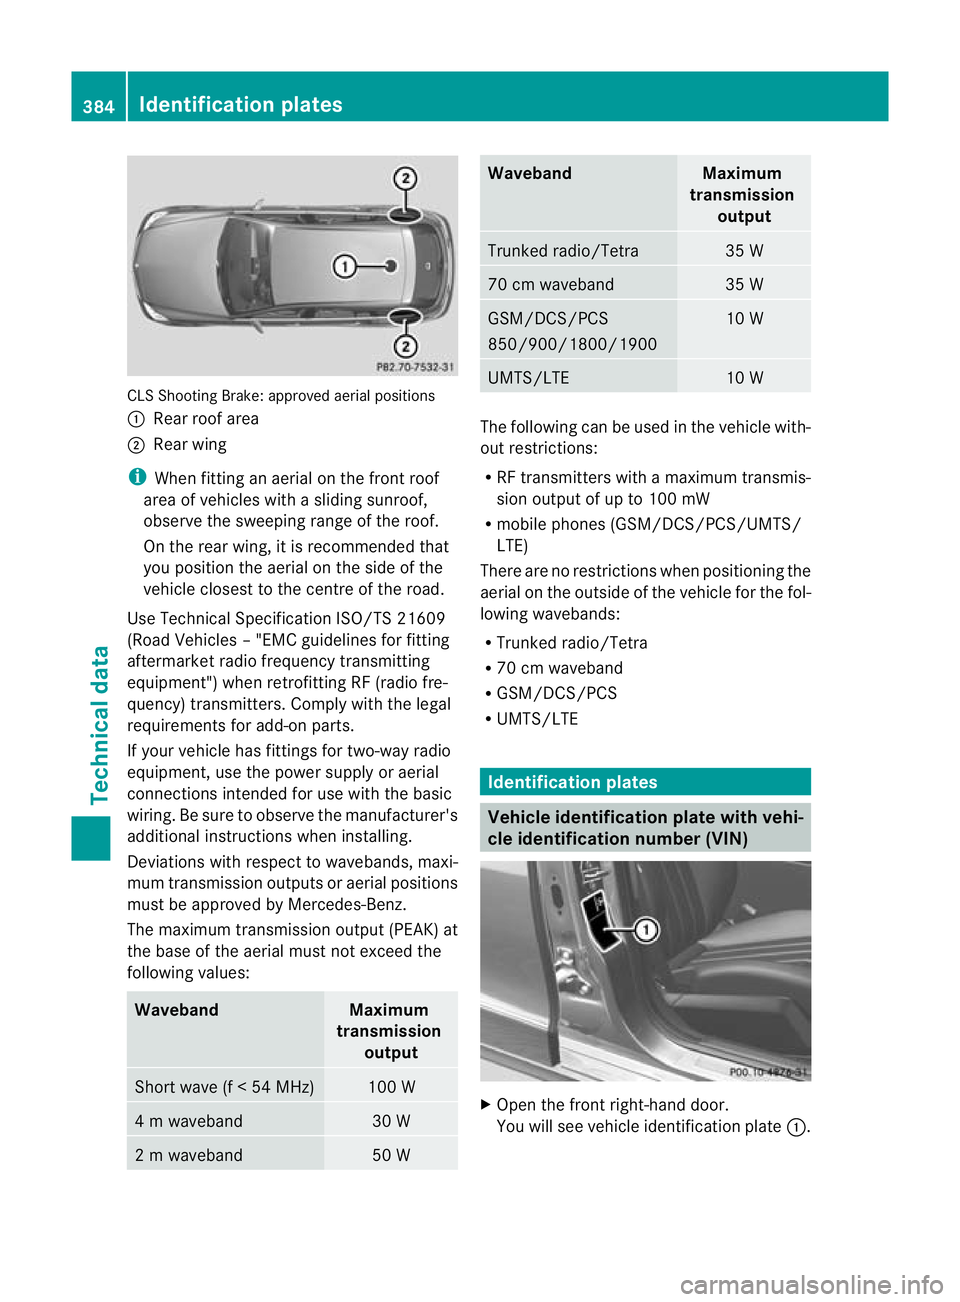
CLS Shooting Brake
:approved aerial positions
: Rear roof area
; Rear wing
i When fitting an aerial on the front roof
area of vehicles with a sliding sunroof,
observe the sweeping range of the roof.
On the rear wing, it is recommended that
you position the aerial on the side of the
vehicle closest to the centre of the road.
Use Technical Specification ISO/TS 21609
(Road Vehicles –"EMC guidelines for fitting
aftermarket radio frequency transmitting
equipment") when retrofitting RF (radio fre-
quency) transmitters .Comply with the legal
requirements for add-on parts.
If your vehicle has fittings for two-way radio
equipment, use the power supply or aerial
connections intended for use with the basic
wiring. Be sure to observe the manufacturer's
additional instructions when installing.
Deviations with respect to wavebands, maxi-
mum transmission outputs or aerial positions
must be approved by Mercedes-Benz.
The maximum transmission output (PEAK) at
the base of the aerial must not exceed the
following values: Waveband Maximum
transmission output Short wave (f < 54 MHz) 100 W
4 m waveband 30 W
2 m waveband 50 W Waveband Maximum
transmission output Trunked radio/Tetra 35 W
70 cm waveband 35 W
GSM/DCS/PCS
850/900/1800/1900 10 W
UMTS/LTE 10 W
The following can be used in the vehicle with-
out restrictions:
R
RF transmitters with amaximum transmis-
sion output of up to 100 mW
R mobile phones (GSM/DCS/PCS/UMTS/
LTE)
There are no restriction swhen positioning the
aerial on the outside of the vehicle for the fol-
lowing wavebands:
R Trunked radio/Tetra
R 70 cm waveband
R GSM/DCS/PCS
R UMTS/LTE Identification plates
Vehicle identification plate with vehi-
cle identification number (VIN)
X
Open the front right-hand door.
You will see vehicle identification plate :.384
Identification platesTechnical data
Page 398 of 405
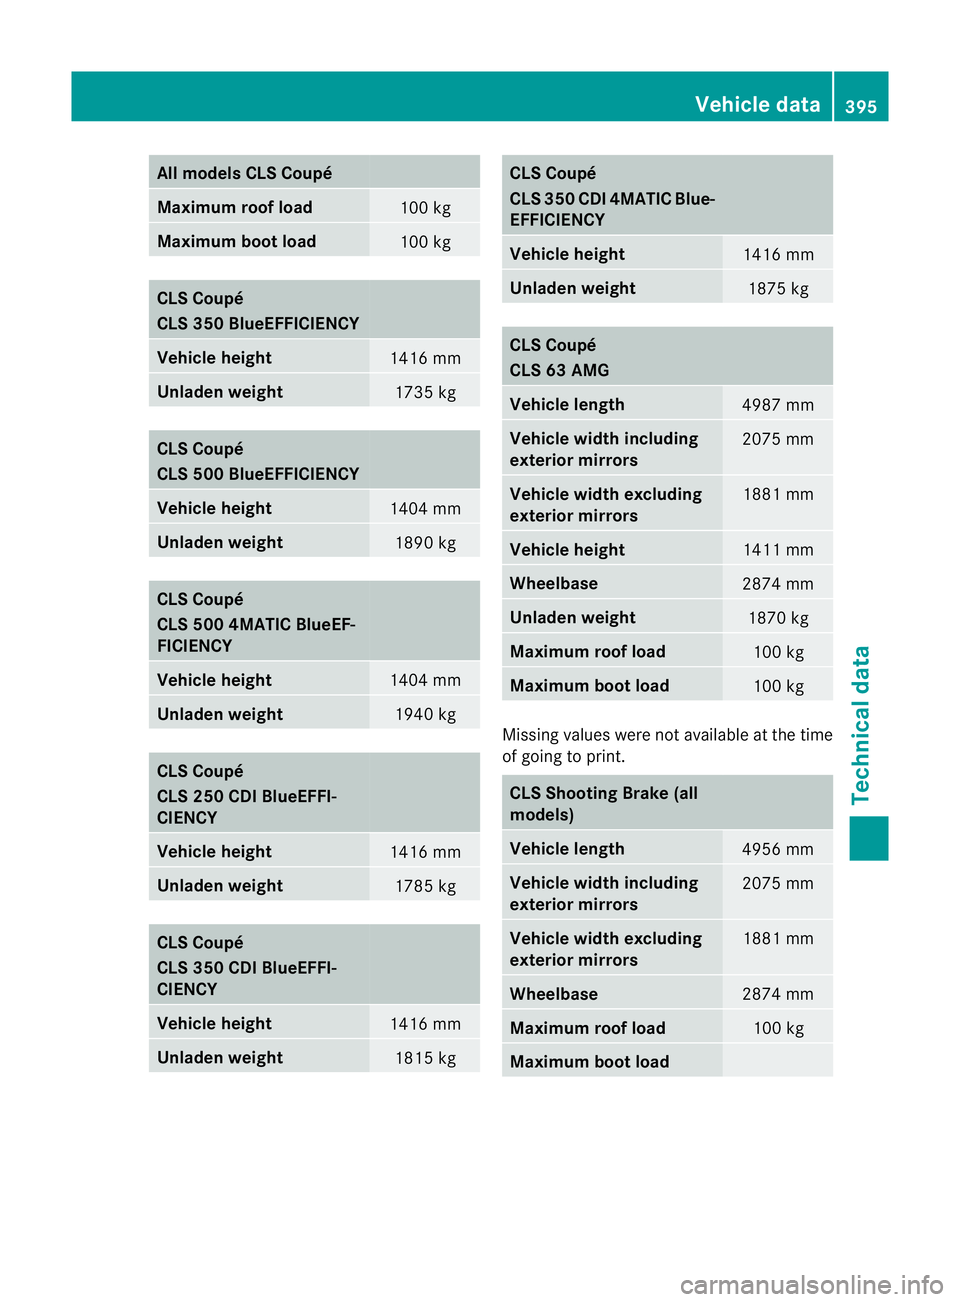
All models CLS Coupé
Maximum roof load
100 kg
Maximum boot load
100 kg
CLS Coupé
CLS 350 BlueEFFICIENCY
Vehicle height
1416 mm
Unladen weight
1735 kg
CLS Coupé
CLS 500 BlueEFFICIENCY
Vehicle height
1404 mm
Unladen weight
1890 kg
CLS Coupé
CLS 500 4MATIC BlueEF-
FICIENCY
Vehicle height
1404 mm
Unladen weight
1940 kg
CLS Coupé
CLS 250 CDI BlueEFFI-
CIENCY
Vehicle height
1416 mm
Unladen weight
1785 kg
CLS Coupé
CLS 350 CDI BlueEFFI-
CIENCY
Vehicle height
1416 mm
Unladen weight
1815 kg CLS Coupé
CLS 350 CDI 4MATIC Blue-
EFFICIENCY
Vehicle height
1416 mm
Unladen weight
1875 kg
CLS Coupé
CLS 63 AMG
Vehicle length
4987 mm
Vehicle widt
hincluding
exterior mirrors 2075 mm
Vehicle width excluding
exterior mirrors
1881 mm
Vehicle height
1411 mm
Wheelbase
2874 mm
Unladen weight
1870 kg
Maximum roof load
100 kg
Maximum boot load
100 kg
Missing values were not available at the time
of going to print.
CLS Shooting Brake (all
models)
Vehicle length
4956 mm
Vehicle width including
exterior mirrors
2075 mm
Vehicle width excluding
exterior mirrors
1881 mm
Wheelbase
2874 mm
Maximum roof load
100 kg
Maximum boot load Vehicle data
395Technical data Z
Page 399 of 405
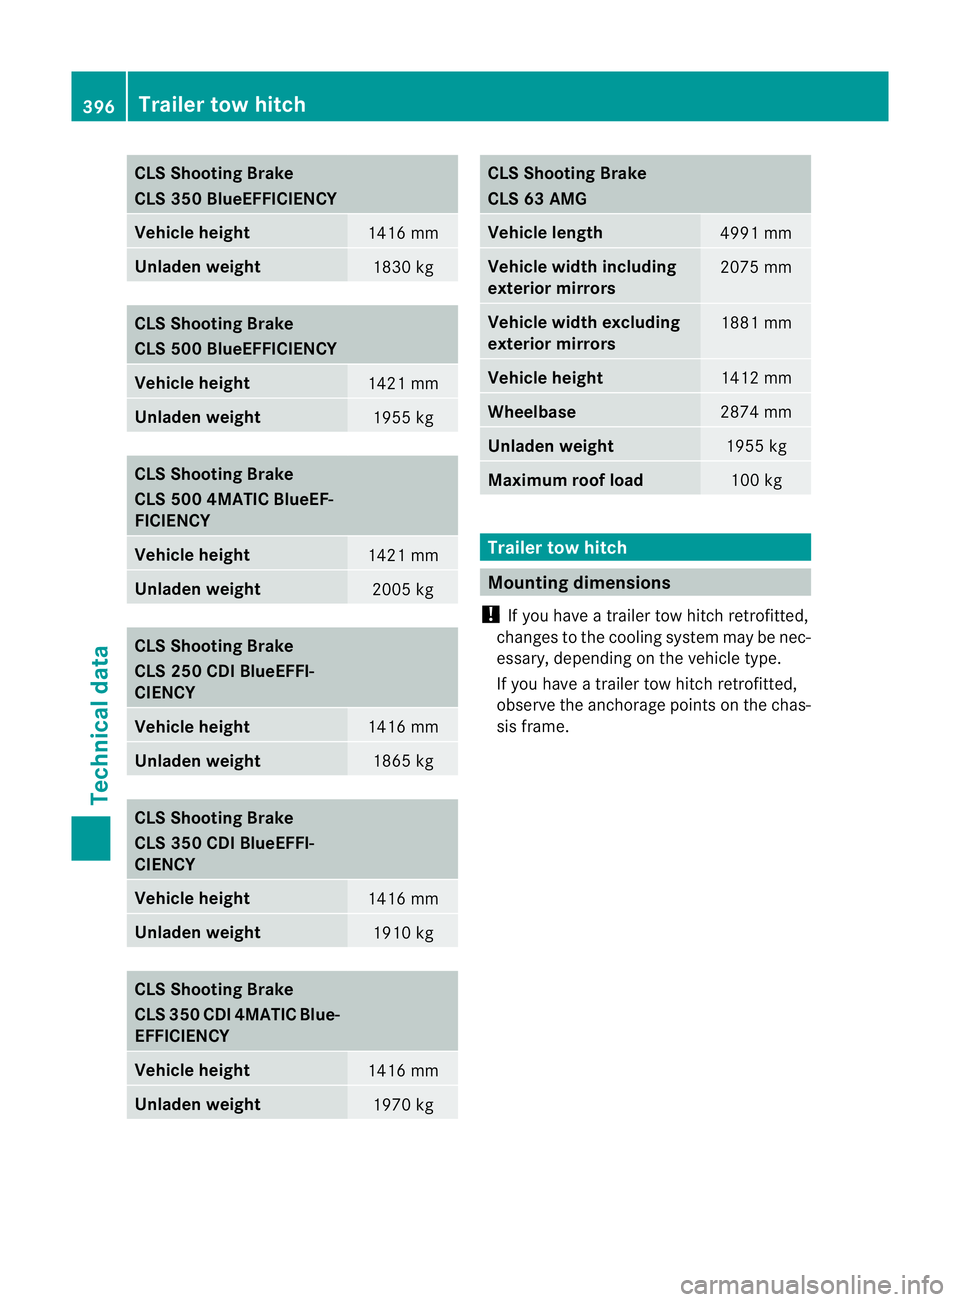
CLS Shooting Brake
CLS 350 BlueEFFICIENCY
Vehicle height
1416 mm
Unladen weight
1830 kg
CLS Shooting Brake
CLS 500 BlueEFFICIENCY
Vehicle height
1421 mm
Unladen weight
1955 kg
CLS Shooting Brake
CLS 500 4MATIC BlueEF-
FICIENCY
Vehicle height
1421 mm
Unladen weight
2005 kg
CLS Shooting Brake
CLS 250 CDI BlueEFFI-
CIENCY Vehicle height
1416 mm
Unladen weight
1865 kg
CLS Shooting Brake
CLS 350 CDI BlueEFFI-
CIENCY Vehicle height
1416 mm
Unladen weight
1910 kg
CLS Shooting Brake
CLS 350 CDI 4MATIC Blue-
EFFICIENCY
Vehicle height
1416 mm
Unladen weight
1970 kg CLS Shooting Brake
CLS 63 AMG
Vehicle length
4991 mm
Vehicle widt
hincluding
exterior mirrors 2075 mm
Vehicle width excluding
exterior mirrors
1881 mm
Vehicle height
1412 mm
Wheelbase
2874 mm
Unladen weight
1955 kg
Maximum roof load
100 kg
Trailer tow hitch
Mounting dimensions
! If you have a trailer tow hitch retrofitted,
changes to the cooling system may be nec-
essary, depending on the vehicle type.
If you have a trailer tow hitch retrofitted,
observe the anchorage point sonthe chas-
sis frame. 396
Trailer tow hitchTechnical data