2012 MERCEDES-BENZ CLS SHOOTING BRAKE boot
[x] Cancel search: bootPage 81 of 405
Changing the settings of the locking
system
You can change the settings of the locking
system. This means that only the driver's door
and the fuel fille rflap are unlocked when the
vehicle is unlocked. This is useful if you fre-
quently travel on your own.
X To change the setting: press and hold
down the %and& buttons on the
key simultaneously for approximately six
seconds until the battery chec klamp
flashes twice ( Ypage 79).
i If the setting of the locking system is
changed within the signal range of the vehi-
cle, pressing the &or% button:
R locks or
R unlocks the vehicle
The key now functions as follows:
X To unlock the driver's door: press the
% button once.
X To unlock centrally: press the%but-
ton twice.
X To lock centrally: press the&button.
The KEYLESS-GO function is changed as fol-
lows:
X To unlock the driver's door: touch the
inner surface of the door handle on the
driver's door.
X To unlock centrally: touch the inner sur-
face of the door handle on the front-
passenger door or the rear door.
X To lock centrally: touch the outer sensor
surface on one of the door handles.
X To restore the factory settings: press
and hold down the %and& buttons
simultaneously for approximately six sec-
onds until the battery check lamp flashes
twice (Y page 79). Emergency key element
General notes If the vehicle can no longer be locked or
unlocked with the key, use the emergency
key element.
If you use the emergenc
ykey element to
unlock and open the driver's door or the boot
lid/tailgate, the anti-thef talarm system will
be triggered (Y page 72).
There are several ways to tur noff the alarm:
X To turn the alarm off with the key: press
the % or& button on the key.
or
X Insert the key into the ignition lock.
or
X To deactivate the alarm with KEYLESS-
GO: press the Start/Stop button in the igni-
tion lock. The key must be in the vehicle.
or
X Lock or unlock the vehicle using KEYLESS-
GO. The key must be outside the vehicle.
If you unlock the vehicle using the emergency
key element, the fuel filler flap will not be
unlocked automatically.
X To unlock the fuel filler flap: insert the
key into the ignition lock.
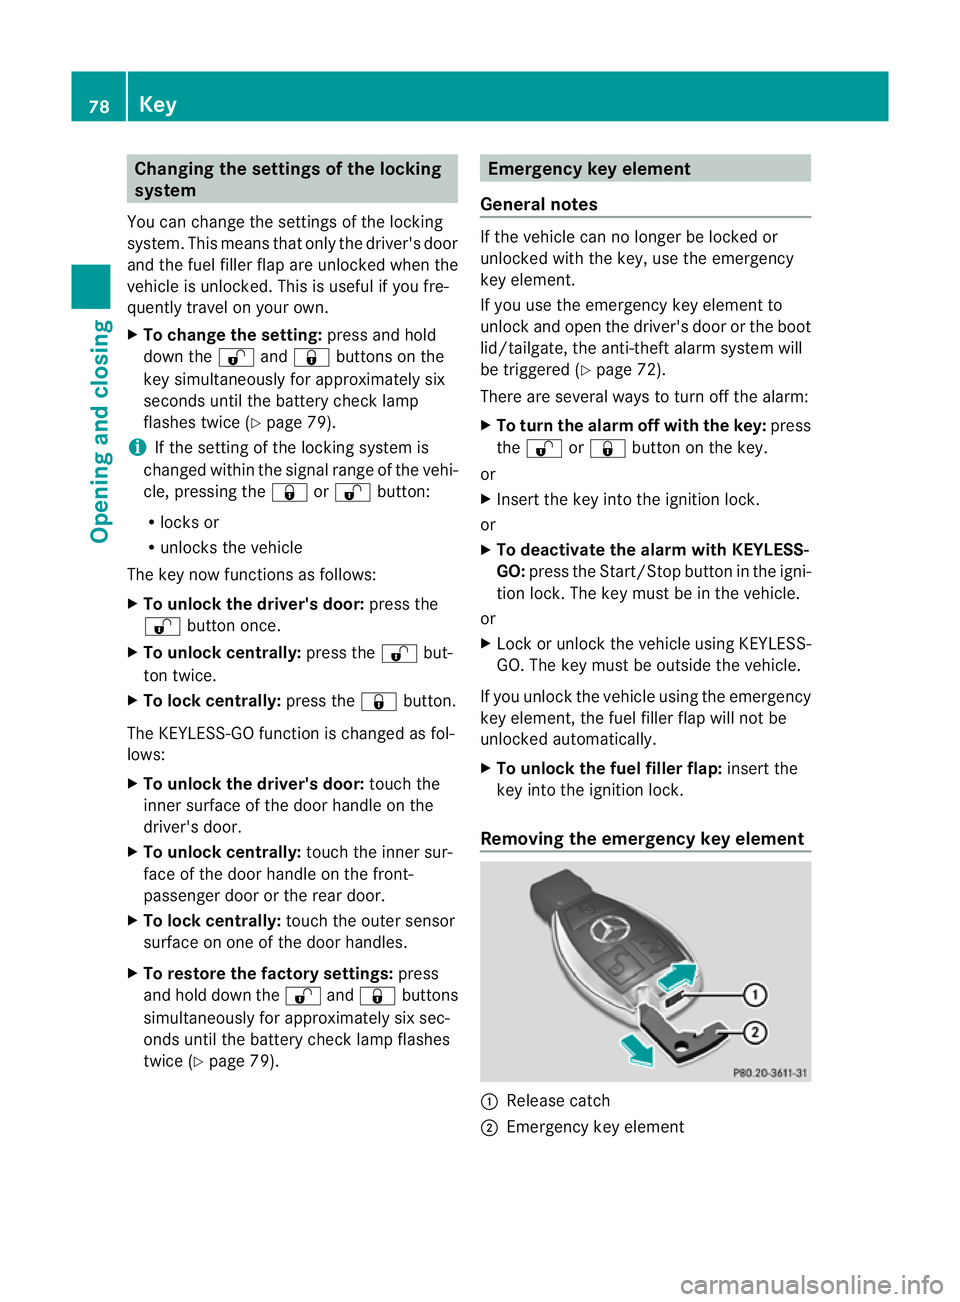
Removing the emergency key element :
Release catch
; Emergency key element 78
KeyOpening and closing
Page 87 of 405
Automatic locking feature
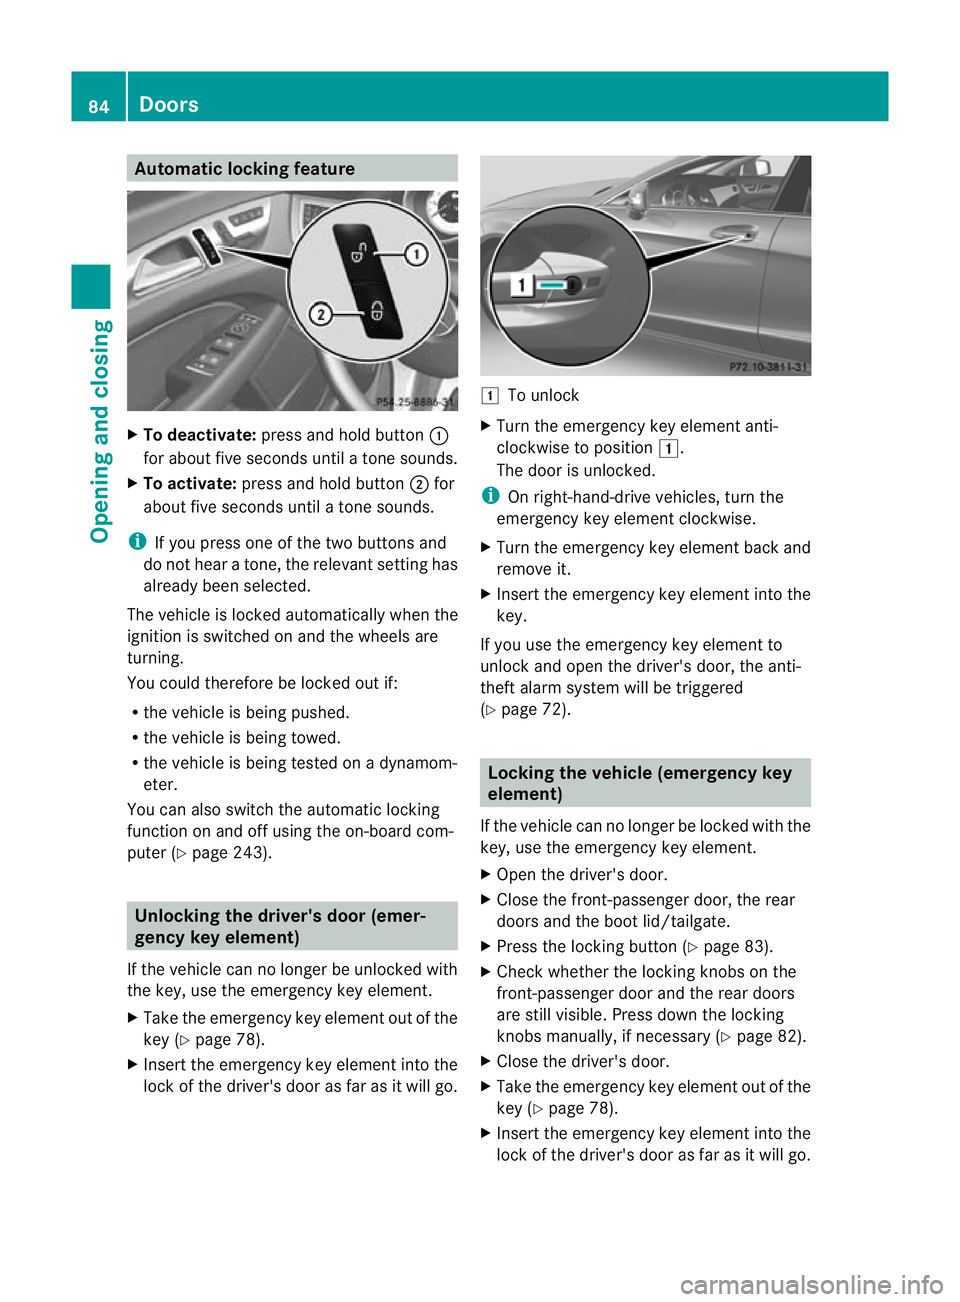
X
To deactivate: press and hold button :
for about five seconds until a tone sounds.
X To activate: press and hold button ;for
about five seconds until a tone sounds.
i If you press one of th etwo buttons and
do not hear a tone, the relevant setting has
already been selected.
The vehicle is locked automatically when the
ignitio nis switched on and the wheels are
turning.
You could therefore be locked out if:
R the vehicle is being pushed.
R the vehicle is being towed.
R the vehicle is being tested on a dynamom-
eter.
You can also switch the automatic locking
function on and off using the on-board com-
puter (Y page 243). Unlocking the driver's door (emer-
gencyk
ey element)
If the vehicle can no longer be unlocked with
the key, use the emergency key element.
X Take the emergency key element out of the
key (Y page 78).
X Inser tthe emergency key element into the
lock of the driver's door as far as it will go. 1
To unlock
X Turn the emergency key element anti-
clockwise to position 1.
The door is unlocked.
i On right-hand-drive vehicles, turn the
emergency key element clockwise.
X Turn the emergency key element back and
remove it.
X Insert the emergency key element into the
key.
If you use the emergency key element to
unlock and open the driver's door, the anti-
theft alarm system will be triggered
(Y page 72). Locking the vehicle (emergency key
element)
If the vehicle can no longer be locked with the
key, use the emergency key element.
X Open the driver's door.
X Close the front-passenger door, the rear
doors and the boot lid/tailgate.
X Press the locking button (Y page 83).
X Check whether the locking knobs on the
front-passenger door and the rear doors
are still visible. Press down the locking
knobs manually, if necessary (Y page 82).
X Close the driver's door.
X Take the emergency key element out of the
key (Y page 78).
X Insert the emergency key element into the
lock of the driver's door as far as it will go. 84
DoorsOpening and closing
Page 88 of 405
1
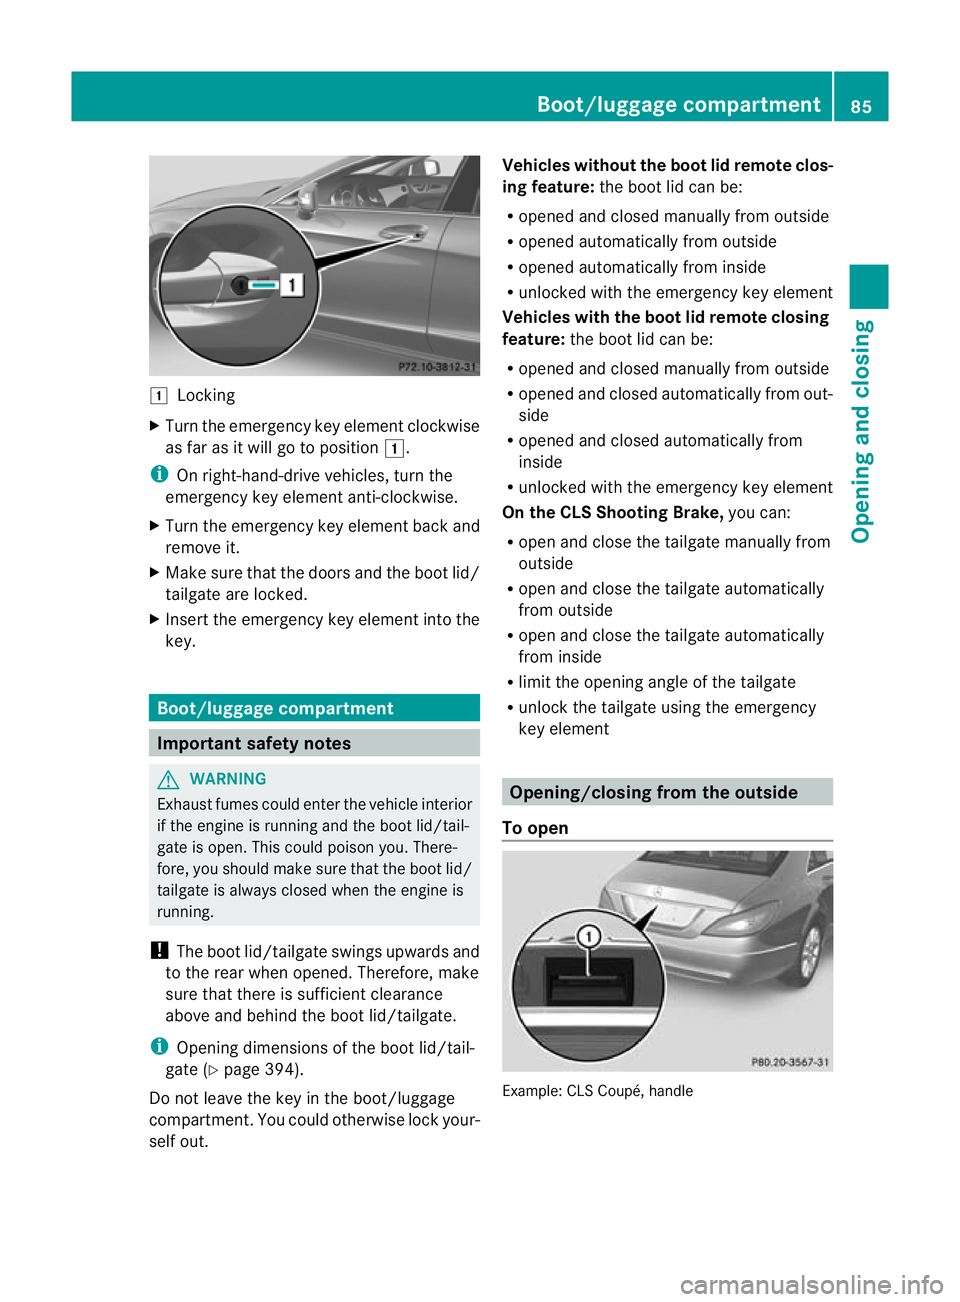
Locking
X Turn the emergency key element clockwise
as far as it will go to position 1.
i On right-hand-drive vehicles, turn the
emergency key element anti-clockwise.
X Turn the emergency key element back and
remove it.
X Make sure that the doors and the boot lid/
tailgate are locked.
X Insert the emergency key element into the
key. Boot/luggage compartment
Important safety notes
G
WARNING
Exhaust fumes could enter the vehicle interior
if the engine is running and the boot lid/tail-
gate is open. This could poiso nyou. There-
fore, you should make sure that the boot lid/
tailgate is always closed when the engine is
running.
! The boot lid/tailgate swings upwards and
to the rear when opened. Therefore, make
sure that there is sufficient clearance
above and behind the boot lid/tailgate.
i Opening dimensions of the boot lid/tail-
gate (Y page 394).
Do not leave the key in the boot/luggage
compartment. You could otherwise lock your-
self out. Vehicles without the boot lid remote clos-
ing feature:
the boot lid can be:
R opened and closed manually from outside
R opened automatically from outside
R opened automatically from inside
R unlocked with the emergenc ykey element
Vehicles with the boot lid remote closing
feature: the boot lid can be:
R opened and closed manually from outside
R opened and closed automatically from out-
side
R opened and closed automatically from
inside
R unlocked with the emergency key element
On the CLS Shooting Brake, you can:
R open and close the tailgate manually from
outside
R open and close the tailgate automatically
from outside
R open and close the tailgate automatically
from inside
R limit the opening angle of the tailgate
R unlock the tailgate using the emergency
key element Opening/closing from the outside
To open Example: CLS Coupé, handle Boot/luggage compartment
85Opening and closing Z
Page 89 of 405
X
Press the %button on the key.
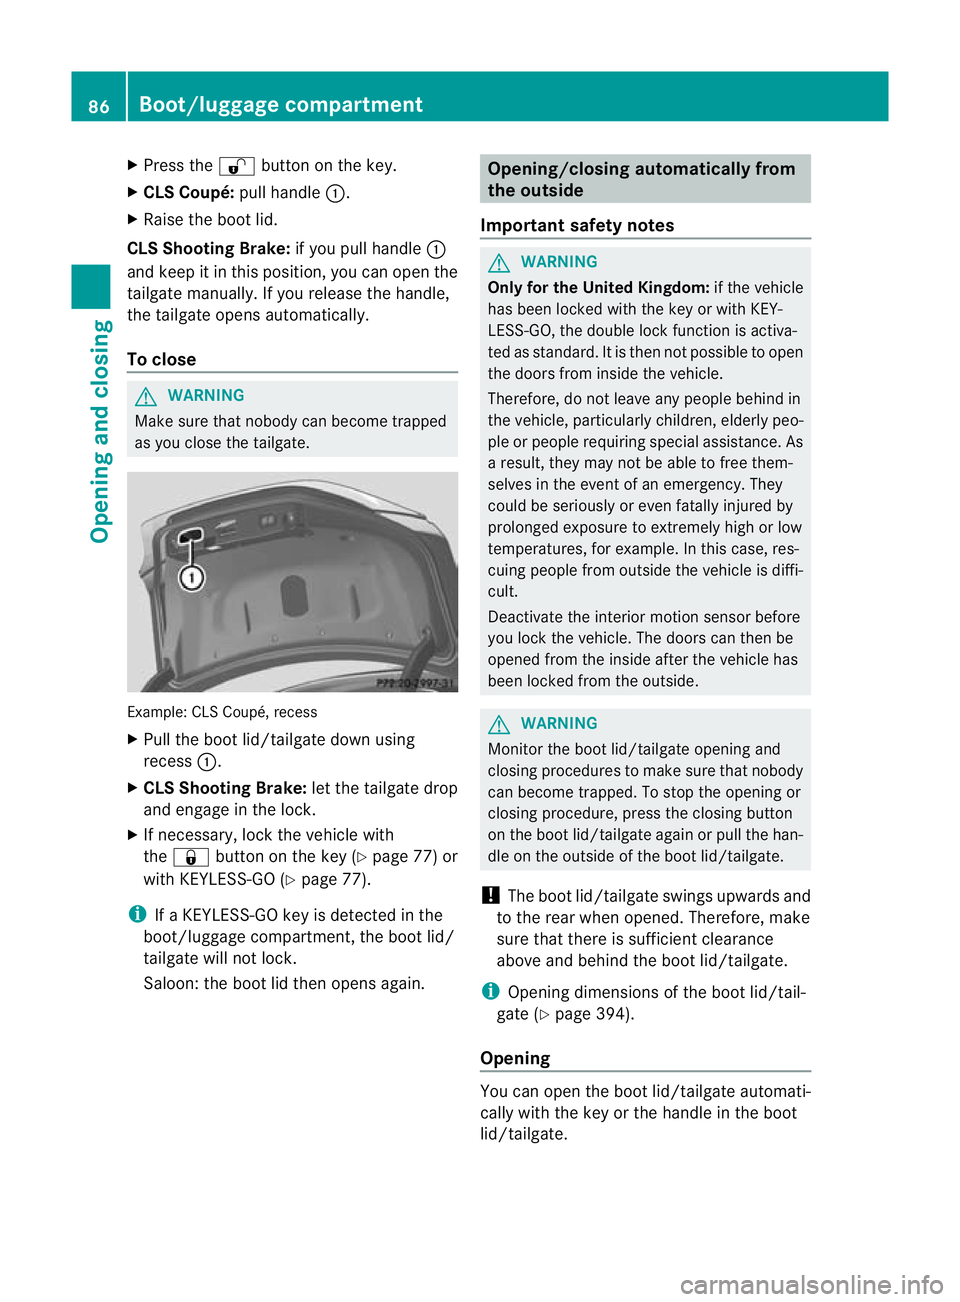
X CLS Coupé: pull handle:.
X Raise the boot lid.
CLS Shooting Brake: if you pull handle:
and keep it in this position, you can open the
tailgate manually. If you release the handle,
the tailgate opens automatically.
To close G
WARNING
Make sure that nobody can become trapped
as you close the tailgate. Example: CLS Coupé, recess
X
Pull the boot lid/tailgate down using
recess :.
X CLS Shooting Brake: let the tailgate drop
and engage in the lock.
X If necessary, lock the vehicle with
the & button on the key (Y page 77) or
with KEYLESS-GO (Y page 77).
i If a KEYLESS-GO key is detected in the
boot/luggage compartment, the boot lid/
tailgate will not lock.
Saloon: the boot lid then opens again. Opening/closing automatically from
the outside
Important safety notes G
WARNING
Only for the United Kingdom: if the vehicle
has been locked with the key or with KEY-
LESS-GO, the double lock function is activa-
ted as standard. It is then not possible to open
the doors from inside the vehicle.
Therefore, do not leave any people behind in
the vehicle, particularly children, elderly peo-
ple or people requiring special assistance. As
a result, they may not be able to free them-
selves in the event of an emergency. They
could be seriously or even fatally injured by
prolonged exposure to extremely high or low
temperatures, for example. In this case, res-
cuing people from outside the vehicle is diffi-
cult.
Deactivate the interior motion sensor before
you lock the vehicle. The doors can then be
opened from the inside after the vehicle has
been locked from the outside. G
WARNING
Monito rthe boot lid/tailgate opening and
closing procedures to make sure that nobody
can become trapped. To stop the opening or
closing procedure, press the closing button
on the boot lid/tailgate again or pull the han-
dle on the outside of the boot lid/tailgate.
! The boot lid/tailgate swings upwards and
to the rear when opened. Therefore, make
sure that there is sufficient clearance
above and behind the boot lid/tailgate.
i Opening dimensions of the boot lid/tail-
gate (Y page 394).
Opening You can open the boot lid/tailgate automati-
cally with the key or the handle in the boot
lid/tailgate. 86
Boot/luggage compartmentOpening and closing
Page 90 of 405
X
Press and hold the Fbutton on the key
until the boot lid/tailgate opens.
or
X If the boot lid/tailgate is unlocked, pull the
handle of the boot lid/tailgate and release
it again immediately (Y page 85).
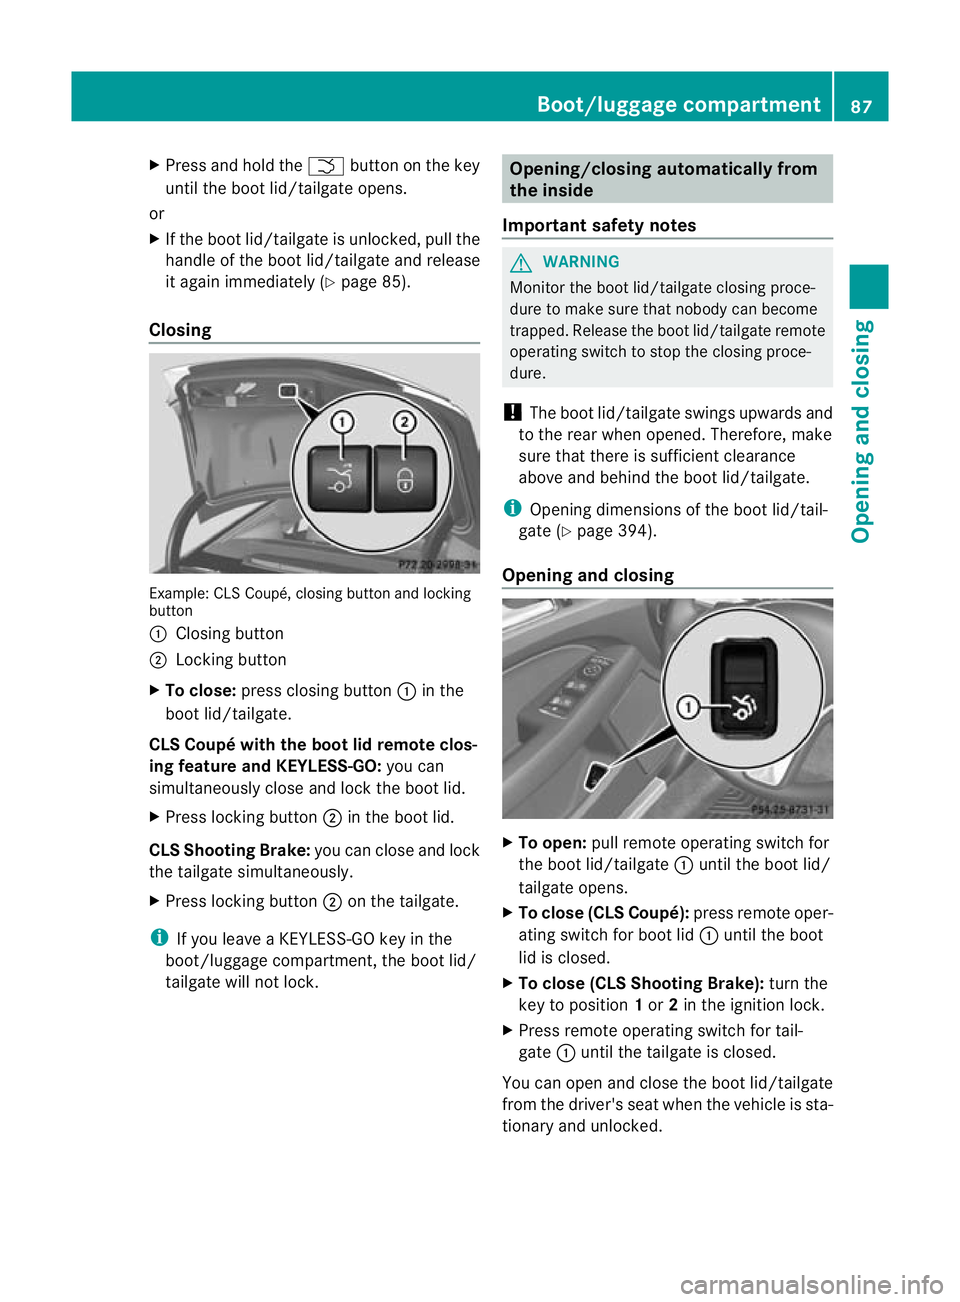
Closing Example: CLS Coupé, closing button and locking
button
:
Closing button
; Locking button
X To close: press closing button :in the
boot lid/tailgate.
CLS Coupé with the boot lid remote clos-
ing feature and KEYLESS-GO: you can
simultaneously close and lock the boot lid.
X Press locking button ;in the boot lid.
CLS Shooting Brake: you can close and lock
the tailgate simultaneously.
X Press locking button ;on the tailgate.
i If you leave a KEYLESS-GO key in the
boot/luggage compartment, the boot lid/
tailgate will not lock. Opening/closing automatically from
the inside
Important safety notes G
WARNING
Monito rthe boot lid/tailgate closing proce-
dure to make sure that nobody can become
trapped. Release the boot lid/tailgate remote
operating switch to stop the closing proce-
dure.
! The boot lid/tailgate swings upwards and
to the rear when opened. Therefore, make
sure that there is sufficient clearance
above and behind the boot lid/tailgate.
i Opening dimensions of the boot lid/tail-
gate (Y page 394).
Opening and closing X
To open: pull remote operating switch for
the boot lid/tailgate :until the boot lid/
tailgate opens.
X To close (CLS Coupé): press remote oper-
ating switch for boot lid :until the boot
lid is closed.
X To close (CLS Shooting Brake): turn the
key to position 1or 2in the ignition lock.
X Press remote operating switch for tail-
gate :until the tailgate is closed.
You can open and close the boot lid/tailgate
from the driver's seat when the vehicle is sta-
tionary and unlocked. Boot/luggage compartment
87Opening and closing Z
Page 91 of 405
Limiting the opening angle of the tail-
gate (CLS Shooting Brake)
Important safety notes !
Make sure there is sufficient clearance to
open the tailgate fully when setting the
opening angle. The tailgate could otherwise
be damaged. Ideally, set the opening angle
outside.
To activate You can limit the opening angle of the tail-
gate. This is possible in th
etop half of its
opening range, up to approximately 20 cm
before the stop.
X To open the tailgate: pull the handle on
the tailgate.
X To stop the opening procedure at the
desired position: press the closing button
(Y page 86) in the tailgate or pull the handle
on the outside of the tailgate again.
X To store the position: press and hold the
closing button in the tailgate until you hear
a short tone.
The opening angle limiter is activated. The
tailgate then stops in the stored position
when opened.
To deactivate X
Press and hold the closing button
(Y page 86) in the tailgate until you hear
two short tones. Unlocking the boot (CLS Coupé)
! The boot lid swings upwards when
opened. Therefore, make sure that there is
sufficient clearance above the boot lid.
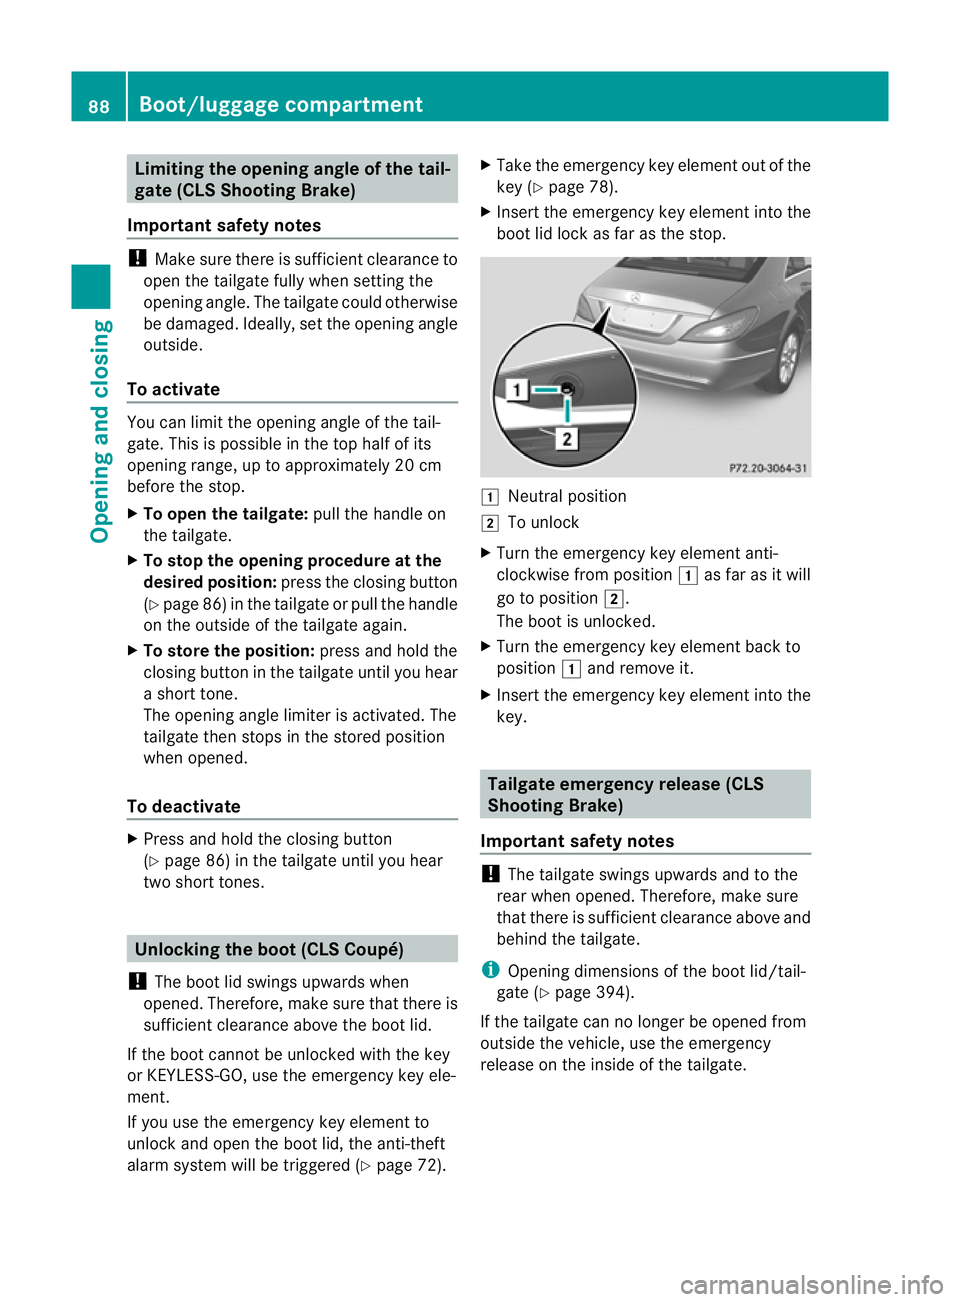
If the boot cannot be unlocked with the key
or KEYLESS-GO, use the emergency key ele-
ment.
If you use the emergenc ykey element to
unlock and open the boot lid, the anti-theft
alarm system will be triggered (Y page 72).X
Take the emergency key element out of the
key (Y page 78).
X Inser tthe emergency key element into the
boot lid lock as far as the stop. 1
Neutral position
2 To unlock
X Turn the emergency key element anti-
clockwise from position 1as far as it will
go to position 2.
The boot is unlocked.
X Turn the emergency key element back to
position 1and remove it.
X Insert the emergency key element into the
key. Tailgate emergency release (CLS
Shooting Brake)
Important safety notes !
The tailgate swings upwards and to the
rear when opened. Therefore, make sure
that there is sufficient clearance above and
behind the tailgate.
i Opening dimensions of the boot lid/tail-
gate (Y page 394).
If the tailgate can no longer be opened from
outside the vehicle, use the emergency
release on the inside of the tailgate. 88
Boot/luggage compartmentOpening and closing
Page 127 of 405
change them. Otherwise, you could be burned
if you touch them.
Keep bulbs ou
tofthe reach of children. Oth-
erwise, they could damage the bulbs, for
example, and injure themselves.
Never use a bulb which has been dropped.
Such a bulb may break or even explode and
injure you.
Halogen bulbs are pressurised and can
explode when you change them, particularly
if they are very hot. You should therefore wear
eye protection and gloves when you are
changing them.
There are bulbs other than xenon and LED
bulbs that you cannot replace. Replace only
the bulbs listed (Y page 124). Have the bulbs
that you cannot replace yourself changed at
a qualified specialist workshop.
If you require assistance changing bulbs, con-
sult a qualified specialist workshop.
Do not touch the glass tube of new bulbs with
your bare hands. Even minor contamination
can burn into the glass surface and reduce
the service life of the bulbs. Always use a lint-
free cloth or only touch the base of the bulb
when fitting.
Only use bulbs of the correct type.
If the new bulb still does not light up, consult
a qualified specialist workshop.
Bulbs and lamps are an important aspect of
vehicle safety. You must therefore make sure
that these function correctly at all times.
Have the headlamp setting checked regularly. Overview of bulb replacement
–bulbs
You can replace the following bulbs. The
details for the bulb type can be found in the
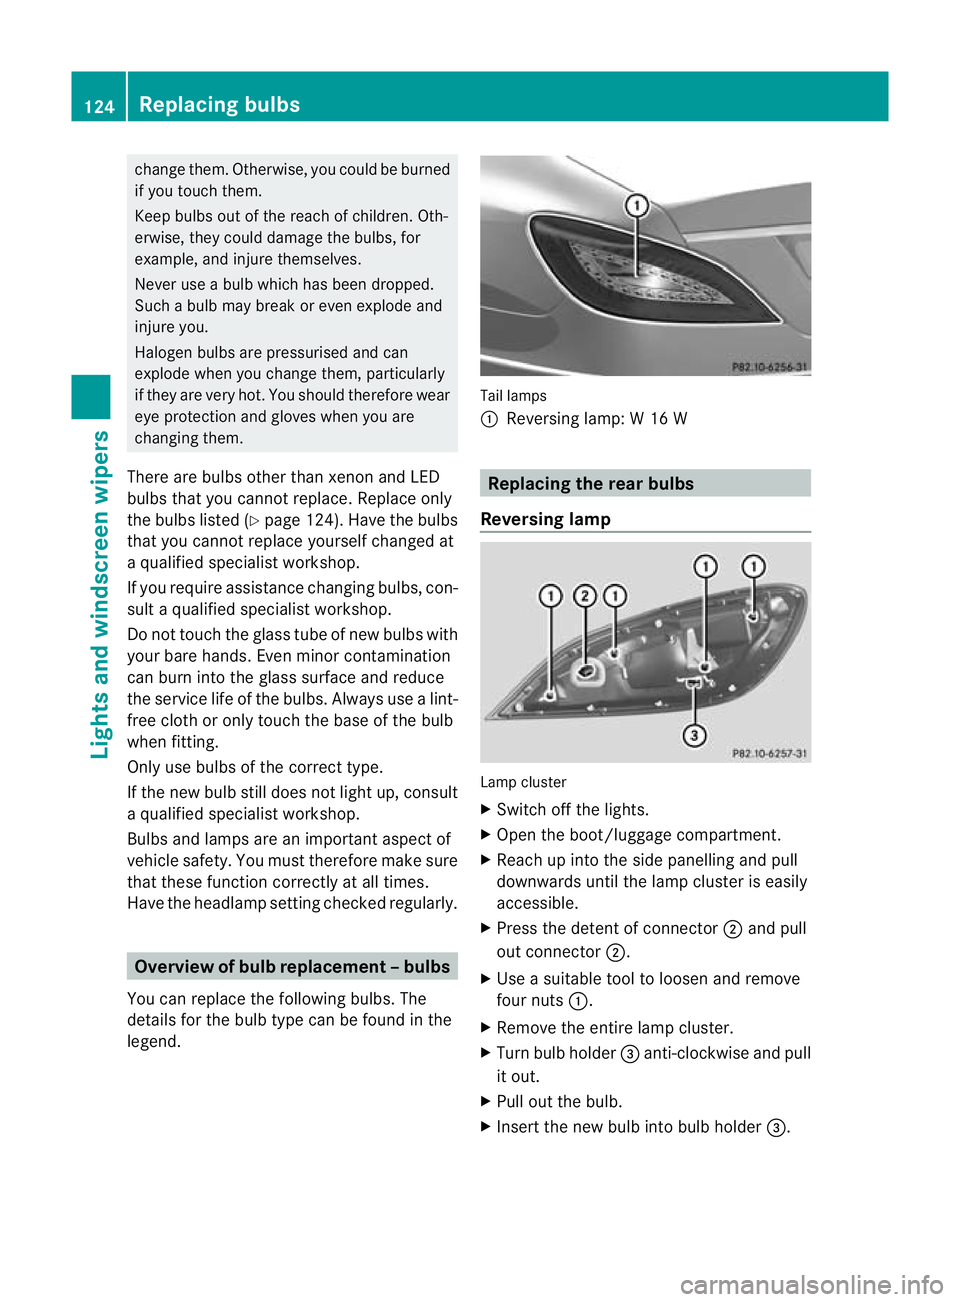
legend. Tail lamps
:
Reversing lamp: W 16 W Replacing the rear bulbs
Reversing lamp Lamp cluster
X
Switch off the lights.
X Open the boot/luggage compartment.
X Reach up into the side panelling and pull
downwards until the lamp cluster is easily
accessible.
X Press the detent of connector ;and pull
out connector ;.
X Use a suitable tool to loosen and remove
four nuts :.
X Remove the entire lamp cluster.
X Turn bulb holder =anti-clockwise and pull
it out.
X Pull out the bulb.
X Insert the new bulb into bulb holder =.124
Replacing bulbsLights and windscreen wipers
Page 166 of 405
X
CLS Coupé: insert the fuel fille rcap into
the holde ronthe inside of fuel filler
flap ;.
or
X CLS Shooting Brake: insert the fuel filler
cap, held in a horizontal position, in the
recesses in the fuel filler flap hinge arm
from above.
X Completely insert the filler neck of the fuel
pump nozzle into the tank and refuel.
X Only fill the tank until the pump nozzle
switches off.
i Do not add any more fuel after the pump
stops filling for the first time. Otherwise,
fuel may leak out.
Closing X
Replace the cap on the filler neck and turn
clockwise until it engages audibly.
X Close the fuel filler flap.
i Close the fuel filler flap before locking the
vehicle. Otherwise, the locking pin of the
central locking prevents the fuel filler flap
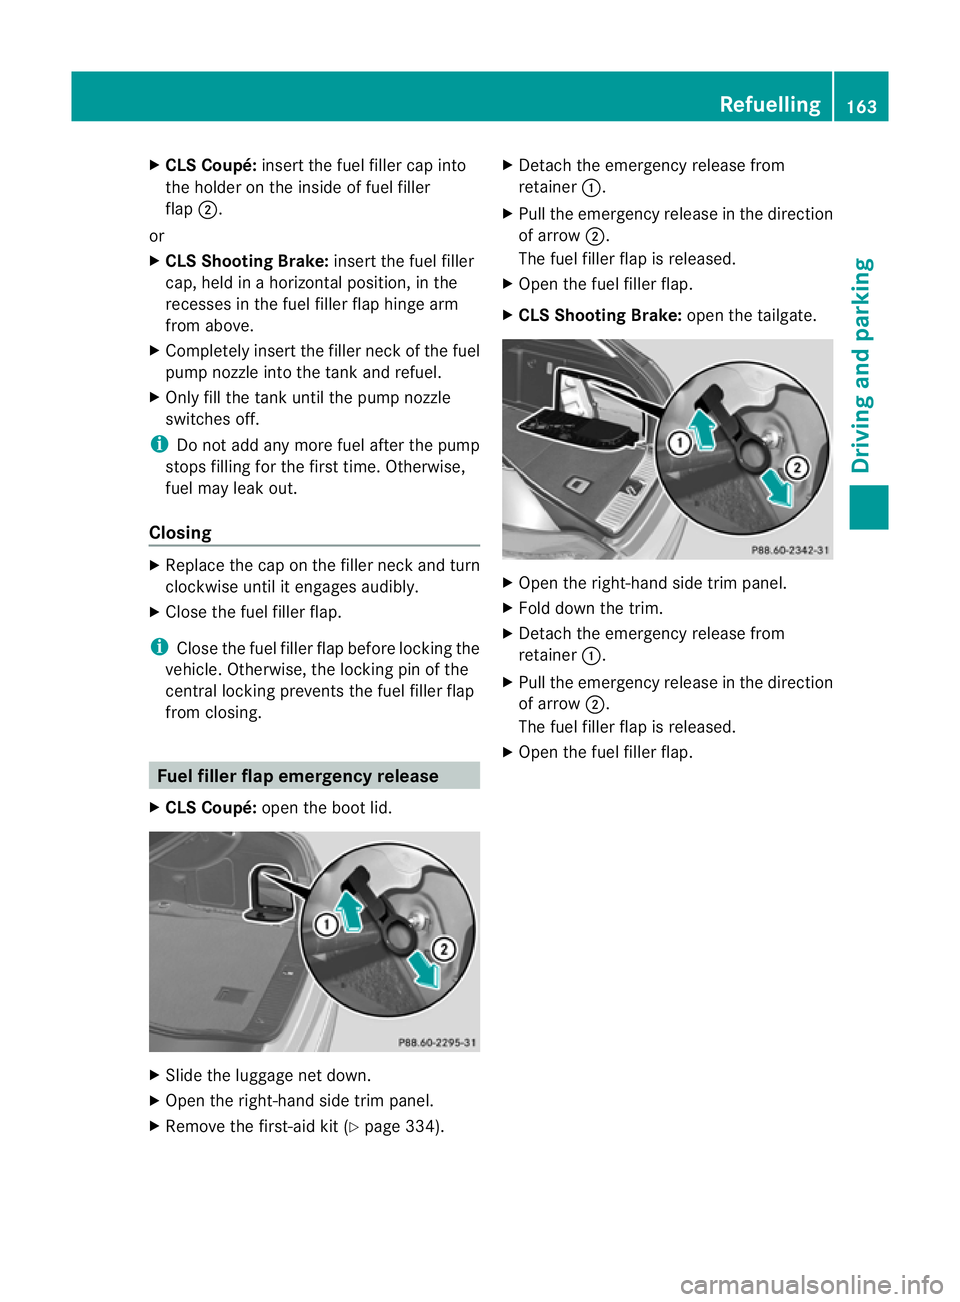
from closing. Fuel filler flap emergency release
X CLS Coupé: open the boot lid. X
Slide the luggage net down.
X Open the right-hand side trim panel.
X Remove the first-aid kit (Y page 334).X
Detach the emergency release from
retainer :.
X Pull the emergency release in the direction
of arrow ;.
The fuel filler flap is released.
X Open the fuel filler flap.
X CLS Shooting Brake: open the tailgate. X
Open the right-hand side trim panel.
X Fold down the trim.
X Detach the emergency release from
retainer :.
X Pull the emergency release in the direction
of arrow ;.
The fuel filler flap is released.
X Open the fuel filler flap. Refuelling
163Driving and parking Z