2012 MERCEDES-BENZ CLS SHOOTING BRAKE child lock
[x] Cancel search: child lockPage 10 of 405
Centre console
Lowe rsection .................................. 35
Lowe rsection (AMG vehicles) ..........36
Uppe rsection .................................. 34
Changing bulbs
Important safety notes ..................123
Overview of bul btypes .................. 124
Reversing lamps ............................ 124
Child-proof locks
Important safety notes ....................63
Rea rdoors ....................................... 63
Children
In the vehicle ................................... 53
Restraint systems ............................ 53
Child seat
Automatic recognition .....................55
ISOFIX .............................................. 56
On the front-passenger sea t............ 54
Problem (malfunction) .....................59
Recommendations ...........................61
Suitable positions ............................ 59
Top Tether ....................................... 57
Cigarette lighter ................................ 307
Cleaning Mirro rturn signal ........................... 328
Trailer tow hitch ............................. 329
Climate control
Auxiliary heating/ventilation .......... 138
Controlling automatically ...............134
Convenience opening/closing
(air-recirculatio nmode) ................. 137
Cooling with aird ehumidification..133
Demisting the windows .................. 136
Demisting the windscreen .............136
Important safety notes ..................130
Indicator lamp ................................ 134
Information on using
THERMOTRONIC automatic cli-
mate control .................................. 133
Notes on using THERMATIC auto-
matic climate control .....................131
Overview of systems ......................130
Problems with cooling with air
dehumidification ............................ 134
Problem with the rear window
heating .......................................... 137
Rea rcontrol panel ......................... 132
Setting the aird istribution.............135 Setting the airflow
.........................135
Setting the airv ents...................... 142
Setting the climate mode (AIR
FLOW) ............................................ 134
Setting the temperature ................134
Setting the temperature,
THERMATI C................................... 134
Setting the temperature,
THERMOTRONIC ............................ 135
Switching air-recirculation mode
on/off ............................................ 137
Switching on/off ........................... 133
Switching residual hea ton/off ......138
Switching the rear window heat-
ing on/off ...................................... 137
Switching the ZONE function on/
off .................................................. 136
THERMATIC automatic climate
control (2-zone) ............................. 131
THERMOTRONIC (3-zone) auto-
matic climate control .....................132
Coat hooks ......................................... 296
Cockpit Overview .......................................... 28
see Instrument cluster
Collapsible emergency spare
wheel
see Emergency spare wheel
COMAND display
Cleaning ......................................... 330
COMAND Online
see separate operating instructions
Combination switch ..........................117
Consumption statistics (on-board
computer) .......................................... 231
Convenience box ............................... 299
Convenience closing feature ..............90
Convenience opening/closing (air-
recirculation mode) ........................... 137
Convenience opening feature ............90
Coolan t(engine)
Checkin gthe level ......................... 323
Display message ............................ 259
Important safety notes ..................392
Temperature (on-board computer) .246
Temperature gauge ........................ 228
Warning lamp ................................. 285 Index
7
Page 15 of 405

H
Handbrake see Parking brake
Hazard warning lamps ......................118
Headbag Display message ............................ 255
Headlamp
Cleaning system (function) ............118
Cleaning system (notes) ................393
Headlamps
Misting up ...................................... 121
Topping up the cleaning system ....323
see Automatic headlamp mode
Head restraints
Adjusting ....................................... 100
Adjusting (electrically). ..................101
Adjusting (manually). .....................100
Adjusting (rear) .............................. 101
Fitting/removing (rear) ..................102
Luxury ............................................ 101
Heating
see Climate control
High-pressure cleaners ....................326
Hill start assist .................................. 150
HOLD function Display message ............................ 263
Function/notes ............................. 186I
Ignition lock see Key positions
Immobiliser .......................................... 72
In-car hotspot see Separate operating instructions
Indicator and warning lamps
Coolant .......................................... 285
DISTRONI CPLUS ........................... 287
Engine diagnostics .........................284
SPORT handling mode ...................282
Indicator lamps
Display message ............................ 256
see Warning and indicator lamps
Insectp rotection on the radiator ....321
Inspection see ASSYST PLUS Instrument cluster
Overview .................................. 30, 227
Settings ......................................... 239
Warning and indicator
lamps ...................................... .32, 276
Instrument cluster lighting ..............240
Intelligen tLight System
Activating/deactivatin g................. 240
Display message ............................ 258
Overview ........................................ 119
Setting the dipped-bea mhead-
lamps for driving on the right/left .241
Interior lighting ................................. 122
Automatic control system ..............122
Delayed switch-off (on-board
computer) ...................................... 242
Emergency lighting ........................123
Manual control ............................... 123
Overview ........................................ 122
Reading lamp ................................. 122
Setting brightness for display/
switches (on-board computer) .......240
Setting the ambient lighting
brightness (on-board computer) ....241
Setting the ambient lighting col-
our (on-board computer) ................ 241
Interior motion sensor ........................73
ISOFIX child seat securing system ....56 J
Jack Storage location ............................ 335
Using ............................................. 364
Jump start (engine)
see Jump starting (engine)
Jump starting (engine) ......................344 K
Key Changing the battery .......................79
Checking the battery .......................79
Convenience closing feature ............91
Convenience opening feature ..........90
Display message ............................ 275
Door central locking/unlocking .......77
Emergency key element ................... 78 12
Index
Page 58 of 405
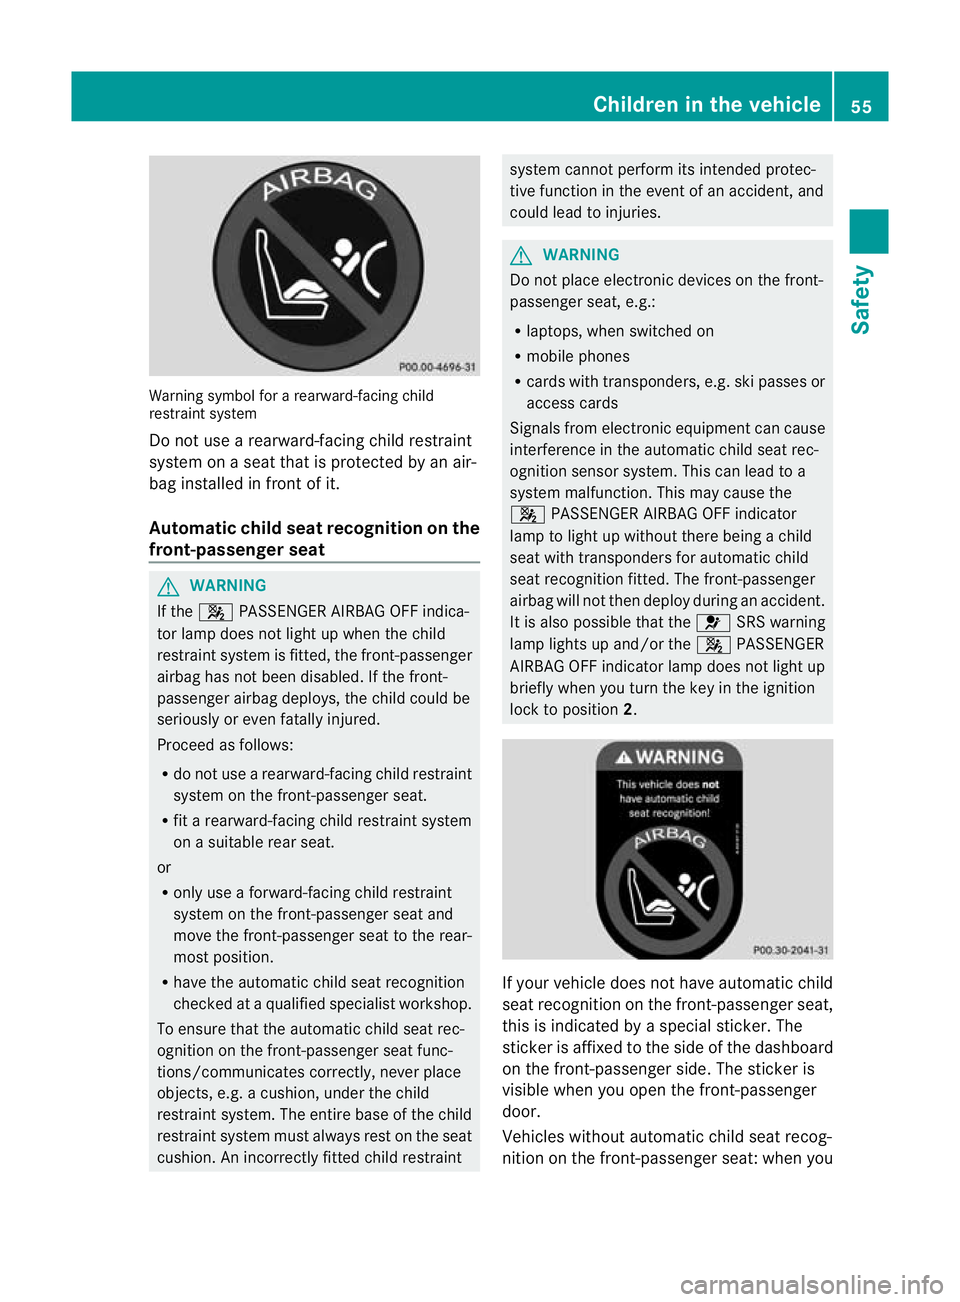
Warning symbol for a rearward-facing child
restraint system
Do not use a rearward-facing child restraint
system on a seat that is protected by an air-
bag installed in fron tofit.
Automatic chil dseat recognition on the
front-passenger seat G
WARNING
If the 4 PASSENGER AIRBAG OFF indica-
to rlamp does no tlight up when the child
restraint system is fitted, the front-passenger
airbag has not been disabled. If the front-
passenger airbag deploys, the child could be
seriously or even fatally injured.
Proceed as follows:
R do not use a rearward-facing child restraint
system on the front-passenge rseat.
R fit a rearward-facing child restraint system
on a suitable rear seat.
or
R only use a forward-facing child restraint
system on the front-passenger seat and
move the front-passenger seat to the rear-
most position.
R have the automatic child seat recognition
checked at a qualified specialist workshop.
To ensure that the automatic child seat rec-
ognition on the front-passenger seat func-
tions/communicates correctly, never place
objects, e.g. a cushion, under the child
restraint system. The entire base of the child
restraint system must always rest on the seat
cushion. An incorrectly fitted child restraint system cannot perform its intended protec-
tive function in the event of an accident, and
could lead to injuries.
G
WARNING
Do not place electronic devices on the front-
passenger seat, e.g.:
R laptops, when switched on
R mobile phones
R cards with transponders, e.g. ski passes or
access cards
Signals from electronic equipment can cause
interference in the automatic child seat rec-
ognition sensor system. This can lead to a
system malfunction. This may cause the
4 PASSENGER AIRBAG OFF indicator
lamp to light up without there being a child
seat with transponders for automatic child
seat recognition fitted. The front-passenger
airbag will not then deploy during an accident.
It is also possible that the 6SRS warning
lamp lights up and/or the 4PASSENGER
AIRBAG OFF indicator lamp does not light up
briefly when you turn the key in the ignition
lock to position 2. If your vehicle does not have automatic child
seat recognition on the front-passenger seat,
this is indicated by a special sticker. The
sticker is affixed to the side of the dashboard
on the front-passenger side. The sticker is
visible when you open the front-passenger
door.
Vehicles without automatic child seat recog-
nition on the front-passenger seat: when you Children in the vehicle
55Safety Z
Page 59 of 405
tur
nthe key to position 2inthe ignition lock,
the 4 PASSENGER AIRBAG OFF indicator
lamp lights up briefly, but does not have any
function. It does not indicate that there is
automatic child seat recognition on the front-
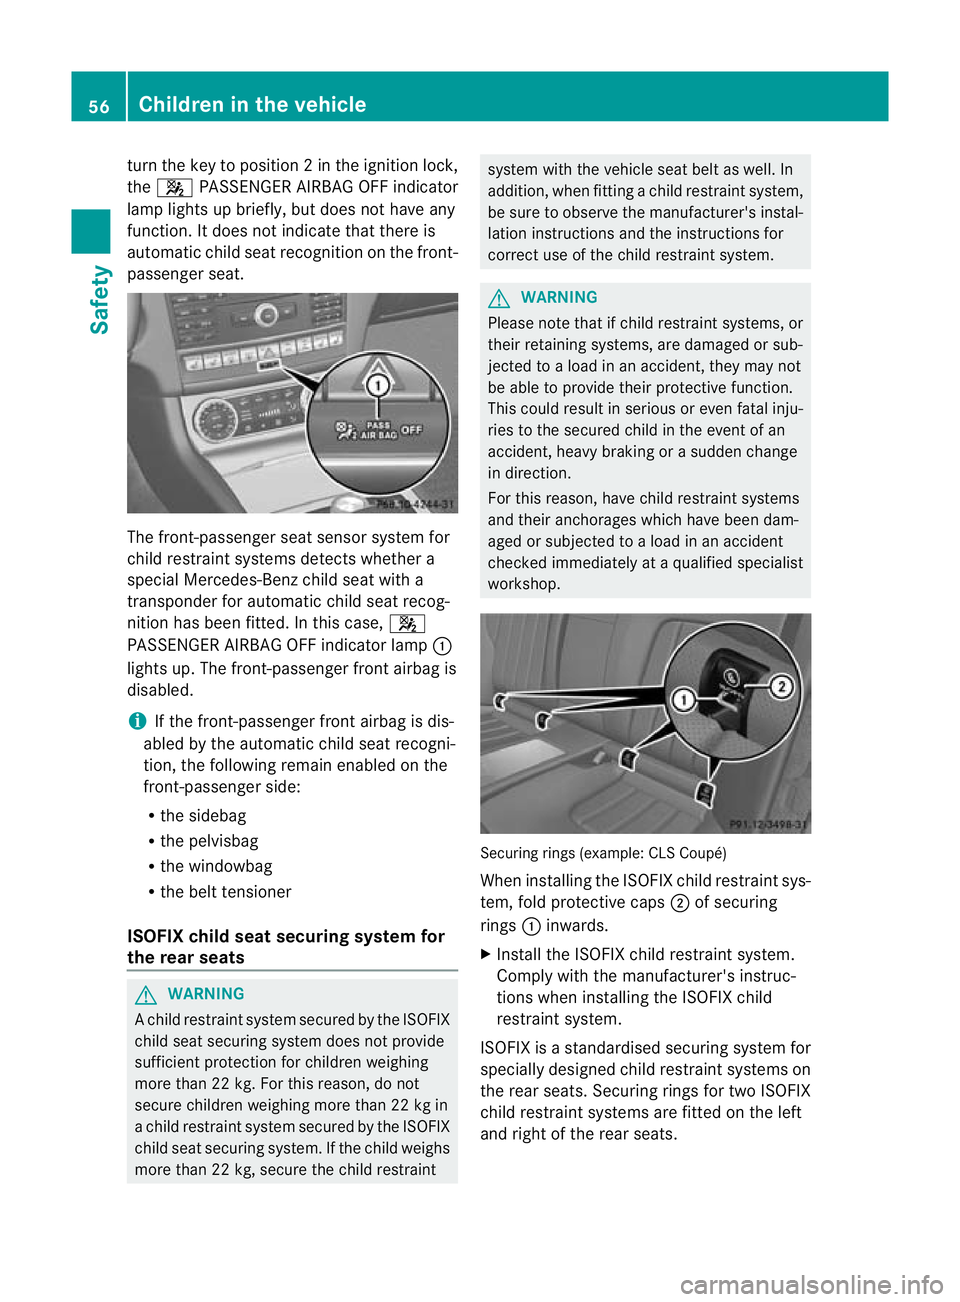
passenger seat. The front-passenger seat sensor system for
child restraint systems detects whether a
special Mercedes-Ben zchild seat with a
transponder for automatic child seat recog-
nition has been fitted. In this case, 4
PASSENGER AIRBAG OFF indicator lamp :
lights up. The front-passenger front airbag is
disabled.
i If the front-passenger front airbag is dis-
abled by the automatic child seat recogni-
tion, the following remain enabled on the
front-passenger side:
R the sidebag
R the pelvisbag
R the windowbag
R the belt tensioner
ISOFIX child seat securing system for
the rear seats G
WARNING
Ac hild restraint system secured by the ISOFIX
child seat securing system does not provide
sufficient protection for children weighing
more than 22 kg. For this reason, do not
secure children weighing more than 22 kg in
a child restraint system secured by the ISOFIX
child seat securing system. If the child weighs
more than 22 kg, secure the child restraint system with the vehicle seat belt as well. In
addition, when fitting a child restraint system,
be sure to observe the manufacturer's instal-
lation instructions and the instructions for
correct use of the child restraint system.
G
WARNING
Please note that if child restraint systems, or
their retaining systems, are damaged or sub-
jected to a load in an accident, they may not
be able to provide their protective function.
This could result in serious or even fatal inju-
ries to the secured child in the event of an
accident, heavy braking or a sudden change
in direction.
For this reason, have child restraint systems
and their anchorages which have been dam-
aged or subjected to a load in an accident
checked immediately at a qualified specialist
workshop. Securing rings (example: CLS Coupé)
When installing the ISOFIX child restraint sys-
tem, fold protective caps
;of securing
rings :inwards.
X Install the ISOFIX child restraint system.
Comply with the manufacturer's instruc-
tions when installing the ISOFIX child
restraint system.
ISOFIX is a standardised securing system for
specially designed child restraint systems on
the rear seats. Securing rings for two ISOFIX
child restraint systems are fitted on the left
and right of the rear seats. 56
Children in the vehicleSafety
Page 66 of 405
Child-proof locks
Important safety notes G
WARNING
Activate the child-proof locks for the rear
doors and the override switch for the rear
windows when childre nare travelling in the
vehicle. Otherwise, the children could open
doors or side windows while the vehicle is in
motion and injure themselves or others. G
WARNING
Do not leave children unsupervised in the
vehicle, even if they are secured in a child
restraint system. They could injure them-
selves on parts of the vehicle. They could also
be seriously or even fatally injured by pro-
longed exposure to extreme heat or cold.
Do not expose the child restraint system to
direct sunlight. Parts of the child restraint sys-
tem could heat up and the child could burn
herself/himsel fonthem.
If a child opens a door, the child or other per-
sons could be injured as a result. They could
get out and injure themselves or be injured by
a passing vehicle.
Also observe the notes on HOLD. Relevant
information can be found in the index.
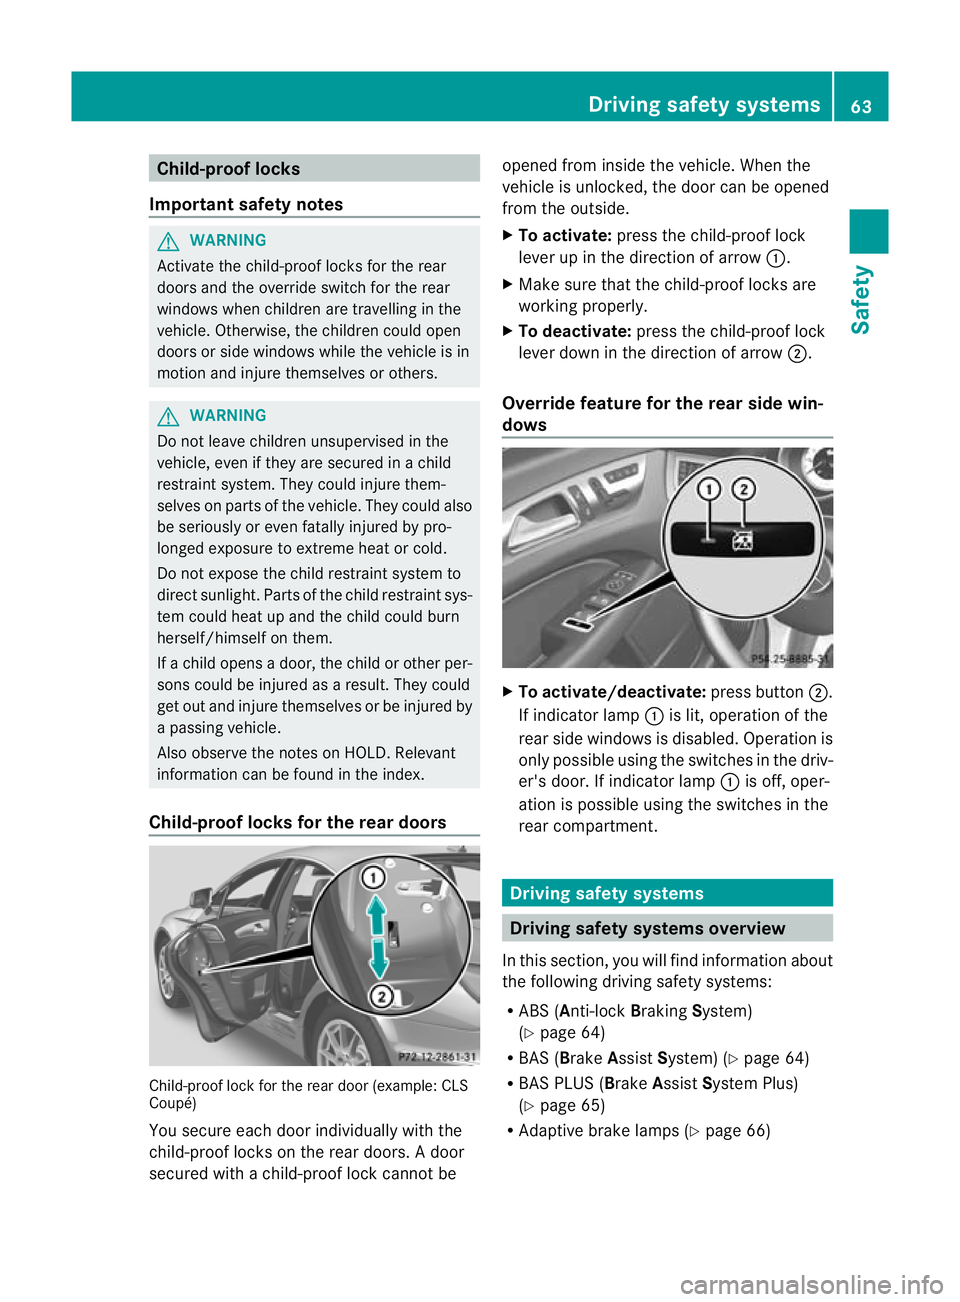
Child-proof locks for the rear doors Child-proof lock for the rear door (example: CLS
Coupé)
You secure each door individually with the
child-proof locks on the rear doors. Adoor
secured with a child-proof lock cannot be opened from inside the vehicle. When the
vehicle is unlocked, the door can be opened
from the outside.
X
To activate: press the child-proof lock
lever up in the direction of arrow :.
X Make sure that the child-proof locks are
working properly.
X To deactivate: press the child-proof lock
lever down in the direction of arrow ;.
Override feature for the rear side win-
dows X
To activate/deactivate: press button;.
If indicator lamp :is lit, operation of the
rear side windows is disabled. Operation is
only possible using the switches in the driv-
er's door. If indicator lamp :is off, oper-
ation is possible using the switches in the
rear compartment. Driving safety systems
Driving safety systems overview
In this section, you will find information about
the following driving safety systems:
R ABS (Anti-lock BrakingSystem)
(Y page 64)
R BAS (Brake AssistSystem) (Y page 64)
R BAS PLUS ( BrakeAssist System Plus)
(Y page 65)
R Adaptive brake lamps (Y page 66) Driving safety systems
63Safety Z
Page 79 of 405
Useful information
i This Owner's Manual describes all mod-
els, series and optional equipment for your
vehicle that were available at the time of
going to press. National variations are pos-
sible. Note that your vehicle may not be
equipped with all of the functions descri-
bed. This is also the case for systems and
functions relevant to safety.
i Read the information on qualified special-
ist workshops: (Y page 24). Key
Important safety notes
G
WARNING
Only for the United Kingdom: if the vehicle
has been locked with the key or with KEY-
LESS-GO, the double lock function is activa-
ted as standard. It is then not possible to open
the doors from inside the vehicle.
Therefore, do not leave any people behind in
the vehicle, particularly children, elderly peo-
ple or people requiring special assistance. As
a result, they may not be able to free them-
selves in the event of an emergency. They
could be seriously or even fatally injured by
prolonged exposure to extremely high or low
temperatures, for example. In this case, res-
cuing people from outside the vehicle is diffi-
cult.
Deactivate the interior motion sensor before
you lock the vehicle. The doors can then be
opened from the inside after the vehicle has
been locked from the outside. G
WARNING
If children are left unsupervised in the vehicle,
they could: R
open a door from inside the vehicle at any
time, even if it has been locked
R start the vehicle using akey which has been
left in the vehicle
R release the parking brake
They could thereby endanger themselves and
others. Never leave children unsupervised in
the vehicle. Always take the key with you
when leaving the vehicle, even if you are only
leaving it for a short time. G
WARNING
If a key ring is too heavy or too large, the
weight acting on the key could cause it to turn
in the ignition lock or catch on the steering
wheel. This could cause the engine to be
switched off suddenly. You may lose control
of the vehicle and cause an accident. Do not
attach any heavy or large key rings to the key
that is inserted in the ignition.
R Do not keep the key:
-with electronic devices, e.g. a mobile
phone or another key
- with metallic objects, e.g. coins or metal
foil
- inside metallic objects, e.g. a metal case
This can affect the key's functionality.
Keep the key away from strong magnetic
fields. Otherwise, the remote control function
could be affected. 76
KeyOpening and closing
Page 82 of 405
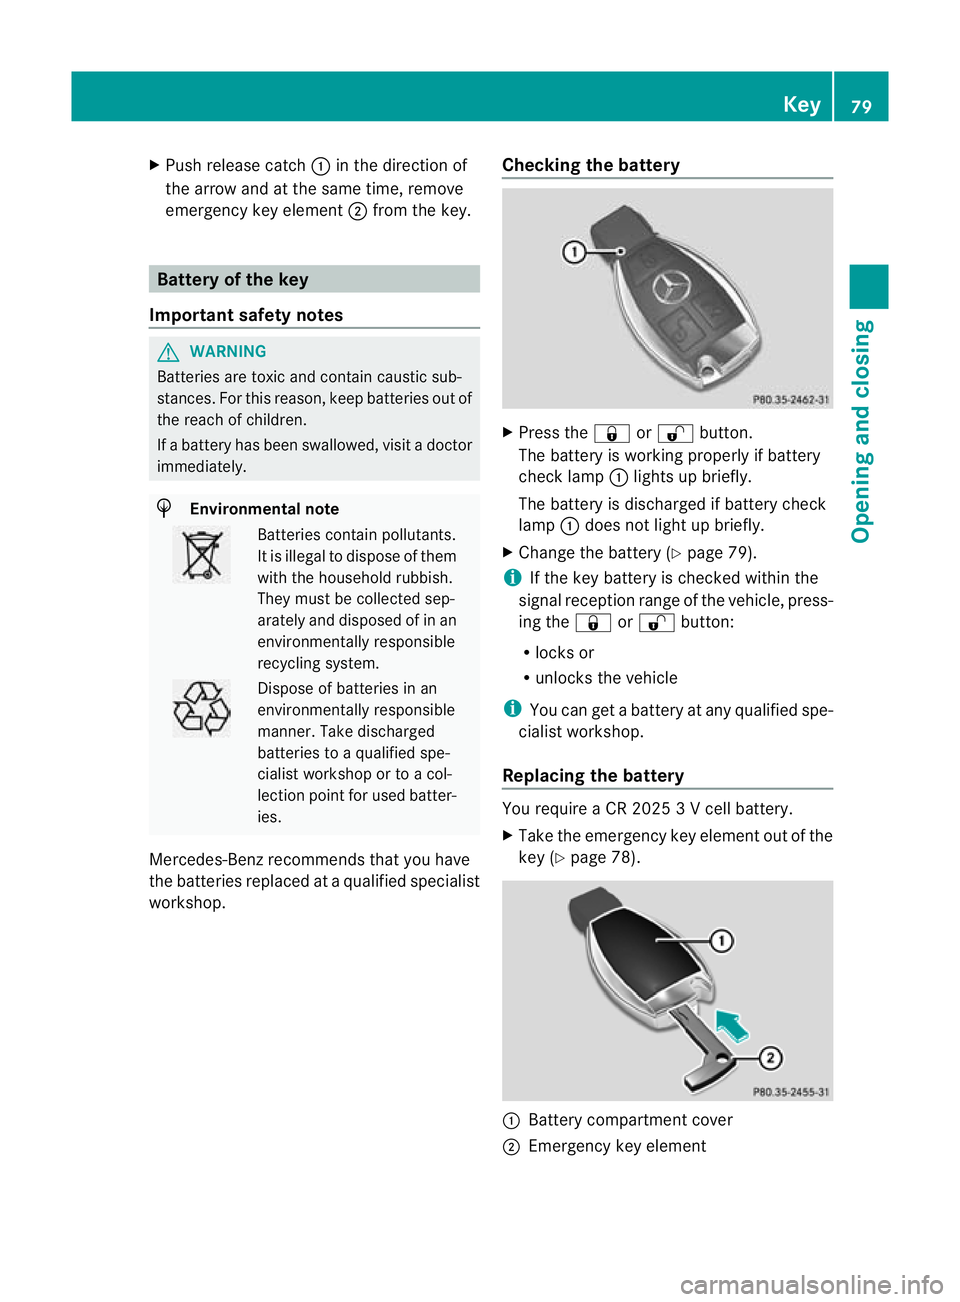
X
Push release catch :in the direction of
the arrow and at the same time, remove
emergency key element ;from the key. Battery of the key
Important safety notes G
WARNING
Batteries are toxic and contain caustic sub-
stances. For this reason, keep batteries out of
the reach of children.
If a battery has been swallowed, visit a doctor
immediately. H
Environmental note Batteries contain pollutants.
It is illegal to dispose of them
with the household rubbish.
They must be collected sep-
arately and disposed of in an
environmentally responsible
recycling system.
Dispose of batteries in an
environmentally responsible
manner
.Take discharged
batteries to a qualified spe-
cialis tworkshop or to a col-
lection point for used batter-
ies.
Mercedes-Benz recommends that you have
the batteries replaced at a qualified specialist
workshop. Checking the battery X
Press the &or% button.
The battery is working properly if battery
check lamp :lights up briefly.
The battery is discharged if battery check
lamp :does not light up briefly.
X Change the battery (Y page 79).
i If the key battery is checked within the
signal reception range of the vehicle, press-
ing the &or% button:
R locks or
R unlocks the vehicle
i You can get a battery at any qualified spe-
cialist workshop.
Replacing the battery You require a CR 2025 3 V cell battery.
X
Take the emergency key element out of the
key (Y page 78). :
Battery compartment cover
; Emergency key element Key
79Opening and closing Z
Page 85 of 405
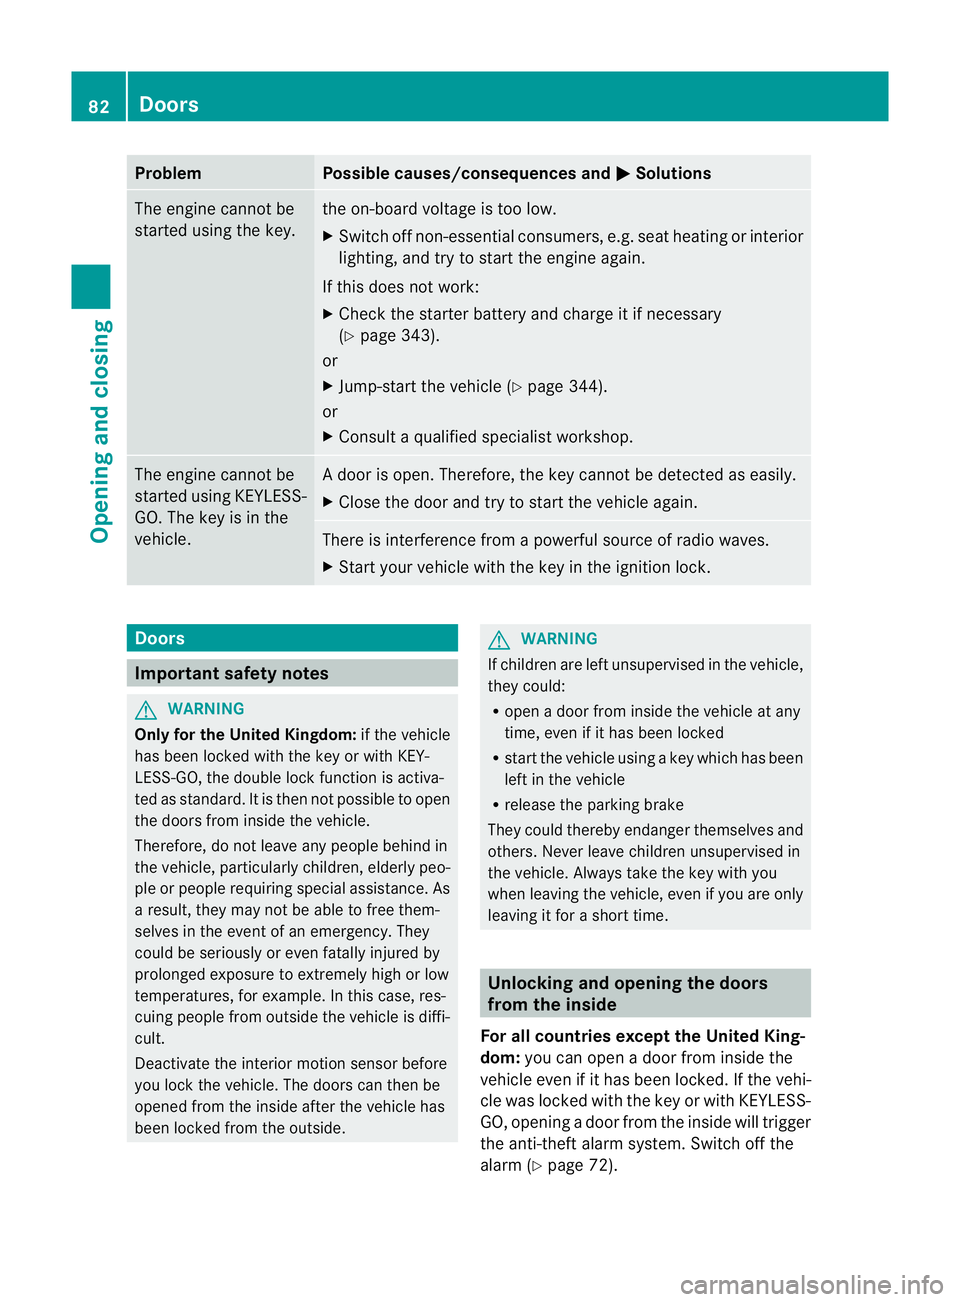
Problem Possible causes/consequences and
M Solutions
The engine cannot be
started using the key. the on-board voltage is too low.
X
Switch off non-essential consumers, e.g. seat heating or interior
lighting, and try to start the engine again.
If this does not work:
X Check the starter battery and charge it if necessary
(Y page 343).
or
X Jump-start the vehicle (Y page 344).
or
X Consult a qualified specialist workshop. The engine cannot be
started using KEYLESS-
GO. The key is in the
vehicle. Ad
oor is open. Therefore, the key cannot be detected as easily.
X Close the door and try to start the vehicle again. There is interference from a powerful source of radio waves.
X
Start your vehicle with the key in the ignition lock. Doors
Important safety notes
G
WARNING
Only for the United Kingdom: if the vehicle
has been locked with the key or with KEY-
LESS-GO, the double lock function is activa-
ted as standard. It is then not possible to open
the doors from inside the vehicle.
Therefore, do not leave any people behind in
the vehicle, particularly children, elderly peo-
ple or people requiring special assistance. As
a result, they may not be able to free them-
selves in the event of an emergency. They
could be seriously or even fatally injured by
prolonged exposure to extremely high or low
temperatures, for example. In this case, res-
cuing people from outside the vehicle is diffi-
cult.
Deactivate the interior motion sensor before
you lock the vehicle. The doors can then be
opened from the inside after the vehicle has
been locked from the outside. G
WARNING
If children are left unsupervised in the vehicle,
they could:
R open a door from inside the vehicle at any
time, even if it has been locked
R start the vehicle using akey which has been
left in the vehicle
R release the parking brake
They could thereby endanger themselves and
others. Never leave children unsupervised in
the vehicle. Always take the key with you
when leaving the vehicle, even if you are only
leaving it for a short time. Unlocking and opening the doors
from the inside
For all countries except the United King-
dom: you can open a door from inside the
vehicle even if it has been locked. If the vehi-
cle was locked with the key or with KEYLESS-
GO, opening a door from the inside will trigger
the anti-theft alarm system. Switch off the
alarm (Y page 72). 82
DoorsOpening and closing