2012 MERCEDES-BENZ CLS SHOOTING BRAKE child lock
[x] Cancel search: child lockPage 86 of 405
United Kingdom only:
if the vehicle has
been locked with the key or with KEYLESS-
GO, the double lock function is activated as
standard. It is then not possible to open the
doors from inside the vehicle. Deactivate the
interior motion senso r(Ypage 73) before you
lock the vehicle. The doors can then be
opened from the inside after the vehicle has
been locked from the outside. The anti-theft
alarm system is triggered if the door is
opened from the inside. Switch off the alarm
(Y page 72).
You can only open the rear compartment
doors from inside the vehicle if they are not
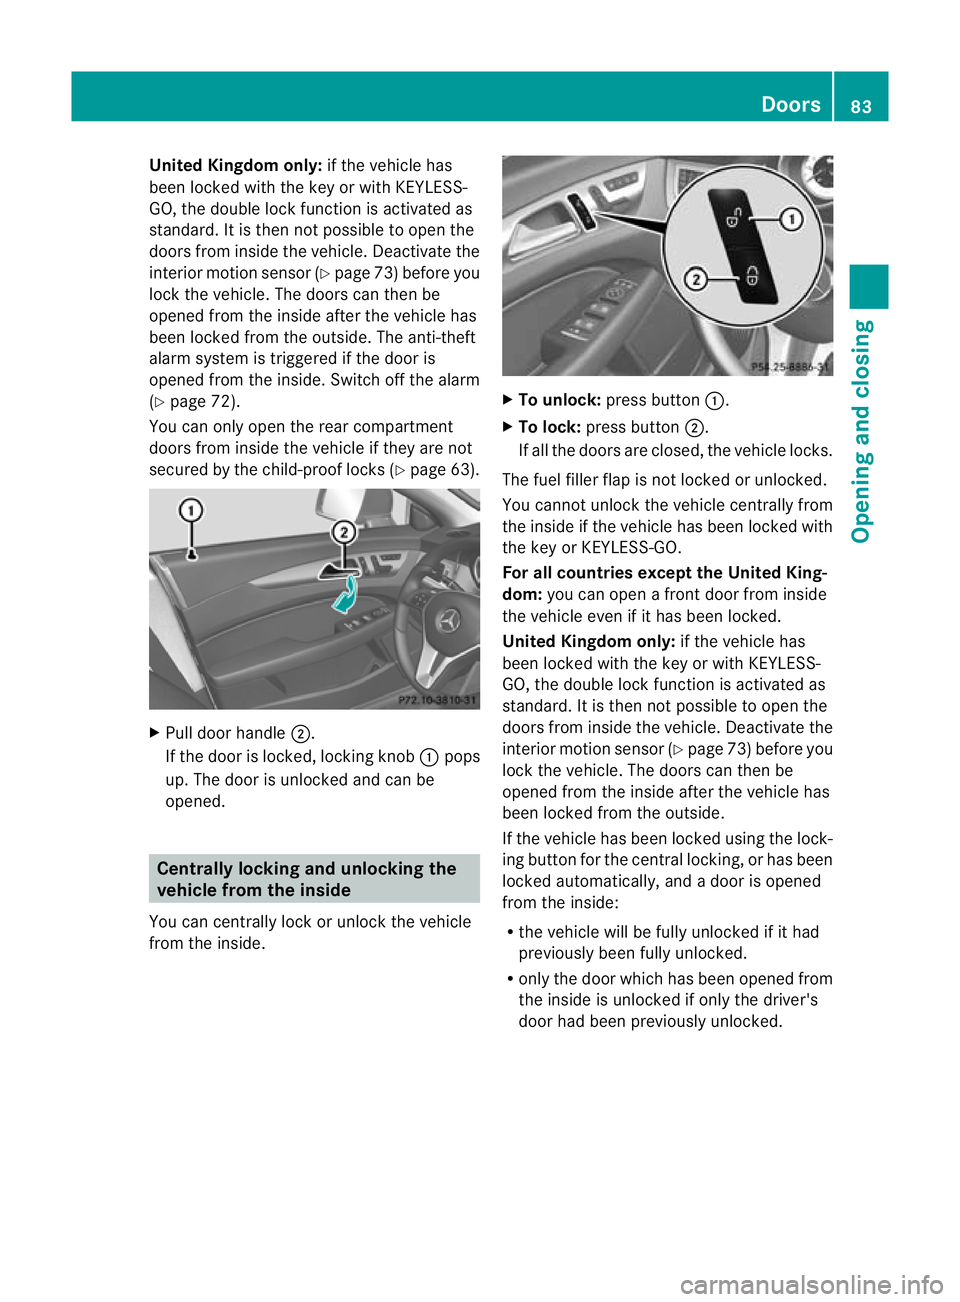
secured by the child-proof locks (Y page 63).X
Pull door handle ;.
If the door is locked, locking knob :pops
up. The door is unlocked and can be
opened. Centrally locking and unlocking the
vehicle from the inside
You can centrally lock or unlock the vehicle
from the inside. X
To unlock: press button :.
X To lock: press button ;.
If all the doors are closed, the vehicle locks.
The fuel filler flap is not locked or unlocked.
You cannot unlock the vehicle centrally from
the inside if the vehicle has been locked with
the key or KEYLESS-GO.
For all countries except the United King-
dom: you can open a front door from inside
the vehicle even if it has been locked.
United Kingdom only: if the vehicle has
been locked with the key or with KEYLESS-
GO, the double lock function is activated as
standard. It is then not possible to open the
doors from inside the vehicle. Deactivate the
interior motion senso r(Ypage 73) before you
lock the vehicle. The doors can then be
opened from the inside after the vehicle has
been locked from the outside.
If the vehicle has been locked using the lock-
ing button for the central locking, or has been
locked automatically, and adoor is opened
from the inside:
R the vehicle will be fully unlocked if it had
previously been fully unlocked.
R only the door which has been opened from
the inside is unlocked if only the driver's
door had been previously unlocked. Doors
83Opening and closing Z
Page 89 of 405
X
Press the %button on the key.
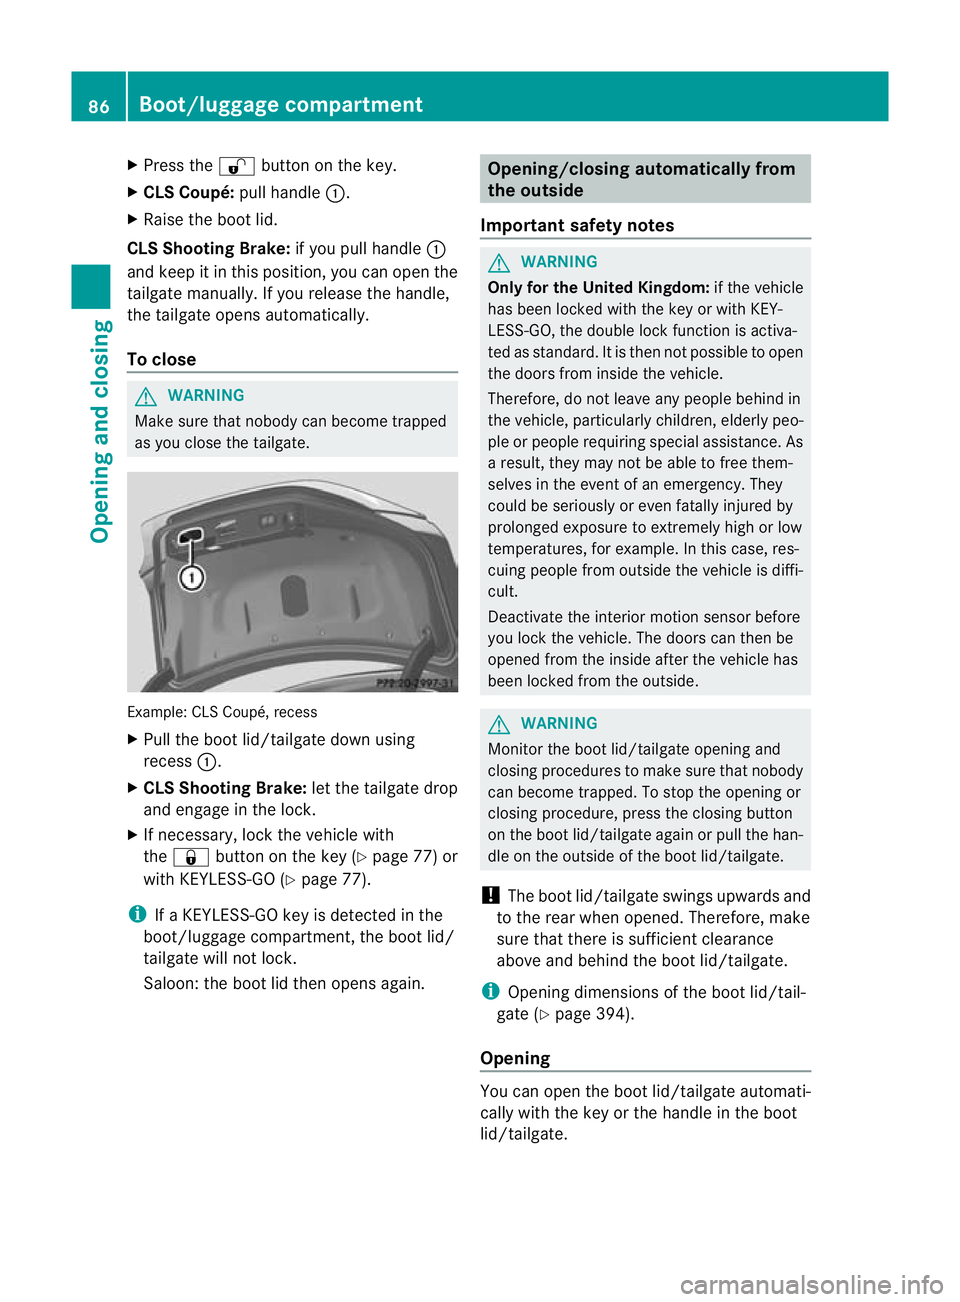
X CLS Coupé: pull handle:.
X Raise the boot lid.
CLS Shooting Brake: if you pull handle:
and keep it in this position, you can open the
tailgate manually. If you release the handle,
the tailgate opens automatically.
To close G
WARNING
Make sure that nobody can become trapped
as you close the tailgate. Example: CLS Coupé, recess
X
Pull the boot lid/tailgate down using
recess :.
X CLS Shooting Brake: let the tailgate drop
and engage in the lock.
X If necessary, lock the vehicle with
the & button on the key (Y page 77) or
with KEYLESS-GO (Y page 77).
i If a KEYLESS-GO key is detected in the
boot/luggage compartment, the boot lid/
tailgate will not lock.
Saloon: the boot lid then opens again. Opening/closing automatically from
the outside
Important safety notes G
WARNING
Only for the United Kingdom: if the vehicle
has been locked with the key or with KEY-
LESS-GO, the double lock function is activa-
ted as standard. It is then not possible to open
the doors from inside the vehicle.
Therefore, do not leave any people behind in
the vehicle, particularly children, elderly peo-
ple or people requiring special assistance. As
a result, they may not be able to free them-
selves in the event of an emergency. They
could be seriously or even fatally injured by
prolonged exposure to extremely high or low
temperatures, for example. In this case, res-
cuing people from outside the vehicle is diffi-
cult.
Deactivate the interior motion sensor before
you lock the vehicle. The doors can then be
opened from the inside after the vehicle has
been locked from the outside. G
WARNING
Monito rthe boot lid/tailgate opening and
closing procedures to make sure that nobody
can become trapped. To stop the opening or
closing procedure, press the closing button
on the boot lid/tailgate again or pull the han-
dle on the outside of the boot lid/tailgate.
! The boot lid/tailgate swings upwards and
to the rear when opened. Therefore, make
sure that there is sufficient clearance
above and behind the boot lid/tailgate.
i Opening dimensions of the boot lid/tail-
gate (Y page 394).
Opening You can open the boot lid/tailgate automati-
cally with the key or the handle in the boot
lid/tailgate. 86
Boot/luggage compartmentOpening and closing
Page 92 of 405
Opening
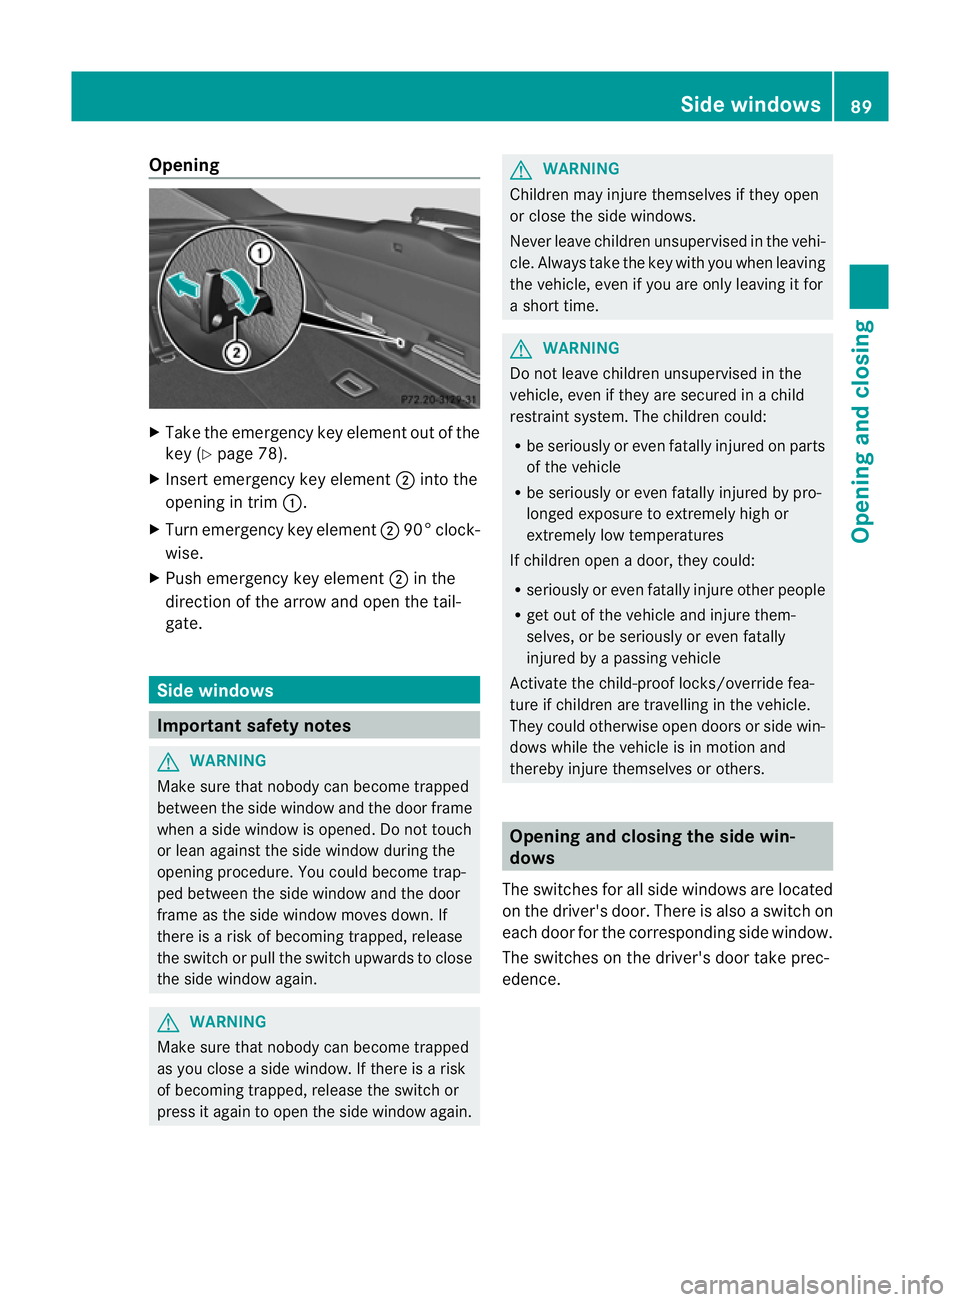
X
Take the emergency key element out of the
key (Y page 78).
X Insert emergency key element ;into the
opening in trim :.
X Turn emergency key element ;90° clock-
wise.
X Push emergency key element ;in the
direction of the arrow and open the tail-
gate. Side windows
Important safety notes
G
WARNING
Make sure that nobody can become trapped
between the side window and the door frame
when a side window is opened. Do not touch
or lean against the side window during the
opening procedure. You could become trap-
ped between the side window and the door
frame as the side window moves down. If
there is a risk of becoming trapped, release
the switch or pull the switch upwards to close
the side window again. G
WARNING
Make sure that nobody can become trapped
as you close a side window. If there is a risk
of becoming trapped, release the switch or
press it again to open the side window again. G
WARNING
Children may injure themselves if they open
or close the side windows.
Never leave children unsupervised in the vehi-
cle. Always take the key with you when leaving
the vehicle, even if you are only leaving it for
a short time. G
WARNING
Do not leave children unsupervised in the
vehicle, even if they are secured in a child
restraint system. The children could:
R be seriously or even fatally injured on parts
of the vehicle
R be seriously or even fatally injured by pro-
longed exposure to extremely high or
extremely low temperatures
If children open a door, they could:
R seriously or even fatally injure other people
R get out of the vehicle and injure them-
selves, or be seriously or even fatally
injured by a passing vehicle
Activate the child-proof locks/override fea-
ture if children are travelling in the vehicle.
They could otherwise open doors or side win-
dows while the vehicle is in motion and
thereby injure themselves or others. Opening and closing the side win-
dows
The switches for all side windows are located
on the driver's door. There is also a switch on
each door for the corresponding side window.
The switches on the driver's door take prec-
edence. Side windows
89Opening and closing Z
Page 95 of 405
Problems with the side windows
G
WARNING
Closing the side windows with increased force or without the anti-entrapment feature could lead
to serious or even fatal injury. Make sure that nobody can become trapped when closing the side
windows. Problem Possible causes/consequences and
M Solutions
As
ide window cannot
be closed because it is
blocked by objects, e.g.
leaves in the window
guide. X
Remove the objects.
X Close the side window. As
ide window cannot
be closed and you can-
not see the cause. If a side window is obstructed during closing and reopens again
slightly:
X
Immediately after the window blocks, pull the corresponding
switch again until the side window has closed.
The side window is closed with increased force.
If a side window is obstructed again during closing and reopens
again slightly:
X Immediately after the window blocks, pull the corresponding
switch again until the side window has closed.
The side window is closed without the anti-entrapmen tfeature. Sliding sunroof
Important safety notes
G
WARNING
Make sure that nobody can become trapped
when opening and closing the sliding sunroof.
If there is a risk of entrapment, release the
switch immediately. During automatic opera-
tion, push the switch briefly in any direction
to stop the sliding sunroof. G
WARNING
The glass in the panorama sunroof could
break in an accident. If you are not wearing a
seat belt, there is a risk that you could be
thrown through the opening in the event of the
vehicle overturning .Therefore, always wear a
seat belt to reduce the risk of injuries. G
WARNING
Children could injure themselves if they oper-
ate the sliding sunroof.
Never leave children unsupervised in the vehi-
cle. Always take the key with you when leaving
the vehicle, even if you are only leaving it for
a short time.
! Only open the panorama sliding sunroof
if it is free of snow and ice. Otherwise, mal-
functions may occur.
Do not allow anything to protrude from the
sliding sunroof. Otherwise, the seals could
be damaged.
i Resonance noises can occur in addition
to the usual airflow noises when the sliding
sunroof is open. They are caused by minor
pressure fluctuations in the vehicle interior. 92
Sliding sunroofOpening and closing
Page 102 of 405
Seats
Important safety notes
G
WARNING
The seats can still be adjusted when there is
no key in the ignition lock. For this reason,
children should never be left unsupervised in
the vehicle. They could adjust the seats and
become trapped. G
WARNING
Only adjust the driver's seat when the vehicle
is stationary. You will otherwise be distracted
from the road and traffic conditions and you
could lose control of the vehicle as a result of
the seat moving. This could cause an acci-
dent. G
WARNING
If you adjust the seat height carelessly, you or
others could be trapped and thereby injured.
Children in particular could unintentionally
press the buttons to electrically adjust the
seats and become trapped.
Take care that:
R while moving the seats, your hands do not
get under the lever assembly of the seat
adjustment system.
R children in the vehicle do not slide their
hands under the levers. G
WARNING
Make sure that nobody can become trapped
when adjusting the seats.
Observe the notes on airbags.
Secure children as recommended; see the
"Children in the vehicle" section. G
WARNING
Make sure that the back of your head is sup-
ported at eye level by the central area of the
head restraint .Ifyour head is not supported
correctly by the head restraint, you could suf-
fer a severe neck injury in the event of an accident
.Never drive if the head restraints are
not engaged and set correctly. G
WARNING
As eat belt can only offer its intended degree
of protection when the backrest is almost ver-
tical and the occupant is sitting upright. Avoid
seat positions that do not allow the seat belt
to be routed correctly. Adjust the backrest so
that it is as upright as possible. Never travel
with the backrest reclined too far backwards.
You could otherwise be seriously or even
fatally injured in the event of an accident or
sudden braking.
! To avoid damage to the seats and the seat
heating, observe the following information:
R do not spill any liquids on the seats. If
liquid is spilled on the seats, dry them as
soon as possible.
R if the seat covers are damp or wet, do not
switch on the seat heating. The seat
heating should also not be used to dry
the seats.
R clean the seat covers as recommended;
see the "Interior care" section.
R do not transport heavy loads on the
seats. Do not place sharp objects on the
seat cushions, e.g. knives, nails or tools.
The seats should only be occupied by
passengers, if possible.
R when the seat heating is in operation, do
not cover the seats with insulating mate-
rials, e.g. blankets, coats, bags, seat cov-
ers, child seats or booster seats.
! To avoid damage to the seats and the seat
heating, observe the following information:
R do not spill any liquids on the seats. If
liquid is spilled on the seats, dry them as
soon as possible.
R if the seat covers are damp or wet, do not
switch on the seat heating. The seat
heating should also not be used to dry
the seats. Seats
99Seats, steering wheel and mirrors Z
Page 108 of 405
X
Make sure that the key is in position 1or
2 in the ignition lock.
X To switch on: press button:repeatedly
until the desired heating level is set.
X To switch off: press button:repeatedly
until all the indicator lamps go out.
i If the battery voltage is too low, the seat
heating may switch off.
Problems with the seat heating The seat heating has switched off prema-
turely or cannot be switched on. The vehicle's
electrical system voltage is too low because
too many electrical consumers are switched
on.
X Switch off electrical consumers that you do
not need, such as the rear window heating
or interior lighting. Switching the seat ventilation on/off
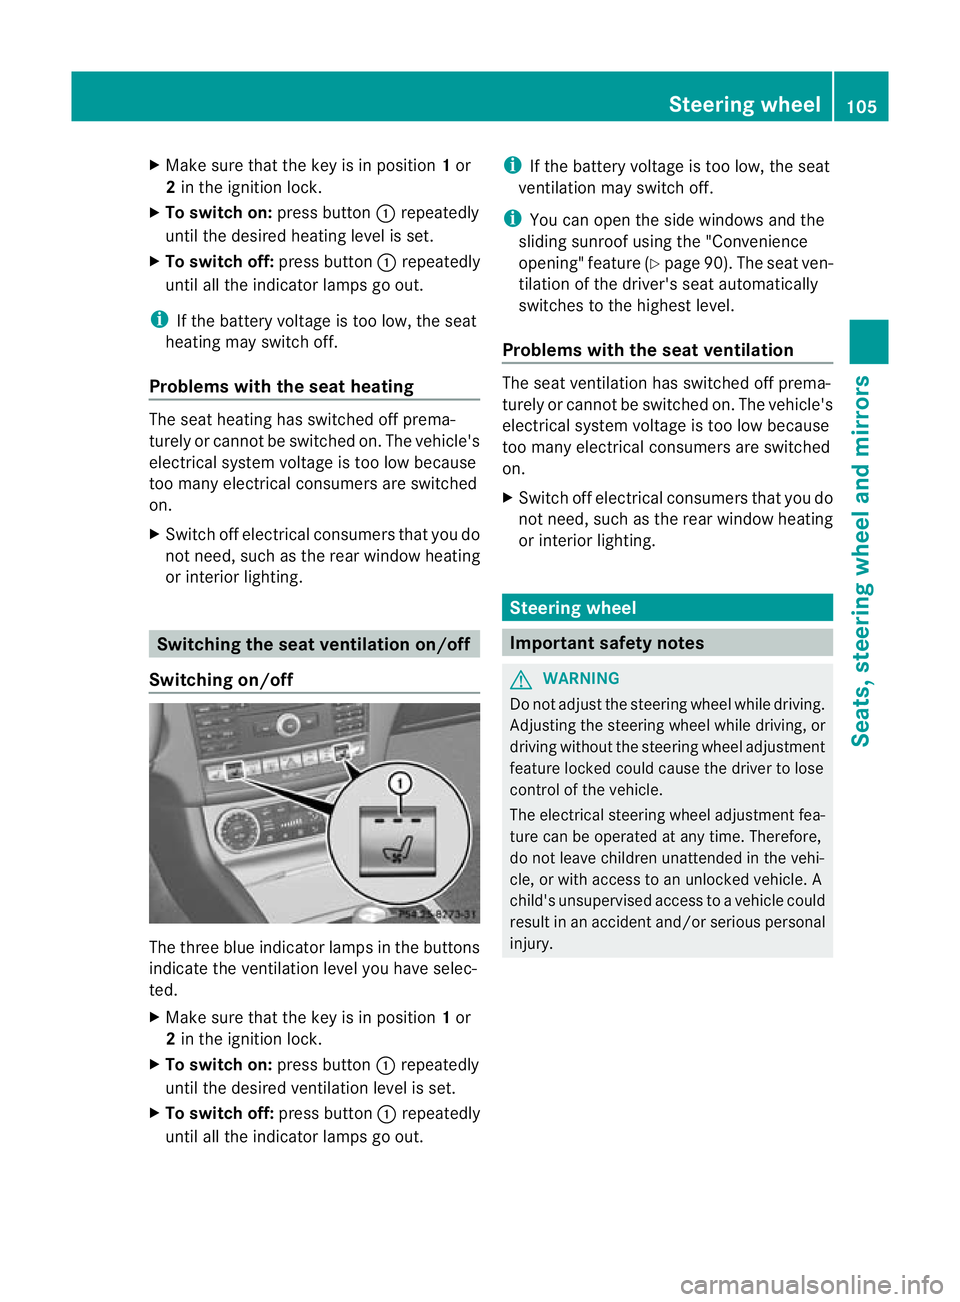
Switching on/off The three blue indicator lamps in the buttons
indicate the ventilation level you have selec-
ted.
X Make sure that the key is in position 1or
2 in the ignition lock.
X To switch on: press button:repeatedly
until the desired ventilation level is set.
X To switch off: press button:repeatedly
until all the indicator lamps go out. i
If the battery voltage is too low, the seat
ventilation may switch off.
i You can open the side windows and the
sliding sunroof using the "Convenience
opening" feature (Y page 90). The seat ven-
tilation of the driver's seat automatically
switches to the highest level.
Problems with the seat ventilation The seat ventilation has switched off prema-
turely or cannot be switched on. The vehicle's
electrical system voltage is too low because
too many electrical consumers are switched
on.
X
Switch off electrical consumers that you do
not need, such as the rear window heating
or interior lighting. Steering wheel
Important safety notes
G
WARNING
Do not adjust the steering wheel while driving.
Adjusting the steering wheel while driving, or
driving without the steering wheel adjustment
feature locked could cause the driver to lose
control of the vehicle.
The electrical steering wheel adjustment fea-
ture can be operated at any time. Therefore,
do not leave children unattended in the vehi-
cle, or with access to an unlocked vehicle. A
child's unsupervised access to a vehicle could
result in an accident and/or serious personal
injury. Steering wheel
105Seats, steering wheel and mirrors Z
Page 110 of 405
Problems with the steering wheel heat-
ing
If steering wheel heating indicator lamp
=is
flashing, the steering wheel heating has
switched off automatically. The vehicle's
electrical system voltage is too low because
too many electrical consumers are switched
on.
X Switch off electrical consumers that you do
not need, such as the rear window heating
or interior lighting.
Once the battery is sufficiently charged, the
steering wheel heating will switch back on
automatically. EASY-ENTRY/EXIT feature
Important safety notes G
WARNING
Make sure that nobody can become trapped
when you activate the EASY-ENTRY/EXIT fea-
ture.
If there is a risk of someone becoming trap-
ped, stop the adjustment procedure. To halt
the procedure:
R press the steering column adjustment but-
ton.
R briefly press one of the memory function
position buttons.
The steering column stops moving immedi-
ately.
Do not keep the memory function position
button pressed down, otherwise the memory
function will start and the steering wheel and
seat will begin to move.
Never leave children unsupervised in the vehi-
cle. They could open the driver's door and
thereby unintentionally activate the EASY-
ENTRY feature and become trapped.
The EASY-ENTRY/EXIT feature makes getting
in and out of your vehicle easier. You can activate and deactivate the EASY-
ENTRY/EXIT feature in the on-board com-
puter (Y
page 244).
Position of the steering wheel when the
EASY-ENTRY/EXIT featurei s active The steering wheel tilts upwards if you:
R
remove the key from the ignition lock
R open the driver's door and KEYLESS-GO is
in position 1
R open the driver's door and the key is in
position 0or 1in the ignition lock
i The steering wheel only moves upwards if
it has not already reached the upper end
stop.
Position of the steering wheel for driv-
ing The steering wheel is moved to the previously
set position if:
R
the driver's door is closed and
R you insert the key into the ignition lock
or
R you press the Start/Stop button once on
vehicles with KEYLESS-GO.
If you close the driver's door with the key
inserted into the ignition lock, the steering
wheel is automatically moved to the previ-
ously set position.
The last position of the steering wheel is
stored when you switch off the ignition or
when you store the setting with the memory
function (Y page 111).
Crash-responsive EASY-EXIT feature If the crash-responsive EASY-EXIT feature is
triggered in an accident, the steering column
will move upwards when the driver's door is
opened. This occurs irrespective of the posi-
tion of the key in the ignition lock. This makes
it easier to exit the vehicle and rescue the
occupants. Steering wheel
107Seats, steering wheel and mirrors Z
Page 114 of 405
Calling up
astore dparking position set-
ting :
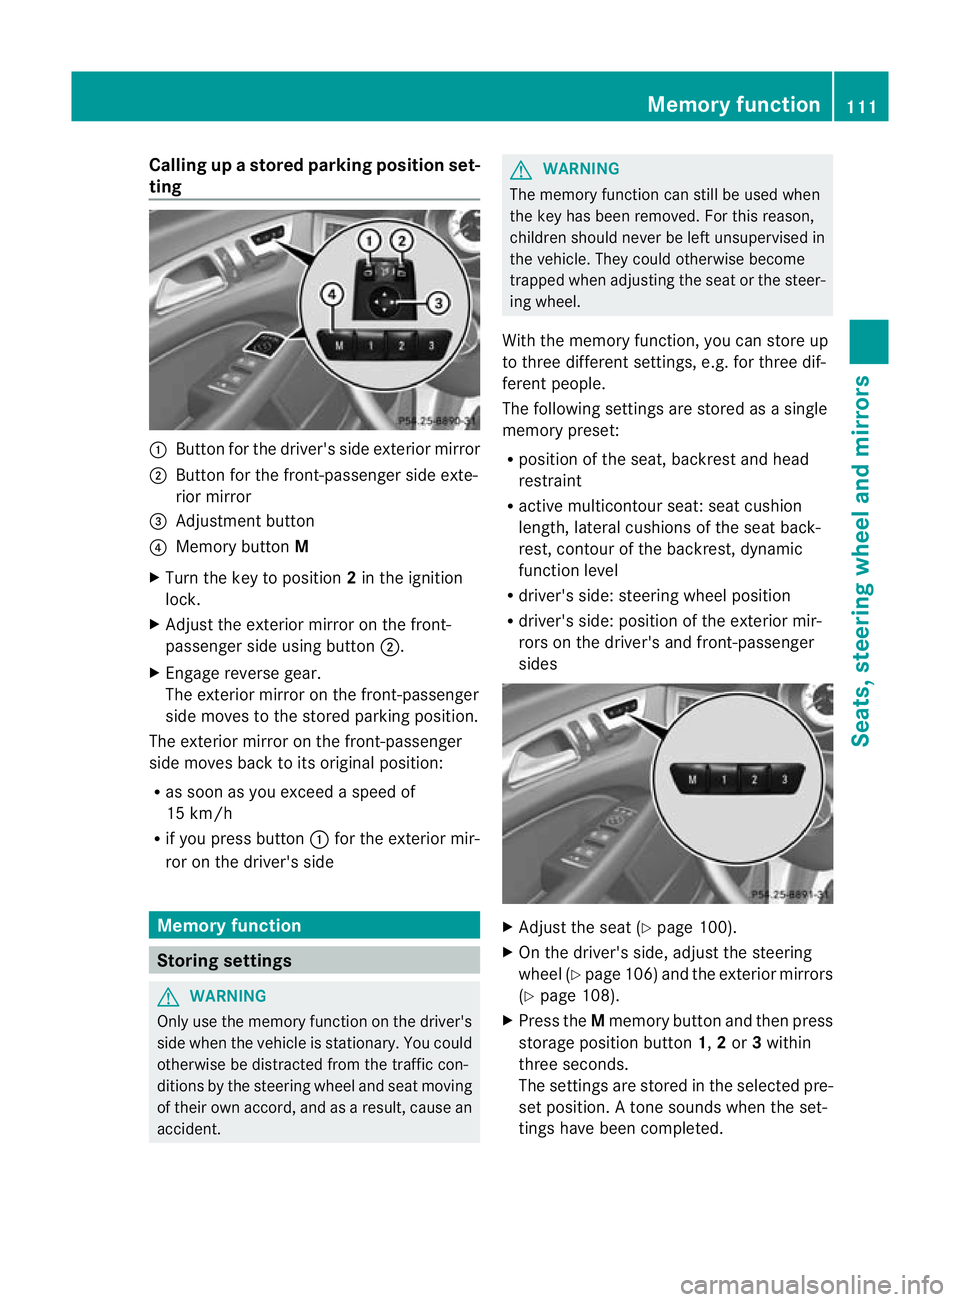
Button for the driver's side exterio rmirror
; Button for the front-passenger side exte-
rior mirror
= Adjustment button
? Memory button M
X Turn the key to position 2in the ignition
lock.
X Adjust the exterior mirror on the front-
passenger side using button ;.
X Engage reverse gear.
The exterior mirror on the front-passenger
side moves to the stored parking position.
The exterior mirror on the front-passenger
side moves back to its original position:
R as soon as you exceed a speed of
15 km/h
R if you press button :for the exterior mir-
ror on the driver's side Memory function
Storing settings
G
WARNING
Only use the memory function on the driver's
side when the vehicle is stationary. You could
otherwise be distracted from the traffic con-
ditions by the steering wheel and seat moving
of their own accord, and as a result, cause an
accident. G
WARNING
The memory function can still be used when
the key has been removed. For this reason,
children should never be left unsupervised in
the vehicle. They could otherwise become
trapped when adjusting the seat or the steer-
ing wheel.
With the memory function, you can store up
to three different settings, e.g. for three dif-
ferent people.
The following settings are stored as a single
memory preset:
R position of the seat, backrest and head
restraint
R active multicontour seat :seat cushion
length, lateral cushions of the seat back-
rest, contour of the backrest, dynamic
function level
R driver's side: steering wheel position
R driver's side: position of the exterior mir-
rors on the driver's and front-passenger
sides X
Adjust the seat (Y page 100).
X On the driver's side, adjust the steering
wheel (Y page 106)a nd the exterio rmirrors
(Y page 108).
X Press the Mmemory button and the npress
storage position button 1,2or 3within
three seconds.
The settings are stored in the selected pre-
set position. Atone sounds when the set-
tings have been completed. Memory function
111Seats, steering wheel and mirrors Z