2012 MERCEDES-BENZ CLS SHOOTING BRAKE child lock
[x] Cancel search: child lockPage 127 of 405
change them. Otherwise, you could be burned
if you touch them.
Keep bulbs ou
tofthe reach of children. Oth-
erwise, they could damage the bulbs, for
example, and injure themselves.
Never use a bulb which has been dropped.
Such a bulb may break or even explode and
injure you.
Halogen bulbs are pressurised and can
explode when you change them, particularly
if they are very hot. You should therefore wear
eye protection and gloves when you are
changing them.
There are bulbs other than xenon and LED
bulbs that you cannot replace. Replace only
the bulbs listed (Y page 124). Have the bulbs
that you cannot replace yourself changed at
a qualified specialist workshop.
If you require assistance changing bulbs, con-
sult a qualified specialist workshop.
Do not touch the glass tube of new bulbs with
your bare hands. Even minor contamination
can burn into the glass surface and reduce
the service life of the bulbs. Always use a lint-
free cloth or only touch the base of the bulb
when fitting.
Only use bulbs of the correct type.
If the new bulb still does not light up, consult
a qualified specialist workshop.
Bulbs and lamps are an important aspect of
vehicle safety. You must therefore make sure
that these function correctly at all times.
Have the headlamp setting checked regularly. Overview of bulb replacement
–bulbs
You can replace the following bulbs. The
details for the bulb type can be found in the
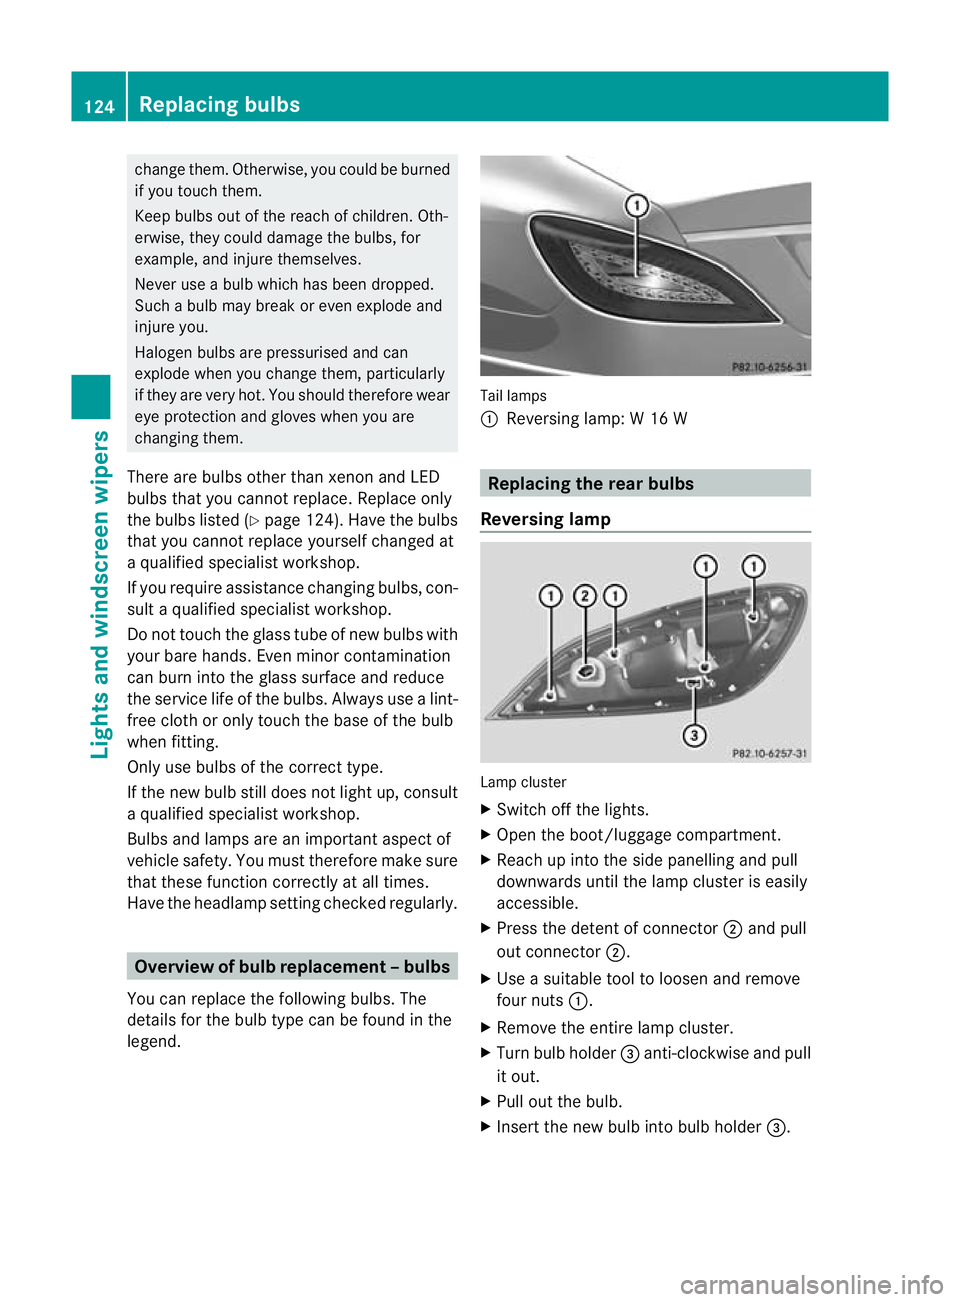
legend. Tail lamps
:
Reversing lamp: W 16 W Replacing the rear bulbs
Reversing lamp Lamp cluster
X
Switch off the lights.
X Open the boot/luggage compartment.
X Reach up into the side panelling and pull
downwards until the lamp cluster is easily
accessible.
X Press the detent of connector ;and pull
out connector ;.
X Use a suitable tool to loosen and remove
four nuts :.
X Remove the entire lamp cluster.
X Turn bulb holder =anti-clockwise and pull
it out.
X Pull out the bulb.
X Insert the new bulb into bulb holder =.124
Replacing bulbsLights and windscreen wipers
Page 152 of 405
sound of the engine may change during this
time.
Automatic transmission X
Shift the transmission to position P.
The transmission position displayint he
multifunction display shows P.
i You can also start the engine when the
transmission is in position N.
Starting procedure with the key i
To start the engine using the key instead
of KEYLESS-GO, pull the Start/Stop button
out of the ignition lock.
X To start a petrol engine: turn the key to
position 3in the ignition lock
(Y page 147) and release it as soon as the
engine is running.
X To startad iesel engine: turn the key to
position 2in the ignition lock
(Y page 147).
The % preglow indicator lamp in the
instrumen tcluster lights up.
X When the %preglow indicator lamp
goes out, tur nthe key to position
3(Y page 147) and release it as soon as the
engine is running.
i You can start the engine without preglow
if the engine is warm.
Using KEYLESS-GO to startt he engineG
WARNING
You rvehicle can be started using a valid KEY-
LESS-GO key. For this reason, children should
never be left unsupervised in the vehicle.
Always take the key with you when leaving the
vehicle, even if you are only leaving it for a
short time.
i The Start/Stop button can be used to
start the vehicle manually without inserting
the key into the ignition lock. The key must
be in the vehicle and the Start/Stop button must be inserted in the ignition lock. This
mode for starting the engine operates inde-
pendently of the ECO start/stop automatic
engine start function.
X Depress the brake pedal and keep it
depressed.
X To star tapetrol engine: press the Start/
Stop button (Y page 147) once.
The engine starts.
X To start adiesel engine: press the Start/
Stop button (Y page 147) once.
Preglow is activated and the engine starts. Pulling away
Automatic transmission G
WARNING
If the engine speed is above the idling speed
and you engage transmission position Dor
R, the vehicle could pull away suddenly. There
is a risk of an accident.
When engaging transmission position Dor R,
always firmly depress the brake pedal and do
not simultaneously accelerate.
X Depress the brake pedal and keep it
depressed.
X Shif tthe transmission to position Dor R.
X Release the parking brake (Y page 166).
X Release the brake pedal.
X Carefully depress the accelerator pedal.
i It is only possible to shift the transmission
from position Pto the desired position if
you depress the brake pedal. Only then is
the parking lock released.
i The vehicle locks centrally once you have
pulled away.T he locking knobs in the doors
drop down.
You can open the doors from the inside at
any time.
You can also deactivate the automatic lock-
ing feature (Y page 243). Driving
149Driving and parking Z
Page 168 of 405
Problem Possible causes/consequences and
M Solutions
The fuel filler flap can-
not be opened. The fuel filler flap is not unlocked.
or
The key battery is discharged.
X
Unlock the vehicle using the emergency key element
(Y page 78).
X Open the boot lid or the tailgate.
X CLS Coupé: open the boot lid.
or
X CLS Shooting Brake: open the tailgate.
X Manually unlock the fuel filler flap using the emergency release
(Y page 163). The fuel filler flap is unlocked, but the opening mechanism is jam-
med.
X
Consult a qualified specialist workshop. Parking
Important safety notes
G
WARNING
If flammable materials such as leaves, grass
or twigs are exposed to prolonged contact to
parts of the exhaust system that heat up, they
could ignite. There is a risk of fire.
Park the vehicle so that no flammable mate-
rials come into contact with parts of the vehi-
cle which are hot. Take particular care not to
park on dry grassland or harvested grain
fields. G
WARNING
If you switch off the ignition while driving,
safety-relevant functions are only available
with limitations, or not at all. This could affect,
for example, the power steering and the brake
boosting effect.Y ou will require considerably
more effort to steer and brake. There is a risk
of an accident.
Do not switch off the ignition while driving. G
WARNING
If you leave children unsupervised in the vehi-
cle, they could set it in motion by, for example:
R releasing the parking brake
R shifting the automatic transmission out of
the parking position P
R starting the engine.
They could also operate the vehicle's equip-
ment.T here is a risk of an accident and injury.
When leaving the vehicle, always take the key
with you and lock the vehicle. Never leave
children unsupervised in the vehicle.
! Am oving vehicle can lead to damage to
the vehicle or damage to the drive train.
To ensure that the vehicle is secured against
rolling away unintentionally:
R the parking brake must be applied.
R the transmission must be in position Pand
the key must be removed from the ignition
lock.
R on uphill or downhill gradients, the front
wheels must be turned towards the kerb. Parking
165Driving and parking Z
Page 169 of 405
Switching off the engine
Vehicles with automatic transmission X
Firmly depress the parking brake.
X All vehicles (except AMG vehicles): shift
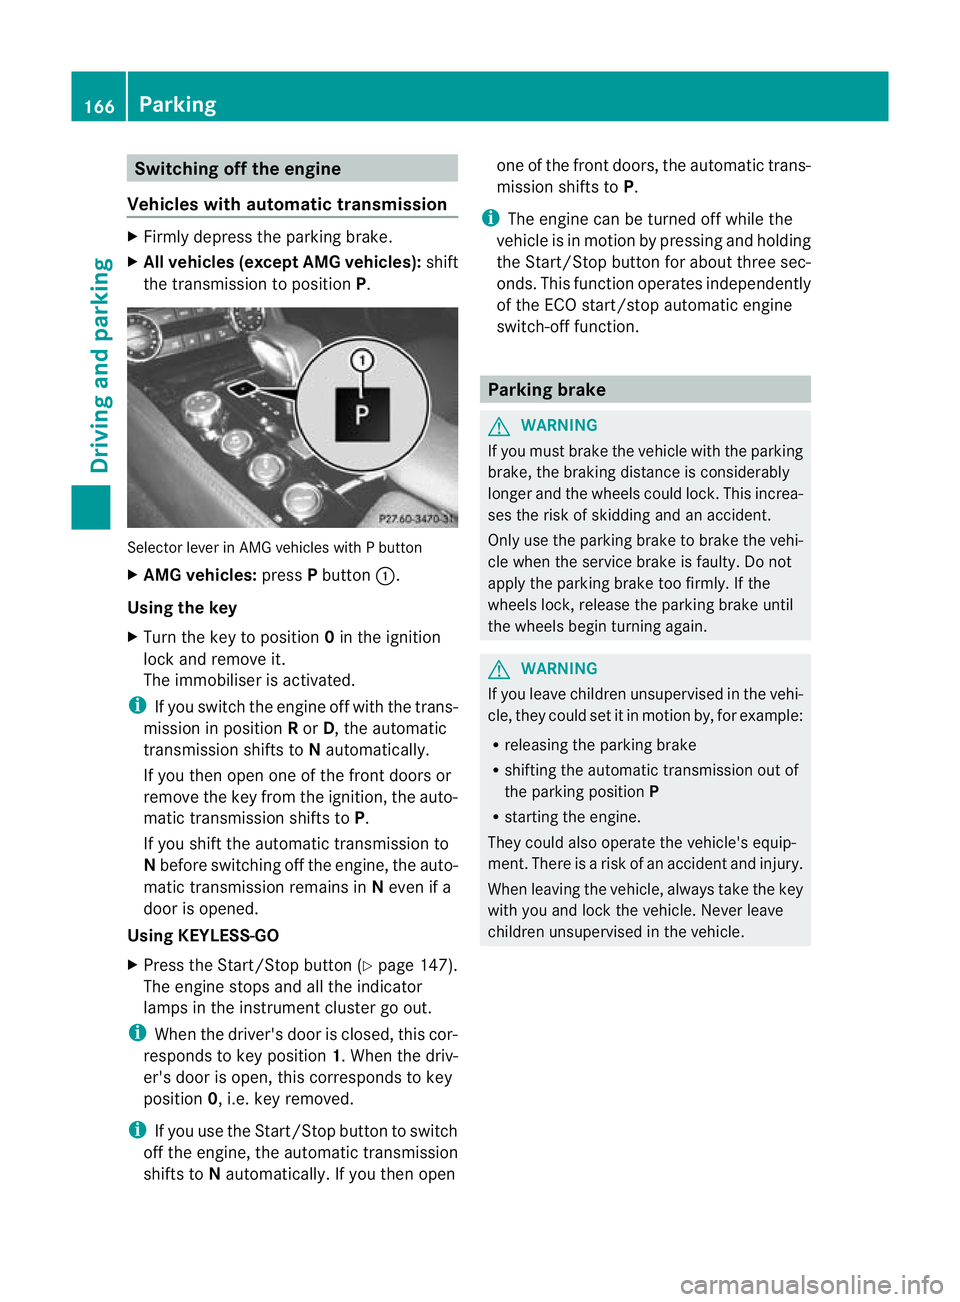
the transmission to position P.Selector lever in AMG vehicles with P button
X AMG vehicles: pressPbutton :.
Using the key
X Turn the key to position 0in the ignition
lock and remove it.
The immobiliser is activated.
i If you switch the engine off with the trans-
mission in position Ror D, the automatic
transmission shifts to Nautomatically.
If you then open one of the front doors or
remove the key from the ignition, the auto-
matic transmission shifts to P.
If you shift the automatic transmission to
N before switching off the engine, the auto-
matic transmission remains in Neven if a
door is opened.
Using KEYLESS-GO
X Press the Start/Stop button (Y page 147).
The engine stops and all the indicator
lamps in the instrumen tcluster go out.
i When the driver's door is closed, this cor-
responds to key position 1. When the driv-
er's door is open, this corresponds to key
position 0, i.e. key removed.
i If you use the Start/Stop button to switch
off the engine, the automatic transmission
shifts to Nautomatically. If you the nopen one of the fron
tdoors, the automatic trans-
mission shifts to P.
i The engine can be turned off while the
vehicle is in motion by pressing and holding
the Start/Stop button for about three sec-
onds. This function operates independently
of the ECO start/stop automatic engine
switch-off function. Parking brake
G
WARNING
If you must brake the vehicle with the parking
brake, the braking distance is considerably
longer and the wheels could lock. This increa-
ses the risk of skidding and an accident.
Only use the parking brake to brake the vehi-
cle when the service brake is faulty. Do not
apply the parking brake too firmly. If the
wheels lock, release the parking brake until
the wheels begin turning again. G
WARNING
If you leave children unsupervised in the vehi-
cle, they could set it in motion by, for example:
R releasing the parking brake
R shifting the automatic transmission out of
the parking position P
R starting the engine.
They could also operate the vehicle's equip-
ment.T here is a risk of an accident and injury.
When leaving the vehicle, always take the key
with you and lock the vehicle. Never leave
children unsupervised in the vehicle. 166
ParkingDriving and parking
Page 310 of 405
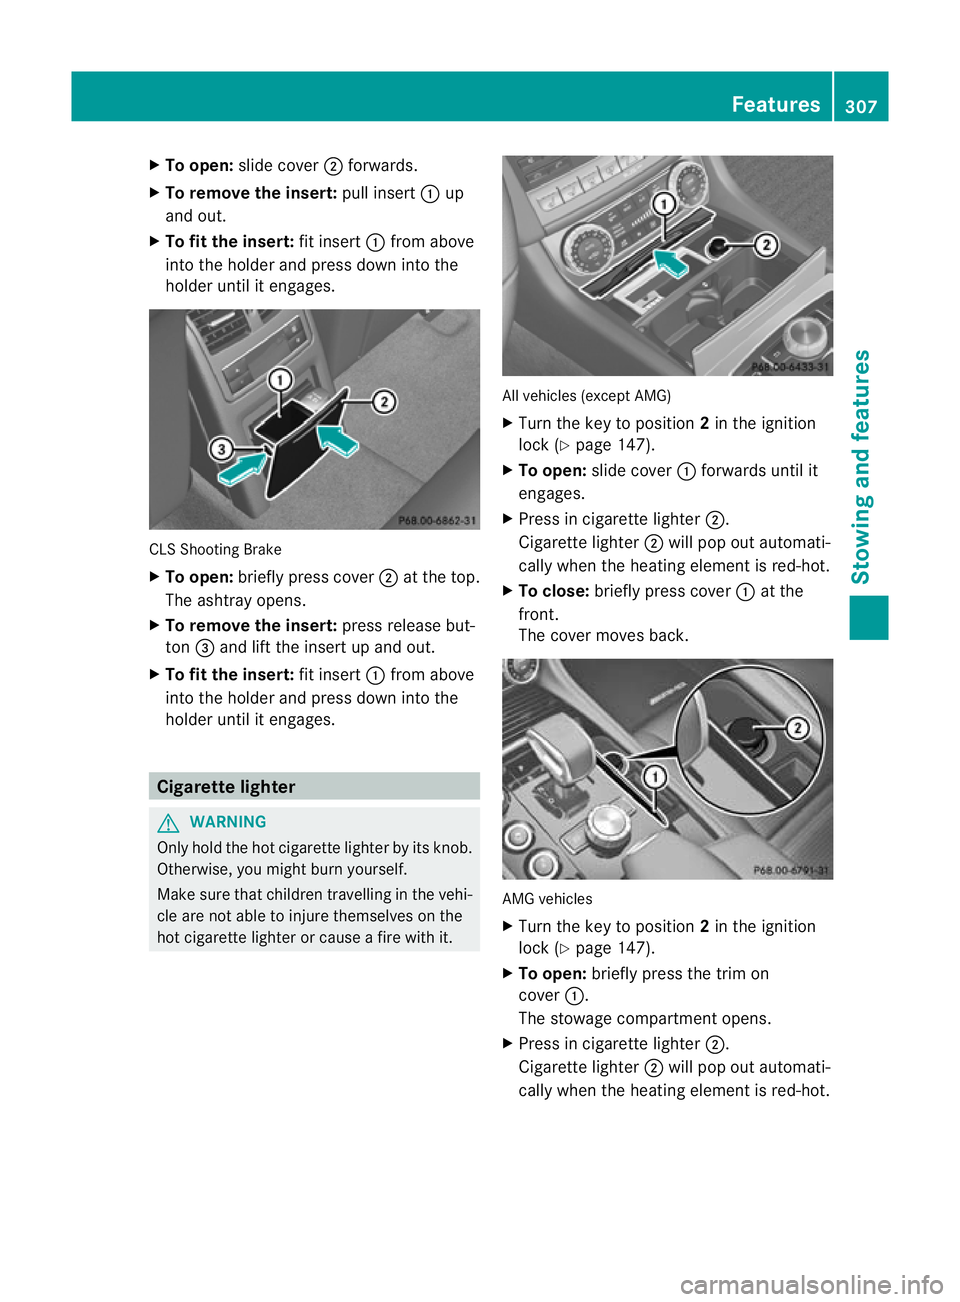
X
To open: slide cover ;forwards.
X To remove the insert: pull insert:up
and out.
X To fit the insert: fit insert:from above
into the holde rand press down into the
holde runtil it engages. CLS Shooting Brake
X
To open: briefly press cover ;at the top.
The ashtray opens.
X To remove the insert: press release but-
ton =and lift the insert up and out.
X To fit the insert: fit insert:from above
into the holde rand press down into the
holde runtil it engages. Cigarette lighter
G
WARNING
Only hold the hot cigarette lighte rby its knob.
Otherwise, you might burn yourself.
Make sure that children travelling in the vehi-
cle are no table to injure themselves on the
hot cigarette lighter or cause a fire with it. All vehicles (excep
tAMG)
X Turn the key to position 2in the ignition
lock (Y page 147).
X To open: slide cover :forwards until it
engages.
X Press in cigarette lighter ;.
Cigarette lighter ;will pop out automati-
cally when the heating element is red-hot.
X To close: briefly press cover :at the
front.
The cover moves back. AMG vehicles
X
Turn the key to position 2in the ignition
lock (Y page 147).
X To open: briefly press the trim on
cover :.
The stowage compartmento pens.
X Press in cigarette lighter ;.
Cigarette lighter ;will pop out automati-
cally when the heating element is red-hot. Features
307Stowing and features Z
Page 344 of 405
work on the battery carried out at a qualified
specialist workshop. G
WARNING
Work carried out incorrectly on the battery
can, for example, lead to a short circuit and
damage your vehicle's electroni csystem. This
can disrupt driving safet ysystems such as
ABS (anti-lock brakin gsystem) or ESP ®
(Elec-
tronic Stability Program).
R If ABS malfunctions, the wheels can lock
during braking. This limits the steerability
of the vehicle when braking and the braking
distance may increase .There is a risk of
accident.
R If ESP ®
malfunctions, the vehicle will not be
stabilised if it starts to skid or a wheel starts
to spin. There is a risk of accident.
You should therefore have all work involving
the battery carried out at a qualified specialist
workshop. G
WARNING
Electrostatic build-up can lead to the creation
of sparks, which could ignite the highly explo-
sive gases of a battery. There is a risk of an
explosion.
Before handling the battery, touch the vehicle
body to remove any existing electrostatic
build-up.
The highly flammable gas mixture is formed
when charging the battery or jump-starting.
Always make sure that neither you nor the
battery is electrostatically charged. For
example, electrostatic charge is caused by:
R wearing synthetic clothing.
R the friction of clothing on the seat.
R pulling or pushing the battery over carpets
or other synthetic materials.
R wiping the battery using a cloth. G
WARNING
During the charging process, a battery produ-
ces hydrogen gas. If a short circuit occurs or sparks are created, the hydrogen gas can
ignite. There is a risk of an explosion.
R
Make sure that the positive terminal of a
connected battery does not come into con-
tact with vehicle parts.
R Never place metal objectsort ools on a bat-
tery.
R It is important that you observe the descri-
bed order of the battery terminals when
connecting and disconnecting a battery.
R When jump-starting, make sure that the
battery poles with identical polarity are
connected.
R It is particularly important to observe the
described order when connecting and dis-
connecting the jump leads.
R Never connect or disconnect the battery
terminals while the engine is running. G
WARNING
Battery acid is caustic. There is a risk of injury.
Avoid contact with the skin, eyes or clothing.
Do not inhale any battery gases. Do not lean
over the battery. Keep children away from
batteries. Wash battery acid immediately with
water and seek medical attention. H
Environmental note Batteries contain pollutants.
It is illegal to dispose of them
with the household rubbish.
They must be collected sep-
arately and disposed of in an
environmentally responsible
recycling system.
Dispose of batteries in an
environmentally responsible
manner
.Take discharged
batteries to a qualified spe-
cialis tworkshop or to a col-
lection point for used batter-
ies.
! Have the battery checked regularly at a
qualified specialist workshop. Battery (vehicle)
341Breakdown assistance Z
Page 345 of 405
Observe the service intervals in the Service
Booklet or contact a qualified specialist
workshop for more information.
! You should have all work involving the
battery carried out at aqualified specialist
workshop. In the exceptional case that it is
necessary for you to disconnect the battery
yourself, make sure that:
R you switch off the engine and remove the
key. On vehicles with KEYLESS-GO,
ensure that the ignition is switched off.
Chec kthat all the indicator lamps in the
instrument cluster are off. Otherwise,
electronic components, such as the
alternator, may be damaged.
R you first remove the negative terminal
clamp and then the positive terminal
clamp. Never swap the terminal clamps.
Otherwise, the vehicle's electronic sys-
tem may be damaged.
R in vehicles with automatic transmission,
the transmission is locked in position P
after disconnecting the battery. The vehi-
cle is secured against rolling away.Y ou
can then no longer move the vehicle.
The battery and the cover of the positive
terminal clamp must be fitted securely dur-
ing operation.
Comply with safety precautions and take pro-
tective measures when handling batteries. WARNING
Fire, naked flames and smoking
are prohibited when handling the
battery. Avoid creating sparks.
Battery acid is caustic. Avoid con-
tact with the skin, eyes or clothing.
Wear suitable protective clothing,
in particular gloves, an apron and
a face mask.
Immediately rinse acid splashes
off with clean water. Consult a doc-
tor if necessary. Wear eye protection.
Keep children away.
Observe this Owner's Manual.
For safety reasons, Mercedes-Benz recom-
mends that you only use batteries which have
been tested and approved for your vehicle by
Mercedes-Benz. These batteries provide
increased impact protection to prevent vehi-
cle occupants from suffering acid burns
should the battery be damaged in the event
of an accident.
In order for the battery to achieve the maxi-
mum possible service life, it must always be
sufficiently charged.
The vehicle battery, like other batteries, can
discharge over time if you do not use the
vehicle. In such cases, have the battery dis-
connected at a qualified specialist workshop.
You can also charge the battery with a
charger recommended by Mercedes-Benz.
For more information, please contact a quali-
fied specialist workshop.
Have the battery charge checked more fre-
quently if you use the vehicle mainly for short
trips or if you leave it standing idle for a
lengthy period. Consult a qualified specialist
workshop if you wish to leave your vehicle
parked up for a long period of time.
i When you park the vehicle, remove the
key if you do not require any electrical con-
sumers. The vehicle will then use very little
energy, thus conserving battery power.
i If the power supply has been interrupted,
e.g. if the battery was discharged, you will
have to:
R set the clock. Information on setting the
clock can be found in the separate oper-
ating instructions. 342
Battery (vehicle)Breakdown assistance
Page 346 of 405
On vehicles with COMAND Online and a
navigation system, the clock is set auto-
matically.
R reset the function for folding the exterior
mirrors in/out automatically, by folding
the mirrors out once (Y page 109).Charging the battery
G
WARNING
During charging and jump-starting, explosive
gases can escape from the battery. There is a
risk of an explosion.
Particularly avoid fire, naked flames, creating
sparks and smoking. Ensure there is sufficient
ventilation while charging and jump-starting.
Do not lean over a battery. G
WARNING
Battery acid is caustic. There is a risk of injury.
Avoid contact with the skin, eyes or clothing.
Do not inhale any battery gases. Do not lean
over the battery. Keep children away from
batteries. Wash battery acid immediately with
water and seek medical attention. G
WARNING
A discharged battery can freeze at tempera-
tures below freezing point. When jump-start-
ing the vehicle or charging the battery, gases
can escape from the battery. There is a risk of
an explosion.
Allow the frozen battery to thaw out before
charging it or jump-starting.
! Only use battery chargers with a maxi-
mum charging voltage of 14.8 V.
! Only charge the battery using the jump-
start connection point.
The jump-starting connection point is in the
engine compartment (Y page 344).
If, at low temperatures, the indicator lamps/
warning lamps in the instrument cluster do
not light up, it is highly likely that the dis-
charged battery has frozen. In this case, you may neither charge the battery nor jump-start
the vehicle. The service life of a thawed-out
battery may be shorter. Starting characteris-
tics are particularly impaired at low tempera-
tures. Have the thawed-out battery checked
at a qualified specialist workshop.
Never charge a battery which is still fitted in
the vehicle unless a Mercedes-Benz approved
battery charger is being used.
Abattery
charge runit specially adapted for Mercedes-
Benz vehicles and tested and approved by
Mercedes-Benz is available as an accessory.
It permits the charging of the battery in its
installed position. Contact a Mercedes-Benz
Service Centre for informatio nand availabil-
ity .R ead the battery charger's operating
instructions before chargin gthe battery.
X Open the bonnet (Y page 320).
X Connect the battery charger to the positive
terminal and earth point in the same order
as when connecting the donor battery in
the jump-starting procedure
(Y page 344). Battery (vehicle)
343Breakdown assistance Z