2012 MERCEDES-BENZ CLS COUPE battery
[x] Cancel search: batteryPage 229 of 373
!
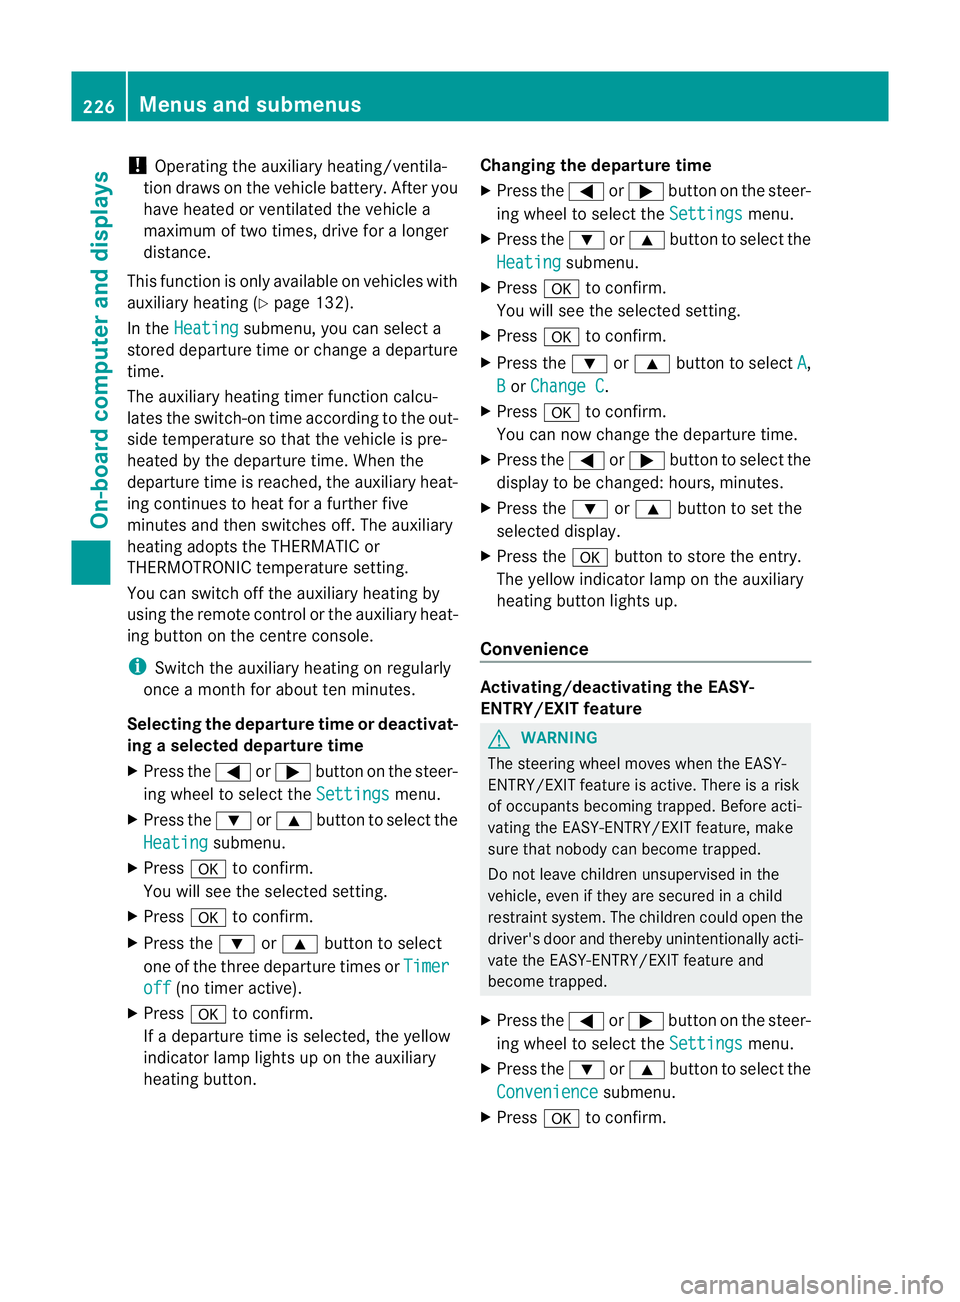
Operating the auxiliary heating/ventila-
tion draws on the vehicle battery. After you
have heated or ventilated the vehicle a
maximum of two times, drive for alonger
distance.
This function is only available on vehicles with
auxiliary heating (Y page 132).
In the Heating submenu, you can select a
stored departure time or change adeparture
time.
The auxiliary heating timer function calcu-
lates the switch-on time according to the out-
side temperature so that the vehicle is pre-
heated by the departure time. When the
departure time is reached, the auxiliary heat-
ing continues to heat for afurther five
minutes and then switches off. The auxiliary
heating adopts the THERMATIC or
THERMOTRONIC temperature setting.
You can switch off the auxiliary heating by
using the remote control or the auxiliary heat-
ing button on the centre console.
i Switch the auxiliary heating on regularly
once amonth for aboutt en minutes.
Selecting the departure time or deactivat-
ing aselected departure time
X Press the =or; button on the steer-
ing wheel to select the Settings menu.
X Press the :or9 button to select the
Heating submenu.
X Press ato confirm.
You will see the selected setting.
X Press ato confirm.
X Press the :or9 button to select
one of the three departure times or Timeroff (no timer active).
X Press ato confirm.
If ad eparture time is selected, the yellow
indicator lamp lights up on the auxiliary
heating button. Changing the departure time
X
Press the =or; button on the steer-
ing wheel to select the Settings menu.
X Press the :or9 button to select the
Heating submenu.
X Press ato confirm.
You will see the selected setting.
X Press ato confirm.
X Press the :or9 button to select A ,
B or
Change C .
X Press ato confirm.
You can now change the departure time.
X Press the =or; button to select the
displaytobec hanged: hours, minutes.
X Press the :or9 button to set the
selected display.
X Press the abutton to store the entry.
The yellow indicator lamp on the auxiliary
heating button lights up.
Convenience Activating/deactivating the EASY-
ENTRY/EXIT feature
G
WARNING
The steering wheel moves when the EASY-
ENTRY/EXIT feature is active. There is arisk
of occupants becoming trapped. Before acti-
vating the EASY-ENTRY/EXIT feature, make
sure that nobody can become trapped.
Do not leave children unsupervised in the
vehicle, even if they are secured in achild
restraint system. The children could open the
driver's door and thereby unintentionally acti-
vate the EASY-ENTRY/EXIT feature and
become trapped.
X Press the =or; button on the steer-
ing wheel to select the Settings menu.
X Press the :or9 button to select the
Convenience submenu.
X Press ato confirm. 226
Menus and submenusOn-board computer and displays
Page 245 of 373
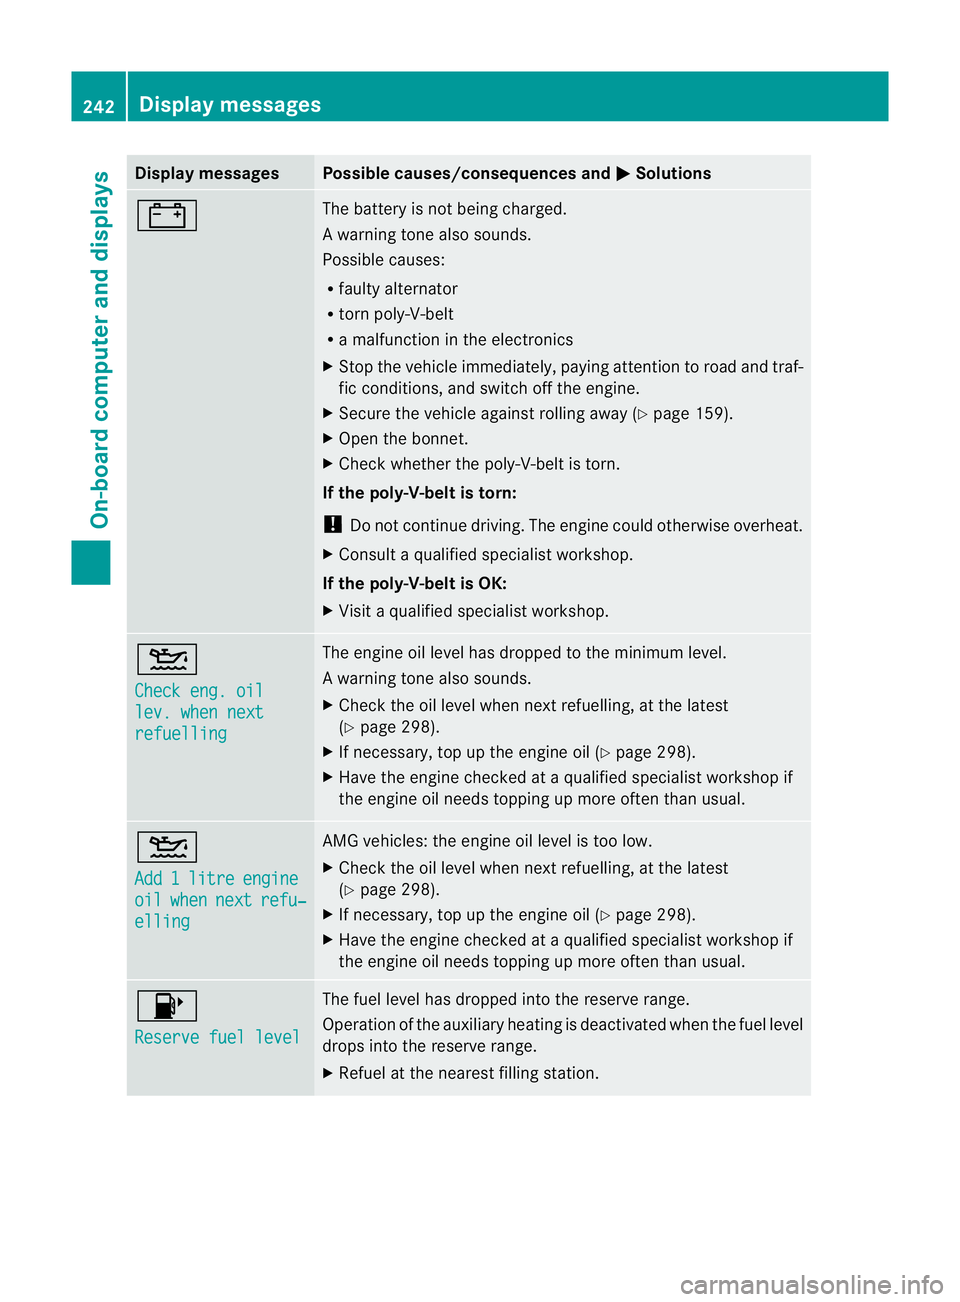
Display messages Possible causes/consequences and
M Solutions
# The battery is no
tbeing charged.
Aw arning tone also sounds.
Possible causes:
R fault yalternator
R torn poly-V-belt
R am alfunctio nintheelectronics
X Stop th evehicle immediately, payin gattentio ntoroad and traf-
fic conditions, and switch off the engine.
X Secure the vehicle against rolling away (Y page 159).
X Open the bonnet.
X Check whether the poly-V-belt is torn.
If the poly-V-belt is torn:
! Do not continue driving. The engine could otherwise overheat.
X Consult aqualified specialist workshop.
If the poly-V-belt is OK:
X Visit aqualified specialist workshop. 4
Check eng. oil
lev. when next
refuelling The engine oil level has dropped to the minimum level.
Aw
arning tone also sounds.
X Chec kthe oil level when next refuelling, at the latest
(Y page 298).
X If necessary, top up the engine oil (Y page 298).
X Have the engine checked at aqualified specialist workshop if
the engine oil needs topping up more often than usual. 4
Add
1 litre engine
oil when next refu‐
elling AMG vehicles: the engine oil level is too low.
X
Check the oil level when next refuelling, at the latest
(Y page 298).
X If necessary, top up the engine oil (Y page 298).
X Have the engine checked at aqualified specialist workshop if
the engine oil needs topping up more often than usual. 8
Reserve fuel level The fuel level has dropped into the reserve range.
Operation of the auxiliary heating is deactivated when the fuel level
drops into the reserve range.
X
Refuel at the nearest filling station. 242
Display messagesOn-board computer and displays
Page 257 of 373
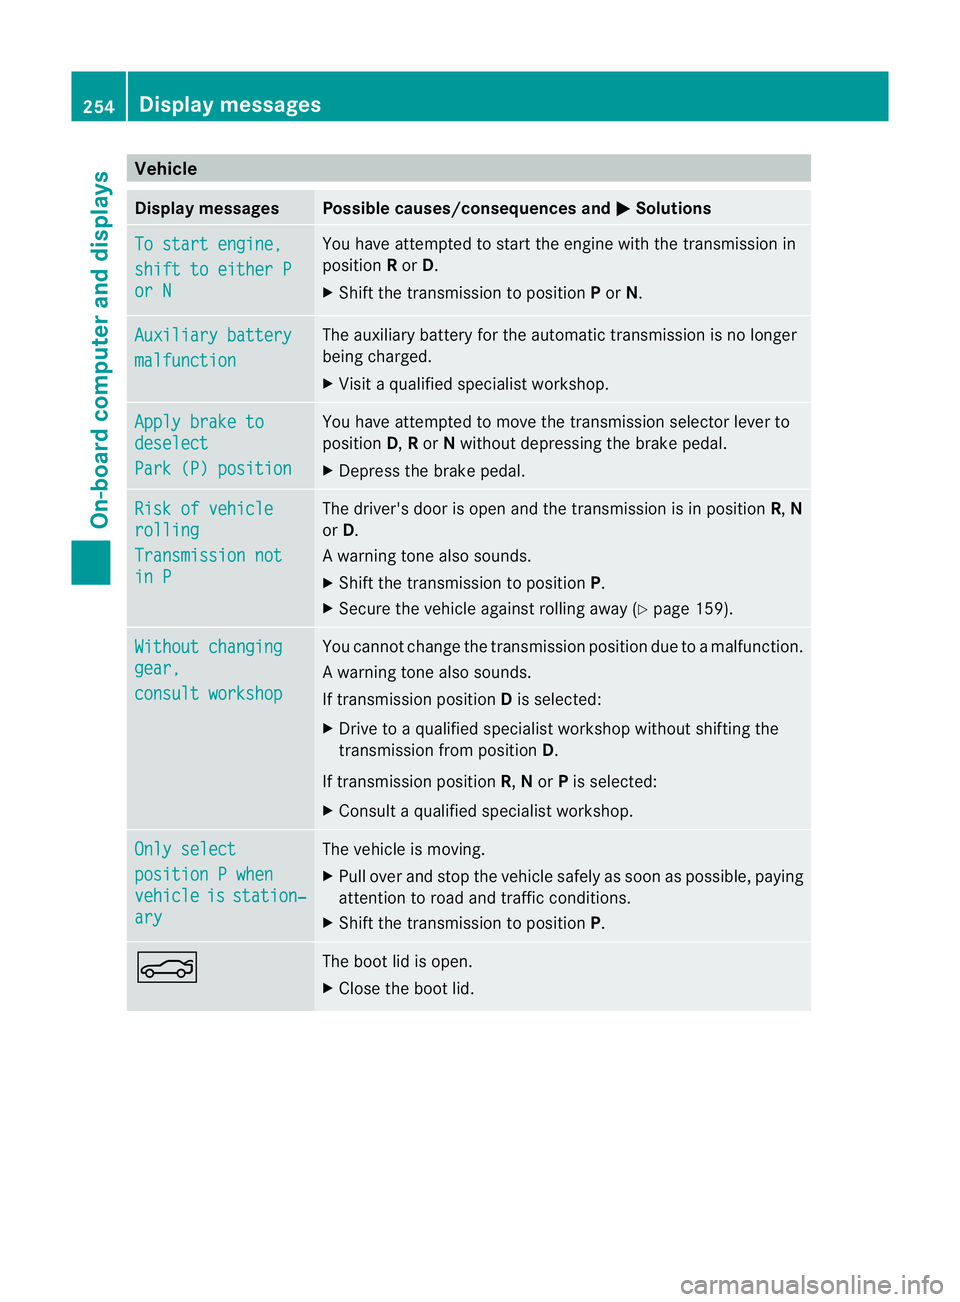
Vehicle
Display messages Possible causes/consequences and
M Solutions
To start engine,
shift to either P
or N Yo
uh avea ttempte dtostart the engine with the transmission in
position Ror D.
X Shift the transmission to position Por N. Auxiliary battery
malfunction The auxiliary battery for the automatic transmission is no longer
being charged.
X
Visit aquali fied specialist workshop. Apply brake to
deselect
Par
k(P) position Yo
uh avea ttempte dtomove the transmission selector lever to
position D,Ror Nwithou tdepressing the brake pedal.
X Depress the brake pedal. Risk of vehicle
rolling
Transmission not
in P The driver's door is open and the transmission is in position
R,N
or D.
Aw arning tone also sounds.
X Shift th etransmission to position P.
X Secure th evehicle against rolling away ( Ypage 159). Withou
tchanging gear,
consul
tworkshop You canno
tchange the transmission position due to amalfunction.
Aw arning tone also sounds.
If transmission position Dis selected:
X Drive to aqualified specialist worksho pwithout shiftin gthe
transmission from position D.
If transmission position R,Nor Pis selected:
X Consult aqualified specialist workshop. Onl
ys elect position
Pwhen vehicle is station‐
ary The vehicle is moving.
X
Pull ove rand stop the vehicl esafelyass oonasp ossible,p aying
attention to road and traffic conditions.
X Shift the transmission to position P.N The boot lid is open.
X
Close the boot lid. 254
Display messagesOn-board computer and displays
Page 258 of 373
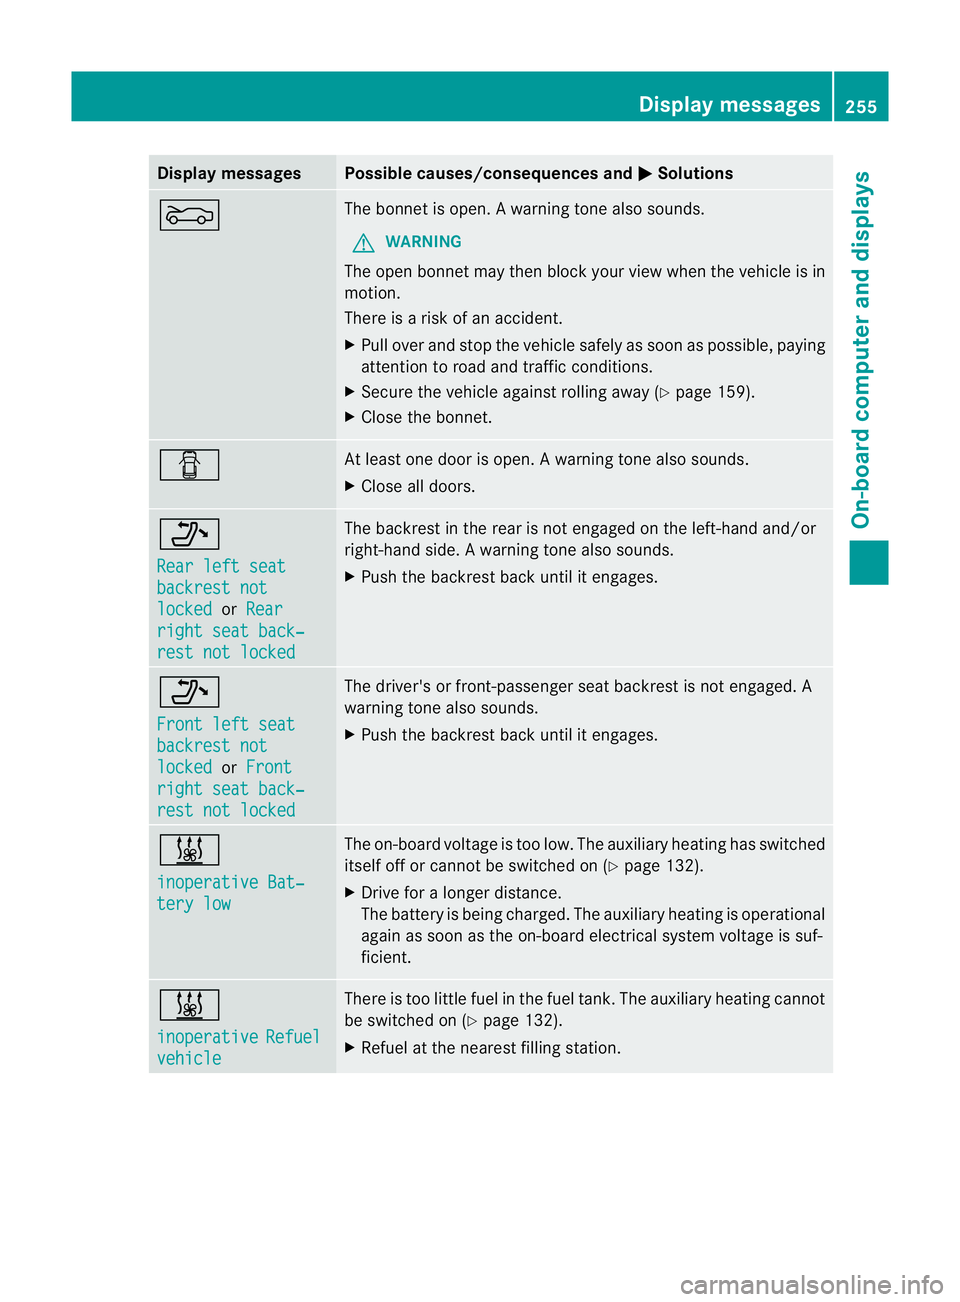
Display messages Possible causes/consequences and
M Solutions
M The bonne
tisopen. Awarning tone also sounds.
G WARNING
The open bonne tmay then bloc kyour view when the vehicle is in
motion.
There is arisk of an accident.
X Pull over and stop the vehicle safely as soon as possible, paying
attention to road and traffic conditions.
X Secure the vehicle against rolling away (Y page 159).
X Close the bonnet. C At least one door is open.
Awarning tone also sounds.
X Close all doors. _
Rea
rl efts eat backrest not
locked or
Rear right sea
tback‐ res
tn ot locked The backres
tinthe rear is not engaged on the left-hand and/or
right-hand side. Awarning tone also sounds.
X Push th ebackres tback until it engages. _
Front lef
tseat backrest not
locked or
Front right sea
tback‐ res
tn ot locked The driver'
sorfront-pa ssenger seat backres tisnot engaged. A
warning tone also sounds.
X Push the backrest back until it engages. &
inoperative Bat‐
tery low The on-board voltage is too low. The auxiliary heating has switched
itself off or cannot be switched on (Y
page 132).
X Drive for alonger distance.
The battery is being charged. The auxiliary heating is operational
againass oon as the on-board electrical system voltage is suf-
ficient. &
inoperative
Refuel
vehicle There is too little fuel in the fuel tank. The auxiliary heating cannot
be switched on (Y
page 132).
X Refuel at the nearest filling station. Display messages
255On-board computer and displays Z
Page 286 of 373
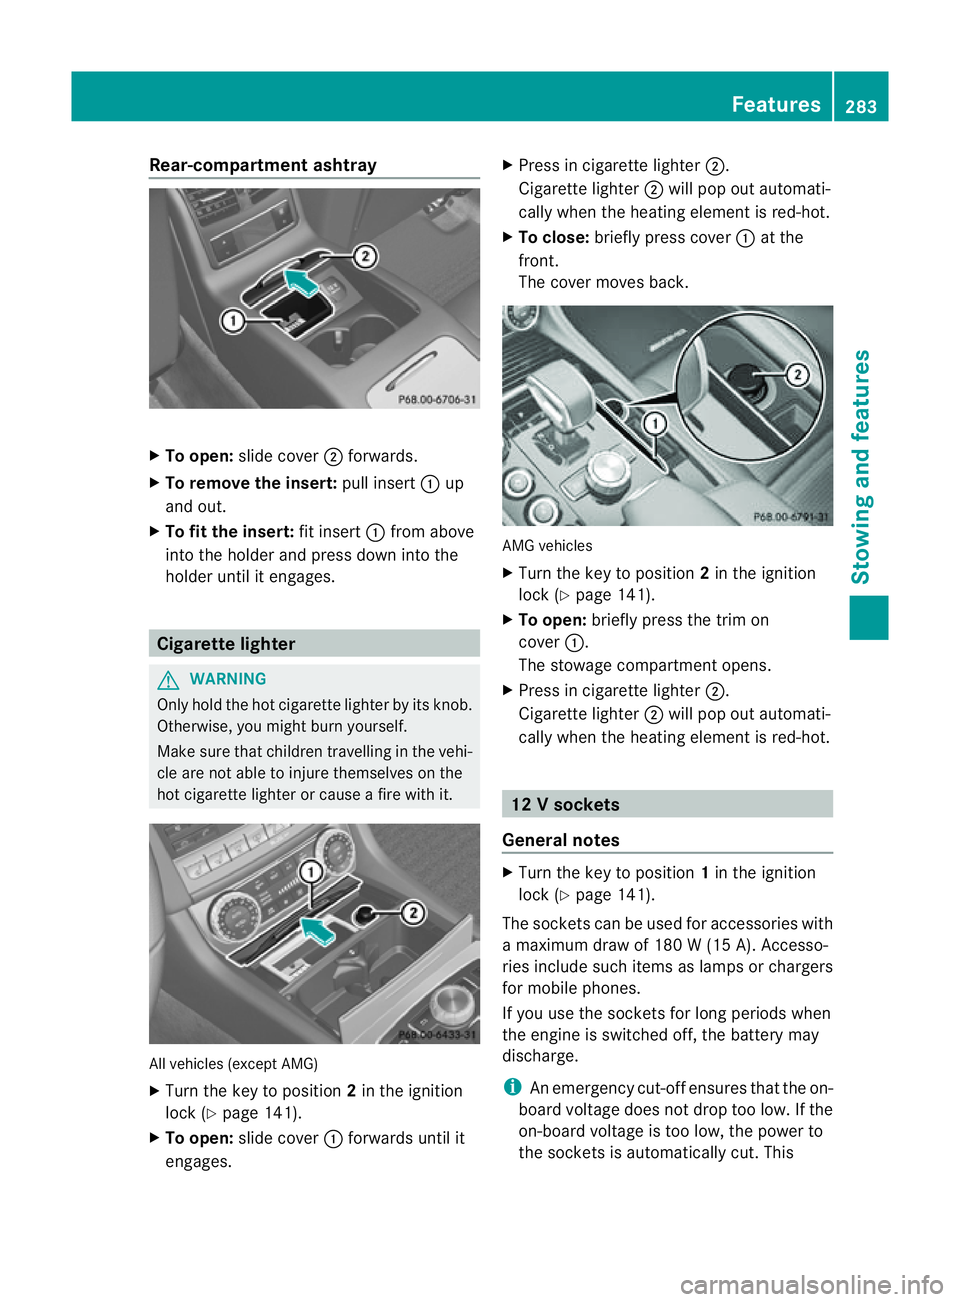
Rear-compartmen
tashtray X
To open: slide cover ;forwards.
X To remove the insert: pull insert:up
and out.
X To fit the insert: fit insert:from above
into the holder and press dow ninto the
holde runtil it engages. Cigarette lighter
G
WARNING
Onl yholdt he hot cigarette lighte rbyitsknob.
Otherwise ,you might burn yourself.
Mak esuret hatc hildren travellin ginthevehi-
cle are no table to injure themselves on the
hot cigarette lighter or cause afire with it. All vehicles (excep
tAMG)
X Turn the key to position 2in the ignition
lock (Y page 141).
X To open: slide cover :forwards until it
engages. X
Press in cigarette lighter ;.
Cigarette lighter ;will pop out automati-
cally when the heating element is red-hot.
X To close: briefly press cover :at the
front.
The cover moves back. AMG vehicles
X
Turn the key to position 2in the ignition
lock (Y page 141).
X To open: briefly press the trim on
cover :.
The stowage compartmento pens.
X Press in cigarette lighter ;.
Cigarett elighter ;will pop out automati-
cally when the heatin gelement is red-hot. 12
Vsockets
General notes X
Turn th ekey to position 1in th eignition
lock (Y page 141).
The socket scan be used for accessories with
am aximum draw of 18 0W(15 A). Accesso-
ries include such items as lamps or chargers
for mobil ephones.
If you use th esocket sfor lon gperiods when
th ee ngine is switche doff,t he battery may
discharge.
i An emergency cut-offe nsures thatthe on-
board voltage does not drop too low. If the
on-board voltage is too low, the power to
the socketsisa utomatically cut. This Features
283Stowing and features Z
Page 303 of 373
The washer fluid reservoir is used for both the
windscreen washer system and the headlamp
cleaning system.
Further information on windscreen washer
fluid/antifreeze (Y page 366).Service
ASSYST PLUS
Service messages The ASSYST PLUS service interval display
inform syou of the next service due date.
Information on the type of service and service
intervals (see separate Servic eBooklet).
You can obtain further information from a
Mercedes-Benz Servic eCentre.
i The ASSYST PLUS service interval display
does not show any information on the
engine oil level. Observe the notes on the
engine oil level (Y page 297).
The multifunction display shows aservice
message for afew seconds, e.g.:
Next service Ain..days Service
Adue Service
Aoverdue by ... days The letter indicates which service is due.
Astands for
aminor service and B for
am ajor
service. Anumber or another letter may be
displayed after the letter .This figure indicates
any necessary additional maintenancew ork
to be performed.
If you notify aqualified specialist workshop of
this display, you will receive astatementon
the associated costs.
Th eA SSYS TPLUSs ervice interval display
does not take intoa ccountany periods of
time during which the battery is disconnec-
ted. Maintaining the time-dependent service
schedule:
X Note down the servic eduedate displayed
in the multifunctio ndisplay befor ediscon-
nectin gthe battery.
or
X After reconnecting the battery, subtract
the battery disconnection periods fro mthe
service date shown on the display.
Hiding aservice message X
Pres sthe % ora button on th esteer-
ing wheel.
Displaying service messages X
Switch th eignitio non.
X Press the =or; button on the steer-
ing whee ltoselect the Serv. menu.
X Press the 9or: button to select the
ASSYST PLUS submenu and confirm with
a.
The servic eduedate appear sinthe multi-
functio ndisplay.
Information about Service Resetting th
eASSYST PLUS service inter-
val display
! If the ASSYS TPLUS service interval dis-
play has been inadvertently reset ,this set-
tin gc an be corrected at aqualified special-
ist workshop.
Have service work carried out as described
in the Servic eBooklet. This may otherwise
lead to increased wear and damage to the
major assemblies or the vehicle.
Aq ualified specialist workshop, e.g. a
Mercedes-Ben zService Centre, will reset the
ASSYST PLUS servic einterval display after
the servic ework has been carried out. You
can also obtain further information on main-
tenance work, for example. 300
ServiceMaintenance and care
Page 305 of 373
R
Vehicles with akey:
do not remove the key from the ignition
lock. Do not open the driver's door or
front-passenger door when the engine is
switched off. Otherwise, the automatic
transmission selects park position P
automatically and locks the wheels. You
can prevent this by shifting the auto-
matic transmission to Nbeforehand.
R Vehicles with KEYLESS-GO:
do not open the driver's door or front-
passenger door when the engine is
switched off. Otherwise, the automatic
transmission selects park position P
automatically and locks the wheels.
Observe the following to make sure that the
automatic transmission stays in position N:
X Make sure the vehicle is stationary and the
ignition is switched off.
X Turn the key to position 2(Ypage 141) in
the ignition lock.
Use the key instead of the Start/Stop but-
ton on vehicles with KEYLESS-GO.
X Depress and hold the brake pedal.
X Shift the automatic transmission to posi-
tion N.
X Release the brake pedal.
X Release the electric parking brake.
X Switch off the ignition and leave the key in
the ignition lock.
You can wash the vehicle in an automatic car
wash from the very start.
Wash off excess dirt before cleaning the vehi-
cle in an automatic car wash.
After using an automatic car wash, wipe off
wax from the windscreen and the wiper
blades. This will prevent smears and reduce
wiping noises caused by residueont he wind-
screen.
Washing by hand In some countries, washing by hand is only
allowed at specially equipped washing bays. Observe the legal requirements for each indi-
vidual country.
X Do not use hot water and do not wash the
vehicle in direct sunlight.
X Use asoft sponge to clean.
X Use amild cleaning agent, such as acar
shampoo approved by Mercedes-Benz.
X Thoroughly hose down the vehicle with a
gentle jet of water.
X Do not point the water jet directly towards
the air inlet.
X Use plenty of water and rinse out the
sponge frequently.
X Rinse the vehicle with clean water and dry
thoroughly with achamois.
X Do not let the cleaning agent dry on the
paintwork.
When using the vehicle in winter, remove all
traces of road salt deposits carefully and as
soon as possible.
High-pressure cleaninge quipment G
WARNING
Do not use high-pressure cleaners with circu-
lar-jet nozzles (dirt grinders) to clean your
vehicle, in particular the tyres. You could oth-
erwise damage the tyres and cause an acci-
dent.
! Always maintain adistance of at least
30 cm between the vehicle and the high-
pressure cleaner nozzle. Information about
the correct distance is available from the
equipment manufacturer.
Move the high-pressure cleaner nozzle
around when cleaning your vehicle.
Do not aim directly at any of the following:
R tyres
R door gaps, roof gaps, jointse tc.
R electrical components
R battery
R connectors
R lights 302
CareMaintenance and care
Page 319 of 373
icantly impair the vehicle's braking and driv-
ing characteristics. There is
arisk of accident.
Do not continue driving. Contact aqualified
specialist workshop.
X Correc tthe tyre pressure if it is still at least
130 kPa (1.3 bar/19 psi) (see the fuel filler
flap for values).
X To increase the tyre pressure: switch on
the tyre inflation compressor. X
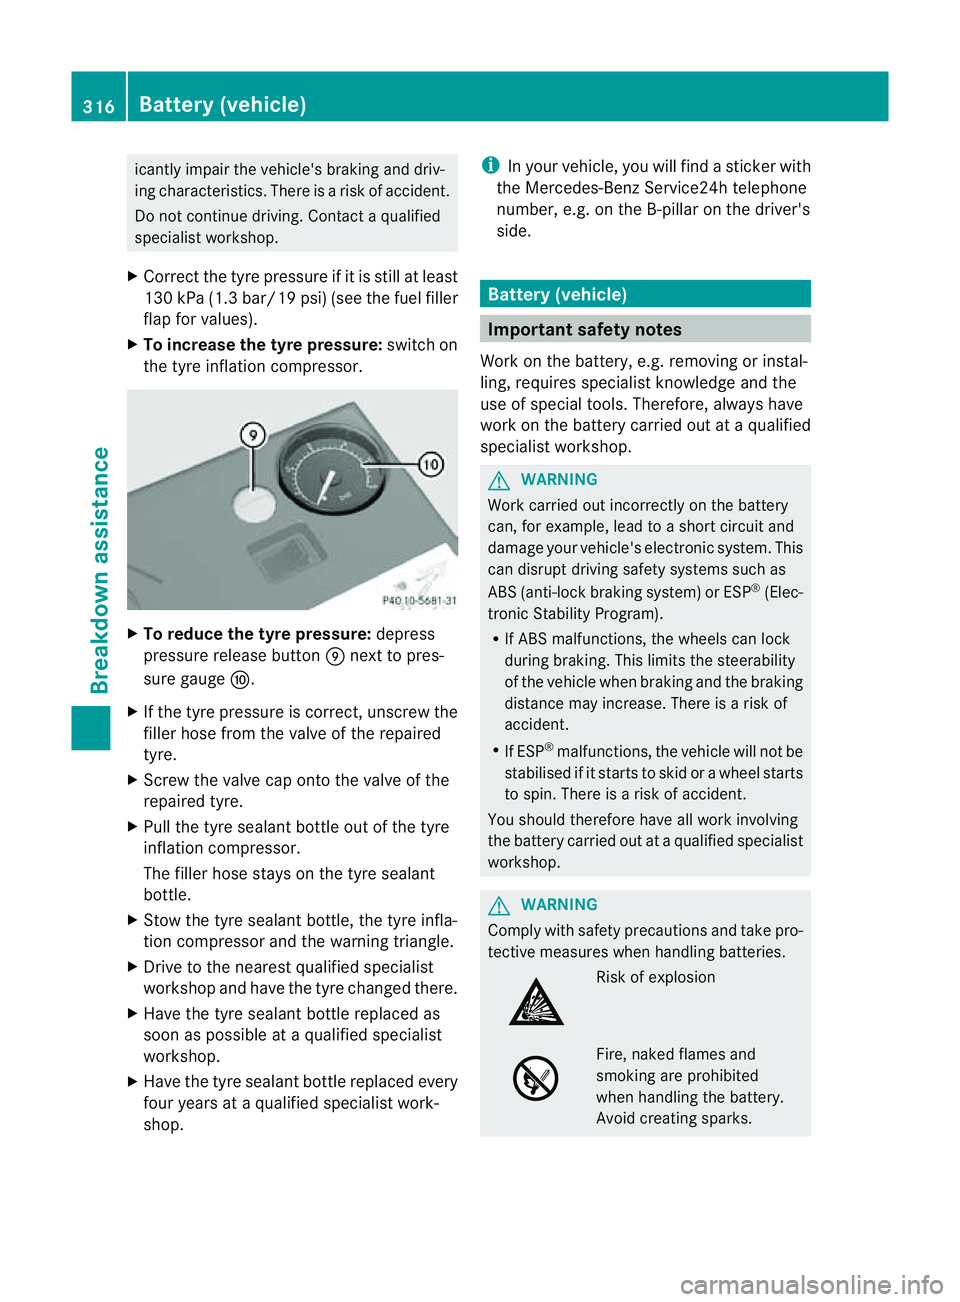
To reduce the tyre pressure: depress
pressure release button Enext to pres-
sure gauge F.
X If the tyre pressure is correct,u nscrew the
filler hose from the valve of the repaired
tyre.
X Screw the valve cap onto the valve of the
repaired tyre.
X Pull the tyre sealant bottle out of the tyre
inflation compressor.
The filler hose stays on the tyre sealant
bottle.
X Stow the tyre sealant bottle, the tyre infla-
tion compressor and the warning triangle.
X Drive to the nearest qualified specialist
workshop and have the tyre changed there.
X Have the tyre sealant bottle replaced as
soon as possible at aqualified specialist
workshop.
X Have the tyre sealant bottle replaced every
four years at aqualified specialist work-
shop. i
In your vehicle, you will find asticker with
the Mercedes-Ben zService24h telephone
number, e.g. on the B-pillar on the driver's
side. Battery (vehicle)
Important safet
ynotes
Work on the battery, e.g. removin gorinstal-
ling, requires specialist knowledge and the
use of special tools. Therefore, alway shave
work on the batter ycarried out at aqualified
specialist workshop. G
WARNING
Work carried out incorrectly on the battery
can, for example, lead to ashort circuit and
damage your vehicle's electronic system. This
can disrupt driving safety systems such as
ABS (anti-lock brakin gsystem) or ESP ®
(Elec-
tronic Stabilit yProgram).
R If AB Smalfunctions, th ewheels can lock
during braking. This limits th esteerability
of th evehicl ewhen brakin gand th ebraking
distanc emay increase .There is arisk of
accident.
R If ESP ®
malfunctions, the vehicle will not be
stabilised if it starts to skid or awheel starts
to spin. There is arisk of accident.
You should therefore have all work involving
the battery carried out at aqualified specialist
workshop. G
WARNING
Comply with safety precautions and take pro-
tective measures when handling batteries. Risk of explosion
Fire, naked flames and
smoking are prohibited
when handling the battery.
Avoid creating sparks.316
Battery (vehicle)Breakdown assistance