2012 MERCEDES-BENZ CLS COUPE ECO mode
[x] Cancel search: ECO modePage 227 of 373
X
Press the :or9 button to select the
Surround lighting function.
When the Surround lighting function is
activated, the light cone and the area
around the vehicle are displaye dinred in
the multifunction display.
X Press the abutton to save the setting.
Deactivating delayed switch-off of the exte-
rior lighting temporarily:
X Before leaving the vehicle, turn the key to
position 0in the ignition lock.
X Turn the key to position 2in the ignition
lock.
The exterior lighting delayed switch-off is
deactivated.
Delayed switch-off of the exterior lighting is
reactivated the next time you start the
engine.
If you have activated the Surround light‐ing function and the light switch is set to
Ã,t he following functions are activated
when it is dark:
R surround lighting: the exterior lighting
remains lit for 40 seconds after unlocking
with the key. If you start the engine, the
surround lighting is switched off and auto-
matic headlamp mode is activated
(Y page 111).
R Exterior lighting delayed switch-off: the
exterior lighting remains lit for 60seconds
after the engine is switched off. If you close
all the doors and the boot lid, the exterior
lighting goes off after 5seconds.
i Depending on your vehicle's equipment,
when the surround lighting and delayed
switch-off exterior lighting are on, the fol-
lowing light up:
R side lamps
R dipped-beam headlamps
R daytime driving lights
R surround lighting in the exterior mirrors Activating/deactivating the interior light-
ing delayed switch-off
If you activat
ethe Lightin gdelayed sw.- off function
,the interior lighting remains on
for 20seconds after you remove the key from
the ignition lock.
X Press the =or; button on the steer-
ing wheel to select the Settings menu.
X Press the :or9 button to select the
Light submenu.
X Press ato confirm.
X Press the :or9 button to select the
Light. delay function.
When the Lightingdelayed sw.-off function is activated, the vehicle interior is
displayed in red in the multifunction dis-
play.
X Press the abutton to save the setting.
Vehicle Setting permanent SPEEDTRONIC
X
Press the =or; button on the steer-
ing wheel to select the Settings menu.
X Press the :or9 button to select the
Vehicle submenu.
X Press ato confirm.
X Press the :or9 button to select the
Limit speed (winter tyres): function.
You will see the curren tsetting.
X Press ato confirm.
X Press the :or9 button to adjust
permanen tSPEEDTRONIC in increment sof
ten ( 230 km/h to
160 km/h ). The
Off set-
ting switches permanent SPEEDTRONIC
off.
X Press the abutton to store the entry.
For furthe rinformation on permanent SPEED-
TRONI C(Ypage 170). 224
Menus and submenusOn-board computer and displays
Page 231 of 373

AMG men
uinAMG vehicles
AMG displays :
Digital speedometer
; Gear indicator
= Upshift indicator
? Engine oil temperature
A Coolant temperature
B ECO start/stop function status indicator
(Y page 144)
X Press the =or; button on the steer-
ing wheel to select the AMG menu.
Upshift indicator UP =
indicates that the
engin ehas reached the overrevving range
when in the manual gearshift program.
Upshift indicator UP =
fades out other mes-
sages until you have shifted up.
If the engin eoil temperature is below 80 †,
the oil temperature is shown in blue. Avoid
using the full output of the engin eduring this
time.
SETUP :
Driv eprogram (C /SS+ /M )
; ESP ®
mode (ON /OFF )orS
PORT handling
mode (SPORT )
= Suspension tunin g(COMFORT /SPORT /
SPORT+ ) SETUP shows the drive program, the ESP
®
(Electronic Stability Program) mode and the
suspension tuning.
X Press the =or; button on the steer-
ing wheel to select the AMG menu.
X Press the 9button repeatedly until
SETUP is displayed.
or
X Briefly press the AMG button on the centre
console (Y page 183).
RACETIMER Displaying and starting the RACETIMER
:
Lap
; RACETIMER
You can start the RACETIME Rwhen the
engin eisrunning or if the key is in position
2 in the ignition lock.
X Press the =or; button on the steer-
ing wheel to select the AMG menu.
X Press the 9button repeatedly until the
RACETIME Risshown.
X To start: press the abutton to start the
RACETIMER.
Displaying the intermediat etime 228
Menus and submenusOn-boar
dcomputer and displays
Page 288 of 373
If it is permitted by law to operate communi-
cations equipment whilet
he vehicle is in
motion, you must only do so if the traffic sit-
uationp ermits.Otherwise, yo ucould be dis-
tracted fro mthe traffi cconditions ,cause an
accident and injure yourself and others.
Two-way radios and fa xequipment used with-
out low-reflection exterior aerials can inter-
fere with the vehicle's electronic sand thereby
jeopardise the operatin gsafety of the vehicle
and your safety. Therefore, you must only use
this equipment if it is correctly connected to
as eparate reflection-free exterior aerial. G
WARNING
Excessiv elevels of electromagnetic radiation
may cause damage to your health and the
health of others. Using an exterior aerial takes
int oa ccoun tcurren tscientific discussions
relatin gtothe possible health risk posed by
electromagnetic fields.
Mercedes-Benz recommends the use of an
approved exterior aerial. This ensures:
R optimal mobile phone reception quality in
the vehicle
R mutual influences between the vehicle
electronic sand mobile phones are mini-
mised
An exterior aerial has the following advan-
tages:
R it conducts the electromagnetic fields gen-
erated by awireless device to the exterior.
R the field strengt hinthe vehicle interior is
lower than in avehicle that does not have
an exterior aerial.
i There are various mobile phone brackets
that may be fitted in your vehicle; in some
cases, these are country-specific.
i You can connec taBluetooth ®
-capable
mobile phone with Audio 20, Audio 50 or
COMAND Onlin evia the Bluetooth ®
inter-
face. This also applies if your vehicle is
equipped with convenience telephony. More information on suitable mobile phones,
mobile phone brackets and on connecting
Bluetooth
®
-capable mobile phones with
Audio 20, Audio 50 or COMAND Onlin ecan
be obtained:
R at your Mercedes-Benz Service Centre
R on the Internet at http://www.mercedes-
benz.com/connect
i The function sand services available when
you use the phone depend on your mobile
phone model and servic eprovider.
Using amobile phone If th
emobile phon eisinserted in th emobile
phon ebracket ,you can speak to th eperson
you are callin gusingthe hands-free system.
X Open th etelephone compartment
(Y page 274).
X If required by th edesig noft he mobile
phone bracket, install the sliding adapter
(Y page 286).
X Insert the mobile phone into the mobile
phone bracket (see the separate installa-
tion instructions for the mobile phone fit-
ting).
i On some mobile phone brackets, you first
have to connect the mobile phone via Blue-
tooth ®
to the mobile phone bracket (see
the separate operating instructions for the
mobile phone bracket).
If this is the case, the mobile phone does
not have to be inserted into the bracket for
you to be able to use the telephone func-
tions. However, the charging function and
aerial function are not available.
Operating the mobile phone You can operate the telephone using the
6
and~ buttons on the multifunction
steering wheel. You can operate other mobile
phone functions via the on-board computer
(Y page 217).
When you remove the key from the ignition
lock, the mobile phone stays switched on. Features
285Stowing and features Z
Page 289 of 373
However, yo
ucan no longer use the hands-
free system.
If yo uhaveana ctivecalla nd would like to
take the key ou tofthe ignition lock, first
remove the mobile phone from the bracket.
i Whe nusing abracket connected to the
mobile phone via Bluetooth ®
and yo uwish
to proceed with acall:
Switch to private mode before removing
the key from the ignition lock. Otherwise ,it
may take up to 20 seconds, before the
mobile phone separates from the system.
Only then can the telephone cal lcontinue.
Information on the necessary steps for set-
ting up "private mode "can be found in the
separate mobile phone operating instruc-
tions.
i Not al lmobile phones support "private
mode".
Sliding adapter for the mobile phone
bracket Overview
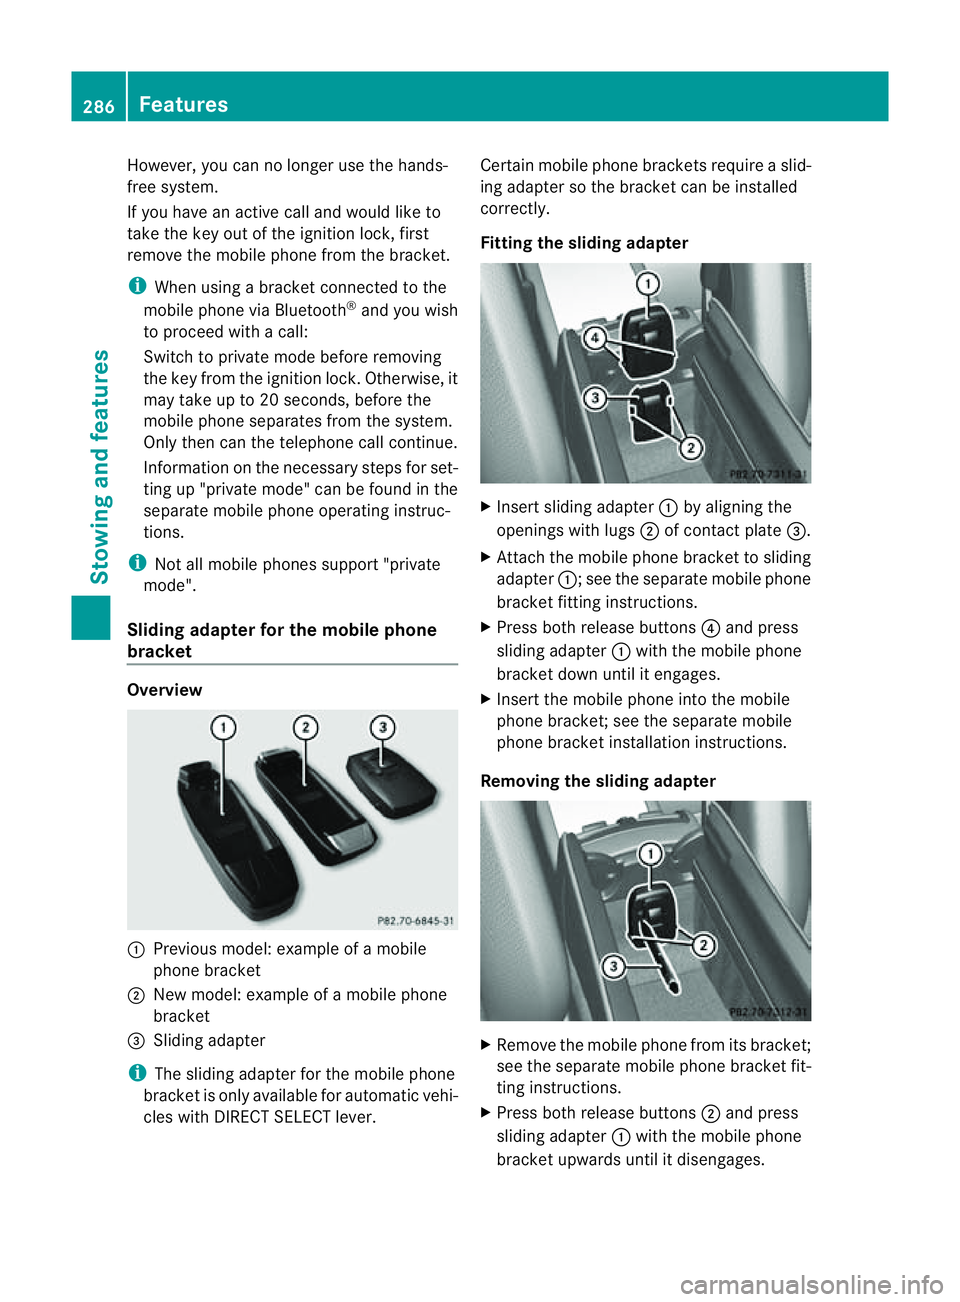
:
Previou smodel: example of amobile
phone bracket
; New model: example of amobile phone
bracket
= Sliding adapter
i The sliding adapter for the mobile phone
bracket is only available for automati cvehi-
cles with DIRECT SELECT lever. Certain mobile phone brackets require
aslid-
ing adapter so the bracket can be installed
correctly.
Fitting the sliding adapter X
Inser tsliding adapter :by alignin gthe
openings with lugs ;of contac tplate =.
X Attac hthe mobile phon ebracket to sliding
adapter :;see the separat emobile phone
bracket fittin ginstructions.
X Press bot hrelease buttons ?and press
slidin gadapter :with the mobile phone
bracket down until it engages.
X Insert the mobile phon eintot he mobile
phon ebracket ;see the separat emobile
phon ebracket installation instructions.
Removing th eslidin gadapt er X
Remove the mobile phon efromi ts bracket;
se et he separate mobil ephone bracket fit-
ting instructions.
X Press both release buttons ;and press
sliding adapter :with the mobil ephone
bracket upwards unti litdisengages. 286
FeaturesSto
wing an dfeatures
Page 331 of 373
Useful information
i This Owner's Manual describes all mod-
els, series and optional equipment for your
vehicle that were available at the time of
going to press. National variation sare pos-
sible. Not ethat your vehicle may not be
equipped with all of the function sdescri-
bed. This is also the case for system sand
function srelevan ttosafety.
i Read the information on qualified special-
ist workshops: (Y page 23). Important safet
ynotes G
WARNING
If wheels and tyres of the wrong size are used,
the wheel brakes or suspension components
may be damaged. There is arisk of accident.
Always replac ewheels and tyre swith those
that fulfil the specifications of the original part
(designation ,manufacturer, model). G
WARNING
Af lat tyre severely impairs the driving, steer-
ing and braking characteristics of the vehicle.
There is arisk of accident.
Tyres without run-flat characteristics:
R do not drive with aflat tyre.
R immediately replac ethe flat tyre with your
emergenc yspare wheel or spare wheel, or
consult aqualified specialist workshop.
Tyres with run-flat characteristics:
R pay attention to the information and warn-
ing notices on MOExtended tyre s(tyres
with run-flat characteristics).
Accessories that are not approved for your
vehicle by Mercedes-Ben zorare not being
usedc orrectly can impair the operating
safety. Before purchasing and using non-approved
accessories, visit aqualified specialist work-
shop and enquire about:
R suitability
R lega lstipulations
R factory recommendations
Information on the dimensions and types of
wheels and tyres for yourv ehicle can be
found under "Wheel/tyre combinations"
(Y page 341).
Information on air pressure for the tyres on
your vehicle can be found:
R on the tyre pressure label on the fuel filler
flap (Y page 157)
R under "Tyre pressure" (Y page 331)
R in the "Tyre pressure" section
Modification work on the brake system and
wheels is not permitted. The use of wheel
spacers or brake dust shields is not permit-
ted. This invalidates the general operating
permit for the vehicle.
i Further information on wheels and tyres
can be obtained at any qualified specialist
workshop. Operation
Information on driving
Check the tyre pressures when the vehicle is
heavily laden and, if necessary, adjust.
While driving, pay attention to vibrations,
noises and unusual handling characteristics,
e.g. pulling to one side. This may indicat ethat
the wheels or tyres are damaged. If you sus-
pect that atyre is defective, reduce your
speed immediately. Stop the vehicle as soon
as possible to chec kthe wheels and tyres for
damage. Hidden tyre damage could also be
causing the unusual handling characteristics.
If you find no signs of damage, have the tyres
and wheels checked at aqualified specialist
workshop.
When parking your vehicle, make sure that
the tyres do not get deformed by the kerb or 328
OperationWheels and tyres
Page 363 of 373
Service products includ
ethe following:
R fuels (e.g. petrol ,diesel)
R lubricants (e.g. engine oil, transmissio noil)
R coolant
R brak efluid
R windscreen washer fluid
R climate control system refrigerant
Component sand service products must be
matched .Mercedes-Ben zrecommends that
you use products tested and approved by
Mercedes-Benz. They are listed in this
Mercedes-Ben zOwner's Manual in th eappro-
priat esection.
You can identif yservice product sapproved
by Mercedes-Ben zbythefollowing inscrip-
tion sont hecontainer:
R MB-Freigabe (e.g. MB-Freigabe 229.51)
R MB Approval (e.g. MB Approval 229.51)
Other designation sorrecommendation sind i-
cat eal evel of qualit yoras pecification in
accordance wit hanMBSheet Number (e.g.
MB 229.5). The yhave no tnecessarily been
approved by Mercedes-Benz.
Further information can be obtained from any
Mercedes-Benz Service Centr eoronthe
Internet at http://bevo.mercedes-benz.com. Fuel
Important safety notes G
WARNING
Fuel is highly flammable. Fire, naked flames
and smokin gare therefor eprohibited when
handlin gfuels.
Switc hoff th eenginea nd th eauxiliary heating
before refuelling. G
WARNING
Avoid contact wit hfuels.
It is hazardous to your healt hifyour skin
comes int odirect contact wit hfuel sory ou
breath einfuel vapours. Tank capacity The total capacit
yofthe fuel tan kmay vary,
dependin gonthevehicle equipment. Model Total capa-
city CLS 250 CDI BlueEFFI-
CIENCY
59.0 l
or
80.0 l All other models (except
CLS 63 AMG)
80.0 l
CLS 63 AMG
66.0 l
or
80.0 l Model Of which
reserve: Models with 59.
0ltotal
capacity Approx-
imately 8. 0l Models with 80.
0ltotal
capacity Approx-
imately 9. 0l CLS 63 AMG
Approx.
14.0 l Petrol (EN 228,
EDIN 51626-1) Fuel grade
!
Do no tuse diesel to refuel vehicles with a
petrol engine. Even asmall quantity of die-
sel willd amage the fuel injection system.
! Only refue lusing unleaded petrol with at
least 95 RON/85 MON that conforms to
European standard EN 228 or EDIN
51626-1 or an equivalent specification.
Fuel with this specification may contain up
to 10 %ethanol.
! Do not use the following:
R E85 (petrol with 85 %ethanol)
R E100 (100 %ethanol)
R M15 (petrol with 15 %methanol) 360
Service products and capacitiesTechnical data
Page 367 of 373
ted on the oi
lcontaine rbytheinscription "MB
Approval" and th ecorre spondin gdesigna-
tion ,e.g.MBA pproval 229.51.
You can cal lupanoverview of approved
engin eoils on th eInterne tat:
http://bevo.mercedes-benz.com by enter-
ing the designation, e.g .229.5.
The table shows which engine oils have been
approved for your vehicle. Petrol engines MB Approval
CL
S3 50 BlueEFFI-
CIENCY 229.3, 229.5
CL
S5 00 BlueEFFI-
CIENCY
CL S5 00 4MATIC Blue-
EFFICIENCY
CL S63A MG 229.5
Diesel engine
swith
diese lparticle filter MB Approval
CL
S2 50 CDIBlueEFFI-
CIENCY
CL S3 50 CDIBlueEFFI-
CIENCY
CL S3 50 CDI4MATIC
BlueEFFICIENCY 228.51,
229.31
,229.51 Use onl
ySAE 0W-40 or SAE 5W-40 engine oils
for AMG vehicles.
i If the engine oils listed in the table ar enot
available, yo umayaddt he following engine
oils unti lthe next oi lchange:
R vehicles with apetrol engine :MB
Approval 229.1 229.3 or ACEA A3
R diese lengines: MB Approval 229.1,
229.3, 229.5 or ACEA C3
Use onl ySAE 0W-40 or SAE 5W-40 engine
oils for AMG vehicles.
Thi sm ayonl ybet oppedupo nce,and the
quantity must not be greate rtha n1 .0l. Ca
pacities The following value
srefe rtoano il change
including the oil filter. Model Replacement
amount CLS 250 CDI Blue-
EFFICIENCY
CLS 350 BlueEFFI-
CIENCY
6.
5l CLS 350 CDI Blue-
EFFICIENCY
CLS 350 CDI
4MATIC BlueEFFI-
CIENCY
CLS 500 BlueEFFI-
CIENCY
CLS 500 4MATIC
BlueEFFICIENCY
8.
0l CLS 63 AMG
8.
5l Additives
!
Do not use any additives with the engine
oil. This could damage the engine.
Engine oil viscosity Viscosit
ydescribes the flow characteristics
of afluid. If an engine oil has ahigh viscosity
rating, it flows slowly; the lower the viscosity,
the faster it flows.
Engine oil selection is based on the respective
outside temperatures and in accordance with
the SA Eclassification (viscosity). The table 364
Service products and capacitiesTechnica
ldata