2012 MERCEDES-BENZ CLS COUPE heating
[x] Cancel search: heatingPage 32 of 373
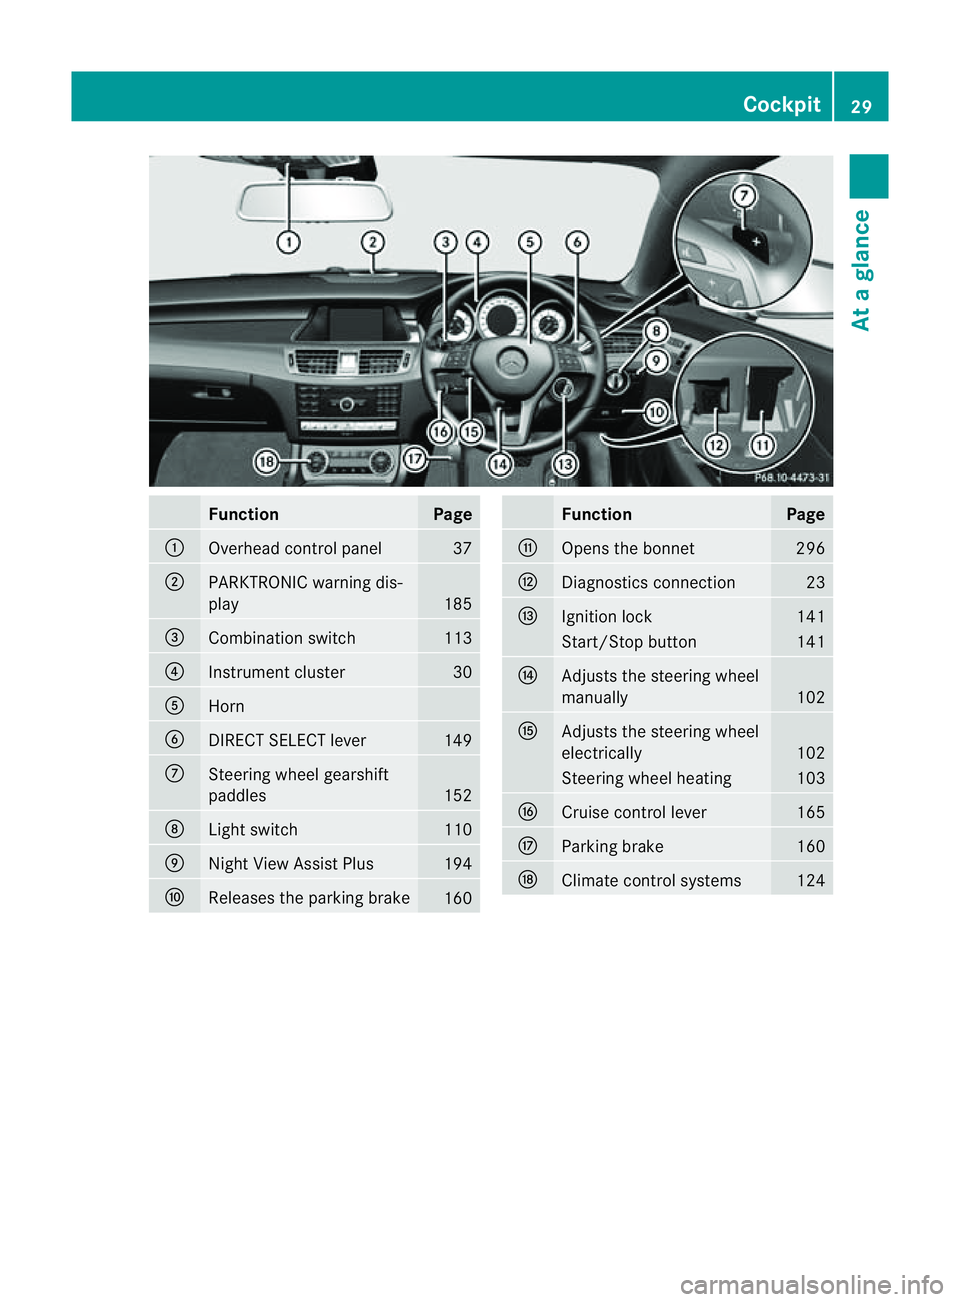
Function Page
:
Overhead control panel 37
;
PARKTRONIC warning dis-
play
185
=
Combination switch 113
?
Instrumen
tcluster 30
A
Horn
B
DIRECT SELECT lever 149
C
Steering wheel gearshift
paddles
152
D
Ligh
tswitch 110
E
Nigh
tView Assist Plus 194
F
Releases the parking brake
160 Function Page
G
Open
sthe bonnet 296
H
Diagnostics connection 23
I
Ignition lock 141
Start/Stop button 141
J
Adjusts the steerin
gwheel
manually 102
K
Adjusts the steerin
gwheel
electrically 102
Steerin
gwheel heating 103
L
Cruise control lever 165
M
Parking brake 160
N
Climate control systems 124Cockpit
29Atag lance
Page 37 of 373
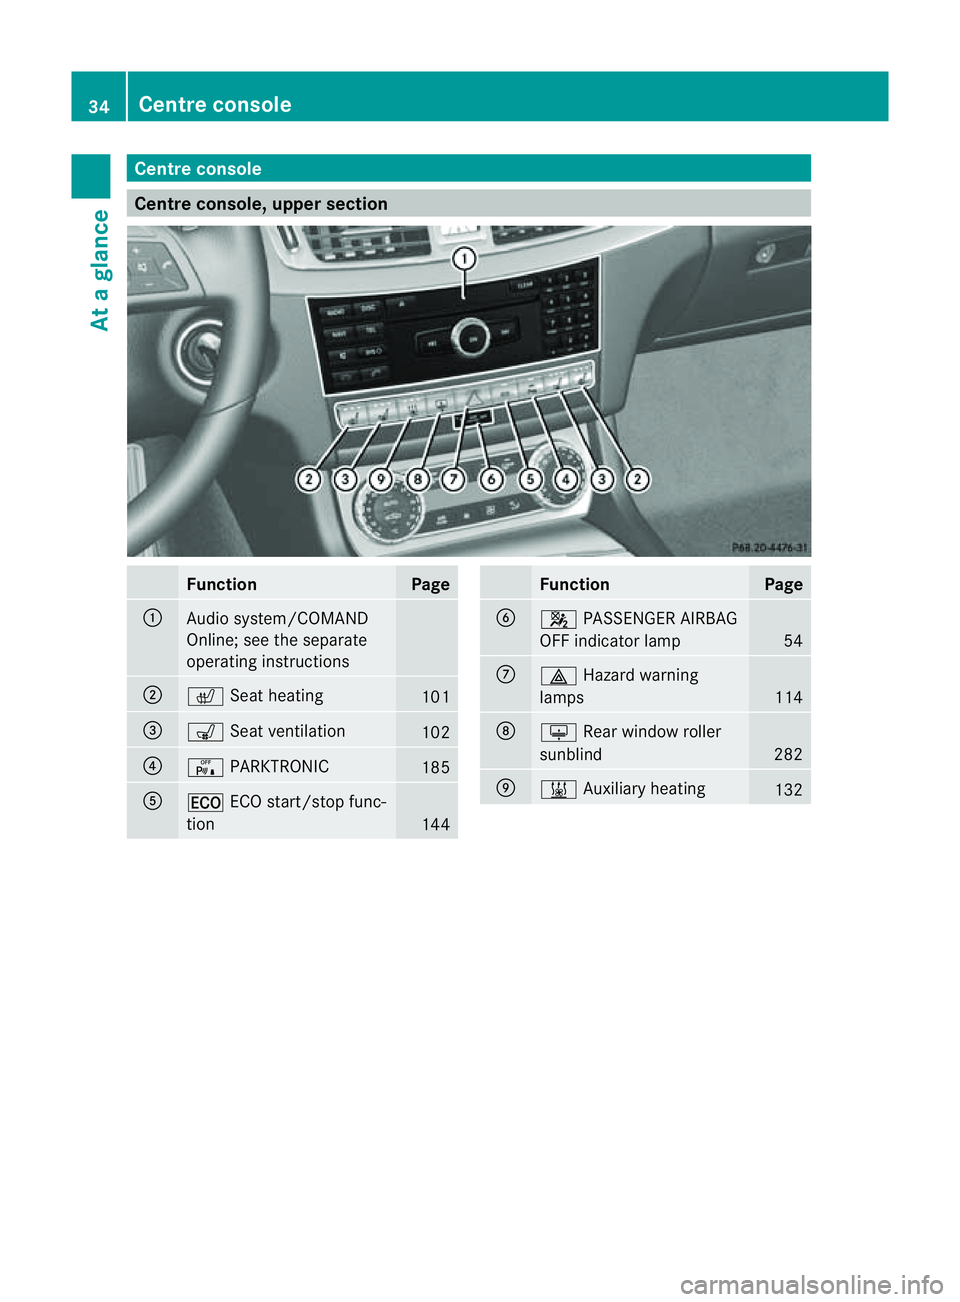
Centre console
Centre console, upper section
Function Page
:
Audi
osystem/COMAND
Online; see th eseparate
operatin ginstructions ;
c
Seat heating 101
=
s
Seat ventilation 102
?
c
PARKTRONIC 185
A
¤
ECO start/sto pfunc-
tion 144 Function Page
B
4
PASSENGER AIRBAG
OF Findicator lamp 54
C
£
Hazard warning
lamps 114
D
u
Rear window roller
sunblind 282
E
&
Auxiliary heating 13234
Centre consoleAt
ag lance
Page 85 of 373
Problem Possible causes/consequences and
M Solutions
The engine cannot be
started using the key. the on-board voltage is too low.
X
Switch off non-essential consumers, e.g. seat heating or interior
lighting, and try to start the engine again.
If this does not work:
X Check the starter battery and charge it if necessary
(Y page 318).
or
X Jump-start the vehicle (Y page 319).
or
X Consult aqualified specialist workshop. The engine cannot be
started using KEYLESS-
GO. The key is in the
vehicle. Ad
oor is open. Therefore, the key cannot be detected as easily.
X Close the door and try to start the vehicle again. There is interferenc
efrom apowerful source of radio waves.
X Start your vehicle with the key in the ignition lock. Doors
Important safety notes
G
WARNING
Only for the United Kingdom: if the vehicle
has been locked with the key or with KEY-
LESS-GO, the double lock function is activa-
ted as standard. It is then not possible to open
the doors from inside the vehicle.
Therefore, do not leave any people behind in
the vehicle, particularly children, elderly peo-
ple or people requiring special assistance. As
ar esult, they may not be able to free them-
selves in the event of an emergency. They
could be seriously or even fatally injured by
prolonged exposure to extremely high or low
temperatures, for example. In this case, res-
cuing people from outside the vehicle is diffi-
cult.
Deactivate the interior motion sensor before
you lock the vehicle. The doors can then be
opened from the inside after the vehicle has
been locked from the outside. G
WARNING
If children are left unsupervised in the vehicle,
they could:
R open adoor from inside the vehicle at any
time, even if it has been locked
R start the vehicle using akey which has been
left in the vehicle
R release the parking brake
They could thereby endanger themselves and
others. Never leave children unsupervised in
the vehicle. Always take the key with you
when leaving the vehicle, even if you are only
leaving it for ashort time. Unlocking and opening the doors
from the inside
For all countries except the United King-
dom: you can open adoor from inside the
vehicle even if it has been locked. If the vehi-
cle has previously been locked with the key
or with KEYLESS-GO, opening adoor from the
inside will trigger the anti-theft alarm system.
Switch off the alarm (Y page 71).82
DoorsOpening and closing
Page 100 of 373
settings with the memory function
(Y
page 107). Seats
Important safety notes
G
WARNING
The seats can still be adjusted when there is
no key in the ignition lock. For this reason,
children should never be left unsupervised in
the vehicle. They could adjust the seats and
become trapped. G
WARNING
Only adjust the driver's seat when the vehicle
is stationary. You will otherwise be distracted
from the road and traffic conditions and you
could lose control of the vehicle as aresult of
the seat moving. This could cause an acci-
dent. G
WARNING
If you adjust the seat height carelessly,y ou or
others could be trapped and thereby injured.
Children in particular could unintentionally
press the buttons to electrically adjust the
seats and become trapped.
Take care that:
R while moving the seats, your hands do not
get under the lever assembly of the seat
adjustment system.
R children in the vehicle do not slide their
hands under the levers. G
WARNING
Make sure that nobody can become trapped
when adjusting the seats.
Observe the notes on airbags.
Secure children as recommended; see the
"Children in the vehicle" section. G
WARNING
Make sure that the back of your head is sup-
ported at eye level by the central area of the head restraint. If your head is not supported
correctly by the head restraint, you could suf-
fer asevere neck injury in the event of an
accident. Never drive if the head restraints are
not engaged and set correctly. G
WARNING
As eat belt can only offer its intended degree
of protection when the backrest is almost ver-
tical and the occupant is sitting upright. Avoid
seat position sthat do not allow the seat belt
to be routed correctly. Adjust the backrest so
that it is as upright as possible. Never travel
with the backrest reclined too far backwards.
You could otherwise be seriously or even
fatally injured in the event of an acciden tor
sudden braking.
! To avoid damage to the seats and the seat
heating, observe the following information:
R do not spill any liquids on the seats. If
liquid is spilled on the seats, dry them as
soon as possible.
R if the seat cover sare damp or wet, do not
switch on the seat heating. The seat
heating should also not be used to dry
the seats.
R clean the seat cover sasrecommended;
see the "Interior care" section.
R do not transport heavy loads on the
seats. Do not place sharp objects on the
seat cushions ,e.g. knives, nails or tools.
The seats should only be occupied by
passengers, if possible.
R when the seat heating is in operation ,do
not cover the seats with insulating mate-
rials, e.g. blankets, coats, bags, seat cov-
ers, child seats or booster seats.
! To avoid damage to the seats and the seat
heating, observe the following information:
R do not spill any liquids on the seats. If
liquid is spilled on the seats, dry them as
soon as possible.
R if the seat cover sare damp or wet, do not
switch on the seat heating. The seat Seats
97Seats, steering wheel and mirrors Z
Page 101 of 373
heating should also not be used to dry
the seats.
R clean the seat covers as recommended;
see "Interior care".
R do not transport heavy loads on the
seats. Do not place sharp objectsont he
seat cushions, e.g. knives, nails or tools.
The seats should only be occupied by
passengers, if possible.
R when the seat heating is in operation, do
not cover the seats with insulating mate-
rials, e.g. blankets, coats, bags, seat cov-
ers, child seats or booster seats.
! Make sure that there are no objectsint he
footwell or behind the seats when moving
the seat back. There is arisk that the seats
and/or the objectsc ould be damaged.
i The head restraintsint he front seats are
fitted with the NECK-PRO system
(Y page 46). For this reason, it is not pos-
sible to remove the head restraintsf rom
the front seats.
For more information ,contact aqualified
specialist workshop.
i Further related subjects:
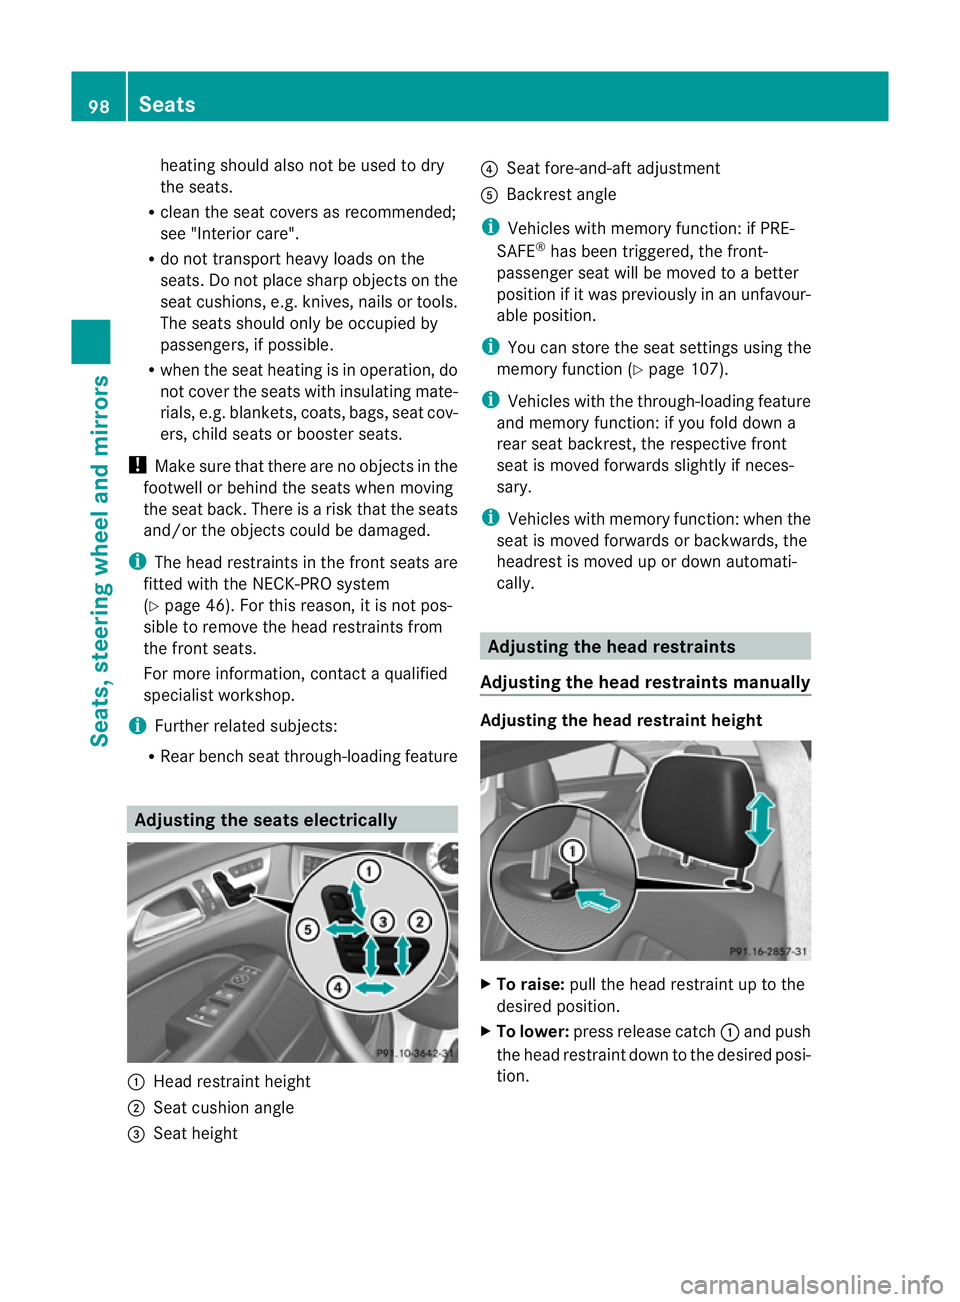
R Rear bench seat through-loading feature Adjusting the seats electrically
:
Head restraint height
; Seat cushion angle
= Seat height ?
Seat fore-and-aft adjustment
A Backrest angle
i Vehicles with memory function: if PRE-
SAFE ®
has been triggered, the front-
passenger seat will be moved to abetter
position if it was previously in an unfavour-
able position.
i You can store the seat settings using the
memory function (Y page 107).
i Vehicles with the through-loading feature
and memory function: if you fold down a
rear seat backrest, the respective front
seat is moved forwards slightly if neces-
sary.
i Vehicles with memory function: when the
seat is moved forwards or backwards, the
headrest is moved up or down automati-
cally. Adjusting the head restraints
Adjusting the head restraints manually Adjusting the head restraint height
X
To raise: pull the head restraint up to the
desired position.
X To lower: press release catch :and push
the head restraint down to the desired posi-
tion. 98
SeatsSeats, steering wheela
nd mirrors
Page 104 of 373
X
To switc hon:press button ;onceor
twice until the desired level is set.
One or two indicator lamps in button ;
light up.
X To switch off: press button;repeatedly
until all indicator lamps in button ;go out.
You can choose between two differen tlevels. Level
1(one indica-
tor lamp) Standard setting:
slightly increased
lateral support and
slow build-up of air
pressure in the side
bolsters of the seat
backrest.
Level
2(two indica-
tor lamps) Sport setting:
increase
dlateral
support and fast
build-u pofpressure
in the side bolsters
of the seat backrest. Massag
efunction (PULSE) Th
em assage functio nhelps you to prevent
muscle tension on long journeys. You can
choose between two levels.
X To switch on: press button?onceor
twice until the desired level is set.
One or two indicator lamps in button ?
light up. The air cushions in the lumbar
region vibrate for approximately
20 minutes. Adjusting the lumba
rsupport
You can adjust the contour of the driver's seat
so as to provide optimum support for your
back.
X Move adjustment lever :in the direction
of the arrow until the desired backrest con-
tour is achieved. Adjusting the 4-way lumba
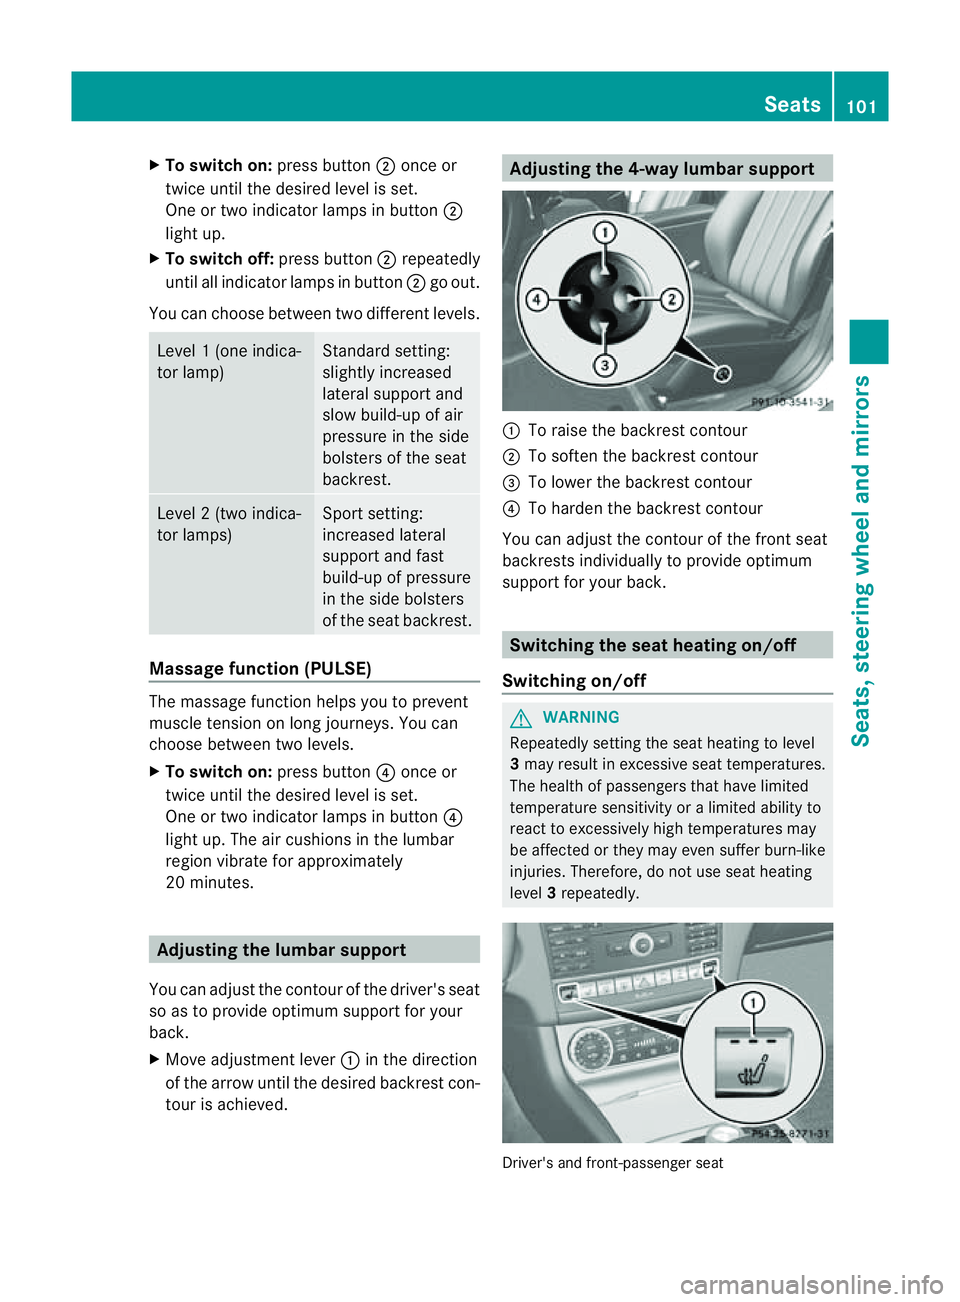
rsupport :
To raise the backrest contour
; To soften the backrest contour
= To lower the backrest contour
? To harden the backrest contour
You can adjust the contour of the fron tseat
backrests individually to provide optimum
support for your back. Switching the seat heating on/off
Switching on/off G
WARNING
Repeatedly setting the seat heating to level
3 may result in excessive seat temperatures.
The health of passengers that have limited
temperature sensitivity or alimited ability to
react to excessively high temperatures may
be affected or they may even suffer burn-like
injuries. Therefore, do not use seat heating
level 3repeatedly. Driver's and front-passenger seat Seats
101Seats, steering wheel and mirrors Z
Page 105 of 373
The three red indicator lamps in the button
indicate the heating level you have selected.
The system automatically switches down
from level 3to level 2after approximately
eight minutes.
The system automatically switches down
from level 2to level 1after approximately ten
minutes.
The system automatically switches off
approximately 20 minutes after it is set to
level 1.
X Make sure that the key is in position 1or
2 in the ignition lock.
X To switch on: press button:repeatedly
until the desired heating level is set.
X To switch off: press button:repeatedly
until all the indicator lamps go out.
i If the battery voltage is too low, the seat
heating may switch off.
Problems with the seat heating The seat heating has switched off prema-
turely or cannot be switched on. The vehicle's
electrical system voltage is too low because
too many electrical consumers are switched
on.
X Switc hoff electrical consumers that you do
not need, such as the rear window heating
or interior lighting. Switching the seat ventilation on/off
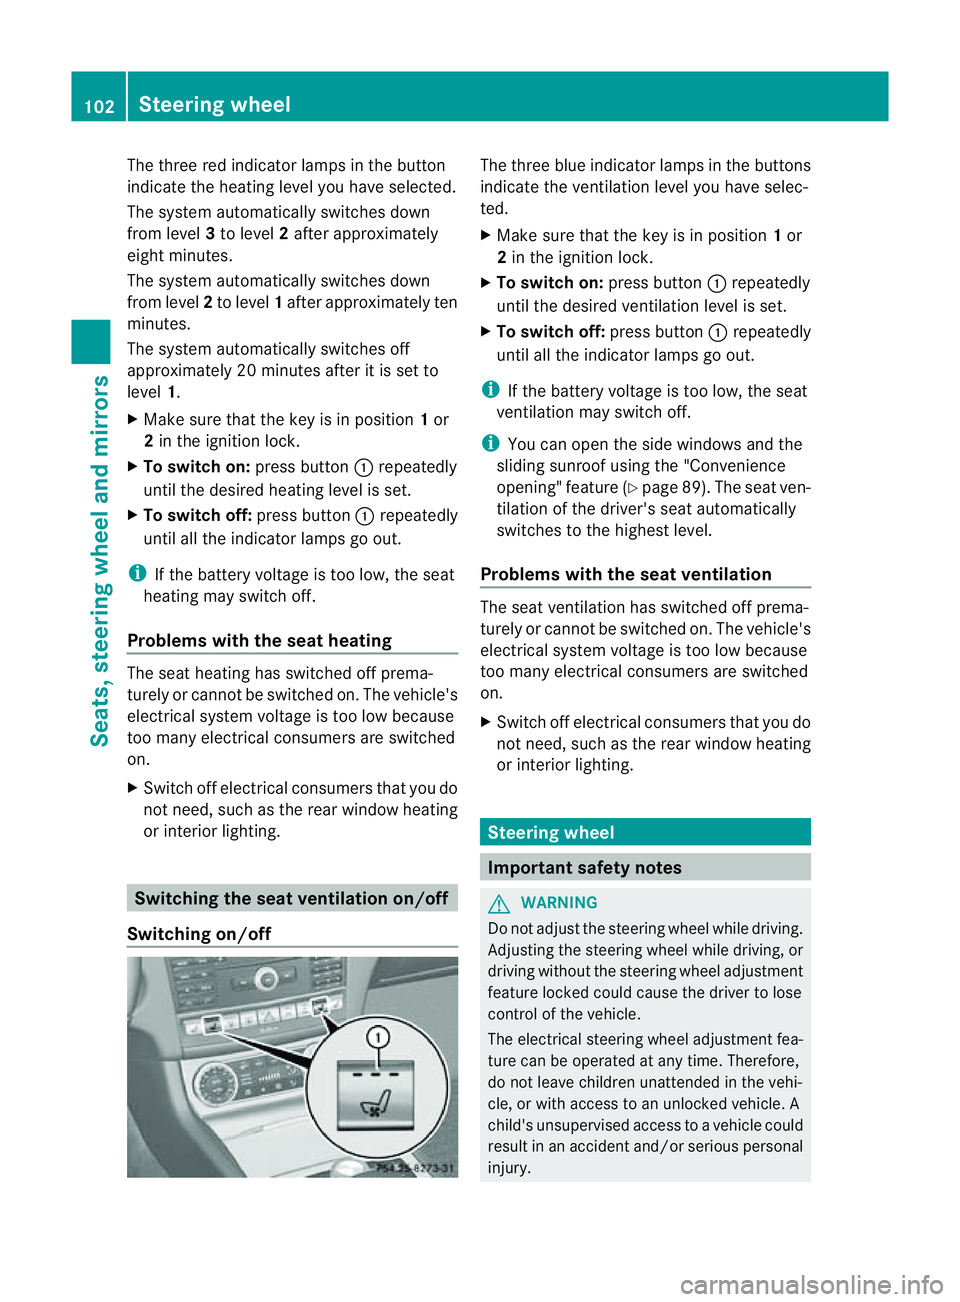
Switching on/off The three blue indicator lamps in the buttons
indicate the ventilation level you have selec-
ted.
X
Make sure that the key is in position 1or
2 in the ignition lock.
X To switch on: press button:repeatedly
until the desired ventilation level is set.
X To switch off: press button:repeatedly
until all the indicator lamps go out.
i If the battery voltage is too low, the seat
ventilation may switch off.
i You can open the side windows and the
sliding sunroof using the "Convenience
opening" feature (Y page 89). The seat ven-
tilation of the driver's seat automatically
switches to the highest level.
Problems with the seat ventilation The seat ventilation has switched off prema-
turely or cannot be switched on. The vehicle's
electrical system voltage is too low because
too many electrical consumers are switched
on.
X
Switc hoff electrical consumers that you do
not need, such as the rear window heating
or interior lighting. Steering wheel
Important safety notes
G
WARNING
Do not adjust the steerin gwheel while driving.
Adjusting the steerin gwheel while driving, or
driving without the steerin gwheel adjustment
feature locked could cause the driver to lose
control of the vehicle.
The electrical steerin gwheel adjustmen tfea-
ture can be operated at any time. Therefore,
do not leave children unattended in the vehi-
cle, or with access to an unlocked vehicle. A
child's unsupervised access to avehicle could
result in an acciden tand/o rserious personal
injury. 102
Steering wheelSeats, steering wheel and mirrors
Page 106 of 373
Adjusting th
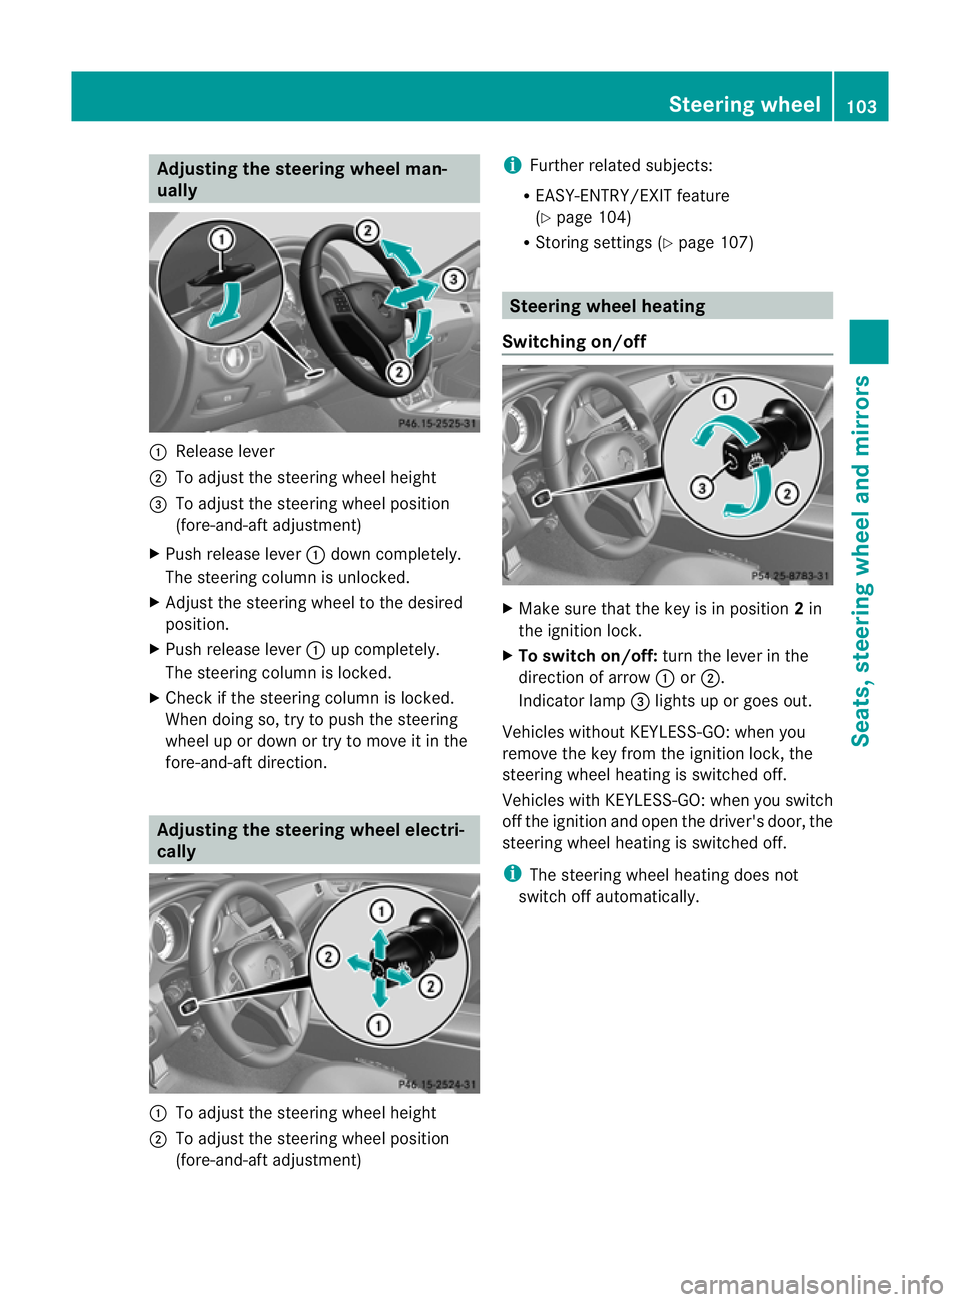
esteering wheel man-
ually :
Releas elever
; To adjust th esteering whee lheight
= To adjust th esteering whee lposition
(fore-and-af tadjustment)
X Push release lever :down completely.
The steering column is unlocked.
X Adjus tthe steering wheel to the desired
position.
X Push release lever :up completely.
The steering column is locked.
X Check if the steering column is locked.
When doing so, try to push the steering
wheel up or down or try to move it in the
fore-and-aft direction. Adjusting the steering wheel electri-
cally :
To adjust the steering wheel height
; To adjust the steering wheel position
(fore-and-aft adjustment) i
Further related subjects:
R EASY-ENTRY/EXI Tfeature
(Y page 104)
R Storing settings (Y page 107) Steering wheel heating
Switching on/off X
Make sure that the key is in position 2in
the ignition lock.
X To switch on/off: turn the lever in the
direction of arrow :or;.
Indicator lamp =lights up or goes out.
Vehicles without KEYLESS-GO: when you
remove the key from the ignition lock, the
steering wheel heating is switched off.
Vehicles with KEYLESS-GO: when you switch
off the ignition and open the driver's door, the
steering wheel heating is switched off.
i The steering wheel heating does not
switch off automatically. Steering wheel
103Seats, steering wheela nd mirrors Z