2012 MERCEDES-BENZ CLS COUPE heating
[x] Cancel search: heatingPage 140 of 373
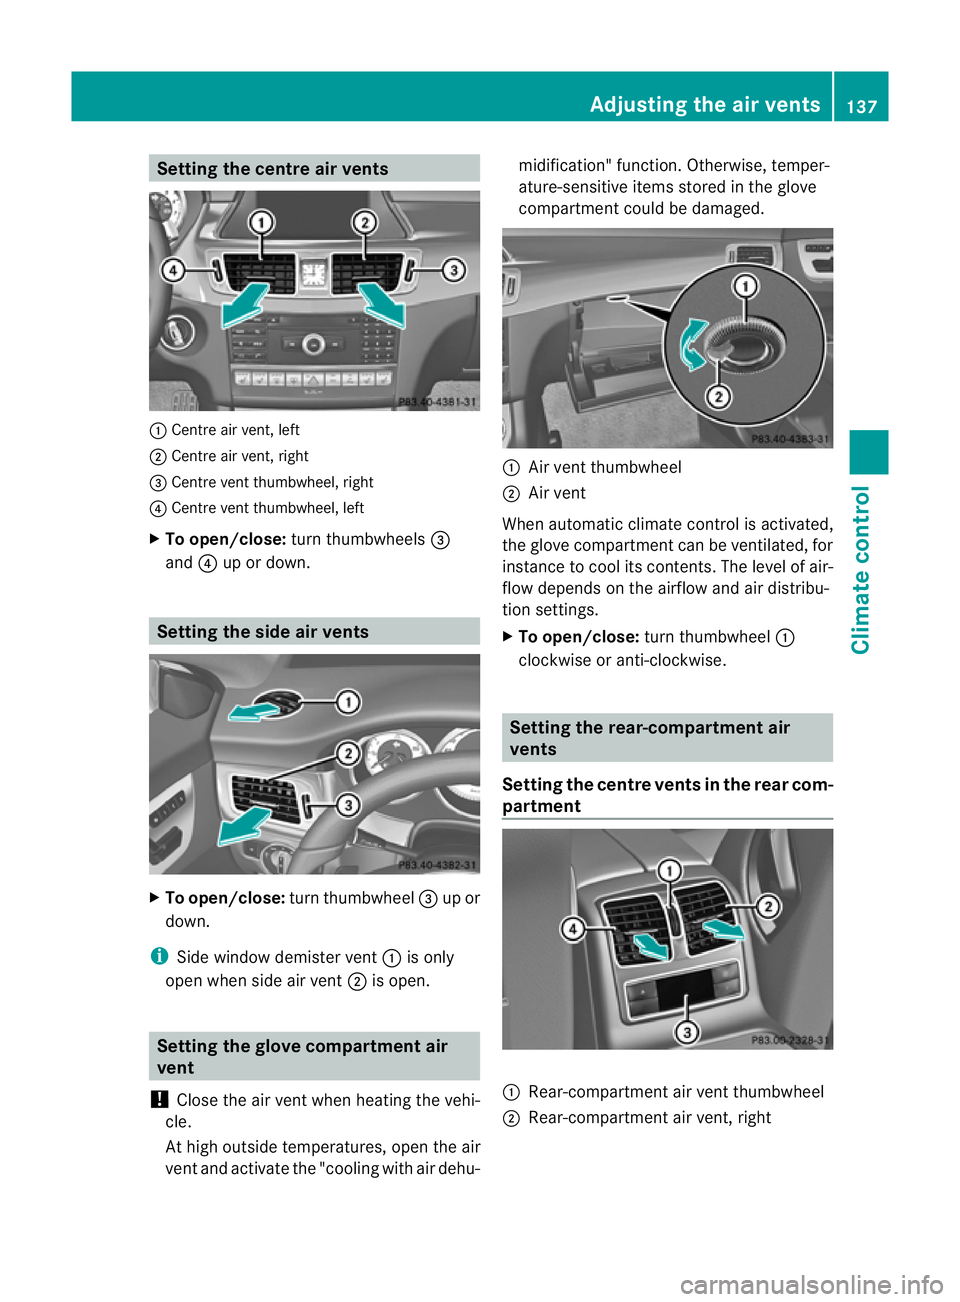
Setting the centre air vents
:
Centre air vent, left
; Centre air vent, right
= Centre vent thumbwheel, right
? Centre vent thumbwheel, left
X To open/close: turn thumbwheels =
and ?up or down. Setting the side air vents
X
To open/close: turn thumbwheel =up or
down.
i Side window demister vent :is only
open when side air vent ;is open. Setting the glove compartment air
vent
! Close the air vent when heating the vehi-
cle.
At high outside temperatures, open the air
vent and activate the "cooling with air dehu- midification" function. Otherwise, temper-
ature-sensitive items stored in the glove
compartmen
tcould be damaged. :
Air vent thumbwheel
; Air vent
When automatic climate control is activated,
the glove compartment can be ventilated, for
instance to cool its contents.T he level of air-
flow depends on the airflow and air distribu-
tion settings.
X To open/close: turn thumbwheel :
clockwise or anti-clockwise. Setting the rear-compartment air
vents
Setting the centre vents in the rear com-
partment :
Rear-compartment air vent thumbwheel
; Rear-compartment air vent,r ight Adjusting the air vents
137Climatecontrol Z
Page 159 of 373
Problems with the transmission
Problem Possible causes/consequences and
M Solutions
The transmission has
problems shifting gear. The transmission is losing oil.
X
Have the transmission checked at aqualified specialist work-
shop immediately. The acceleration ability
is deteriorating.
The transmission no
longer changes gear. The transmission is in emergency mode.
It is only possible to shift into
secondgear and reverse gear.
X Stop.
X Shift the transmission to position P.
X Switch off the engine.
X Wait at least ten seconds before restarting the engine.
X Shift the transmission to position Dor R.
If D is selected, the transmission shifts into secondgear; ifRis
selected, the transmission shifts into reverse gear.
X Have the transmission checked at aqualified specialist work-
shop immediately. Refuelling
Important safety notes
G
WARNING
Fuel is highly flammable. Fire, naked flames
and smoking are therefore prohibited when
handling fuels.
Switch off the engine and the auxiliary heating
before refuelling. G
WARNING
Avoid contact with fuels.
It is hazardous to your health if your skin
comes into direct contact with fuels or you
breathe in fuel vapours. G
WARNING
Do not use petrol to refuel adiesel tank.N ever
mix diesel with petrol. Doin gsocould damage
the fuel system and the engine. The vehicle
could also catc hfire.
! Do not use petrol to refuel vehicles with a
diesel engine. Do not use diesel to refuel vehicles with
apetrol engine. Even small
amounts of the wrong fuel result in damage
to the fuel system and the engine.
! Do not switch on the ignition if you acci-
dentally refuel with the wrong fuel. Other-
wise, the fuel will enter the fuel lines. Notify
aq ualified specialist workshop and have
the fuel tank and fuel lines drained com-
pletely.
! Overfilling the fuel tank could damage the
fuel system.
! Take care not to spill any fuel on painted
surfaces. You could otherwise damage the
paintwork.
! Use afilter when adding fuel from afuel
can. The fuel lines and/or the diesel injec-
tion system could otherwise be blocked by
particles from the fuel can.
Further information on fuel and on fuel grades
can be found in the "Fuel" section
(Y page 360). 156
RefuellingDriving and parking
Page 167 of 373
The wear of individual componentsoft
he
brake system, such as the brake pads/linings
or brake discs, depends on the individual driv-
ing style and operating conditions.
For this reason, it is impossible to state a
mileage lifetime that will be valid under all
circumstances. An aggressive driving style
will lead to high wear. You can obtain further
information about this from your Mercedes-
Benz Servic eCentre.
New and replaced brake pads and discs only
reach their optimum braking effect after sev-
eral hundred kilometres of driving. Compen-
sate for this by applying greater force to the
brake pedal. Do not forget this, and adapt
your driving and braking accordingly during
this run-in period.
Excessively heavy braking results in corre-
spondingly high brake wear. Observe the
brake system warning lamp in the instrument
cluster and notea ny brake status messages
in the multifunction display .For high-per-
formanc edriving in particular, it is important
to maintain and have the brake system
checked regularly. Driving on wet roads
Aquaplaning If water has accumulated to
acertain depth
on the road surface, there is adanger of aqua-
planing occurring, even if:
R you are driving at low speeds.
R the tyres have adequate tread depth.
For this reason, do not drive in tyre ruts and
brake carefully.
Driving on flooded roads !
Bear in mind that vehicles travelling in
front or in the opposite direction create
waves. This may cause the maximum per-
missible water depth to be exceeded.
These notes must be observed under all
circumstances. You could otherwise dam- age the engine, the electronics or the trans-
mission.
If you have to drive on stretches of road on
which water has collected, please bear in
mind that:
R the maximum permissible still water depth
is 25 cm.
R you should drive no faster than at walking
pace. Winter driving
Important safety notes G
WARNING
If you shift down on aslippery road surface in
an attempt to increase the engine's braking
effect ,the drive wheels could lose their grip.
This increases the risk of skidding and having
an accident.
Do not shift down for additional engine brak-
ing on aslippery road surface. G
DANGER
If the exhaust pipe is blocked or adequate
ventilation is not possible, poisonous gases
such as carbon monoxide (CO) may enter the
vehicle. This is the case, e.g. if the vehicle
becomes trapped in snow. There is arisk of
fatal injury.
If you leave the engine or the auxiliary heating
running, make sure the exhaust pipe and area
around the vehicle are clear of snow. To
ensure an adequate supply of fresh air, open
aw indow on the side of the vehicle that is not
facing into the wind.
Have your vehicle winterproofed at aqualified
specialist workshop at the onset of winter.
Observe the notes in the "Winter operation"
section (Y page 330).
Driving with summer tyres Observe the notes in the "Winter operation"
section (Y
page 330). 164
Driving tipsDriving and parking
Page 168 of 373
Slippery road surfaces
G
WARNING
If you shift down on aslippery road surface in
an attempt to increase the engine's braking
effect,t he drive wheels could lose their grip.
This increases the risk of skidding and having
an accident.
Do not shift down for additional engine brak-
ing on aslippery road surface.
If the vehicle threaten stoskid or cannot be
stopped when moving at low speed:
X Move the transmission to position N.
X Try to bring the vehicle under control by
using corrective steering.
You should drive particularly carefully on slip-
pery road surfaces. Avoid sudden accelera-
tion, steering and braking manoeuvres.
i For more information on driving with
snow chains, see (Y page 331). Driving systems
Cruise control
Important safety notes G
WARNING
Do not change down for additional engine
braking on aslippery road surface. This could
cause the drive wheels to lose their grip and
the vehicle could skid. G
WARNING
Cruise control cannot take account of road
and traffic conditions.
Always pay attention to traffic conditions
even when cruise control is activated.
Cruise control is only an aid designed to assist
driving. You are responsible for the vehicle's
speed and for braking in good time. G
WARNING
Do not use cruise control
R in traffic condition sthat do not allow you to
drive at aconstant speed (e.g. heavy traffic
or winding roads). You may otherwise
cause an accident.
R on slippery roads. The drive wheels may
lose their grip when braking or accelerating
and the vehicle may skid.
R when there is low visibility, e.g. due to fog,
heavy rain or snow.
General notes Cruise control maintains
aconstant road
speed for you. It brakes automatically in order
to avoid exceeding the set speed. On long and
steep downhill gradients, especially if the
vehicle is laden, you must select shift range
1, 2or 3in good time. By doing so, you will
make use of the braking effect of the engine.
This relieves the load on the brake system and
preventst he brakes from overheating and
wearing too quickly.
Use cruise control only if road and traffic con-
ditions make it appropriate to maintain a
steady speed for aprolonged period. You can
store any road speed above 30 km/h.
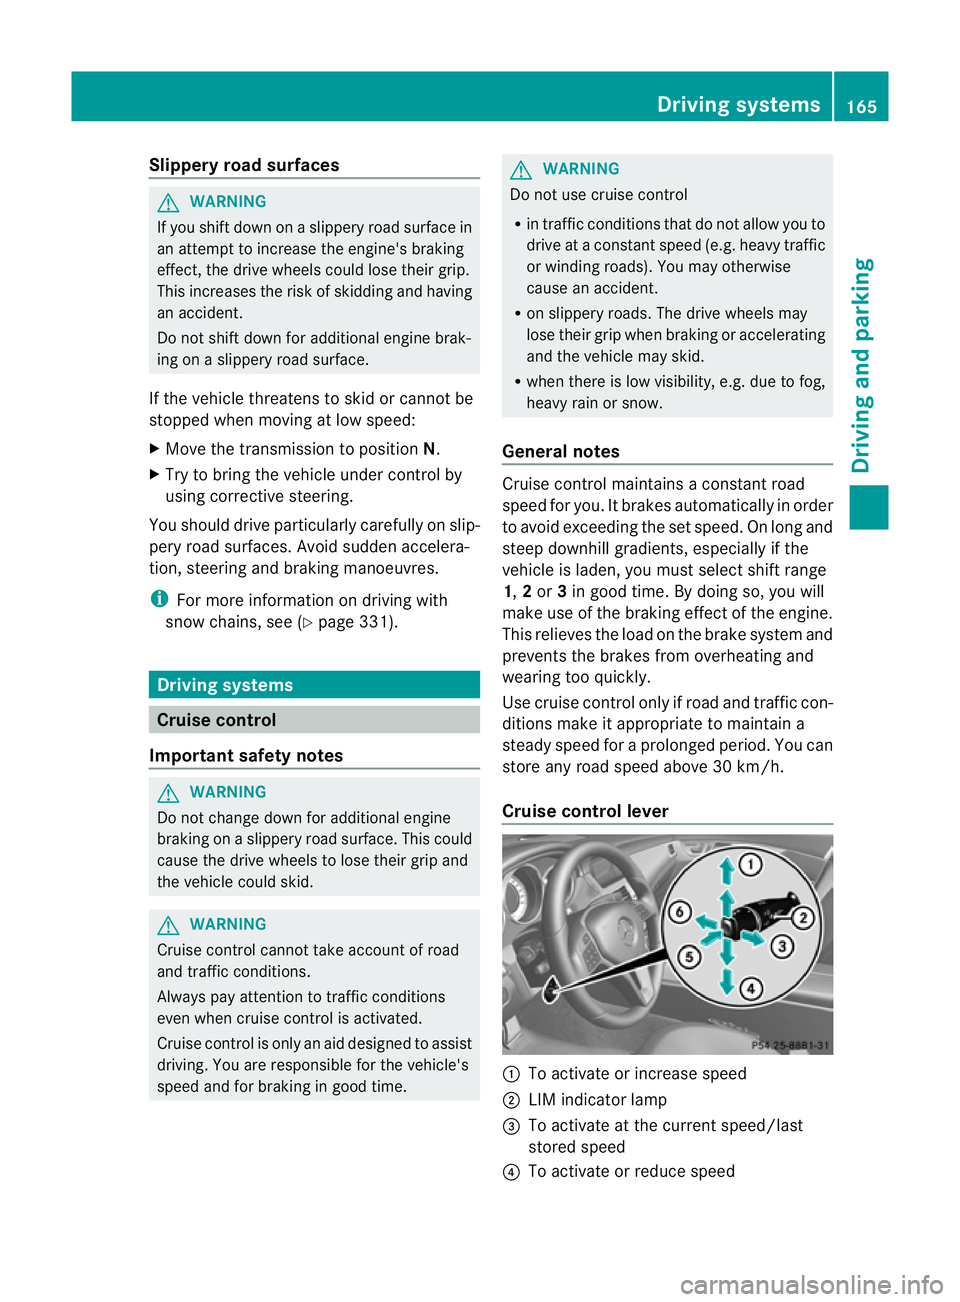
Cruise control lever :
To activate or increase speed
; LIM indicator lamp
= To activate at the current speed/last
stored speed
? To activate or reduce speed Driving systems
165Driving and parking Z
Page 171 of 373
control off message in the multifunction
displayf or approximately five seconds.
i The last speed stored is cleared when you
switch off the engine. SPEEDTRONIC
Important safety notes G
WARNING
Never depress the brake pedal continuously
while the vehicle is in motion, e.g. never cause
the brakes to rub by applying constant slight
pedal pressure. This causes the brake system
to overheat, increases the braking distance
and can lead to the brakes failing completely. G
WARNING
Do not change down for additional engine
braking on aslippery road surface. This could
cause the drive wheels to lose their grip and
the vehicle could skid. G
WARNING
SPEEDTRONIC is only an aid designed to
assist driving. You are responsible for the
vehicle's speed and for braking in good time.
SPEEDTRONIC brakes automaticallysot hat
you do not exceed the set speed. On long and
steep downhill gradients, especially if the
vehicle is laden, you must select shift range
1, 2or 3in good time. By doing so, you will
make use of the braking effect of the engine.
This relieves the load on the brake system and
prevents the brakes from overheating and
wearing too quickly. If you need additional
braking, depress the brake pedal repeatedly
rather than continuously.
You can set avariableorp ermanent limit
speed:
R variable for speed limits, e.g. in built-up
areas
R permanent for long-term speed restric-
tions, e.g. when driving with winter tyres
fitted (Y page 170) i
The speed indicated in the speedometer
may differ slightly from the limit speed
stored.
Variable SPEEDTRONIC General notes
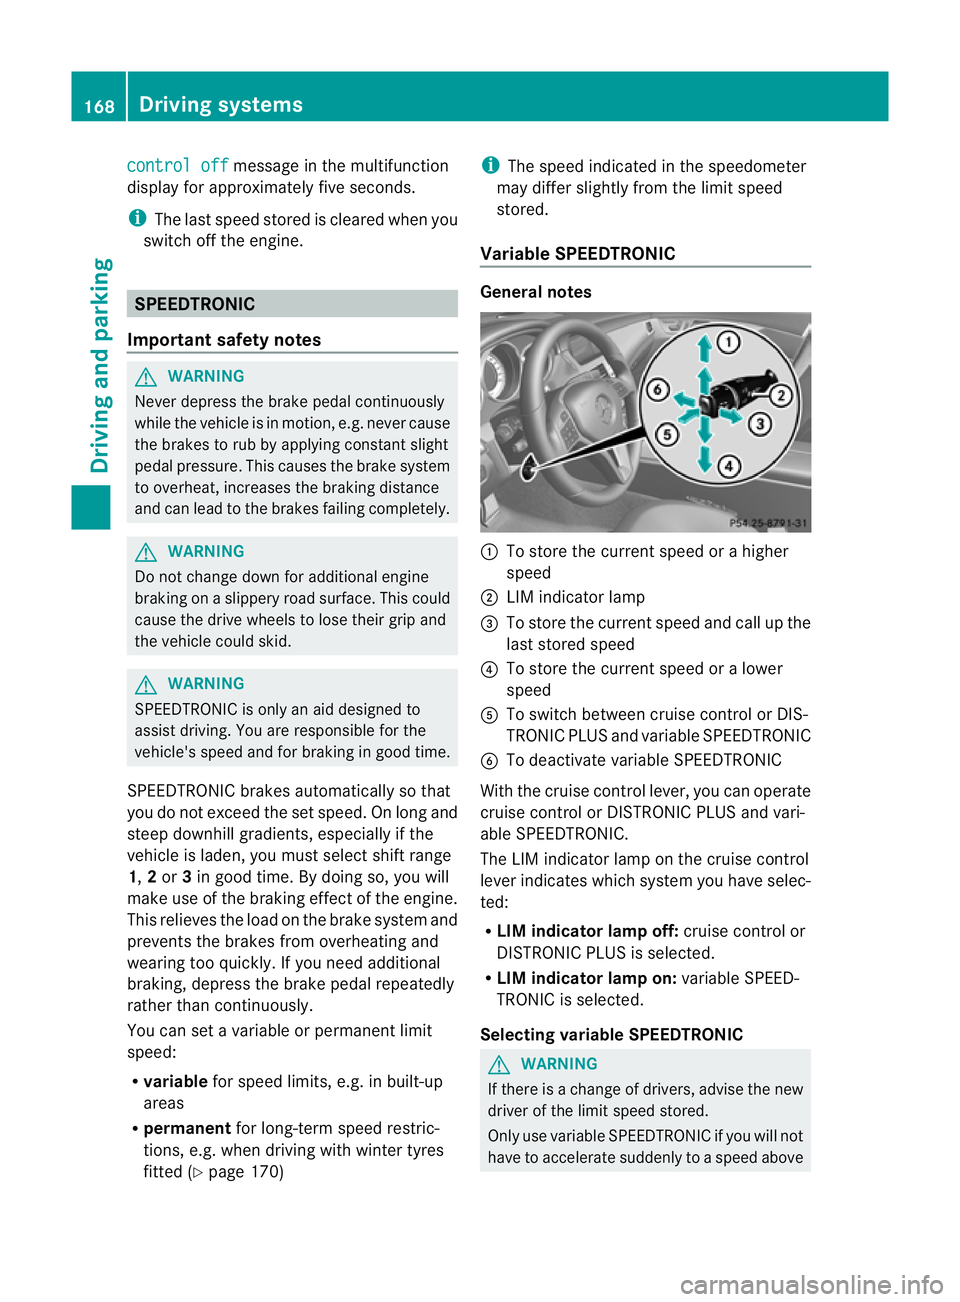
:
To store the current speed or ahigher
speed
; LIM indicator lamp
= To store the current speed and call up the
last stored speed
? To store the current speed or alower
speed
A To switch between cruise control or DIS-
TRONIC PLUS and variableS PEEDTRONIC
B To deactivate variableS PEEDTRONIC
With the cruise control lever, you can operate
cruise control or DISTRONIC PLUS and vari-
able SPEEDTRONIC.
The LIM indicator lamp on the cruise control
lever indicates which system you have selec-
ted:
R LIM indicator lamp off: cruise control or
DISTRONIC PLUS is selected.
R LIM indicator lamp on: variableSPEED-
TRONIC is selected.
Selecting variable SPEEDTRONIC G
WARNING
If there is achange of drivers, advise the new
driver of the limit speed stored.
Only use variableS PEEDTRONIC if you will not
have to accelerate suddenly to aspeed above 168
Driving systemsDriving and parking
Page 174 of 373
G
WARNING
DISTRONIC PLUS cannot take account of road
and traffic conditions. If DISTRONIC does not
recognise or no longer recognise sthe vehicle
in front, do not activate DISTRONIC or, if it is
already active, deactivate it. This is especially
the case:
R before corners
R on filter lanes
R when changing to alane with faster moving
traffic
R in comple xdriving situations or where lanes
are diverted ,e.g. at roadworks on amotor-
way
DISTRONIC PLUS otherwise maintains the
current spee dset by you or accelerates up to
the set speed.
DISTRONIC PLUS cannot take account of
weather conditions. Deactivate, or do not
activate, DISTRONIC PLUS:
R if the road sare slippery ,snow-covered or
icy. The wheels could lose their grip when
braking or accelerating. The vehicl ecould
start to skid.
R if the sensors are dirty or there is poor vis-
ibility ,e.g. due to snow, rain or fog. Dis-
tance control may be impaired.
Always pay attention to traffic conditions
even when DISTRONIC PLUS is activated.
Otherwise, you may fail to recognise dangers
in time, caus eanaccident and injure yourself
and others. G
WARNING
DISTRONIC PLUS brakes yourv ehicle up to a
maximum of 4m/s2
depending on its speed.
This corresponds to approximately 40% of
your vehicle's maximum braking power. You
must also apply the brakes yourself if this
braking power is not sufficient.
If DISTRONIC PLUS detect sarisk of collision
with avehicle in front, an intermittent warning
tones ounds. In addition, the ·distance
warning lamp in the instrument cluster lights
up. Brak etoavoidacollision. General notes DISTRONIC PLUS regulates the speed and
automatically helps you maintain the dis-
tanc
etot he vehicle detected in front. DIS-
TRONIC PLUS brakes automatically so that
the set speed is not exceeded.
On long and steep downhill gradients, you
must select shift range 1,2or 3in good time.
By doing so, you will make use of the braking
effec tofthe engine. This relieves the load on
the brake system and prevents the brakes
from overheating and wearing too quickly.
If DISTRONIC PLUS detectsas lower-moving
vehicle in front,y our vehicle is braked in order
to maintain the preset distance to the vehicle
in front.
The radar sensor system is switched off auto-
matically in the vicinity of radio telescope
facilities (Y page 368).
If you want DISTRONIC PLUS to assist you,
the radar sensor system must be activated
(Y page 225) and operational.
If there is no vehicle in front,D ISTRONIC
PLUS operates in the same way as cruise
control in the speed range between
30 km/h and 200 km/h. If avehicle is driving
in fron tofyou, DISTRONIC operates in the
speed range between 0km/h and
200 km/h.
Do not use DISTRONIC PLUS on road swith
steep gradients. Driving systems
171Driving and parking Z
Page 224 of 373
In the
Serv. menu, you have the following
options:
R call up display messages in the message
memory (Y page 231)
R restart the tyre pressure loss warning sys-
tem (Y page 333)
R check the tyre pressure electronically
(Y page 334)
R call up when aservice is due
(Y page 300) Settings menu
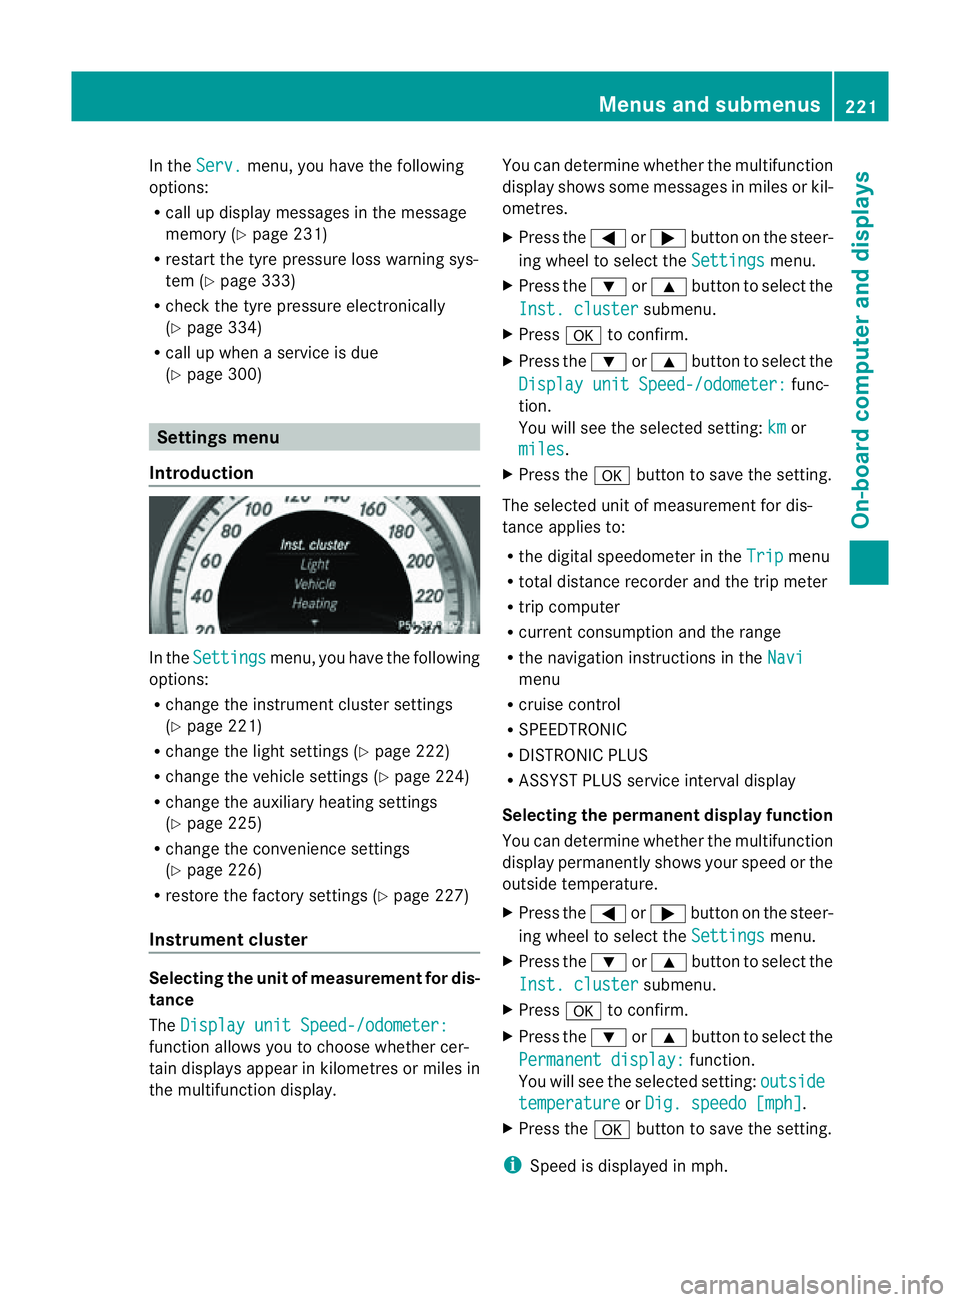
Introduction In the
Settings menu, you have the following
options:
R change the instrument cluster settings
(Y page 221)
R change the lights ettings (Ypage 222)
R change the vehicle settings (Y page 224)
R change the auxiliary heating settings
(Y page 225)
R change the convenience settings
(Y page 226)
R restore the factory settings (Y page 227)
Instrument cluster Selecting the unit of measurement for dis-
tance
The Display unit Speed-/odometer: function allows you to choose whether cer-
tain displays appear in kilometres or miles in
the multifunction display. You can determine whether the multifunction
display shows some messages in miles or kil-
ometres.
X
Press the =or; button on the steer-
ing wheel to select the Settings menu.
X Press the :or9 button to select the
Inst. cluster submenu.
X Press ato confirm.
X Press the :or9 button to select the
Display unit Speed-/odometer: func-
tion.
You will see the selected setting: km or
miles .
X Press the abutton to save the setting.
The selected unit of measuremen tfor dis-
tancea pplies to:
R the digital speedometer in the Trip menu
R total distance recorder and the trip meter
R trip computer
R current consumption and the range
R the navigation instructions in the Navi menu
R cruise control
R SPEEDTRONIC
R DISTRONIC PLUS
R ASSYST PLUS service interval display
Selecting the permanent display function
You can determin ewhether the multifunction
display permanently shows your speed or the
outside temperature.
X Press the =or; button on the steer-
ing wheel to select the Settings menu.
X Press the :or9 button to select the
Inst. cluster submenu.
X Press ato confirm.
X Press the :or9 button to select the
Permanent display: function.
You will see the selected setting: outside temperature or
Dig. speedo [mph] .
X Press the abutton to save the setting.
i Speed is displayed in mph. Menus and submenus
221On-board computer and displays Z
Page 228 of 373
Switching the automatic locking feature
on/off
X
Press the =or; button on the steer-
ing wheel to select the Settings menu.
X Press the :or9 button to select the
Vehicle submenu.
X Press ato confirm.
X Press the :or9 button to select the
Auto. door locks function.
When the Automatic door locks func-
tion is activated, the vehicle doors are dis-
played in red in the multifunction display.
X Press the abutton to save the setting.
If you activate the Automatic door locks function, the vehicle is centrally locked above
as
peed of around 15 km/h.
For further information on the automatic lock-
ing feature, see (Y page 84).
Activating/deactivating the acoustic
locking confirmation
If you switch on the Acoustic Lock function,
an acoustic signal sounds when you lock the
vehicle.
X Press the =or; button on the steer-
ing wheel to select the Settings menu.
X Press the :or9 button to select the
Vehicle submenu.
X Press ato confirm.
X Press the :or9 button to select the
Acoustic Lock function.
If the Acoustic Lock function is activated,
the & symbol in the multifunction dis-
play lights up red.
X Press the abutton to save the setting.
Activating/deactivating the radar sensor
system
X Press the =or; button on the steer-
ing wheel to select the Settings menu.
X Press the :or9button to select the
Vehicle submenu.
X Press ato confirm. X
Press the 9or: button to select
Radar sensor (See Owner's Man.): .
You will see the selected setting: on or
off .
X Press the abutton to save the setting.
i You must deactivate the radar sensor sys-
tem in certain countries and near radio
telescope facilities. For further informa-
tion, see (Y page 368).
When you are close to radio telescope facili-
ties, the radar sensor system will be deacti-
vated automatically.
The following systems are switched off when
the radar sensor system is deactivated:
R DISTRONIC PLUS (Y page 170)
R BAS PLUS (Y page 64)
R PRE-SAFE ®
Brake (Y page 68)
R Blind Spot Assist (Y page 197)
R Active Blind Spot Assist (Y page 201)
Heating Auxiliary heating departuret
ime G
WARNING
Exhaust fumes are produced when the auxili-
ary heating is in operation. Inhaling these
exhaust fumes can be poisonous. You should
therefore switch off the auxiliary heating in
confined spaces without an extraction sys-
tem, e.g. agarage. G
WARNING
When operating the auxiliary heating parts of
the vehicle can get very hot. Make sure that
the exhaust system does not under any cir-
cumstances come into contact with easily
ignitable material such as dry grass or fuels.
The material could otherwise ignite and set
the vehicle alight. Choose your parking spot
accordingly.
Operating the auxiliary heating is thus pro-
hibited at filling stations or when your vehicle
is being refuelled. You must therefore switch
off the auxiliary heating at filling stations. Menus and submenus
225On-board computer and displays Z