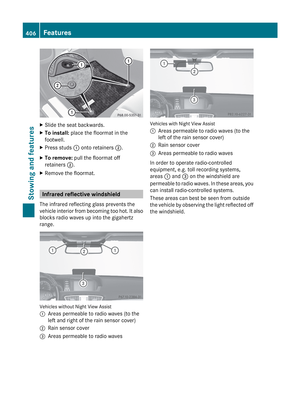
Page 169 of 488

Moving the map
Showing the crosshair
XTo hide the menu: slide ZV the COMAND
controller and, when the Full screen
menu item is shown, press W.XTo move the map: slide XVY, ZV Æ or
aVb the COMAND controller.
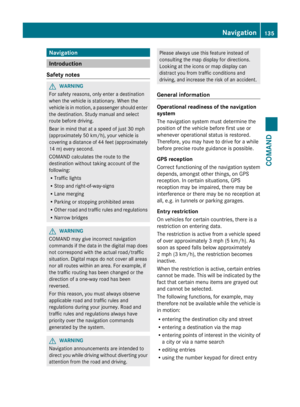
A crosshair appears on the map. If you slide
it again, the map moves in the
corresponding direction under the
crosshair.
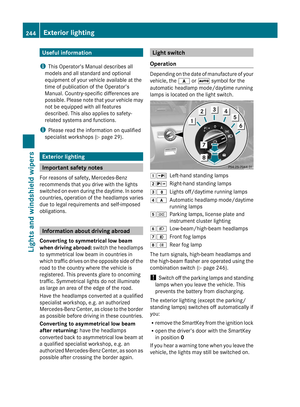
Map with crosshair
:Current vehicle position;Crosshair=Details of the crosshair position?Map scale selected
Display = may be the name of a street, for
example, provided the digital map contains
the necessary data. Or it may show the geo-
coordinate position of the crosshair if the
Geo-coordinates display is switched on
( Y page 170).
Hiding the crosshair and centering the
map on the vehicle position or destination
XPress the % back button.
The crosshair disappears and the map is
set to the vehicle position.
or
XSet the map to the vehicle position; see the
explanation below.Setting the map to the vehicle position,
intermediate stop or destination
position
Centering the map on the vehicle position
XTo show the menu: press W the COMAND
controller.XSelect Position in the navigation system
menu bar by sliding VÆ and turning cVd
the COMAND controller and press W to
confirm.XSelect Vehicle Position Map and press
W to confirm or, if the crosshair is shown,
press the % back button.
This hides the crosshair.
Centering on an intermediate stop
This function requires that a route to an
intermediate stop has been calculated.
XTo show the menu: press W the COMAND
controller.XSelect Position in the navigation system
menu bar by sliding VÆ and turning cVd
the COMAND controller and press W to
confirm.XSelect Stopover Map and press W to
confirm.
The crosshair is centered on the
destination.
Centering on the destination
This function requires that a route to a
destination has been calculated.
XTo show the menu: press W the COMAND
controller.XSelect Position in the navigation system
menu bar by sliding VÆ and turning cVd
the COMAND controller and press W to
confirm.XSelect Destination Map and press W to
confirm.
The crosshair is centered on the
destination.Navigation167COMANDZ
Page 170 of 488

Map display
Setting the map orientation
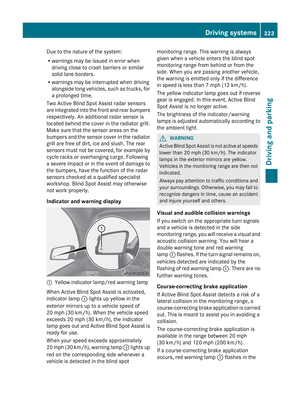
Map orientation
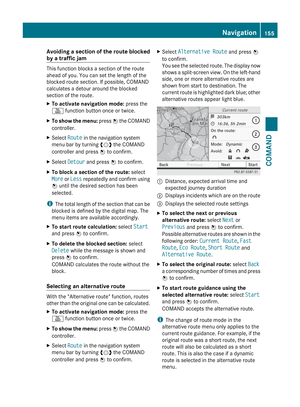
:Current map orientation
The following display modes are possible:
R 0 North orientation (the map view is
displayed so that north is always up).
R ¤ Orientation in direction of travel (the
map is displayed so that the direction of
travel is always up; the orange point of the
icon points north).
R ¤ Bird's-eye view (the map is displayed so
that the direction of travel is always up; the
map projection reproduces the curvature
of the earth and the orange point of the icon
points north).
R ¤ 3D map (the map is displayed in the
direction of travel with elevation and terrain
modeling. The orange point of the icon
points north).
Example display: Bird's-eye view
:Current crosshair position;Current map orientationXTo show the menu: press W the COMAND
controller.XSelect Navi in the main function bar by
sliding ZV and turning cVd the COMAND
controller and press W to confirm.XSelect Map Orientation and press W to
confirm.
A # dot indicates the current setting.XSelect North Up , Heading Up , Bird's-
eye View or 3-D Map by turning cVd the
COMAND controller and press W to
confirm.XTo exit the menu: slide XVY the COMAND
controller.
The map orientation changes accordingly.
Setting the point of interest icons in the
map
You can set the points of interest you wish to
have displayed as symbols on the map. Points
of interest are, for example, gas stations,
hotels, cinemas and restaurants.
The following settings are possible:
R Standard Symbols
Symbol display determined by the factory
settings.
R Personal Symbols
You can determine the symbols yourself.
R No Symbols
The map does not show any symbols.
XTo show the menu: press W the COMAND
controller.168NavigationCOMAND
Page 171 of 488

XSelect Navi in the main function bar by
sliding ZV and turning cVd the COMAND
controller and press W to confirm.XSelect POI Symbols on Map and press
W to confirm.XSelect Standard Symbols , Personal
Symbols or No Symbols .
If you select Personal Symbols , the list of
points of interest appears.XTo switch the icon display on/off: select
a point of interest by turning cVd the
COMAND controller and press W to
confirm.
Depending on the previous state of the
symbols, they will either be shown O or
hidden ª. You can switch on the symbol
displays for more than one point of interest.
i The list shows all symbols that are
contained on the digital map across all
countries. However, not all points of
interest are available in all countries. As a
result, certain point of interest symbols
may not be displayed on the map, even if
the symbol display is switched on.
XTo exit the menu: press the % back
button.
Map information in the display
Showing text information
During route guidance, you can have map
information displayed at the bottom edge of
the display.
XTo show the menu: press W the COMAND
controller.XSelect Navi in the main function bar by
sliding ZV and turning cVd the COMAND
controller and press W to confirm.
The main area is active.XSelect Navi again and press W to confirm.
The navigation menu opens.XSelect Text Information on Map and
press W to confirm.
A # dot indicates the current setting.XSelect Arrival Time/Distance ,
Current Street , Geo-Coordinates or
None and press W to confirm.XTo exit the menu: slide XVY the COMAND
controller.
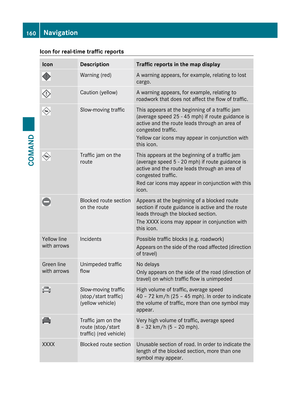
Arrival time/distance to the destination
Arrival time/distance display switched on
:Icon for destination;Distance to the destination=Icon for estimated time of arrival?Estimated time of arrival
You can only see this display during route
guidance. While scrolling the map
( Y page 167), you will see additional data, e.g.
road names, depending on the crosshair
position, if the digital map supports this data.
Road display
Road display active
:Road names or numbers, e.g. for
highwaysNavigation169COMANDZ
Page 172 of 488

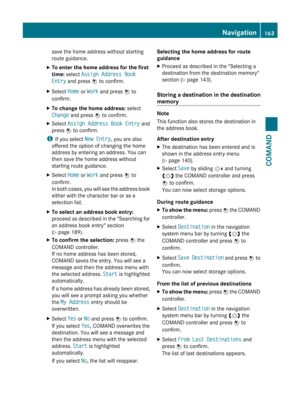
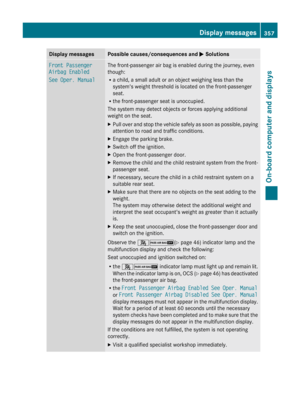
Geo-coordinate display
Geo-coordinate display active
:Current height above average sea level,
rounded;Current vehicle position: latitude
coordinates=Current vehicle position: longitude
coordinates?Number of GPS satellites currently being
used
There must be sufficient GPS reception for all
displays to be shown. If this is not the case,
the display will be grayed out. Height
display : may vary from the actual value,
because the navigation system uses the GPS
signals for the calculation.
While scrolling the map (Y page 167), you will
see the geo-coordinates of the crosshair
position. Height display : and number of
satellites used ? are not displayed.
"None" menu option
Display switched off
:Current map orientation
i During the "Move map" function you can
see additional information depending on
the position of the crosshair, such as a road
name, if the digital map supports this data.
Switching the topographical map on/
off
The topographical map uses different colors
to depict elevation. The color key generally
reflects the topography's dominant
vegetation or the ground's perceived color
when seen from the air, for example:
R green for lowland
R yellow or brown for hills
R gray or white for mountains
XTo show the menu: press W the COMAND
controller.XSelect Navi in the main function bar by
sliding ZV and turning cVd the COMAND
controller and press W to confirm.XSelect Topographical Map and confirm
with W.
Depending on the previous state, switch
the option on O or off ª.
Switching the city model on/off
When the city model is switched on, the map
shows buildings as 3D models.
i The city model is only shown in the "3D
map" map orientation.
It is available for map scales 50 m and
100 m.
The data required for displaying buildings
is not available for all cities.
XTo show the menu: press W the COMAND
controller.XSelect Navi in the main function bar by
sliding ZV and turning cVd the COMAND
controller and press W to confirm.XSelect City (3D) and press W to confirm.
Depending on the previous state, switch
the option on O or off ª.170NavigationCOMAND
Page 173 of 488

:Hills;Buildings=Important buildings
Showing the map data version
XTo show the menu: press W the COMAND
controller.XSelect Navi in the main function bar by
sliding ZV and turning cVd the COMAND
controller and press W to confirm.XSelect Map Version and press W to
confirm.
The map data version number is shown.
Information about new versions of the
digital map can be obtained from an
authorized Mercedes-Benz Center.
Traffic information on the map
If you subscribe to the SIRIUS XM Satellite
Radio Traffic Message Service, traffic
information can be displayed on the map. You
can select three categories for the display.
XTo switch the displays on/off: press W
the COMAND controller to show the menu.XSelect Navi in the main function bar by
sliding ZV and turning cVd the COMAND
controller and press W to confirm.XSelect Traffic Information On Map and
press W to confirm.XSelect a category and press W to confirm.
Depending on the previous state, switch
the option on O or off ª.
R
Traffic incidents
Road sections are illustrated with a yellow
line and arrows.
Warning messages or traffic incidents are
represented on the map by appropriate
symbols and/or yellow/red arrows.
Explanation of symbols ( Y page 158).
R Speed & Flow
Road sections are represented by yellow or
red car icons.
Green arrows: free-flowing traffic
Yellow car icons: congested traffic, average
speed 25 - 45 mph
Red car icons: traffic jam, average speed 5
– 20 mph
R Free Flow
Road sections are illustrated with a green
line and arrows.
Additional settings
Freeway information
When driving on highways, you can have the
nearest gas stations, rest areas, etc., as well
as your current distance from them, shown
on the right-hand side of the display.
XTo activate navigation mode: press the
S function button once or twice.XTo show the menu: press W the COMAND
controller.Navigation171COMANDZ
Page 174 of 488

XSelect Navi in the main function bar by
sliding ZV and turning cVd the COMAND
controller and press W to confirm.XSelect Highway Information and press
W to confirm.
Depending on the previous state, switch
the option on O or off ª.
SIRIUS XM service
Displaying SIRIUS XM service information
You can display the SIRIUS XM service
information.
XTo show the menu: press W the COMAND
controller.XSelect Navi in the main function bar by
sliding ZV and turning cVd the COMAND
controller and press W to confirm.XSelect SIRIUS Service and press W to
confirm.
Registering for the SIRIUS XM traffic
report service
XCall the traffic report provider's phone
number shown on the screen.
i You can also have the satellite service
activated online. To do so, visit the SIRIUS
XM Radio website at
http://www.sirius.com (USA) or
http://www.siriuscanada.com
(Canada).
Once the connection has been established:
XFollow the instructions of the operator.
The activation process may take up to ten
minutes.
If registration is not included when
purchasing the system, your credit card
details will be required to activate your
account.
Compass function
You can display the current compass
direction heading in which the front of the
vehicle is facing.
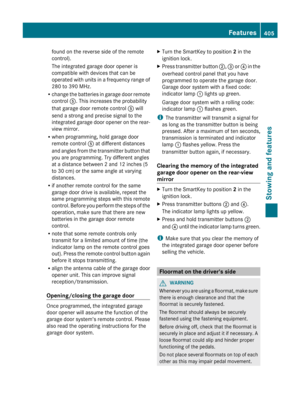
:Current compass heading;geo-coordinates
In the compass view, you can see the current
direction of travel, the current height above
sea level and the coordinates of the vehicle
position, for example.
XTo activate navigation mode: press the
S function button once or twice.XTo show the menu: press W the COMAND
controller.XSelect Position in the navigation system
menu bar by sliding VÆ and turning cVd
the COMAND controller and press W to
confirm.XSelect Compass and press W to confirm.XTo exit the display: confirm Back by
pressing W or press the % button.
Installing new map software
The digital maps generated by the map
software become outdated in the same way
as conventional road maps. Optimum route
guidance can only be provided by
the navigation system in conjunction with the
most up-to-date map software. Information
about new map software versions can be
obtained from an authorized Mercedes-Benz
Center.
172NavigationCOMAND
Page 175 of 488

You can install new map software yourself
which, depending on the scope, may consist
of one or more DVDs.
The installation process can take between
10 and 120 minutes, depending on the scope
of the map software. If the radio is switched
on before you start the installation process,
you can still adjust the volume. You can also
use COMAND to operate automatic climate
control and to cancel the process. Other
functions are not operational. If possible,
carry out the installation when the vehicle is
stationary. The DVD read speed is higher
when the vehicle is stationary than when it is
in motion, so less time is required. If the
starter battery is not sufficiently charged,
COMAND may end the process automatically
in order to protect the battery. Therefore, let
the engine idle during the installation
process.GWARNING
Never leave the engine running in enclosed
spaces. The exhaust gases contain toxic
carbon monoxide. Breathing in exhaust fumes
is a health hazard and can lead to
unconsciousness or death.
Displaying information on the map
version currently in use
XTo activate navigation mode: press the
S function button once or twice.XTo show the menu: press W the COMAND
controller.XSelect Navi in the main function bar by
sliding VÆ and turning cVd the COMAND
controller and press W to confirm.XSelect Map Version and press W to
confirm.
Notes on handling DVDs
R Only hold DVDs by the edge.
R Handle DVDs carefully to prevent reading
errors.
R Avoid getting scratches, fingerprints and
dust on DVDs.
R Use a commercially-available cleaning
cloth to clean discs. When cleaning CDs,
you should wipe in straight lines from the
center outwards rather than in a circular
motion.
R Place DVDs back in their cases after use.
R Protect DVDs from heat and direct sunlight.
Map software copy protection
Map software for COMAND is subject to a
charge. The map software has just one
activation code which is usable in one vehicle
only, and is not transferable. You can obtain
the six-digit activation code from your
authorized Mercedes-Benz Center. If you
have lost the activation code, or if COMAND
does not accept the activation code that you
have received, contact your authorized
Mercedes-Benz Center.
Your vehicle is supplied with map software at
the factory. Depending on the country, map
software for your region is either pre-installed
(Europe/USA) or the map software is
supplied as a DVD (all other countries). You
do not require an activation code for the map
software that is provided with your vehicle.
If the map software on your vehicle has been
installed at the factory and you wish to
reinstall it, this also does not necessitate
entry of the activation code.
Installation processXLoad the map software DVD in the DVD
drive ( Y page 204).
COMAND checks the DVD and shows a
corresponding message in the display.
Map software is not compatible with the
navigation system
You will see a message that the map software
cannot be installed.
XTo confirm the message: press W.
COMAND ejects the DVD.XTake the DVD out of the slot.XInsert a DVD which is compatible with the
vehicle’s navigation system.Navigation173COMANDZ
Page 176 of 488

Map software is not compatible with the
current system software
You will see a message that the system
software and the map software are not
compatible.XTo confirm the message: press W.
COMAND ejects the DVD.XTake the DVD out of the slot.XHave the system software updated at an
authorized Mercedes-Benz Center.
The map software cannot be installed until
the system software has been updated.
Map software compatible with the
navigation system and the current
system software
COMAND checks whether the map data on
the DVD is already installed.
Map data is already installed
You will see a message that the map data is
already installed and a prompt will appear
asking you whether you wish to continue with
the map software installation.
XSelect Yes or No.
If you select Yes, the existing map data is
overwritten.
If you select No, COMAND automatically
ejects the DVD and the installation of the
map software is canceled.XTake the DVD out of the slot.
Map data is not installed yet
In the display, you will see a comparison of
the version statuses of the map software DVD
and the map software installed in COMAND.
A prompt then appears asking whether the
map software installation should be carried
out.
XSelect Yes or No.
If you select Yes, the map data is installed.
If you select No, COMAND automatically
ejects the DVD and the installation of the
map software is canceled.XTake the DVD out of the slot.If an activation code is required for the map
software, a prompt appears in the display
requesting the code to be entered.XEnter the activation code and confirm the
entry with !.
The map software is installed.
If you enter an incorrect activation code, the
prompt to enter the activation code appears
again. If the activation code is entered
incorrectly three times, the prompt asking
you to enter the activation code appears after
a time delay. The time delay increases every
time the activation code is entered
incorrectly, from five minutes up to a
maximum of five hours.
Installing map data
Just before the copying process starts,
COMAND restarts the system.
While the installation is running, you will see
a message to this effect and a progress bar.
XTo cancel the installation process: eject
the DVD.XTake the DVD out of the slot.
i If you interrupt the installation process,
the navigation system will not be
operational. You can continue an
interrupted installation process at a later
date.
XInstallation process with multi-DVD
map data: once the content of the first
DVD has been installed, a message appears174NavigationCOMAND