Page 121 of 488

Calling up the audio function
XSelect Audio in the main function bar by
sliding ZV and turning cVd the COMAND
controller and press W to confirm.
The basic display of the current audio
operating mode, e.g. audio CD, appears.
Switching to radio mode
Option 1
XPress the R function button.
The radio display appears.
i Repeated pressing of this function button
switches between radio and the most
recently active audio source.
Option 2
XSelect Audio again by sliding ZV the
COMAND controller and press W to
confirm.
The Audio menu appears.:Current audio operating mode;Main function bar=Audio menuXPress W the COMAND controller and
confirm Radio.
The radio basic display appears with the
waveband last selected.XTo set the station: if the display/selection
window is activated in the radio display,
turn cVd or slide XVY COMAND
controller.
Entering characters in navigation mode
(entering a city)
General information
Character entry is explained in the following
sections using NEW YORK as an example for
entering a city.
If you want to use the address entry menu
( Y page 137) to enter a city, a street or a
house number, for example, COMAND
provides either a list with a character bar
(option 1) or a selection list (option 2).
At a glance119COMANDZ
Page 122 of 488

You can enter the characters using either the
character bar or the number keypad. In the
selection list, you select an entry to copy it to
the address entry menu.
Option 1: city list with character barXCall up the city list with character bar
( Y page 137).
The alphabetically sorted city list shows the
first available entries.
Entering characters using the character
bar
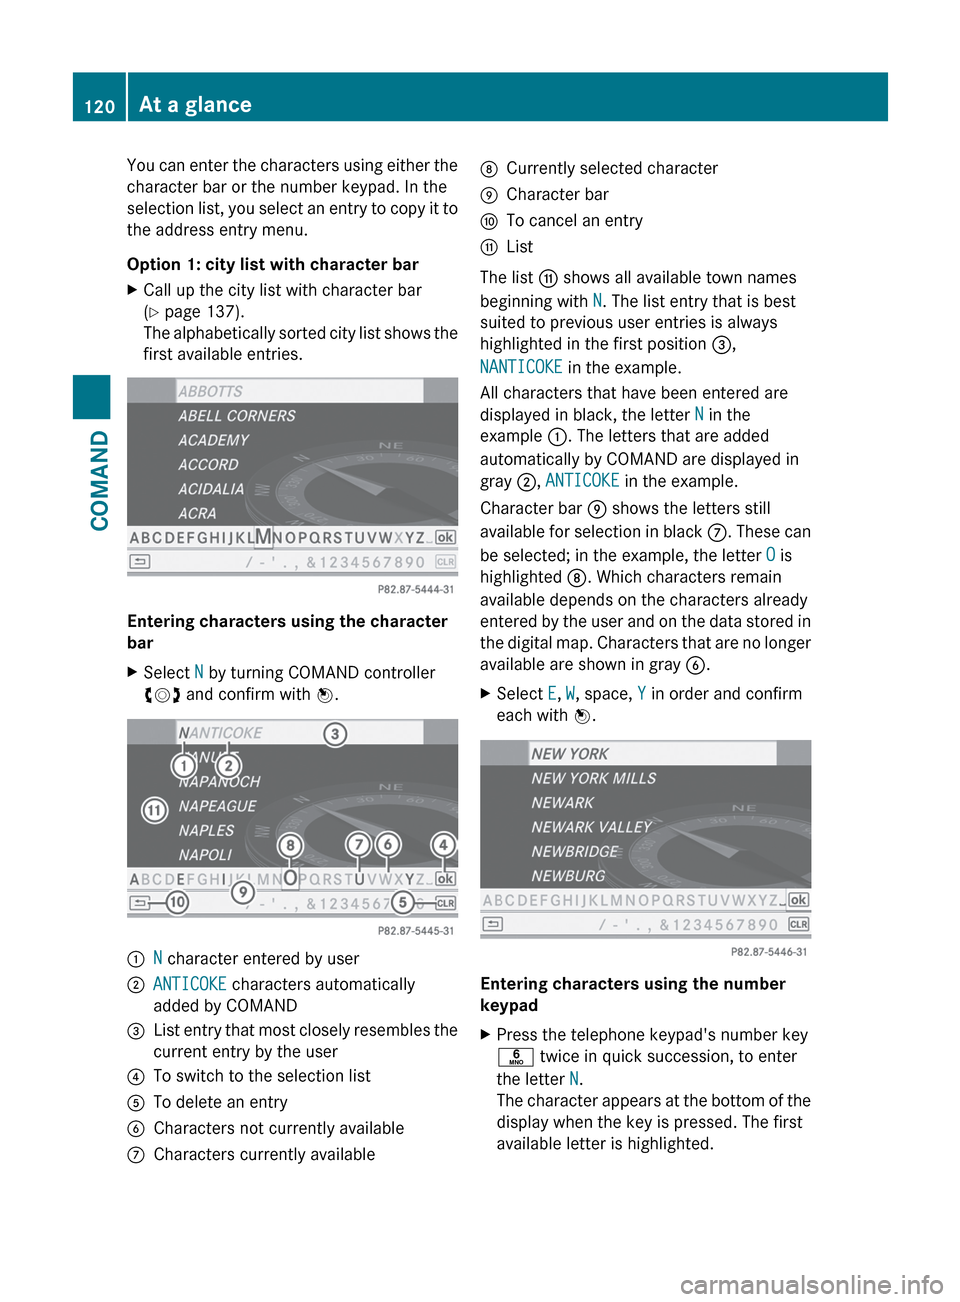
XSelect N by turning COMAND controller
cVd and confirm with W.:N character entered by user;ANTICOKE characters automatically
added by COMAND=List entry that most closely resembles the
current entry by the user?To switch to the selection listATo delete an entryBCharacters not currently availableCCharacters currently availableDCurrently selected characterECharacter barFTo cancel an entryGList
The list G shows all available town names
beginning with N. The list entry that is best
suited to previous user entries is always
highlighted in the first position =,
NANTICOKE in the example.
All characters that have been entered are
displayed in black, the letter N in the
example :. The letters that are added
automatically by COMAND are displayed in
gray ;, ANTICOKE in the example.
Character bar E shows the letters still
available for selection in black C. These can
be selected; in the example, the letter O is
highlighted D. Which characters remain
available depends on the characters already
entered by the user and on the data stored in
the digital map. Characters that are no longer
available are shown in gray B.
XSelect E, W , space, Y in order and confirm
each with W.
Entering characters using the number
keypad
XPress the telephone keypad's number key
p twice in quick succession, to enter
the letter N.
The character appears at the bottom of the
display when the key is pressed. The first
available letter is highlighted.120At a glanceCOMAND
Page 123 of 488

You see which characters you can enter with
that key. Each time the key is pressed, the
next character is selected.
Example: key p:
R press once = M
R press twice = N
R press three times = OXWait until the character display goes out.
The entries matching your input are shown
in the list.XEnter E, W , space, Y with the corresponding
keys.
i The space is entered using number key
9 .
Further functions in the list with
character bar
XTo delete characters: select F by sliding
V Æ and turning cVd the COMAND
controller and press W to confirm.XTo delete an entry: select F and press
and hold W the COMAND controller until
the entire entry has been deleted.XTo switch the character set: select
B and press W to confirm.XTo cancel an entry: select the & symbol
in the bottom left of the character bar and
press W to confirm.
or
XPress the % back button.
The address entry menu appears.XTo accept the first list entry: press and
hold W the COMAND controller until the
address entry menu appears.
The accepted list entry is shown there.
Calling up the list as a selection list
Select the desired city from the selection list.
If there are several entries for a city or if
several cities of the same name are stored,
then ¬ is highlighted in the character bar.
XPress W the COMAND controller.It is also possible to switch the city list to the
selection list at any time during character
input.XSlide W the COMAND controller
repeatedly until the city list appears as a
selection list.
or
XSelect ¬ in the character bar by turning
cVd the COMAND controller and press
W to confirm.
Option 2: city list as selection list
COMAND either shows the selection list
automatically or you can call up the selection
list from the list with character bar.
The example shows the selection list after the
city NEW YORK has been entered. The entry is
highlighted automatically.
XConfirm NEW YORK with COMAND
controller W.
The address entry menu appears. You can
now enter a street, for example.At a glance121COMANDZ
Page 124 of 488

iYou will find further information in the
"Destination entry" section ( Y page 137).
Entering characters in the address and
the phone book
Introduction
The following section describes how to enter
characters in the phone book/address book
when creating a new entry.
Creating a new entry in the phone book
XCall up the input menu with data fields
( Y page 190).
Phone book: input menu with data fields
:Selected data field with cursor;Character bar
Creating a new entry in the address book
XCall up the input menu with data fields
( Y page 190).
Input menu with data fields
:Selected data field with cursor;Character barEntering characters
The example describes how to enter the
surname Schulz.XSelect S by turning cVd and sliding ZVÆ
the COMAND controller and press W to
confirm.
S is entered into the data field. All
characters are shown in black and can
always be selected in the character bar.
The character bar offers characters
corresponding to the respective data field
(letters or digits).:To switch the character bar to upper-
case/lower-case letters;To switch the character bar from upper/
lower-case letters to digits=To change the language of the character
bar?To delete a character/an entryXSelect c and confirm by pressing W the
COMAND controller.
The letter c is added to S in the data field.XRepeat the process until the name has
been entered in full.X To enter a phone number: select the
digits one by one in the corresponding data
field by turning cVd and sliding ZVÆ the
COMAND controller and press W to
confirm.
Switching data fields
If you want to enter a first name after you have
entered a surname, for example, proceed as
follows to switch between the data fields:
122At a glanceCOMAND
Page 125 of 488

Option 1XSelect 4 or 5 in the character bar and
press W to confirm.
The input menu shows the data field
selected.:Cursor in the next data field;To store an entry=4 and 5 icons to select a data field
Option 2
XSlide ZV the COMAND controller
repeatedly until the character bar
disappears.XSelect the data field by sliding ZVÆ and
press W to confirm.
Storing an entry
XSelect ¬ in the character bar by turning
cVd the COMAND controller and press
W to confirm.
The entry is stored in the address book.
Further functions available in the
character bar
XTo switch the character bar to upper/
lower-case characters: select * or
E and press W to confirm.XTo switch the character set: select
p and press W to confirm.
The character set switches between
upper/lower-case letters and digits.XTo change the language of the
character bar: select B and press W
to confirm.XSelect the language by turning cVd the
COMAND controller and press W to
confirm.XTo reposition the cursor within the data
field: select 2 or 3 and press W to
confirm.:Cursor (repositioned);2 and 3 icon to reposition the cursorXDelete the character/entry ( Y page 191).
Basic functions of COMAND
Switching COMAND on/off
XPress the u function button on the
center console.
i If you switch off COMAND, playback of
the current audio or video source will also
be switched off. You cannot switch off
COMAND while making a call via COMAND.
You can also make phone calls using the
buttons on the multifunction steering
wheel when COMAND is switched off
( Y page 331).
At a glance123COMANDZ
Page 126 of 488

Mute
Switching audio and video sources on/off
XPress the 8 button on the multifunction
steering wheel.
The sound from the respective audio or
video source is switched on or muted.
i When the sound is off, the system
displays the , symbol in the status line.
When you change the audio or video
source, or adjust the volume, sound
automatically switches on again.
i Even if the sound is switched off, you will
still hear traffic and navigation system
announcements.
Switching off Traffic program and
navigation announcements completely
XTraffic program: press the 8 button
until the . message disappears from the
status bar of the display.
A confirmation tone sounds.XNavigation announcements: during an
announcement, press the 8 button on
the multifunction steering wheel.
Switching Traffic program and navigation
announcements on again
XTraffic program: press and hold down the
8 button until the . display appears
in the status bar.
A confirmation tone sounds.XNavigation messages: select the y
symbol in the navigation menu bar and
press W to confirm.
i
The navigation announcements are
activated again if you switch COMAND off
and on again or start a new route guidance.
Adjusting the volume
Adjusting the volume for the audio or
video source
XTo adjust: turn thumbwheel :.
or
XPress the W or X button on the
multifunction steering wheel.
The volume of the currently selected audio
or video source changes.
You can also adjust the volume for the
following:
R traffic announcements
R navigation announcements
R phone calls
R Voice Control System (see the separate
operating instructions)
Adjusting the volume for navigation
announcements
During a navigation announcement:
XTurn thumbwheel :.
or
XPress the W or X button on the
multifunction steering wheel.
Adjusting the volume for phone calls
You can adjust the volume for hands-free
mode during a telephone call.
XTurn thumbwheel :.
or
XPress the W or X button on the
multifunction steering wheel.124At a glanceCOMAND
Page 127 of 488

Adjusting the sound settings
Calling up the sound menu
You can make various sound settings for the
different audio and video sources. This means
that it is possible to set more bass for radio
mode than for audio CD mode, for example.
You can call up the respective sound menu
from the menu of the desired mode.
The example describes how to call up the
sound menu in radio mode.
XPress the R function button.
The radio display appears. You will hear the
last station played on the last waveband.XSelect Sound by sliding VÆ and turning
cVd the COMAND controller and press
W to confirm.
You can now set the treble and bass or the
balance and fader for radio mode.
Adjusting treble and bass
XSelect Treble or Bass in the sound menu
by turning cVd the COMAND controller
and press W to confirm.
An adjustment scale appears.
To set the treble
:Last setting selected;Current settingXSelect a setting by turning cVd the
COMAND controller and press W to
confirm.
The setting is stored and you exit the menu.
Adjusting balance and fader
With the Balance function, you can control
whether the sound is louder on the driver's or
front-passenger side.
The Fade function is used to control whether
the sound is louder in the front or the rear of
the vehicle.
XSelect Balance/Fader in the sound menu
by turning cVd and press W to confirm.:Current settingXSelect a setting by sliding ZVÆ or XVY the
COMAND controller and press W to
confirm.
The setting is stored and you exit the menu.At a glance125COMANDZ
Page 128 of 488

Surround sound
General information
If your vehicle is equipped with the harman/
kardon ®
Logic 7 ®
surround sound system,
you can set the optimum surround sound for
every passenger.
The harman/kardon ®
Logic 7 ®
surround
sound system is available for the following
operating modes:
R radio (FM only)
R satellite radio
R audio CD
R audio DVD (MLP, dts, PCM and Dolby
Digital audio formats)
R MP3 (including SD memory card)
R Media Interface
R video DVD (PCM, dts and Dolby Digital
audio formats)
R AUX
Because some DVDs contain both stereo and
multichannel audio formats, it may be
necessary to set the audio format
( Y page 211).
i The Logic7 ®
ON function enables
playback of, e.g. stereo recordings with a
surround sound experience for every
passenger. It enables optimum playback of
music and films on CD, audio DVD or video
DVD with multichannel audio formats, such
as MLP, dts or Dolby Digital. This results in
sound characteristics like those intended
by the sound engineer when the original
was recorded.
i If you select LOGIC7®
OFF , the sound
system plays the tracks as stored on the
medium. Due to the design of the
passenger compartment, an optimum
audio experience cannot be guaranteed for
all passengers.
i Discs which support the audio formats
mentioned have the following logos:
Dolby Digital
dts
Switching surround sound on/off
Example: switching on surround sound for
radio mode
XPress the R function button.
The radio display appears. You will hear the
last station played on the last waveband.XSelect Sound by sliding VÆ and turning
cVd the COMAND controller and press
W to confirm.XSelect 3D Sound and press W to confirm.126At a glanceCOMAND