Page 97 of 436
97
1. DESTINATION SEARCH
3
NAVIGATION SYSTEM
CT200h_Navi_OM76078E_(EE)
14.02.06 12:29
1Press the “MENU” button on the
Remote Touch. (See “Remote
Touch” on page 12.)
2Select “Navi”, and select “Menu” if
the map screen is displayed.
3Select “Destination” on the naviga-
tion menu screen.
4Select “POI near cursor” on the sec-
ond page of the “Destination”
screen.
5Set the search point by one of the fol-
lowing methods.
To set a memory point as a destina-
tion using the telephone number, the
number must already be registered
with the memory point. (See page
133.)
DESTINATION SEARCH BY
“POI near cursor”
The destination can be set by select-
ing the search point and the POI cat-
egory.
No.Function
Enter the town centre
Set the current position as the
search point
Set the search point via the map
Set the search point from any des-
tination
It is possible to display the names of
POIs located within approximately
30 km (20 miles) from the selected
search point.
Page 102 of 436

102
1. DESTINATION SEARCH
CT200h_Navi_OM76078E_(EE)
14.02.06 12:29
3. STARTING ROUTE GUIDANCE
1When an arrow facing the desired
point is selected, the map scrolls in
that direction.
The scroll stops when the selection of
the arrow is released.
2Select “Enter”.
The system starts route search and dis-
plays recommended routes.
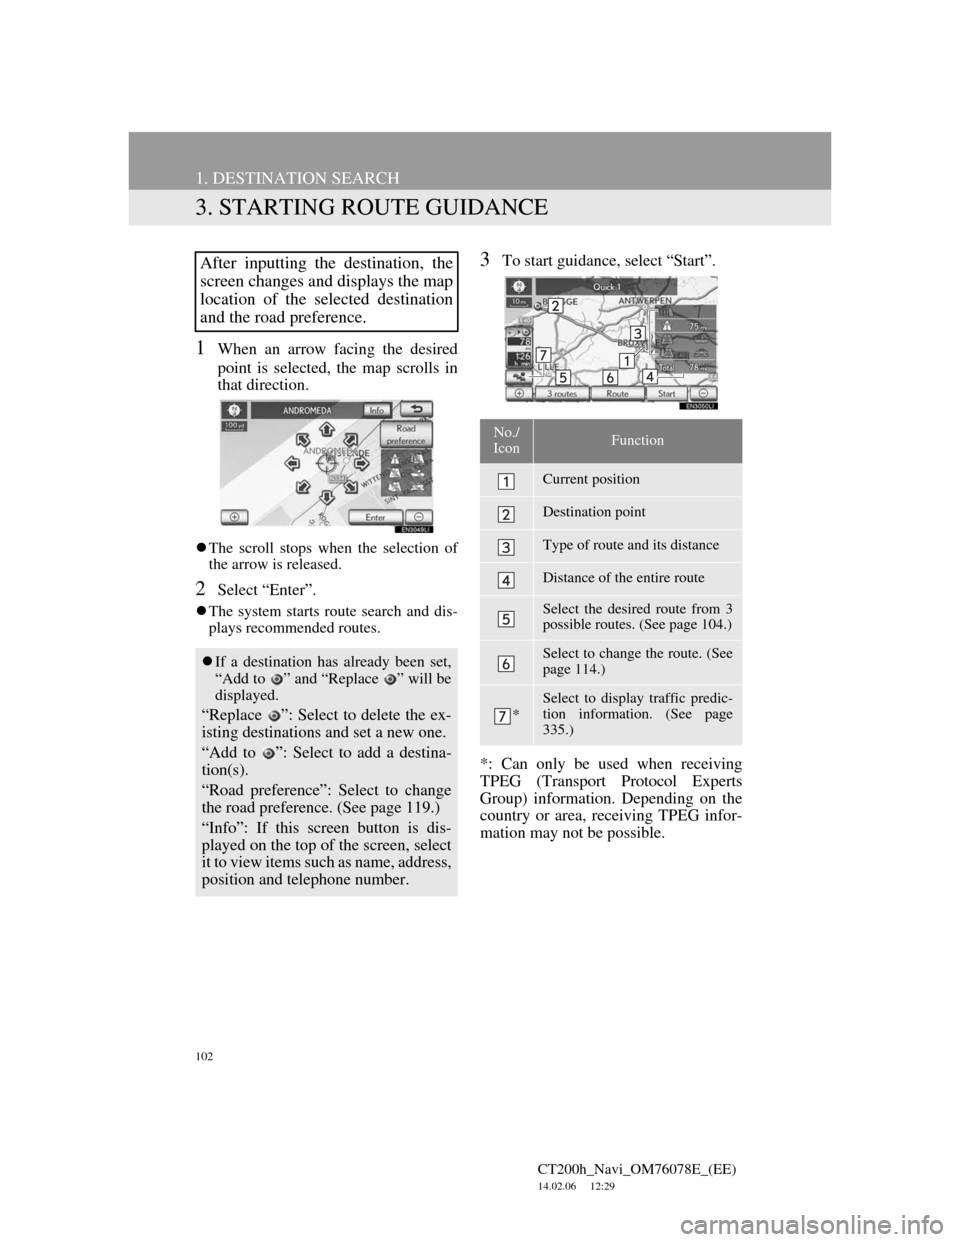
3To start guidance, select “Start”.
*: Can only be used when receiving
TPEG (Transport Protocol Experts
Group) information. Depending on the
country or area, receiving TPEG infor-
mation may not be possible.After inputting the destination, the
screen changes and displays the map
location of the selected destination
and the road preference.
If a destination has already been set,
“Add to ” and “Replace ” will be
displayed.
“Replace ”: Select to delete the ex-
isting destinations and set a new one.
“Add to ”: Select to add a destina-
tion(s).
“Road preference”: Select to change
the road preference. (See page 119.)
“Info”: If this screen button is dis-
played on the top of the screen, select
it to view items such as name, address,
position and telephone number.
No./
IconFunction
Current position
Destination point
Type of route and its distance
Distance of the entire route
Select the desired route from 3
possible routes. (See page 104.)
Select to change the route. (See
page 114.)
*
Select to display traffic predic-
tion information. (See page
335.)
Page 128 of 436
128
3. MEMORY POINTS
CT200h_Navi_OM76078E_(EE)
14.02.06 12:29
1Press the “MENU” button on the
Remote Touch.
2Select “Navi”, and select “Menu” if
the map screen is displayed.
3Select “Memory point” on the navi-
gation menu screen.
4Select “Home” on the “Memory
point” screen.
5Select “Edit”.
6Select the screen button to be edited.
7Select “OK”.
EDITING HOME
No.FunctionPage
Select to change the
home icon to be dis-
played on the map. 135
Select to edit home
name. The name can be
displayed on the map.
136
Select to illuminate the
indicator. When the indi-
cator is illuminated, the
registered name is dis-
played on the upper part
of the map screen.
137
Select to edit location in-
formation. 137
Select to edit home’s
telephone number. 137
Page 131 of 436
131
3. MEMORY POINTS
CT200h_Navi_OM76078E_(EE)
14.02.06 12:29
3
NAVIGATION SYSTEM
1Press the “MENU” button on the
Remote Touch.
2Select “Navi”, and select “Menu” if
the map screen is displayed.
3Select “Memory point” on the navi-
gation menu screen.
4Select “Quick access” on the “Mem-
ory point” screen.
5Select “Edit”.
6Select the screen button of the de-
sired quick access.
7Select the screen button to be edited.
8Select “OK”.
EDITING QUICK ACCESS
No.FunctionPage
Select to change the
icons to be displayed on
the map. 135
Select to edit the quick
access name. The names
can be displayed on the
map.
136
Select to illuminate the
indicator. When the indi-
cator is illuminated, the
registered name is dis-
played on the upper part
of the map screen.
137
Select to edit location in-
formation. 137
Select to edit telephone
number. 137
Page 134 of 436

134
3. MEMORY POINTS
CT200h_Navi_OM76078E_(EE)
14.02.06 12:29
6Select the desired screen button and
enter the location in the same way as
for a destination search. (See “DES-
TINATION SEARCH” on page 81.)
When registering establishments that
were set as a destination using an
online search, select “Previous”.
After the memory point has been regis-
tered, the “Memory points” screen will
be displayed.
7Select “OK”.
1Press the “MENU” button on the
Remote Touch.
2Select “Navi”, and select “Menu” if
the map screen is displayed.
3Select “Memory point” on the navi-
gation menu screen.
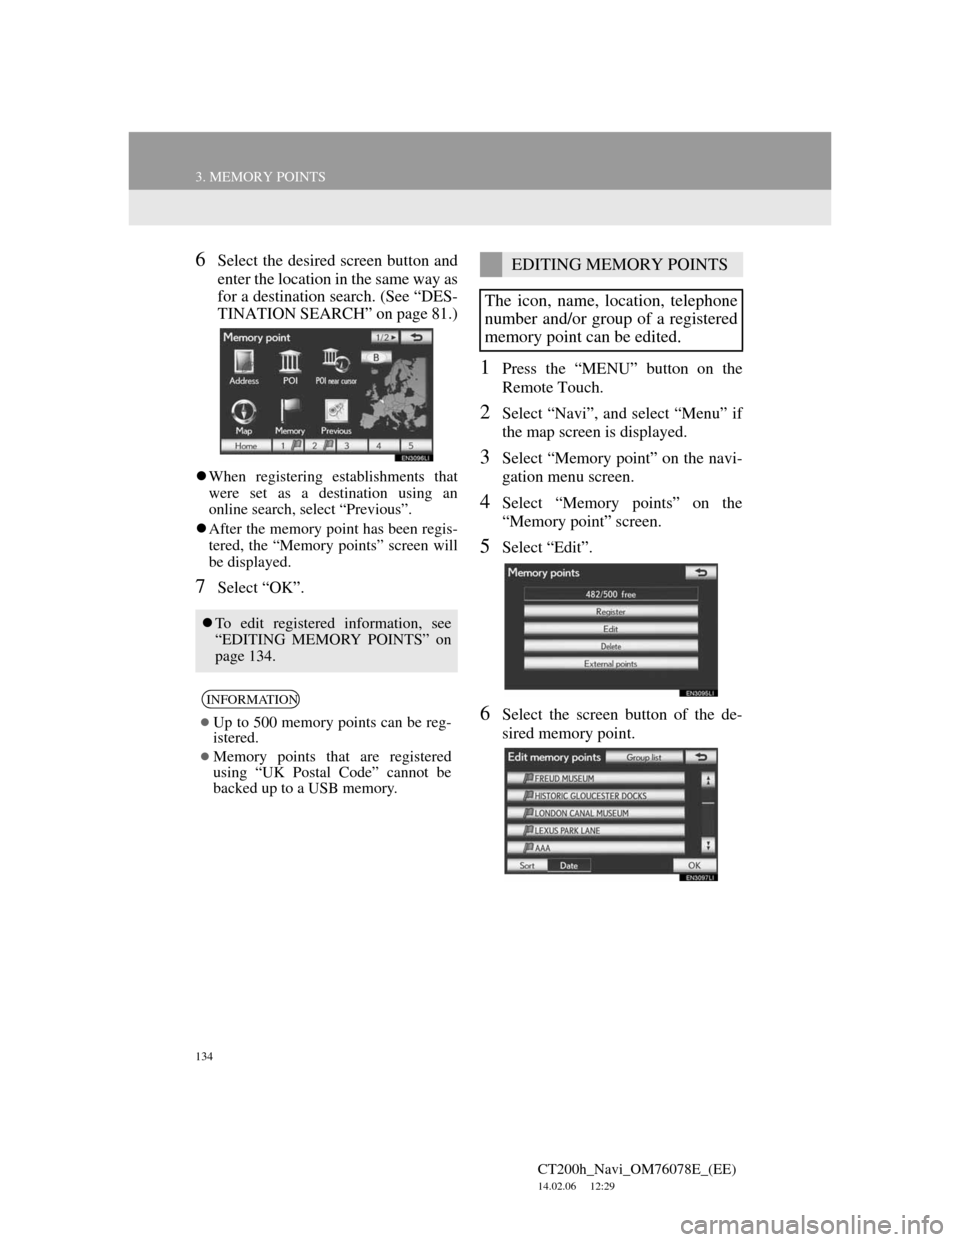
4Select “Memory points” on the
“Memory point” screen.
5Select “Edit”.
6Select the screen button of the de-
sired memory point.
To edit registered information, see
“EDITING MEMORY POINTS” on
page 134.
INFORMATION
Up to 500 memory points can be reg-
istered.
Memory points that are registered
using “UK Postal Code” cannot be
backed up to a USB memory.
EDITING MEMORY POINTS
The icon, name, location, telephone
number and/or group of a registered
memory point can be edited.
Page 135 of 436
135
3. MEMORY POINTS
CT200h_Navi_OM76078E_(EE)
14.02.06 12:29
3
NAVIGATION SYSTEM
7Select the screen button to be edited.
8Select “OK”.
TO CHANGE “Mark”
1Select “Mark”.
2Select the desired icon.
Change pages by selecting the “Page
1”, “Page 2” or “With sound” tab.
No.FunctionPage
Select to change the icon
to be displayed on the
map. 135
Select to edit the memory
point name. The names
can be displayed on the
map.
136
Select to illuminate the
indicator. When the indi-
cator is illuminated, the
registered name is dis-
played on the upper part
of the map screen.
137
Select to edit location in-
formation. 137
Select to edit the tele-
phone number. 137
Select to register group. 138
Page 137 of 436
137
3. MEMORY POINTS
CT200h_Navi_OM76078E_(EE)
14.02.06 12:29
3
NAVIGATION SYSTEM
DISPLAYING MEMORY POINT
NAMES
1To display a memory point name, se-
lect “Show name”. The indicator
will illuminate. To hide memory
point names, select “Show name”
again. The indicator will turn off.
TO CHANGE “Location”
1Select “Location”.
2Select one of the 8 directional screen
buttons to move the cursor to the
desired point on the map.
3Select “OK”.
The previous screen will be displayed.
TO CHANGE “Tel. no.” (TELE-
PHONE NUMBER)
1Select “Tel. no.”.
2Enter the number using the number
keys.
3Select “OK”.
The previous screen will be displayed.
The name of a memory point can be
set to be displayed on the map.
Page 160 of 436
160
4. SETUP
CT200h_Navi_OM76078E_(EE)
14.02.06 12:30
4Select “Set dealer”.
5If the dealer has not been registered,
enter the location of the dealer in the
same way as for a destination search.
(See “DESTINATION SEARCH”
on page 81.)
When “Set dealer” registration is fin-
ished, the “Set dealer” screen will be
displayed.
6Select the screen button to be edited.
No
.Function
Select to enter the name of a deal-
er. (See page 161.)
Select to enter the name of a dealer
member. (See page 161.)
Select to set the location. (See
page 161.)
Select to set the telephone num-
ber. (See page 161.)
Select to delete the dealer infor-
mation displayed on the screen.
Select to set the displayed dealer
as a destination. (See “START-
ING ROUTE GUIDANCE” on
page 102.)