Page 51 of 436
51
1. BASIC INFORMATION BEFORE OPERATION
2
BASIC FUNCTION
CT200h_Navi_OM76078E_(EE)
14.02.06 12:29
MEMORY POINT INFORMA-
TION
1Select “Info”.
2Information such as the name, ad-
dress, position and telephone num-
ber are displayed.
If “Enter ” is selected, the position
of the cursor will be set as a destina-
tion.
If there is already a set destination,
“Add to ” and “Replace ” will be
displayed.
“Add to ”: Select to add a destina-
tion.
“Replace ”: Select to delete the ex-
isting destination(s) and set a new one.
To register this POI as a memory
point, select “Save”. (See “REGIS-
TERING MEMORY POINTS” on
page 133.)
If is selected, the registered
telephone number can be called.
The desired POI can be displayed on
the map screen. (See “DISPLAY POI
ICONS” on page 122.)
When the cursor is set on a memory
point icon, the name and “Info” are
displayed at the top of the screen.
Page 52 of 436
52
1. BASIC INFORMATION BEFORE OPERATION
CT200h_Navi_OM76078E_(EE)
14.02.06 12:29
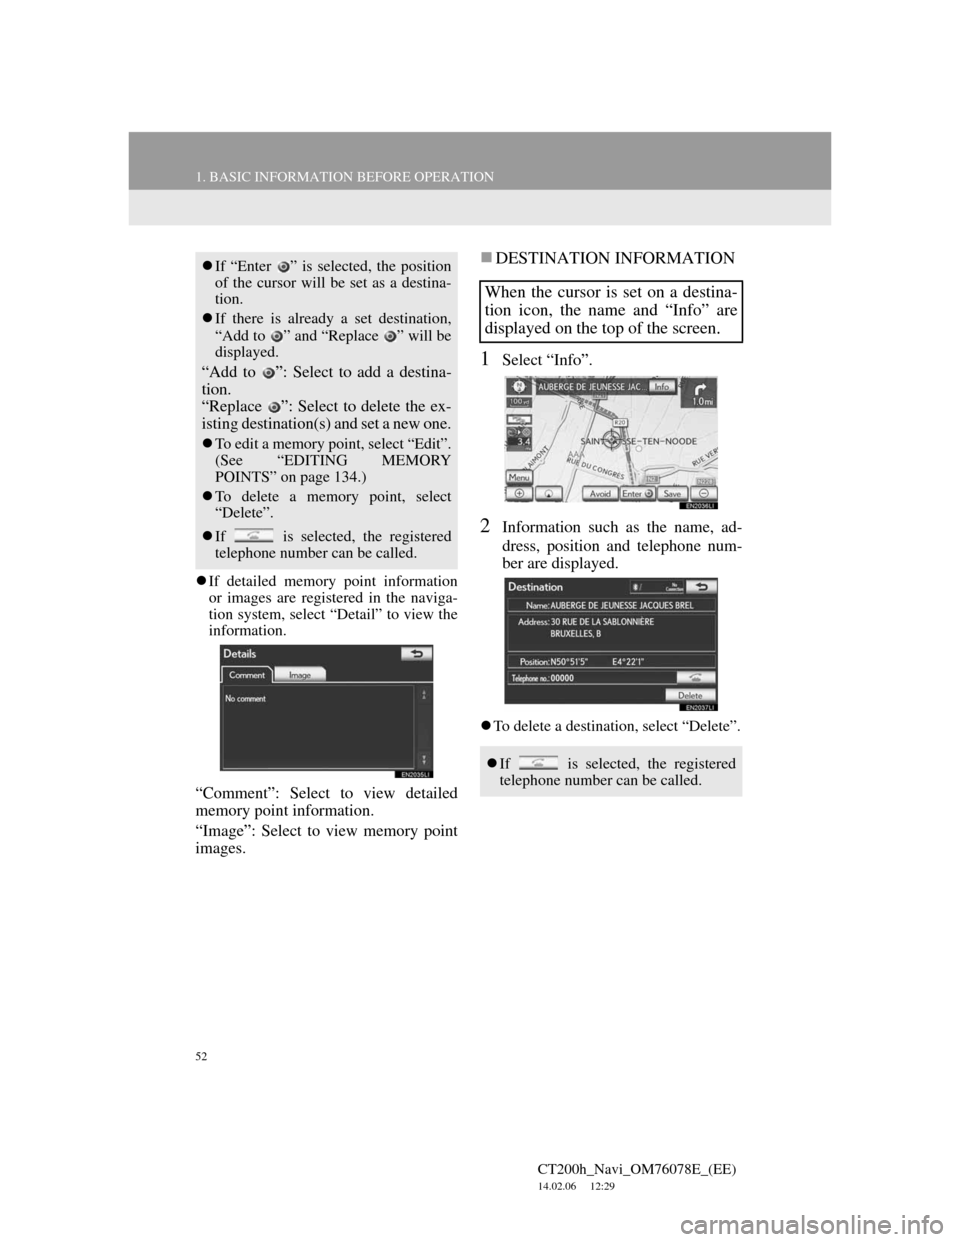
If detailed memory point information
or images are registered in the naviga-
tion system, select “Detail” to view the
information.
“Comment”: Select to view detailed
memory point information.
“Image”: Select to view memory point
images.
DESTINATION INFORMATION
1Select “Info”.
2Information such as the name, ad-
dress, position and telephone num-
ber are displayed.
To delete a destination, select “Delete”.
If “Enter ” is selected, the position
of the cursor will be set as a destina-
tion.
If there is already a set destination,
“Add to ” and “Replace ” will be
displayed.
“Add to ”: Select to add a destina-
tion.
“Replace ”: Select to delete the ex-
isting destination(s) and set a new one.
To edit a memory point, select “Edit”.
(See “EDITING MEMORY
POINTS” on page 134.)
To delete a memory point, select
“Delete”.
If is selected, the registered
telephone number can be called.
When the cursor is set on a destina-
tion icon, the name and “Info” are
displayed on the top of the screen.
If is selected, the registered
telephone number can be called.
Page 54 of 436
54
1. BASIC INFORMATION BEFORE OPERATION
CT200h_Navi_OM76078E_(EE)
14.02.06 12:29
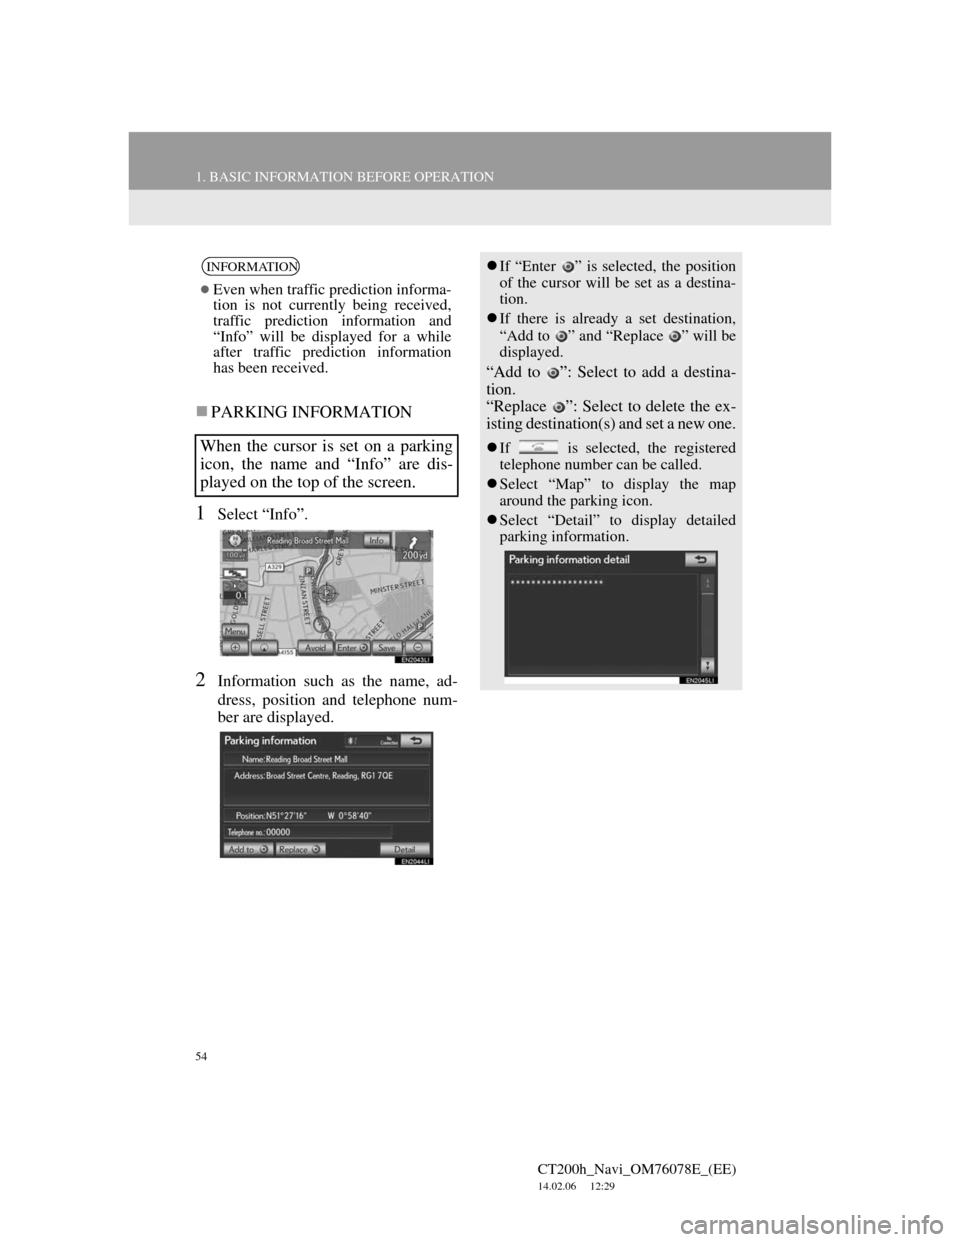
PARKING INFORMATION
1Select “Info”.
2Information such as the name, ad-
dress, position and telephone num-
ber are displayed.
INFORMATION
Even when traffic prediction informa-
tion is not currently being received,
traffic prediction information and
“Info” will be displayed for a while
after traffic prediction information
has been received.
When the cursor is set on a parking
icon, the name and “Info” are dis-
played on the top of the screen.
If “Enter ” is selected, the position
of the cursor will be set as a destina-
tion.
If there is already a set destination,
“Add to ” and “Replace ” will be
displayed.
“Add to ”: Select to add a destina-
tion.
“Replace ”: Select to delete the ex-
isting destination(s) and set a new one.
If is selected, the registered
telephone number can be called.
Select “Map” to display the map
around the parking icon.
Select “Detail” to display detailed
parking information.
Page 72 of 436
72
2. SETUP
CT200h_Navi_OM76078E_(EE)
14.02.06 12:29
1Press the “MENU” button on the
Remote Touch, then select “Setup”.
2Select “General” on the “Setup”
screen.
3Select “Delete personal data”.
4Select “Delete”.
5Select “Yes”.
The following personal data can be
deleted or returned to their default set-
tings:
• Maintenance conditions
• Maintenance information off setting
• Memory point
• Password settings for backing up and
copying memory points
• Areas to avoid
• Previous points
• Route guidance
• Route trace
• Phonebook data
• Call history data
• Speed dial data
•Bluetooth
® phone data
• Phone sound settings
• Phone display settings
• Message settings
• Audio setting
•Bluetooth
® audio setting
• Search engine settings
• Opening image data
• Screen off image data
DELETING PERSONAL
DATA
INFORMATION
This function is not available while
driving.
Page 76 of 436
76
CT200h_Navi_OM76078E_(EE)
14.02.06 12:29
1. QUICK REFERENCE....................... 78
2. DESTINATION SEARCH................ 81
SELECTING THE SEARCH AREA ....... 82
DESTINATION SEARCH BY HOME ... 84
DESTINATION SEARCH BY QUICK
ACCESS ................................................ 84
DESTINATION SEARCH BY “Address” ...
85
DESTINATION SEARCH BY “POI*” ... 89
DESTINATION SEARCH BY “Map” .... 92
DESTINATION SEARCH BY “Memory” ...
93
DESTINATION SEARCH BY “Previous”...
93
DESTINATION SEARCH BY
“Intersection” ......................................... 94
DESTINATION SEARCH BY
“Motorway ent./exit” ............................. 95
DESTINATION SEARCH BY
“Coordinates”......................................... 96
DESTINATION SEARCH BY
“Telephone no.” ..................................... 96
DESTINATION SEARCH BY
“POI* near cursor”................................. 97
DESTINATION SEARCH BY
“UK Postal Code” ................................ 101
3. STARTING ROUTE GUIDANCE . 102
1DESTINATION SEARCH
Page 80 of 436
80
1. DESTINATION SEARCH
CT200h_Navi_OM76078E_(EE)
14.02.06 12:29
“POI near
cursor”Select to set the destination by selecting the
search point and the POI category.97
Quick access
screen button
Select one of the 5 quick access as a destina-
tion. To use this function, it is necessary to set
quick access to the quick access screen but-
tons. (To register a quick access, see “REGIS-
TERING QUICK ACCESS” on page 130.)
84
“Home”
Select your personal home address without
having to enter the address each time. If a
home address has not been registered, a mes-
sage will be displayed and the setting screen
will automatically appear. (To register home,
see “REGISTERING HOME” on page 127.)
84
“Coordinates”Select to enter latitude and longitude coordi-
nates.96
“Telephone
no.”Select to enter a destination using a telephone
number.96
No.NameFunctionPage
Page 82 of 436
82
1. DESTINATION SEARCH
CT200h_Navi_OM76078E_(EE)
14.02.06 12:29
1Press the “MENU” button on the
Remote Touch. (See “Remote
Touch” on page 12.)
2Select “Navi”, and select “Menu” if
the map screen is displayed.
3Select “Destination” on the naviga-
tion menu screen.
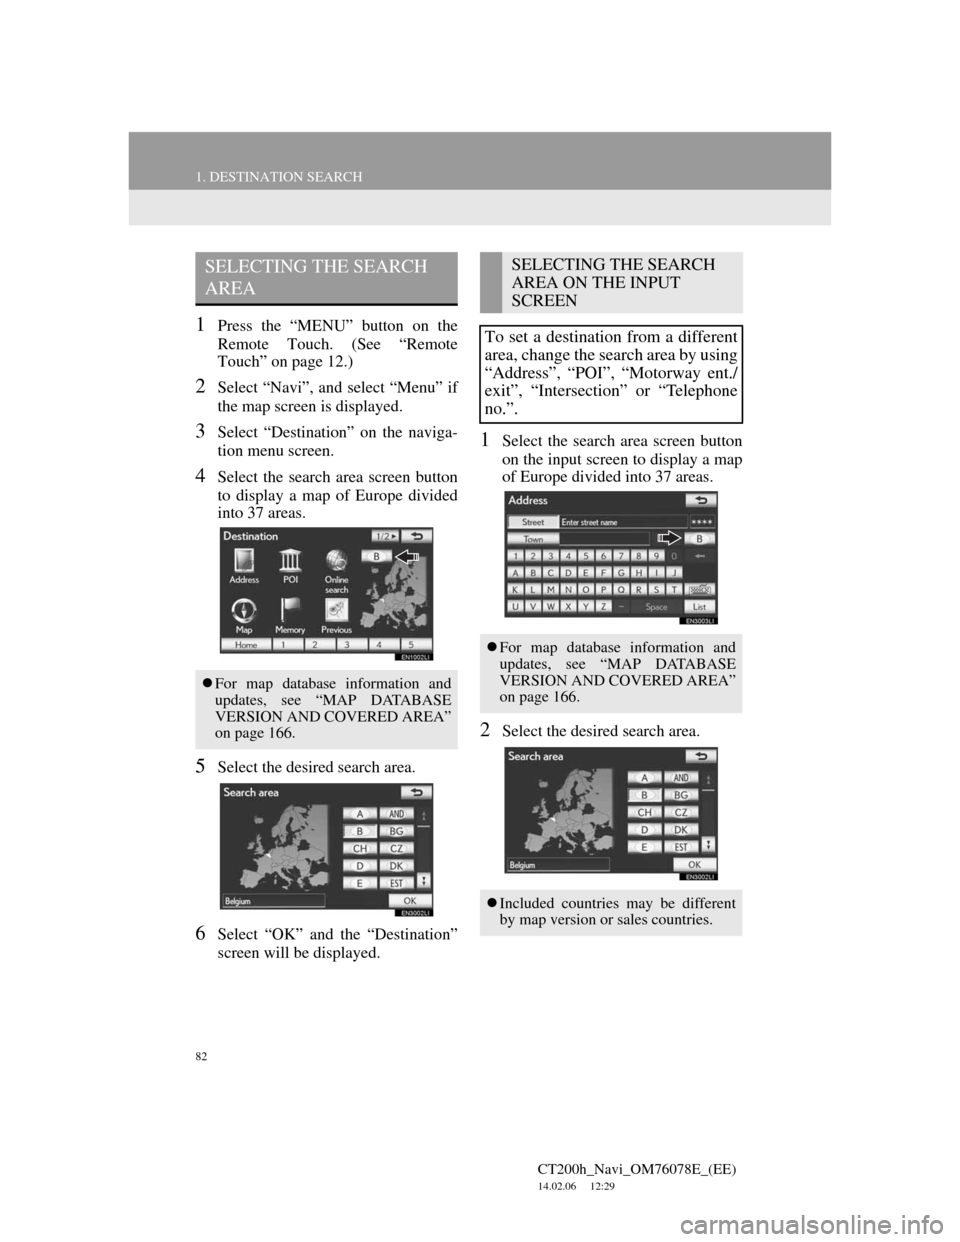
4Select the search area screen button
to display a map of Europe divided
into 37 areas.
5Select the desired search area.
6Select “OK” and the “Destination”
screen will be displayed.
1Select the search area screen button
on the input screen to display a map
of Europe divided into 37 areas.
2Select the desired search area.
SELECTING THE SEARCH
AREA
For map database information and
updates, see “MAP DATABASE
VERSION AND COVERED AREA”
on page 166.
SELECTING THE SEARCH
AREA ON THE INPUT
SCREEN
To set a destination from a different
area, change the search area by using
“Address”, “POI”, “Motorway ent./
exit”, “Intersection” or “Telephone
no.”.
For map database information and
updates, see “MAP DATABASE
VERSION AND COVERED AREA”
on page 166.
Included countries may be different
by map version or sales countries.
Page 96 of 436
96
1. DESTINATION SEARCH
CT200h_Navi_OM76078E_(EE)
14.02.06 12:29
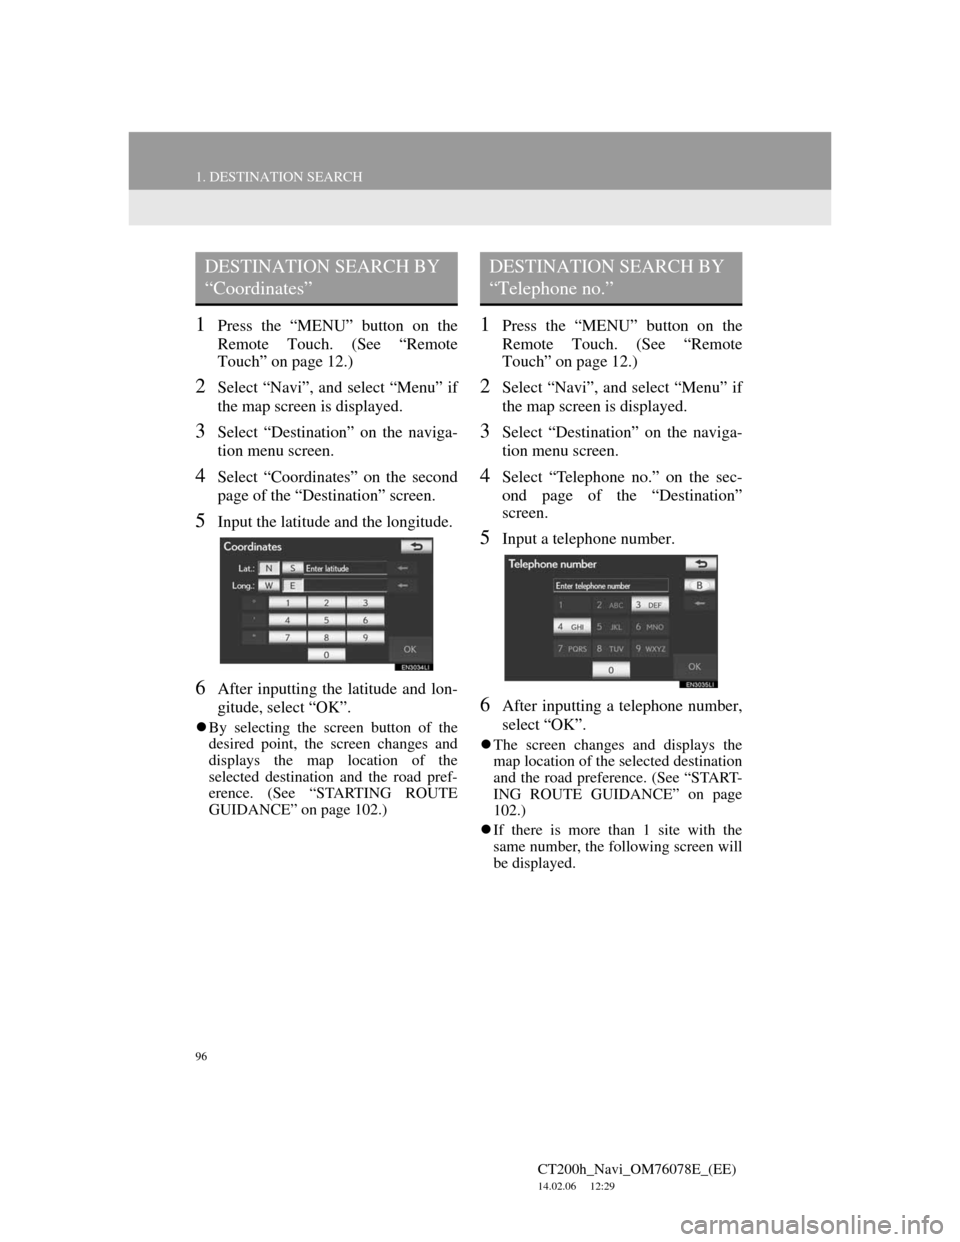
1Press the “MENU” button on the
Remote Touch. (See “Remote
Touch” on page 12.)
2Select “Navi”, and select “Menu” if
the map screen is displayed.
3Select “Destination” on the naviga-
tion menu screen.
4Select “Coordinates” on the second
page of the “Destination” screen.
5Input the latitude and the longitude.
6After inputting the latitude and lon-
gitude, select “OK”.
By selecting the screen button of the
desired point, the screen changes and
displays the map location of the
selected destination and the road pref-
erence. (See “STARTING ROUTE
GUIDANCE” on page 102.)
1Press the “MENU” button on the
Remote Touch. (See “Remote
Touch” on page 12.)
2Select “Navi”, and select “Menu” if
the map screen is displayed.
3Select “Destination” on the naviga-
tion menu screen.
4Select “Telephone no.” on the sec-
ond page of the “Destination”
screen.
5Input a telephone number.
6After inputting a telephone number,
select “OK”.
The screen changes and displays the
map location of the selected destination
and the road preference. (See “START-
ING ROUTE GUIDANCE” on page
102.)
If there is more than 1 site with the
same number, the following screen will
be displayed.
DESTINATION SEARCH BY
“Coordinates”DESTINATION SEARCH BY
“Telephone no.”