2012 Lancia Voyager ECO mode
[x] Cancel search: ECO modePage 209 of 344
tor is illuminated) and the headphone
selector switch is on the desired chan-
nel. If the headphones are turned on,
press the remote control’s power but-
ton to turn audio on. If audio is still
not heard, check that fully charged
batteries are installed in the head-
phones.
Disc Formats
The VES™ DVD player is capable of
playing the following types of discs
(120 mm or 80 mm diameter):
DVD-Video discs (MPEG-2 videocompression) (see notes about DVD
Region Codes)
DVD-Audio discs (2 channel audio output only)
Audio Compact Discs (CDs)
CD Data discs with MP3 and WMA compressed audio format files
Video CDs (MPEG-1 video com- pression)
DVD Region Codes
The VES™ DVD player and many
DVD discs are coded by geographic
region. These region codes must
match in order for the disc to play. If the region code for the DVD disc does
not match the region code for the
player, the disc will not play and will
be ejected.
DVD Audio Support
When a DVD-Audio disc is inserted in
the VES™ DVD player, the DVD-
Audio title on the disc is played by
default (most DVD-Audio discs also
have a Video title, but the Video title is
ignored). All multi-channel program
material is automatically mixed down
to two channels, which may result in a
lowered apparent volume level. If you
increase the volume level to account
for this change in level, remember to
lower the volume before changing the
disc or to another mode.
Recorded Discs
The VES™ DVD player will play
CD-R and CD-RW discs recorded in
CD-Audio or Video-CD format, or as
a CD-ROM containing MP3 or WMA
files. The player will also play DVD-
Video content recorded to a DVD-R or
DVD-RW disc. DVD-ROM discs (ei-
ther pressed or recorded) are not sup-
ported.
If you record a disc using a personal
computer, there may be cases where
the VES™ DVD player may not be
able to play some or the entire disc,
even if it is recorded in a compatible
format and is playable on other play-
ers. To help avoid playback problems,
use the following guidelines when re-
cording discs.
Open sessions are ignored. Only
sessions that are closed are play-
able.
For multi-session CDs that contain only multiple CD-Audio sessions,
the player will renumber the tracks
so each track number is unique.
For CD Data (or CD-ROM) discs, always use the ISO-9660 (Level 1
or Level 2), Joliet, or Romeo for-
mat. Other formats (such as UDF,
HFS, or others) are not supported.
The player recognizes a maximum of 512 files and 99 folders per
CD-R and CD-RW disc.
Mixed media recordable DVD for- mats will only play the Video_TS
portion of the disc.
203
Page 211 of 344
The DVD player may shut down dur-
ing extremely hot conditions, such as
when the vehicle’s interior tempera-
ture is above 48°C . When this occurs,
the DVD player will display "VES
High Temp" and will shut off the
VES™ displays until a safe tempera-
ture is reached. This shutdown is nec-
essary to protect the optics of the DVD
player.
Display
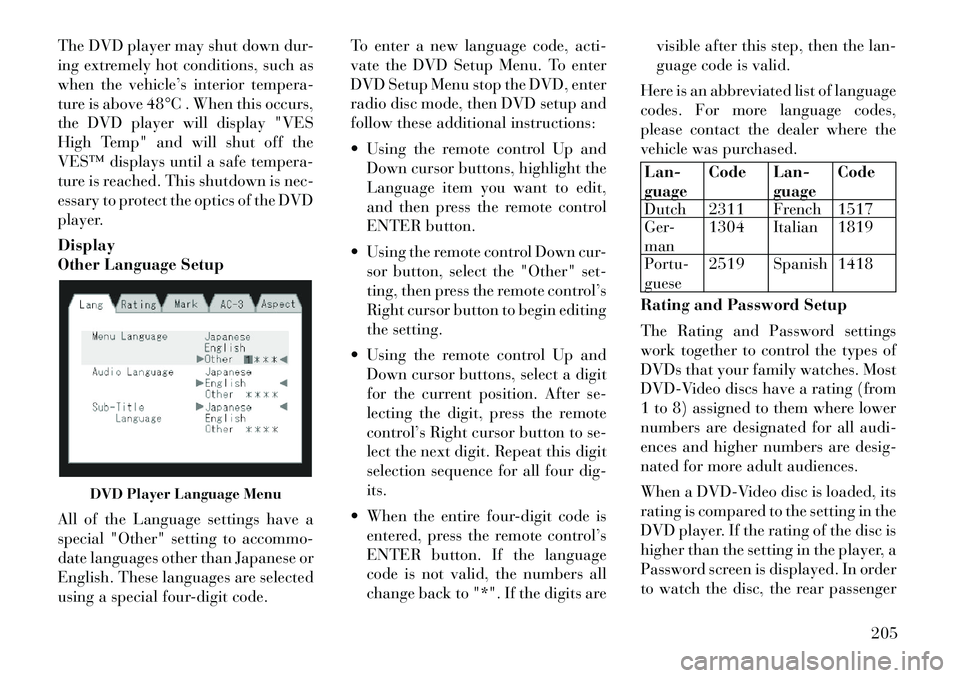
Other Language Setup
All of the Language settings have a
special "Other" setting to accommo-
date languages other than Japanese or
English. These languages are selected
using a special four-digit code.To enter a new language code, acti-
vate the DVD Setup Menu. To enter
DVD Setup Menu stop the DVD, enter
radio disc mode, then DVD setup and
follow these additional instructions:
Using the remote control Up and
Down cursor buttons, highlight the
Language item you want to edit,
and then press the remote control
ENTER button.
Using the remote control Down cur- sor button, select the "Other" set-
ting, then press the remote control’s
Right cursor button to begin editing
the setting.
Using the remote control Up and Down cursor buttons, select a digit
for the current position. After se-
lecting the digit, press the remote
control’s Right cursor button to se-
lect the next digit. Repeat this digit
selection sequence for all four dig-
its.
When the entire four-digit code is entered, press the remote control’s
ENTER button. If the language
code is not valid, the numbers all
change back to "*". If the digits are visible after this step, then the lan-
guage code is valid.
Here is an abbreviated list of language
codes. For more language codes,
please contact the dealer where the
vehicle was purchased.
Lan-
guage Code Lan-
guageCode
Dutch 2311 French 1517
Ger-
man 1304 Italian 1819
Portu-
guese 2519 Spanish 1418
Rating and Password Setup
The Rating and Password settings
work together to control the types of
DVDs that your family watches. Most
DVD-Video discs have a rating (from
1 to 8) assigned to them where lower
numbers are designated for all audi-
ences and higher numbers are desig-
nated for more adult audiences.
When a DVD-Video disc is loaded, its
rating is compared to the setting in the
DVD player. If the rating of the disc is
higher than the setting in the player, a
Password screen is displayed. In order
to watch the disc, the rear passenger
DVD Player Language Menu
205
Page 214 of 344
LW, or to CD mode, depending on
which radio is in the vehicle.
The left-hand rocker switch has a
pushbutton in the center. The func-
tion of the left-hand switch is differ-
ent, depending on which mode you
are in.
The following describes the left-hand
rocker switch operation in each mode.
Radio Operation
Pressing the top of the switch will
SEEK up for the next listenable sta-
tion, and pressing the bottom of the
switch will SEEK down for the next
listenable station.
The button located in the center of the
left-hand switch will tune to the next
preset station that you have pro-
grammed in the radio preset pushbut-
ton.
CD Player
Pressing the top of the switch once
will go to the next track on the CD.
Pressing the bottom of the switch once
will go to the beginning of the current
track, or to the beginning of the pre-vious track if it is within one second
after the current track begins to play.
If you press the switch up or down
twice it plays the second track; three
times, it will play the third, etc.
The button in the center of the left-
hand switch has no function in this
mode.
CD/DVD DISC
MAINTENANCE
To keep a CD/DVD in good condition,
take the following precautions:
1. Handle the disc by its edge; avoid
touching the surface.
2. If the disc is stained, clean the sur-
face with a soft cloth, wiping from
center to edge.
3. Do not apply paper or tape to the
disc; avoid scratching the disc.
4. Do not use solvents such as ben-
zene, thinner, cleaners, or anti-static
sprays.
5. Store the disc in its case after play-
ing.
6. Do not expose the disc to direct
sunlight.7. Do not store the disc where tem-
peratures may become too high.
NOTE:
If you experience difficulty in
playing a particular disc, it may be
damaged (i.e., scratched, reflective
coating removed, a hair, moisture
or dew on the disc) oversized, or
have protection encoding. Try a
known good disc before consider-
ing disc player service.
RADIO OPERATION AND
MOBILE PHONES
Under certain conditions, the mobile
phone being on in your vehicle can
cause erratic or noisy performance
from your radio. This condition may
be lessened or eliminated by relocat-
ing the mobile phone antenna. This
condition is not harmful to the radio.
If your radio performance does not
satisfactorily “clear” by the reposi-
tioning of the antenna, it is recom-
mended that the radio volume be
turned down or off during mobile
phone operation.
208
Page 216 of 344
5. Right Front Temperature Control
Provides right front seat occupant
with independent temperature con-
trol. Turn left for cooler or right for
warmer temperature settings.
6. Mix ModeAir is directed through the floor,
defrost and side window demist
outlets. This setting works best
in cold or snowy conditions that re-
quire extra heat at the windshield.
This setting is good for maintaining
comfort, while reducing moisture on
the windshield.
7. Front Defrost Mode Air is directed through the
windshield and side window
demist outlets. Use Defrost
mode with maximum blower and
temperature settings for best wind-
shield and side window defrosting. NOTE:
The air conditioning compressor
may operate in Mix and Defrost, or
a blend of these modes even if the
A/C button is not pressed. This de-
humidifies the air to help dry the
windshield. To improve fuel
economy, use these modes only
when necessary.
8. Electronic Rear Window Defrost
Press this button to turn on the
rear window defroster and the
heated outside mirrors (for
versions/markets, where provided).
An indicator in the button will illumi-
nate when the rear window defroster
is on. The rear window defroster au-
tomatically turns off after approxi-
mately 10 minutes. For an additional
five minutes of operation, press the
button a second time.
NOTE:
You can turn off the heated mir- ror feature at anytime by press-
ing the rear window defroster
switch a second time. To prevent excessive battery
drain, use the rear window de-
froster only when the engine is
operating.
CAUTION!
Failure to follow these cautions can
cause damage to the heating ele-
ments:
Use care when washing the inside
of the rear window. Do not use
abrasive window cleaners on the
interior surface of the window.
Use a soft cloth and a mild wash-
ing solution, wiping parallel to the
heating elements. Labels can be
peeled off after soaking with
warm water.
Do not use scrapers, sharp instru-
ments, or abrasive window clean-
ers on the interior surface of the
window.
Keep all objects a safe distance
from the window.
210
Page 217 of 344

9. Recirculation Control Button
Press this button to choose
between outside air intake or
recirculation of the air inside
the vehicle. A lamp will illu-
minate when you are in Recirculation
mode. Only use the Recirculation mode
to temporarily block out any outside
odors, smoke, or dust, and to cool the
interior rapidly upon initial start-up in
very hot or humid weather.
NOTE:
If the Recirculation button is
pressed when the system is in
Defrost mode the Recirculation
LED indicator will flash 3 times
to indicate Recirculation mode
is not allowed.
In Floor and Mix mode the sys- tem will turn off Recirculation
mode after five minutes of op-
eration. You can select Recircu-
lation mode again if desired.
Continuous use of the Recircu- lation mode may make the in-
side air stuffy and window fog-
ging may occur. Extended use of
this mode is not recommended. In cold or damp weather, the use
of the Recirculation mode will
cause windows to fog on the in-
side because of moisture
buildup inside the vehicle. For
maximum defogging, select the
outside air position.
In order to prevent fogging, when the Recirculation button is
pressed and the mode control is
set to Panel, the A/C will engage
automatically.
The A/C can be deselected manually without disturbing the
mode control selection.
10. Air Conditioning (A/C) Button Press and release to change
the current setting. The in-
dicator illuminates when
ON.
NOTE:
If your air conditioning perfor-
mance seems lower than expected,
check the front of the A/C con-
denser (located in front of the ra-
diator), for an accumulation of dirt
or insects. Clean with a gentle wa-
ter spray from behind the radiator and through the condenser. Fabric
front fascia protectors may reduce
airflow to the condenser, reducing
air conditioning performance.
11. Floor Mode Button
Air is directed through the floor
outlets with a small amount
through the defrost and side
window demist outlets.
12. Bi-Level Mode Button Air is directed through the panel
and floor outlets.
NOTE:
There is a difference in tempera-
ture (in any conditions other than
full cold or full hot), between the
upper and lower outlets for added
comfort. The warmer air goes to
the floor outlets. This feature gives
improved comfort during sunny
but cool conditions.
211
Page 218 of 344
13. Panel Mode ButtonAir is directed through the outlets
in the instrument panel. These
outlets can be adjusted for direc-
tion, and turned on or off to control
airflow.
NOTE:
For maximum airflow to the rear,
the center instrument panel out-
lets can be directed toward the
rear seat passengers.
Economy Mode
If ECONOMY mode is desired, press
the A/C button to turn off the indica-
tor light and the A/C compressor. Ro-
tate the temperature control knob to
the desired temperature.
Max A/C
For maximum cooling use the A/C
and Recirculation mode buttons at
the same time.
REAR MANUAL CLIMATE
CONTROL (for
versions/markets, where
provided)
The Rear Manual Climate Control
system has floor air outlets at the rear of the right side sliding door, and
overhead outlets at each outboard
rear seating position. The unit pro-
vides warm or cool air through the
floor and upper outlets.
The rear blower and temperature con-
trols for the rear seat passengers are
located in the headliner, near the cen-
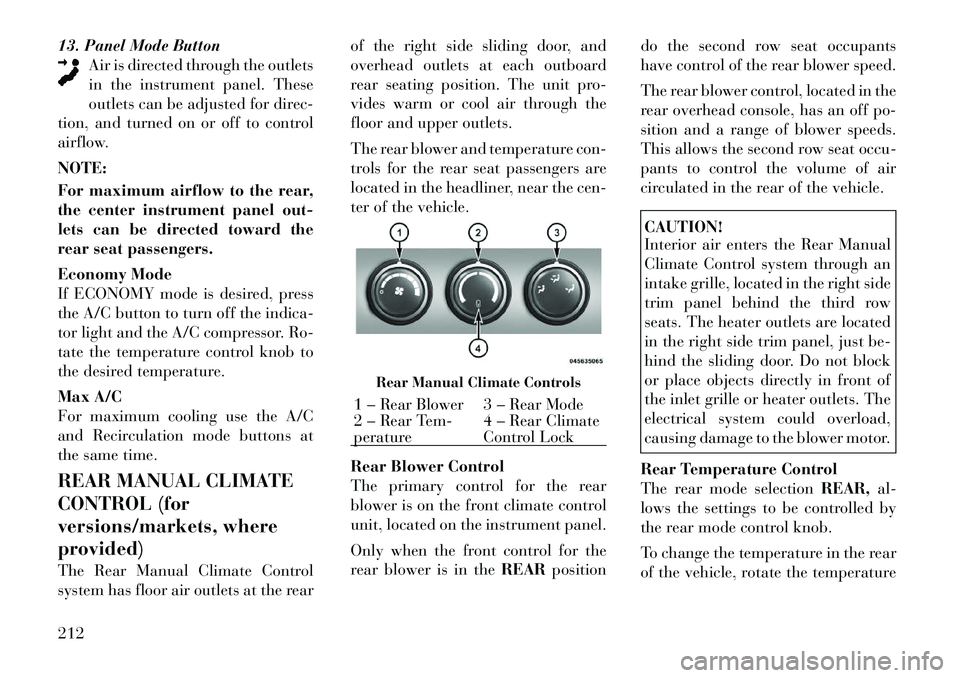
ter of the vehicle.
Rear Blower Control
The primary control for the rear
blower is on the front climate control
unit, located on the instrument panel.
Only when the front control for the
rear blower is in the
REARposition do the second row seat occupants
have control of the rear blower speed.
The rear blower control, located in the
rear overhead console, has an off po-
sition and a range of blower speeds.
This allows the second row seat occu-
pants to control the volume of air
circulated in the rear of the vehicle.
CAUTION!
Interior air enters the Rear Manual
Climate Control system through an
intake grille, located in the right side
trim panel behind the third row
seats. The heater outlets are located
in the right side trim panel, just be-
hind the sliding door. Do not block
or place objects directly in front of
the inlet grille or heater outlets. The
electrical system could overload,
causing damage to the blower motor.
Rear Temperature Control
The rear mode selection REAR,al-
lows the settings to be controlled by
the rear mode control knob.
To change the temperature in the rear
of the vehicle, rotate the temperature
Rear Manual Climate Controls
1 – Rear Blower 3 – Rear Mode
2 – Rear Tem-
perature 4 – Rear Climate
Control Lock
212
Page 221 of 344

15. Mode Control Button
Press and release to select between
Modes (Panel, Bi-Level, Floor, Mix).
Performing this function will cause
the ATC to switch into manual mode.
16. Recirculation Control Button
Press and release to change the cur-
rent setting, the indicator illuminates
when ON.
17. SYNC Button
Press and release to control the tem-
perature setting for all three zones
from the driver temperature control.
18. Driver Temperature Control
Up/Down Button
Provides the driver with independent
temperature control. Push the top
button for warmer temperatures or
the lower button for cooler tempera-
ture settings.
Controlling The Rear Climate
Controls From The Front ATC
Panel
The Three-Zone ATC system allows
for adjustment of the rear climate
controls from the front ATC panel.To change the rear system settings:
1. Press "REAR" button to change
control to rear control mode, Rear
display (below) will appear. Control
functions now operate rear system.
2. To return to Front screen, press
"REAR button again, or it will revert
to the Front screen after six seconds.
1. Mode Display
This display shows the current Mode
selection.
2. Rear Temperature Display
This display shows the temperature
setting for the rear seat occupants.
3. Blower Control Display
This display shows the current Blower
speed selection.
4. Rear Auto Indicator
This indicates when the system is in
Rear Auto mode.
Automatic Operation
1. Press the AUTO button on the
front ATC Panel and the words Front
Auto will illuminate in the front ATC
display, along with two temperatures
for the driver and front passenger.
The system will then automatically
regulate the amount of airflow.
2. Next, adjust the temperature you
would like the system to maintain, by
adjusting the driver, front passenger,
and rear seat rotary temperature
knobs. Once the desired temperature
is displayed, the system will achieve
and automatically maintain that com-
fort level.
Front ATC Panel Rear Control
Display
215
Page 223 of 344

Bi-Level ModeAir comes from the instrument
panel outlets, floor outlets and
defrost outlets. A slight amount
of air is also directed through the side
window demister outlets.
NOTE:
In many temperature positions,
the Bi-Level mode is designed to
provide cooler air out of the panel
outlets and warmer air from the
floor outlets.
Floor Mode Air comes from the floor outlets.
A slight amount of air is directed
through the defrost and side
window demister outlets.
Mix Mode Air comes from the floor, defrost
and side window demist outlets.
This mode works best in cold or
snowy conditions. It allows you to stay
comfortable, while keeping the wind-
shield clear. Defrost Mode
Air comes from the windshield
and side window demist out-
lets. Use Defrost mode with
maximum blower and temperature
settings for best windshield and side
window defrosting.
NOTE:
While operating in the other
modes, the system will not auto-
matically sense the presence of fog,
mist or ice on the windshield. De-
frost mode must be manually se-
lected to clear the windshield and
side glass.
Air Conditioning (A/C)
The Air Conditioning (A/C) button
allows the operator to manually acti-
vate or deactivate the air conditioning
system. When in A/C mode and the
ATC is set to a cool temperature, de-
humidified air flows through the air
outlets. If Economy mode is desired,
press the A/C button to turn off the
A/C mode in the ATC display and
deactivate the A/C system. NOTE:
If the system is in Mix, Floor or
Defrost Mode, the A/C can be
turned off, but the A/C system
shall remain active to prevent
fogging of the windows.
If fog or mist appears on the windshield or side glass, select
Defrost mode and increase
blower speed.
Recirculation Control When outside air contains
smoke, odors, or high hu-
midity, or if rapid cooling is
desired, you may wish to
recirculate interior air by pressing the
Recirculation control button. Recir-
culation mode should only be used
temporarily. A LED will illuminate on
the Recirculation control button when
Recirculation mode is selected. Push
the button a second time to turn off
the Recirculation mode LED and al-
low outside air into the vehicle.
217