2012 CITROEN RELAY Handbook (in English)
-
 1
1 -
 2
2 -
 3
3 -
 4
4 -
 5
5 -
 6
6 -
 7
7 -
 8
8 -
 9
9 -
 10
10 -
 11
11 -
 12
12 -
 13
13 -
 14
14 -
 15
15 -
 16
16 -
 17
17 -
 18
18 -
 19
19 -
 20
20 -
 21
21 -
 22
22 -
 23
23 -
 24
24 -
 25
25 -
 26
26 -
 27
27 -
 28
28 -
 29
29 -
 30
30 -
 31
31 -
 32
32 -
 33
33 -
 34
34 -
 35
35 -
 36
36 -
 37
37 -
 38
38 -
 39
39 -
 40
40 -
 41
41 -
 42
42 -
 43
43 -
 44
44 -
 45
45 -
 46
46 -
 47
47 -
 48
48 -
 49
49 -
 50
50 -
 51
51 -
 52
52 -
 53
53 -
 54
54 -
 55
55 -
 56
56 -
 57
57 -
 58
58 -
 59
59 -
 60
60 -
 61
61 -
 62
62 -
 63
63 -
 64
64 -
 65
65 -
 66
66 -
 67
67 -
 68
68 -
 69
69 -
 70
70 -
 71
71 -
 72
72 -
 73
73 -
 74
74 -
 75
75 -
 76
76 -
 77
77 -
 78
78 -
 79
79 -
 80
80 -
 81
81 -
 82
82 -
 83
83 -
 84
84 -
 85
85 -
 86
86 -
 87
87 -
 88
88 -
 89
89 -
 90
90 -
 91
91 -
 92
92 -
 93
93 -
 94
94 -
 95
95 -
 96
96 -
 97
97 -
 98
98 -
 99
99 -
 100
100 -
 101
101 -
 102
102 -
 103
103 -
 104
104 -
 105
105 -
 106
106 -
 107
107 -
 108
108 -
 109
109 -
 110
110 -
 111
111 -
 112
112 -
 113
113 -
 114
114 -
 115
115 -
 116
116 -
 117
117 -
 118
118 -
 119
119 -
 120
120 -
 121
121 -
 122
122 -
 123
123 -
 124
124 -
 125
125 -
 126
126 -
 127
127 -
 128
128 -
 129
129 -
 130
130 -
 131
131 -
 132
132 -
 133
133 -
 134
134 -
 135
135 -
 136
136 -
 137
137 -
 138
138 -
 139
139 -
 140
140 -
 141
141 -
 142
142 -
 143
143 -
 144
144 -
 145
145 -
 146
146 -
 147
147 -
 148
148 -
 149
149 -
 150
150 -
 151
151 -
 152
152 -
 153
153 -
 154
154 -
 155
155 -
 156
156 -
 157
157 -
 158
158 -
 159
159 -
 160
160 -
 161
161 -
 162
162 -
 163
163 -
 164
164 -
 165
165 -
 166
166 -
 167
167 -
 168
168 -
 169
169 -
 170
170 -
 171
171 -
 172
172 -
 173
173 -
 174
174 -
 175
175 -
 176
176 -
 177
177 -
 178
178 -
 179
179 -
 180
180 -
 181
181
 55
3
EASE OF USE
and
COMFOR
T
Ventilation
ADDITIONAL HEATING SYSTEMS
Supplementar
y heating
On the 2-3 seats version, this is located
under the seat on the drivers side with air
diffusion")
 56
Ventilation
Activation/Deactivation
This control, located on the
control panel at the right-hand
end of the dashboard, enables
you to activate/deactivate the
operation of the rear")
 3
EASE OF USE
and
COMFOR
T
Ventilation
PROGRAMMABLE ADDITIONAL HEATING
If your vehicle is fitted with separate
programmable heating: it gradually brings
the engine up to a good temperature to
fa")
 58
Ventilation
Setting the time of the internal clock
Set the clock on the control panel before
programming the deferred switching on of
the heating.
Immediate switching on of the heat")
 59
3
EASE OF USE
and
COMFOR
T
Ventilation
Cancelling the programming
Press this button briefly to clear
the programmed start time.
The screen illumination and the
pre-selection number (e.g. 1)")

Seats
DRIVERS SEAT SEATS
Head restraint
Press the tab to adjust the height of the
head restraint.
To remove the head restraint, press the tabs
and raise the head restraint.")
 61
3
EASE OF USE
and
COMFOR
T
Seats
Lumbar support
Turn the control.
Seat cushion height adjustment
Lift the handle 1
to raise
or lower the front of the seat.
Lift the handle 2")
 62
Seats
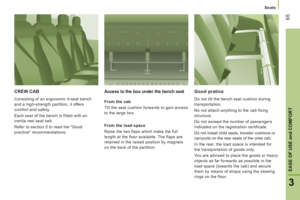
2-SEAT FRONT BENCH
This is fitted with two seat belts.
Grab handle
This is located above the centre passenger.
Writing table
The back of the centre seat folds to f")