Page 89 of 182

Audio equipment
87
4
TECHNOLOGY
on
BOAR
D
Scroll the
display
Select
Display
Select
Display
Select
Display
Select
Display
Select
Display
Enables you
to…
AF
Switching
On
AF
Switching
Off Set the sensitivity of automatic reception of the FM
radio frequencies (tuner):
- On for a search of the transmitters which have
the strongest signal,
- Off for a search of all of the surrounding
transmitters.
Traffic
Information
Off
Traffic
Information
On Receive traffic information from FM1, FM2, FMA
radio stations.
TA is displayed if On is selected.
Regional
mode Off
Regional
mode On Select the reception of local or regional
programmes (different from one region to another):
- Off for no programmes,
- On for local programmes.
MP3
display
(if there
is an MP3
CD in the
player)
Title
Author
Album
Folder
name
File
name Select the type of MP3 display for the current track
(if ID3 TAG available for the CD):
- Title for the title of the track,
- Author for the name of the artist,
- Album for the title of the album,
- Folder name for the name of the directory
(folder) for the current track,
- File name for the name of the file.
Page 90 of 182
Audio equipment
88
Scroll the
display
Select
Display
Select
Display
Select
Display
Select
Display
Enables you
to…
Speed
volume Off
Speed
volume
Low
Speed
volume
High Select the automatic control of the volume in relation to
the vehicle speed:
- Off.
- Low for on (low sensitivity),
- High for on (high sensitivity),
Radio on
vol - Limit
on
Radio
on vol -
Limit off Select the initial volume setting:
Limit on:
- if the volume equal to or greater than the maximum
value, the volume will be at maximum,
- if the volume is between the maximum and
minimum values, the volume will be that memorised
when switching off,
- if the volume is equal to or lower than the minimum
value, the volume will be at minimum.
Limit off:
- the volume is memorised when switching off.
Choose a volume setting between 1 and 40.
EXT Audio
off
EXT
Audio
Volume
23 Choose the volume setting for an external telephone:
- Off for mute,
- 23 by default. Select a volume level between 1 and 40.
Page 91 of 182
89
4
TECHNOLOGY
on
BOAR
D
Scroll the
display
Select
Display
Select
Display
Select
Display
Select
Display
Enables you
to…
Radio off
00 MIN
20 MIN Set the audio system play time after switching off the
engine:
- 00 MIN to switch off immediately,
- 20 MIN to play for 20 minutes.
Place the key in the "MAR" running position to switch
the audio system back on.
System
reset NO
YES Restore factory settings.
- NO to not restore factory settings,
- YES to restore factory settings, "Resetting" is
displayed.
Page 92 of 182
Audio equipment
90
SELECTING A STATIONSTORING A STATION - MANUALLY
After selecting a frequency, press
one of these buttons (for more than
2 seconds) to store the frequency.
Storing is confirmed by an audible
beep.
Press the AM or FM button and then
select a waveband from: MW1 and
MW2 or FM1, FM2 and FMA.
To select the radio function, make a
short press on the AM or FM button.
Briefly press one of these buttons to
carry out an automatic search of the
radio stations.
Press one of these buttons to carry
out a manual search of the radio
stations.
RADIO
Press the FM AS * button (for more
than 2 seconds) until the audible
signal is heard.
The radio searches for and stores the
6 stations with the strong signal
(in decreasing signal strength order)
in the waveband.
A long press on the button updates
the selection.
STORING A STATION - AUTOMATICALLY
* AutoStore: automatic storing (pre-setting) of stations.
Page 93 of 182

22
11
33
Audio equipment
91
4
TECHNOLOGY
on
BOAR
D
The MP3 format, an abbreviation of MPEG 1.2 & 2.5 Audio
Layer 3, is an audio compression standard which permits the
recording of several tens of music files on a single disc.
MP3
In order to be able to play a recorded CDR or CDRW, when
recording it is preferable to select standards ISO 9660
level 1.2 or Joliet.
If the disc is recorded in another format, it may not be played
correctly.
It is recommended that the same recording standard is
always used for an individual disc, with as low a speed as
possible (4x maximum) for optimum sound quality.
In the particular case of a multi-session CD, the Joliet
standard is recommended.
The audio equipment will only play files with the extension
".mp3" with a sampling rate of 22.05 KHz or 44.1 KHz.
No other type of file (.wma, .mp4, m3u...) can be played.
It is advisable to restrict file names to 20 characters without
using special characters (e.g.: () " " ? ; , space) to avoid any
playing or displaying problems.
PLAY A CD
Insert circular compact discs only.
Some anti-pirating systems, on original
discs or CDs copied using a personal
recorder, may cause faults which are no
reflection on the quality of the original
player.
Insert a CD or an MP3 CD in the player,
play begins automatically.
If the player already contains a disc, switch
on the audio equipment and press the
MEDIA source button briefl y.
The last track played begins.
Press one of the buttons to select a
track on the CD.
Press and hold one of the buttons for
fast forwards or backwards.
Press this button to pause play.
Press again to resume play.
Page 94 of 182

Audio equipment
92
When you switch on the audio system, you may have to enter a
code for access to its functions.
In this cases, the message " Radio Code
" is displayed in the
screen, followed by 4 dashes.
The 4-number code should be entered using the buttons 1 to 6.
You have 20 seconds to enter the code.
If the wrong code is entered, the audio system gives an audible
signal and the message message " Radio blocked/wait
" is
displayed. You should then start the procedure again.
Keep your code in a safe place, never inside the
vehicle
.
TELEPHONE PRE-EQUIPMENT
If the hands-free kit is fitted to your vehicle, you can use the
audio system and the steering mounted controls to manage your
telephone calls.
During an incoming call, the audio system is deactivated, and
the message " PHONE
" is displayed.
The volume can be adjusted and stored via the " EXTERNAL
AUDIO
" menu.
Each time an incorrect code is entered, the waiting time before
the code can be entered again increases progressively (1 minute,
2 minutes, 4 minutes, 8 minutes, 16 minutes, 30 minutes, 1 hour,
2 hours, 4 hours, 8 hours, 16 hours, 24 hours).
Page 95 of 182
93
5
Driving safely
SAFETY
DRIVING SAFELY
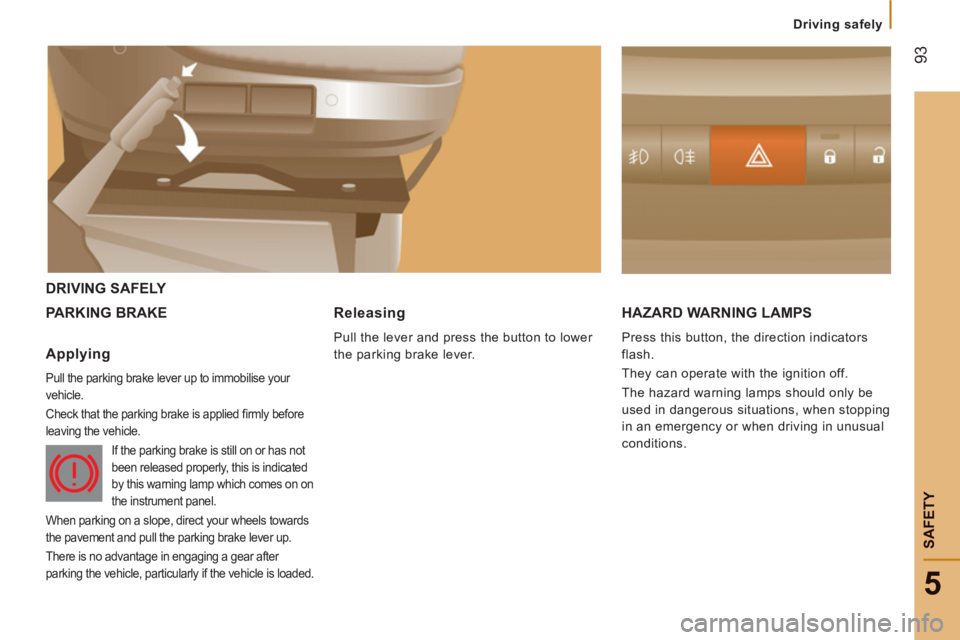
PARKING BRAKE HAZARD WARNING LAMP
S
Press this button, the direction indicators
flash.
They can operate with the ignition off.
The hazard warning lamps should only be
used in dangerous situations, when stopping
in an emergency or when driving in unusual
conditions.
Applying
Pull the parking brake lever up to immobilise your
vehicle.
Check that the parking brake is applied fi rmly before
leaving the vehicle.
If the parking brake is still on or has not
been released properly, this is indicated
by this warning lamp which comes on on
the instrument panel.
When parking on a slope, direct your wheels towards
the pavement and pull the parking brake lever up.
There is no advantage in engaging a gear after
parking the vehicle, particularly if the vehicle is loaded.
Releasing
Pull the lever and press the button to lower
the parking brake lever.
Page 96 of 182

94
Driving safely
HORN
Press the centre of the steering wheel.
ANTI-LOCK BRAKING SYSTEM (ABS - EBFD)
The ABS and EBFD (electronic brake force
distribution) systems improve the stability
and manoeuvrability of your vehicle on
braking, in particular on poor or slippery
surfaces.
The ABS prevents locking of the wheels, the
EBFD provides full control of the braking
pressure wheel by wheel.
EMERGENCY BRAKING ASSISTANCE
SYSTEM (EBA)
In an emergency, this system enables the
optimum braking pressure to be reached more
quickly, press the pedal fi rmly without releasing it.
It is triggered by the speed at which the brake
pedal is activated.
This alters the resistance of the brake pedal
under your foot.
To prolong the operation of the emergency
braking assistance system: keep your foot on the
brake pedal.
Good practice
The anti-lock braking system comes into
operation automatically when there is a risk
of wheel lock. It does not reduce the braking
distance.
On very slippery surfaces (ice, oil, etc...)
the ABS may increase the braking distance.
When braking in an emergency, do not
hesitate to press the brake pedal firmly,
without releasing the pressure, even on a
slippery surface, you will then be able to
continue to steer the vehicle to avoid an
obstacle.
Normal operation of the ABS may be felt by
slight vibration of the brake pedal.
When changing wheels (tyres and rims),
ensure that these are approved. If this warning lamp comes on,
it indicates a malfunction of the
ABS which could result in a
loss of control of the vehicle on
braking.
If this warning lamp comes on,
together with the brake warning
lamp, it indicates a malfunction of
the electronic brake force distribution
which could result in a loss of control
of the vehicle on braking.
Stop immediately.
In both cases, contact a CITROËN dealer.