Page 65 of 236

could slide around inside the vehicle
wh ile driving or when accelerating or
when applying the brakes or when driv
ing around a corner .
- When you are driving make sure that
anything you may have placed in the cen
ter console or other storage locations cannot fa ll out into the footwells . In case
of sudden braking you would not be able
to brake, depress the clutch or acceler
ate.
Glove compartment
The glove compartment is illuminated and
can be locked.
F ig . 77 G love compar tmen t
To op en glove compa rtm ent
... Pull the hand le ¢ fig . 77 in the direction of
the arrow, push down lid to the fully open
position.
To close glove compartm ent
.., Push the glove compartment lid upward un-
t il the lock engages.
The glove compartment light comes on as the parking or dr iving lights are sw itched on and
the compartment is opened . Yo u will find a
g lasses case in the lid .
The glove compartment has a standard 12-
volt socket for con necting e lectrica l accesso
ries. The powe r consumpt ion at the outlet
must not exceed 100 watts. The socket works
on ly with the ignition switched on .
Sea ts a nd s to rage 63
A WARNING
To reduce the risk of personal injury in an
accident or sudden stop, always keep the
glove compartment closed while driving.
Storage compartment in the front seats
Applies to vehicles: with storage compartment in the
front seats
There is a fold -out storage compartment in
the front of the seats .
Opening
.., Lift the handle and pull the drawer out.
Closing
... Push the drawer in completely until it latch
es.
(!) Tips
The maximum carrying capacity 2 .2 lbs.
(1 kg).
Storage compartments between the
seat backrests
The storage compartments are illuminated
and can be locked with the vehicle key.
F ig . 78 Storage compar tm ents betw een th e sea t
back rests
The CD changer* or the Audi Music Interface*
are located in the lower storage compart
ment .
Opening the upper storage compartment
... Fold the lid upward in the direction of the
arrow @¢
fig. 78. ..,_
Page 66 of 236
64 Seats and storage
Opening the lower storage compartment
.. Fo ld t he lid dow nward in the direct ion o f
the a rrow @.
,8. WARNING
Always keep the sto rage compartments
closed when dr iving to help reduce the risk
of injury .
(D Tips
Both lids must be closed in or der to lock
the compartments .
-
Page 67 of 236

Warm and cold Climate controls
Controls
W arm and cold 65
The climate controls automatically maintain the selected temperature in the vehicle interior
throughout each season .
Fig. 79 Climate contro ls
We recommend the following sett ing :
• Rotate the knob¢
fig. 79@ to the right to
switch on the air conditioning .
• Set the temperature to 72
°F (22 °().
• Press the !AUTO !¢ fig . 79 button .
Using the previously recommended setting is
the quickest way to achieve a comfortable cli
mate in the vehicle . Th is setting shou ld there
fore only be changed when persona l comfort
l eve ls o r ce rtain circumstances requ ire it .
The climate controls are a combination of au
tomatic heating and ventilation systems and a
cooling system which dehum idifies and coo ls
the air inside the vehicle .
The climate controls automatically maintain a temperature once it has been set. The tem
pe rat ure of the air from the v ents, fan speed
(air volume) and ai r distribu tion a re also auto
mat ica lly adjus ted . The system a lso takes into
account strong s unshine so that manua l ad
justment is not necessary . So in almost all
cases,
automatic mode offers the best cond i
tions for the comfort of the occupants at all
times of the year ¢
page 68.
Please note:
In cooling mode, relative humidity in the inte
r ior is reduced . This prevents the w indows
from fogg ing up . When outside temperatu res
ar e l ow (temperat ures below freezing), the air
cond it ion ing (compressor) switches off auto
matically - a ir in the vehicle interior is not de
humid ified.
When relative hum idity and tempera tures
outside are high,
c onden sate can drip from
t he a ir cond ition ing evaporator and form a
poo l of w at er unde r the ve hicle. This is normal
and not an ind ication of a leak!
When o uts ide temperatures are low, the fan
does not swi tch to a higher speed until the
coolant has reached an adequa te tempera
tu re, wit h the exception of the defrost set
ting.
When ac celera ting at w ide-open throttle, t he
air condi tioning compressor is temporar ily
swi tched off to ma intain full engine power .
In order to ensure engine coo ling under ex
t reme engine lo ads , the compressor is switch
ed off if coolant temperatures climb too hig h . ..,.
Page 68 of 236

66 Warm and cold
Functions are set by turning the rotary knob
or switched on and
off by tapping the buttons.
The LED in the buttons illuminates when the
function is active.
Button(s) Meaning Page
Rotary knob Temperature ¢ page 66
CD selection
Switch air con-
Rotary knob ditioning on/
¢page 67
@ ~ off
Fan
Rotary knob Air distribu-
¢ page 67
® tion
~ Defrost ¢page 68
~
Rear window ¢page 69
defogger
I Heated seat
I-"' +I driver/passen-¢page 69
ger side*
~ Recirculation ¢ page 68
l(g]
Switch on
cooling sys-
¢page 68
I tern
Pollutant filter
The pollutant filter (particle filter) ensures
that contaminants in the outside air (such as
dust or pollen) are greatly reduced or stop
ped. The air is also filtered in recirculation
mode.
The pollutant filter element must be changed
according to the intervals specified in the maintenance schedule so that the air condi
tioning system's performance is not adversely
affected.
If the filter 's effectiveness is weakened by
driving the vehicle in areas with heavily pollut
ed outside air, the filter element should also
be changed between the listed services.
Energy management
To prevent the battery from being discharged
and to restore the balance of energy, compo
nents which require large amounts of energy
are temporarily cut back or switched
off
¢ page 147. Heating systems in particular re
quire a great deal of energy. If you notice , for
example, that the rear window heater is not
heating, then it has been temporarily cut back
or switched
off by energy management.
These systems are available again as soon as
the energy balance has been restored.
A WARNING ,..__
For safety reasons, it is important that all
windows are free of ice, snow, and conden
sation. Only then is good visibility ensured.
Please familiarize yourself with the correct
operation of the air conditioning and how
to dehumidify/defrost the windows.
@ Note
- If
you suspect that the climate controls
have been damaged, switch the system
off to avoid damaging it , and have it in
spected by an authorized Audi dealer.
- Audi climate control system repairs re
quire special expertise and the proper
tools. You should contact an authorized
Audi dealer in the event of malfunctions.
(D Tips
-To avoid adversely affecting heating and
cooling performance and to prevent con
densation on the windows, the air intake
in front of the windshield must be free of
ice, snow, and leaves .
- Climate control works most effectively if
the windows are closed. However, if the interior of a parked vehicle is extremely
hot from the sun's rays, briefly opening
the windows can speed up the cooling
process.
Setting temperature
.,. Turn the rotary knob CD¢ page 65, fig. 79
to the desired temperature setting.
To set a lower temperature, turn the rotary
knob to the left. To set a higher temperature,
turn the rotary knob to the right. There are .,..
Page 69 of 236

additional intermediate settings available to
adjust the temperature as needed .
Switching climate control on /off
Sw itching the clim ate cont rol sy stem on /
off
• Turn the knob@¢ page 65, fig. 79 to the
rig ht to sw itch cl imate control on. The LED
next to the word OFF goes out .
• Turn the knob@¢
page 65, fig. 79 to the
left to switch the cl imate control system off .
The L ED next to the word O FF comes on.
Setting fan speed~
• Turn the knob@¢ page 65, fig. 79 to the
setting you want to adjust fan speed (a ir
quantity) .
Air distribution
F ig. 80 Instr ument pane l: Locat io n of air vents
• Turn the rotary knob@¢ page 65, fig. 79
to the desired setting.
• To open and close the outlets , turn the ad
just ing ring .
• To ad just the direct ion of the a irflow from
the outlet, move the tab in the center of the
outlet in the desi red d irect ion. The direction
of the air de livered from the ven ts can be
adjusted horizontally and vertically.
Air dist ribution :
- In sett ing
0, air flows only to the w indows,
vents
(I) and @are open. To defrost the
W arm and cold 6 7
If the difference between the desi red temper
ature set by you and the vehicle's interior tem
perature is too great, the fan speed w ill
change automatically. This is done so that the
desired temperature setting is reached as
quick ly as poss ible .
(D Tips
If the difference between the desired tem
perature you have set and the veh icle's in
terior temperature is too high, the fan
speed will change automat ica lly. This is
done so that the desired tempera ture set
ting is reached as quickly as poss ible.
driver and front passenger side windows most effective ly, the vents @sho uld be di
rected toward the side windows .
- In setting®, ai r flows only to the driver/
passenger, vents@and @ are open.
- In setting
-0-, air flows only to the footwell,
vents @ are open.
- In setting~. air flows only to the windows
and the footwell, vents
(I) , @ and © are
open.
Page 70 of 236
 avai lable to adjust air
d istribution as needed.
(D Tips
I f the climate cont rols are runn ing")
68 Warm and cold
There are additional combinations (through
intermediate settings) avai lable to adjust air
d istribution as needed.
(D Tips
I f the climate cont rols are runn ing in cool
ing mo de, air shou ld flow mainly from
vents @and
@. To achieve suff ic ient coo l
ing, you shou ld neve r close these vents
comp letely .
Defrost ~
The windshield and side windows are defrost
ed or cleared of condensa tion a s quickly a s
possible.
.. To turn on the de fogger/defroster, press the
C!:J button c> page 65 , fig . 79 .
.,. To turn the defogger/defroster
off, press
the ~ button aga in , or the
!AU TO ! button .
Temperature is controlled automatically. The
maximum amount of a ir flows main ly from
ve nts 1
<=> page 67.
A sma ll amount of air flows from vents 2 -if
they are open
<=> page 67 .
P ress ing the ~ button switches
off recircu la
tion mode.
Automatic operation ~
Standard operating mode at all times of the
year.
Turning on automatic operation
.. Set the temperature you want .
.,. Press the
!AUTO I bu tton c> page 65, fig. 79.
Automatic operation ensures constant tem
pe ratures in the int erio r and dehum idifies the
a ir i nside t he vehi cle. Ai r temperature, vol
ume, and dist ribution a re controlled a utoma t
i ca lly to reach o r maintain the desire d interio r
temperature as q uickl y as possib le . Fluct ua
tions in exterior temperature and the effects
of tempe rat ur e from the position of the sun
are compensated for automat ica lly.
Manual air recirculation mode~
The recirculation mode prevents polluted out
side air from entering the vehicle interior.
Switching on air recirculation
.. Press the button ~ c> page 65 , fig. 79,
c> _& .
Switching off air recirculation
.,. Press the b utton !,.;,,I ag ain, or
.. Press the
!AU TO ! button, or
.. Press th e ~ button .
In recirc ulation mode, air is drawn from t he
vehicle interior, filte red, and recircula ted . We
recommend that yo u se lect rec irculatio n
mode
briefly <=>.&. under the fo llowing cond i
tions:
When driving thro ugh a tunne l or in a traff ic
jam so that exha ust fumes an d odors cannot
enter the vehicle inte rior.
A WARNING
You sho uld not use the recirculation mode
for an extended pe riod s ince no fresh air is
d rawn in, and with the air co ndit ioning
switched
off the windows can fog up - this
i nc reases the r is k of an accident!
A/C operation ~
Switching on A/C
.. Press t he !AC ! button c> page 65, fig . 79.
Switching A /C off
.. Press the !AC ! button again .
The cooling sys tem is swi tched on d uring A/C
operation - the heat ing and ventilation system
is contro lled automatically .
{I) Tips
If the LED in the sw itch stays on a fter A/C
ope ration has been switc hed
off( = switch
i ng the A/C
off), there is a fault in an air
cond itioning component. P lease cons ult .,.
Page 71 of 236

an authorized Audi dealer when there is an
operating prob lem.
Using the climate controls economically
Economical use of the climate controls helps
to save fuel.
When climate con trol is wor king in cool ing
mode, engine performance is red uced and
fuel consumption is affected. To keep the time
the air conditioning is on as short as possib le,
you shou ld do the fo llow ing:
.,. If you wo uld like to save f uel, sw itch the air
conditioning off .
.. If you open the windows whi le driving,
switch the air conditioning off.
.,. If the vehicle is extremely hot due to the
heat of the sun, briefly open doors and win
dows.
@ For the sake of the environment
When you save fuel, you reduce em iss ions
from the vehicle.
Rear window defogger
The rear window defogger clears the rear win
dow of condensation .
.. Press the Iii button <=> page 65, fig. 79 to
turn the rear window defogger on and off.
The rear window defogger wor ks only when
the eng ine is r unning. The indicator light in
the button illuminates when the rear window
defogger is turned on.
The rear window defogger is switched off au
tomatically after approx . 10 minutes .
@ For the sake of the environment
As soon as the rear window is clear, yo u
should switc h the rea r window de fogger
off . The reduced power consumption has a
beneficial effect on f uel consumption.
Warm and c old 69
Heated seats
Applies to vehicles: with heated seats
The seat cushion and the seatback of the
front seats can be heated electrically.
.. Press the heated seats button I-J + I
<=> page 65, fig . 79 to set the leve l of heating
desired.
The range of cont ro ls goes from 1 to 3. The
heat setting selected is shown by LEDs above
the button.
A WARNING
--=
Indiv iduals wit h reduced sens itiv ity to pa in
or temperature could deve lop burns when
using the seat heat ing funct ion. To reduce
the r isk of injury, these ind ividuals should
not use seat heating.
@ Note
To avoid damage to the heat ing e lements
i n the seats, do not kneel on the seats or
place heavy loads o n a small area of the
seat.
Page 72 of 236

70 On the road
On the road
Steering
Adjusting the steering wheel column
The steering wheel position can be continu
ously adjusted in height and distance .
Fig. 81 Lever under the steering column
~ Push the lever¢ fig. 81 down ¢ .&_.
~ Move the s teer ing whee l to the desired po
sition.
~ Push the lever against the steering column
until it locks.
There must be at least 10 inches (25 cm) be
tween your chest and the center of the steer
ing wheel. If you cannot sit more than 10 in
ches (25 cm) from the steering wheel, see if
adaptive equipment is available to help you
reach the pedals and increase the distance
from the steer ing wheel.
A WARNING
Improper use of steering wheel adjust
ment and improper seating position can
cause serious personal injury.
- Adjust the steer ing whee l co lumn only
when the vehicle is not moving to pre
vent loss of veh icle control.
-
- Adjust the dr iver's seat or steering wheel
so that there is a minimum of 10 inches
(25 cm) between your chest and the
steering wheel ¢
page 92, fig. 104. If
you cannot maintain this minimum dis
tance, the airbag system cannot protect
you properly .
- If physical limitations prevent you from
sitting 10 inches (25 cm) or more from the steering wheel, check with your au
thorized Audi dealer to see if adaptive
equipment is
available.
- If the steer ing whee l is aligned with your
face, the supplemental dr iver's a irbag
cannot provide as much protection in an
accident . Always make sure that the
steer ing whee l is al igned with your
chest.
- Always hold the steering wheel w ith your
hands at the 9 o'clock and 3 o'clock posi
tions to reduce the risk of personal injury if the dr iver's airbag dep loys.
- Never hold the steering wheel at the 12
o'clock position or with you r hands inside
the steering wheel rim or on the steering
wheel hub . Ho lding the steering wheel
the wrong way can cause serious injuries
to the hands, arms and head if the driv
er's airbag deploys.
Ignition lock/Ignition
switch
Ignition lock
The ignition key starts or stops the engine.
Fig . 82 Ignit ion lock positions
Ig niti on off ©
In position ¢ fig. 82 (D both the ignition and
engine are
off, and the steering is locked .
T o
loc k t he steerin g after you have removed
the ignition key, turn the steering wheel in ei
ther direction unt il you hear it lock into place.
You should a lways lock the steering whenever
you leave your vehicle. This makes vehicle
theft even more difficult¢&. .
 1
1 2
2 3
3 4
4 5
5 6
6 7
7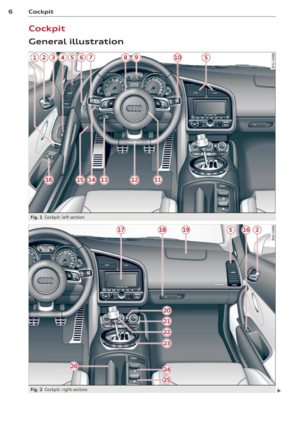 8
8 9
9 10
10 11
11 12
12 13
13 14
14 15
15 16
16 17
17 18
18 19
19 20
20 21
21 22
22 23
23 24
24 25
25 26
26 27
27 28
28 29
29 30
30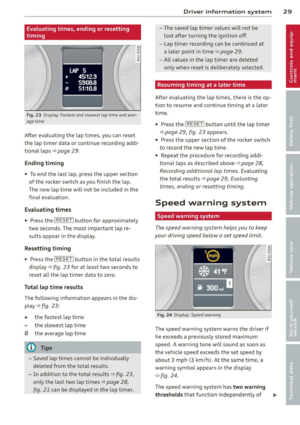 31
31 32
32 33
33 34
34 35
35 36
36 37
37 38
38 39
39 40
40 41
41 42
42 43
43 44
44 45
45 46
46 47
47 48
48 49
49 50
50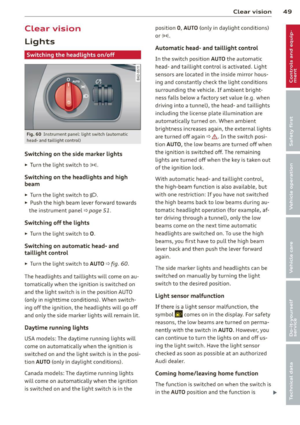 51
51 52
52 53
53 54
54 55
55 56
56 57
57 58
58 59
59 60
60 61
61 62
62 63
63 64
64 65
65 66
66 67
67 68
68 69
69 70
70 71
71 72
72 73
73 74
74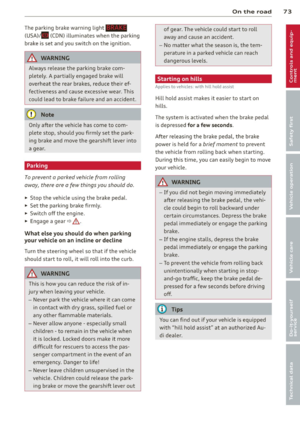 75
75 76
76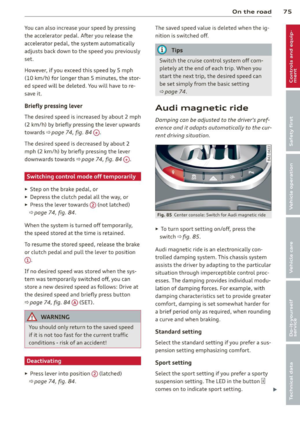 77
77 78
78 79
79 80
80 81
81 82
82 83
83 84
84 85
85 86
86 87
87 88
88 89
89 90
90 91
91 92
92 93
93 94
94 95
95 96
96 97
97 98
98 99
99 100
100 101
101 102
102 103
103 104
104 105
105 106
106 107
107 108
108 109
109 110
110 111
111 112
112 113
113 114
114 115
115 116
116 117
117 118
118 119
119 120
120 121
121 122
122 123
123 124
124 125
125 126
126 127
127 128
128 129
129 130
130 131
131 132
132 133
133 134
134 135
135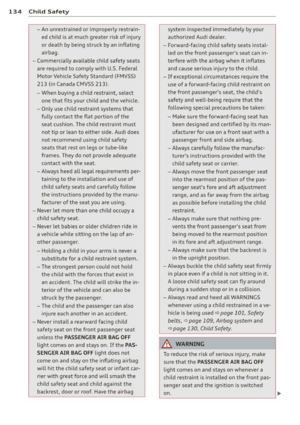 136
136 137
137 138
138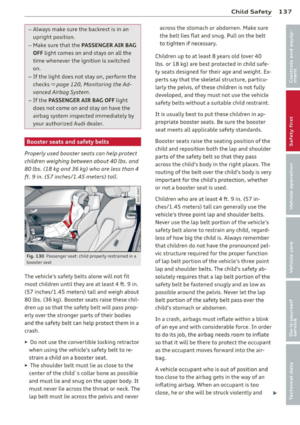 139
139 140
140 141
141 142
142 143
143 144
144 145
145 146
146 147
147 148
148 149
149 150
150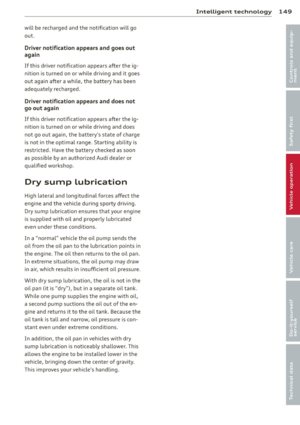 151
151 152
152 153
153 154
154 155
155 156
156 157
157 158
158 159
159 160
160 161
161 162
162 163
163 164
164 165
165 166
166 167
167 168
168 169
169 170
170 171
171 172
172 173
173 174
174 175
175 176
176 177
177 178
178 179
179 180
180 181
181 182
182 183
183 184
184 185
185 186
186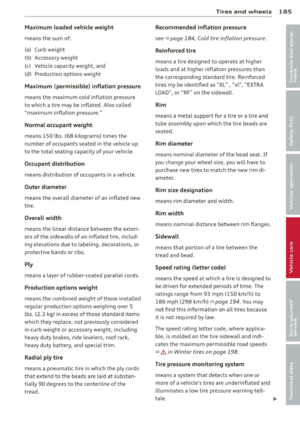 187
187 188
188 189
189 190
190 191
191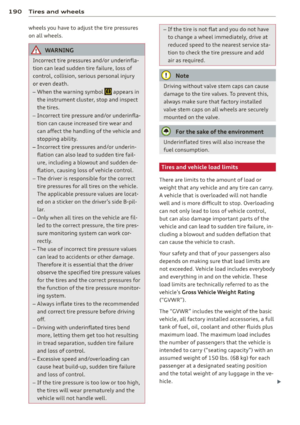 192
192 193
193 194
194 195
195 196
196 197
197 198
198 199
199 200
200 201
201 202
202 203
203 204
204 205
205 206
206 207
207 208
208 209
209 210
210 211
211 212
212 213
213 214
214 215
215 216
216 217
217 218
218 219
219 220
220 221
221 222
222 223
223 224
224 225
225 226
226 227
227 228
228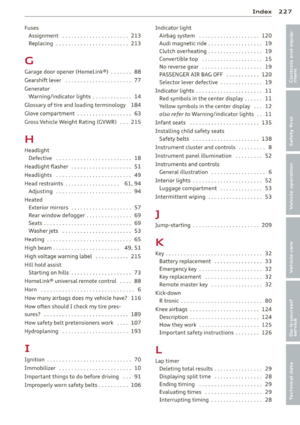 229
229 230
230 231
231 232
232 233
233 234
234 235
235