Page 89 of 236
Requirement: The parking system must be
switched on .
.,. Press the Sett ings contro l but ton.
- Front volum e -front sensor volume
- Front frequ enc y-front sensor frequency
-Re ar volume -rear sensor volume
-Re ar fr eque ncy -rear sensor frequency
The new ly adjusted val ue is briefly heard from
the signa l generator .
(D Tips
Changed settings are activated when park
ing system is swi tched on aga in.
Error messages
Applies to vehicles: with parking system advanced
There is an error in the system if the LED on
the ~ switch is blinking and yo u hear a con
tinuous a larm for a few seconds after switch
ing on the parking system or when the park
ing system is already activated. Have your au
thor ized Audi dealer correct the error .
(D Tips
If an error has occurred before the ignition
is turned off, the LED in the
[i;] switch will
blink the next time the ignit ion is switched
on, reverse gea r selected, and the acoustic
parking system is activated .
Parking system 87
Page 90 of 236

88 Homelin k®
Homelink ®
Universal remote
control
General information
The Homelink universal remote control can
be programmed with hand-held transmitters
from existing equipment.
You must first program the Homelink ® trans
mitter before you can use the system
~ page 88, Programming the Homelink ®
transmitter.
In order to program the Homelink® transmit
ter for devices utilizing rolling code, a second person on a ladder who can safely reach the
garage door opener motor is recommended.
It is also necessary to locate the "learn" but
ton on your garage door opener motor . Refer
to the operating instructions for the opener,
as the location and color of this button may
vary by manufacturer .
You can still use the original remote control
for the device at any time.
A WARNING
-
- Never use the Homelink® transmitter
with any garage door opener that does
have not the safety stop and reverse fea
ture as required by federal safety stand
ards. This includes any garage door open
er model manufactured before April 1,
1982.
- A garage door opener which cannot de
tect an object, signaling the door to stop
and reverse does not meet current feder
al safety standards. Using a garage door
opener without these features increases
risk of serious injury or death.
- For safety reasons never release the
parking brake or start the engine while
anyone is standing in front of the vehicle.
- A garage door or an estate gate may
sometimes be set in motion when the
Homelink ® remote control is being pro
grammed. If the device is repeatedly ac- tivated, this can overstrain motor and
damage its electrical components
-an
overheated motor is a fire hazard!
- To avoid possible injuries or property
damage, please always make absolutely
certain that no persons or objects are lo
cated in the range of motion of any
equipment being operated.
{!) Tips
- If you would like more information on
Homelink ®, where to purchase the
Homelink ® compatible products, or
would like to purchase the Homelink®
Home Lighting Package, please call toll
free: 1-800-355-3515.
- For Declaration of Compliance to United
States FCC and Industry Canada regula
tions ~
page 222.
Programming the Homelink ®
transmitter
The transmitter is programmed in two phas
es. For rolling code transmitters, a third
phase is also necessary.
~----------------- ~ ,:.
~
Fig. 101 Overhead console: Homeli nk® keypad
I
'-..~0000 - - ,r.;-_ - -
Fig. 102 Fro nt bumper , driver side : loc ation of trans -
mi tter unit ..,_
Page 91 of 236

Phase 1:
p rogramming th e overh ead k eypad
1. Make sure your vehicle is wit hin operating
range of the remote controlled garage
door opener.
2. Set the parking brake
q A in General in
formation on page 88.
3 . Turn the ignition on . Do not start the en
g ine!
4. P ress and hold the two outs ide Home
Link ® buttons
(D and @for approxi
mately 20 seconds until indicator light @
¢fig. 101 begins to flash . Then release
both buttons. Do not ho ld the buttons for
longer than 30 seconds.
.,. This procedure only needs to be performed
once . It erases the factory-set default codes
and does not have to be repeated to pro
gram add it ional remote controls.
S. P ress and hold the Home Link ® button
(D ,
® or @ until the indicato r ligh t@
starts flashing
slowly. Re lease the bu tton.
.,. The system will remain in programming
mode for 5 minutes . Co to the front of the
vehicle and proceed with phase 2 .
Phase 2:
programmin g th e bumper mounted tran s
m itter
6. Hold the original remote control at a dis
tance between 0 -6 in. (0 -15 cm) from the
bumper below the appropriate headlight
for your vehicle
c:!;> fig. 102 (use the short
est distance possib le).
7 . A im the remote con trol just be low the
driver sid e head light.
8. P ress and hold the activation button on
the remote contro l.
.,. May be different in Canada.
If so, press and
re-press (cycle) the act ivation button on your
remote control every two seconds.
9. The emergency flashers will flash
three
time s
(after about 15-60 seconds) when
the programm ing is successful. Release
the butto n on the remote control.
.,. To program more devices, repeat steps 4 to
9.
Homelink ® 89
10. Press and hold the tra ined Homelink ®
button and observe the indicator light @
qfig. 101 .
.,. If the indicator light is solid/contin uous,
programm ing is complete and your device
should activate when you press and release
the t ra ined Homel ink® button .
.,. If the ind icator light blinks rapidly fo r 2 sec
onds and is the n a solid/continuous light,
p roceed w ith phase 3 to program a roll ing
code device.
Phase 3: rolling code programming
.,. A second pe rson on a ladder who can safely
reach the garage door opene r motor is rec
ommended .
11. Lo ca te the "learn" button on the ga rage
doo r opener motor ( re fer to the operating
instructions for the opener, as t he loca
tion of t his button may vary by man ufac
turer).
12. Press and re lease the learn button on the
garage door opener motor .
.,. Not e: once the button is pressed, there are
30 s econds in wh ich to in it iate the next
step.
13. On t he Homelink ® keypad inside the vehi
cl e, firmly press and ho ld the Homel in k®
bu tton prev iously programmed in phases
1 and 2 for two seconds and release. Re
peat this sequence
twice.
.,. Some vehicles may require the press/hold/
release sequence up to three times to com
plete t he trai ning process .
.,. Homelink ® should now activate your rolling
code equipped device.
If the S m inute time limit is exceeded, the
emergency flash ers will flash one time to in
dicate that the p rocess has been te rm inated.
In this case, repeat steps 4 t hrough 9.
If the emergency flashers do not flash
three
times (after about lS-60 seconds), program ming was not successful. In this case, repeat
steps 4 through 9 .
Remote contro l units for garage door openers
in Canada are set to stop transmitting radio
frequency sig nals afte r two seconds. This t ime
Ill-
Page 92 of 236

90 Homelink®
may not be sufficient for the Homelink ® sys
tem to learn the radio frequency signal. Per
form all other steps as described above.
Operating the Homelink ® transmitter
The HomeLink ® transmitter works in the
some manner as the original hondheld re
mote control that come with the system.
1------------------g: g
N :l',
:l!III !
d ..
-~ ~ H ~
i: ...
Fig. 1 03 Overhead co nsole: Homelink ® keypad
"" Press the appropriate programmed button
(D , ® or @) to activate the des ired remote
control funct ion
c::> &, in General informa
tion on page 88.
Reprogramming a single button
A HomeLink ® button can be reprogrammed
individually without affecting the other but t on allocations.
Programming the overhead keypad
"" Press the app ropriate Homelink ® button
unt il the ind icator light begins flashing
slowly.
Programming the bumper mounted trans
mitter
1. H old the original remote control at a dis
tance between
0 -5 in . (0 -13 cm) from the
bumper below the app ropriate head light
fo r your vehicle (use the shortest distance
possib le) .
2 . Aim the remote control just below the
driver side head light .
3. Press and hold the activation button on
the remote control.
4 . The emergency flashers will flash
three
time s
(after about 15-60 seconds) when the p
rogramming is successful. Now re
l ease the button on the remote control.
"" If the dev ice utilizes a rolling code, p lease
follow phase 3 of
c::> page 88, Programming
the HomeLink ® transmitter
for rolling code
programm ing .
This p rocedu re will ca use the e xisting pro
gramming on the Homelink ® button to be
erased!
Erasing the programming of the
Homelink ® transmitter
When you erase the programming, the pro
gramming on all three of the transmitter
channels with be lost!
"" Perform steps 1 to 4 as described on
~ page 89, Phase 1: programming the over
head keypad .
When completed, the Homelink ® system will
be in the prog ramm ing mode and is then
r eady to learn the codes fo r remote controlled
devices.
© Tips
- Programmed buttons ca nnot be erased
ind iv idually .
- For security reasons you are adv ised to
erase the programming of the Home
Link® sys tem before you se ll you r vehicl e.
Page 93 of 236

Driving Safely
General notes
Safe driving habits
Please remember -safety first!
This chapter contains important information,
tips, instructions and warnings that you need
to read and observe for your own safety, the
safety of your passengers and others . We have
summarized here what you need to know
about safety belts, airbags, child restraints as
well as child safety. Your safety is for us
priori
ty number 1.
Always observe the information
and warnings in this section - for your own
safety as well as for that of your passengers.
The information in this section applies to all
model versions of your vehicle . Some of the
features described in this sections may be
standard equipment on some models, or may
be optional equipment on others. If you are
not sure, ask your authorized Audi dealer.
A WARNING
- Make certain that you follow the instruc
tions and heed the WARNINGS in this
Manual. It is in your interest and in the
interest of your passengers.
- Always keep the complete owner's litera
ture in your Audi when you lend or sell
your vehicle so that this important infor
mation will always be available to the
driver and passengers.
- Always keep the owner's literature handy
so that you can find it easily if you have
questions.
Safety equipment
The safety features are part of the occupant
restraint system and work together to help
reduce the risk of injury in a wide variety of
accident situations .
Your safety and the safety of your passengers
should not be left to chance. Advances in
technology have made a variety of features
available to help reduce the risk of injury in an
Driving Safely 91
accident. The following is a listing of just a
few of the safety features in your Audi:
- sophisticated safety belts for driver and all
passenger seating positions,
- safety belt pretensioners ,
- front airbags,
- knee airbags,
- side airbags in the seats
- adjustable head restraints,
- adjustable steering column.
These individual safety features can work to
gether as a system to help protect you and
your passengers in a wide range of accidents.
These features cannot work as a system if
they are not always properly adjusted and
properly used!
Safety is everybody's responsibility!
Important things to do before driving
Safety is everybody's job! Vehicle and occu
pant safety always depends on the informed and careful driver.
For your safety and the safety of your passen
gers,
before driving always:
~ Make sure that all lights and signals are op
erating correctly .
~ Make sure that the tire pressure is correct.
~ Make sure that all windows are clean and
afford good visibility to the outside.
~ Secure all luggage and other items carefully
c::>page 62.
~ Make sure that nothing can interfere with
the pedals.
~ Adjust front seat, head restraint and mir
rors correctly for your height .
~ Instruct passengers to adjust the head re
straints according to their height .
~ Make sure to use the right child restraint
correctly to protect children¢
page 130,
Child Safety.
~ Sit properly in your seat and make sure that
your passengers do the same¢
page 59,
Seats and storage. .,..
•
•
Page 94 of 236

92 Driving Safel y
• Fasten your safety belt and wear it proper ly.
Also instruct your passengers to fasten their
safety belts proper ly
¢ page 101.
What impairs driving safety?
Safe driving is directly related to the condi
tion of the vehicle, the driver as well as the
driver's ability to concentrate on the rood
without being distracted.
The driver is responsible for the safety of the
vehicle and all of its occupants. If your ability
to drive is impaired, safety risks for everybody
in the vehicle increase and you also become a
hazard to everyone else on the road
¢ .&, .
Therefore:
• Do not let yourself be distracted by passen
gers or by using a cellular telephone.
• NEVER drive when your dr iving ability is im
paired (by medicat ions, alcohol, drugs, etc.) .
• Observe all traffic laws, rules of the road
and speed limits and plain common sense .
• ALWAYS adjust your speed to road, traff ic
and weather condit ions.
• Take frequent breaks on long trips . Do not
drive for more than two hours at a stretch .
• Do NOT drive when you are tired , under
pressure or when you are stressed.
A WARNING , .
Impaired driving safety increases the risk
of serious personal injury and death when
ever a vehicle is being used .
Proper occupant
seating positions
Proper seating position for the driver
The proper driver seating position is impor
tant for safe, relaxed driving.
Fig. 104 Correct seat ing posit ion
For your own safety and to reduce the risk of
injury in the event of an accident, we recom
mend that you adjust the driver's seat to the
following position:
• Adjust the steering wheel so that there is a
distance of at least 10 inches (25 cm) be
tween the steering wheel and your breast
bone¢
fig . 104 .
• Adjust the driver's seat so that you can easi
ly push the pedals all the way to the floor
while keeping your knee(s) slightly bent
¢.&, .
• Grasp the top of the steer ing whee l with
your elbow(s) slightly bent.
• Adjust the head restraint so the upper edge
is as even as possible with the top of your
head. If that is not possible, try to adjust
the head restraint so that it is as close to
this position as possible .
• Adjust the steering wheel so that the steer
ing wheel and airbag cover points at your
chest and not at your face.
• Adjust the angle of the seatback so that it is
in an upright position so that your back
comes in full contact with it when yo u drive.
• Fasten and wear safety be lts correctly
¢ page 102.
• Always keep both feet in the footwell so
that you are in control of the vehicle at all
times .
Page 95 of 236

For detailed information on how to adjust the
dr iver's seat, see
¢ page 59, Seats and stor
age.
A WARNING
Drivers who are unbelted, out of position
or too close to the airbag can be seriously
injured by an airbag as it deploys. To help
reduce the risk of serious personal injury:
- Always adjust the driver's seat and the
steering wheel so that there are at least
10 inches (25 cm) between your breast
bone and the steering wheel.
- Always adjust the driver's seat and the
steering wheel so that there are at least
4 inches (10 cm) between the knees and
the lower part of the instrument panel.
- Always hold the steering wheel on the
outside of the steering wheel rim with
your hands at the 9 o'clock and 3 o'clock positions to help reduce the risk of per
sonal injury if the driver's airbag inflates.
- Never hold the steering wheel at the
12 o'clock position or with your hands at
other positions inside the steering wheel
rim or on the steering wheel hub. Hold
ing the steering wheel the wrong way
can cause serious injuries to the hands,
arms and head if the driver's airbag in
flates
- Pointing the steering wheel toward your
face decreases the ability of the supple
mental driver's airbag to protect you in a
collision .
- Always sit in an upright position and nev
er lean against or place any part of your
body too close to the area where the air
bags are located.
- Before driving, always adjust the front
seats and head restraints properly and
make sure that all passengers are prop
erly restrained.
- Never adjust the seats while the vehicle
is moving. Your seat may move unexpect
edly and you could lose control of the ve
hicle.
- Never drive with the backrest reclined or
tilted far back! The farther the backrests
Driving Safely 93
are tilted back, the greater the risk of in
jury due to incorrect positioning of the
safety belt and improper seating posi
tion .
- Children must always ride in child seats
¢ page 130. Special precautions apply
when installing a child seat on the front
passenger seat
¢ page 109.
Proper seating position for the front
passenger
The proper front passenger seating position
is important for safe, relaxed driving.
For your own safety and to reduce the risk of
injury in the event of an accident, we recom
mend that you adjust the seat for the front
passenger to the following position :
"' Adjust the angle of the seatback so that it is
in an upright position and your back comes
in full contact with it whenever the vehicle is
moving.
"' Adjust the head restraint so the upper edge
is as even as possible with the top of your
head. If that is not possible, try to adjust
the head restraint so that it is as close to
this position as possible
¢ page 94.
"' Keep both feet flat on the floor in front of
the front passenger seat .
"' Fasten and wear safety belts correctly
¢ page 104.
For detailed information on how to adjust the
front passenger's seat, see
¢ page 59, Seats
and storage.
A WARNING
Front seat passengers who are unbelted,
out of position or too close to the airbag
can be seriously injured or killed by the air
bag as it deploys. To help reduce the risk of
serious personal injury:
- Passengers must always sit in an upright
position and never lean against or place
any part of their body too close to the
area where the airbags are located.
•
•
Page 96 of 236

94 Driving Safely
-Passengers who are unbelted, out of po
sition or too close to the airbag can be
seriously injured by an airbag as it de
ploys with great force in the blink of an
eye.
- Always make sure that there are at least
10 inches (25 cm) between the front
passenger's breastbone and the instru
ment panel.
- Always make sure that there are at least
4 inches (10 cm) between the front pas
senger's knees and the lower part of the
instrument panel.
- Each passenger must always sit on a seat
of their own and properly fasten and
wear the safety belt belonging to that
seat.
- Before driving, always adjust the front
passenger seat and head restraint prop
erly.
- Always keep your feet on the floor in
front of the seat. Never rest them on the
seat, instrument panel, out of the win
dow, etc. The airbag system and safety
belt will not be able to protect you prop
erly and can even increase the risk of in
jury in a crash.
- Never drive with the backrest reclined or
tilted far back! The farther the backrests
are tilted back, the greater the risk of in
jury due to incorrect positioning of the
safety belt and improper seating posi
tion.
- Children must always ride in child seats
r:::;, page 130. Special precautions apply
when installing a child seat on the front
passenger seat
r:::;, page 109.
Proper adjustment of head restraints
Fig. 105 Head restra int: v iewed from the front
The head restraints must be correctly adjust
ed to achieve the best protection.
.,. For adjustable head restraints : adjust the
head restraint so the upper edge is as even
as possible with the top of your head. If that
is not possible, try to adjust the head re
straint so that it is as close to this position
as possible
r:::;, fig. 1 OS .
Adjusting head restraints<=> page 61.
A WARNING ~
Driving without head restraints or with im-
properly adjusted head restraints increases
the risk of serious injuries in a collision . To
help reduce the risk of injury:
- Always drive with the head restraints in
place and properly adjusted.
- Every person in the vehicle must have a properly adjusted head restraint.
- Always make sure each person in the ve
hicle properly adjusts their head re
straint . Adjust the head restraints so the
upper edge is as even as possible with
the top of your head.
If that is not possi
ble, try to adjust the head restraint so
that it is as close to this position as pos
sible,
- Never attempt to adjust head restraint
while driving. If you have driven off and
must adjust the driver headrest for any
reason, first stop the vehicle safely be
fore attempting to adjust the head re
straint .
 1
1 2
2 3
3 4
4 5
5 6
6 7
7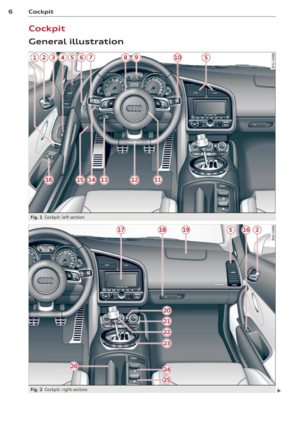 8
8 9
9 10
10 11
11 12
12 13
13 14
14 15
15 16
16 17
17 18
18 19
19 20
20 21
21 22
22 23
23 24
24 25
25 26
26 27
27 28
28 29
29 30
30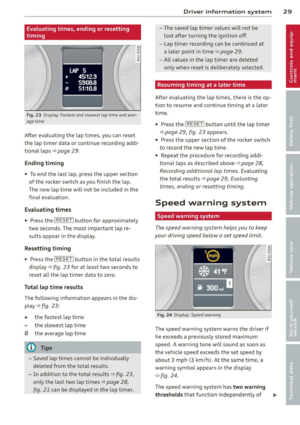 31
31 32
32 33
33 34
34 35
35 36
36 37
37 38
38 39
39 40
40 41
41 42
42 43
43 44
44 45
45 46
46 47
47 48
48 49
49 50
50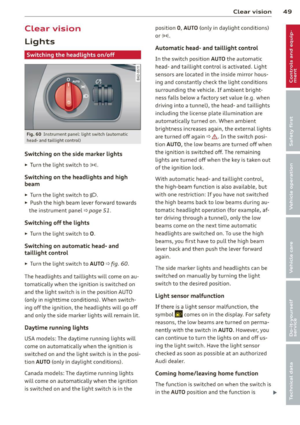 51
51 52
52 53
53 54
54 55
55 56
56 57
57 58
58 59
59 60
60 61
61 62
62 63
63 64
64 65
65 66
66 67
67 68
68 69
69 70
70 71
71 72
72 73
73 74
74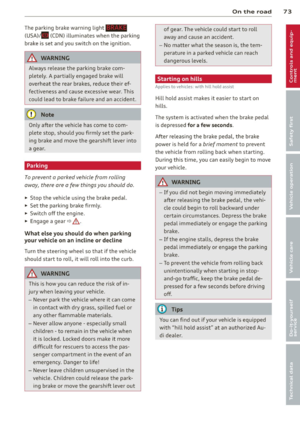 75
75 76
76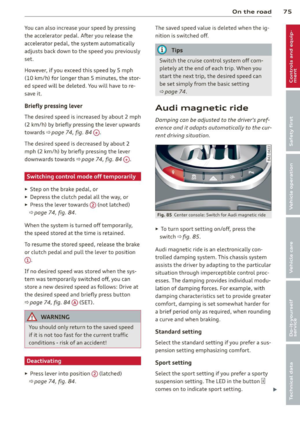 77
77 78
78 79
79 80
80 81
81 82
82 83
83 84
84 85
85 86
86 87
87 88
88 89
89 90
90 91
91 92
92 93
93 94
94 95
95 96
96 97
97 98
98 99
99 100
100 101
101 102
102 103
103 104
104 105
105 106
106 107
107 108
108 109
109 110
110 111
111 112
112 113
113 114
114 115
115 116
116 117
117 118
118 119
119 120
120 121
121 122
122 123
123 124
124 125
125 126
126 127
127 128
128 129
129 130
130 131
131 132
132 133
133 134
134 135
135 136
136 137
137 138
138 139
139 140
140 141
141 142
142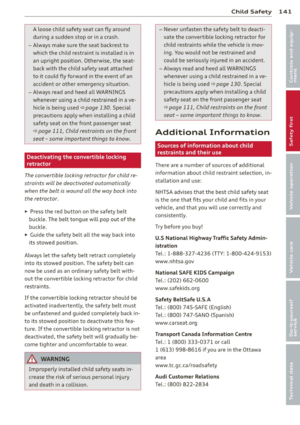 143
143 144
144 145
145 146
146 147
147 148
148 149
149 150
150 151
151 152
152 153
153 154
154 155
155 156
156 157
157 158
158 159
159 160
160 161
161 162
162 163
163 164
164 165
165 166
166 167
167 168
168 169
169 170
170 171
171 172
172 173
173 174
174 175
175 176
176 177
177 178
178 179
179 180
180 181
181 182
182 183
183 184
184 185
185 186
186 187
187 188
188 189
189 190
190 191
191 192
192 193
193 194
194 195
195 196
196 197
197 198
198 199
199 200
200 201
201 202
202 203
203 204
204 205
205 206
206 207
207 208
208 209
209 210
210 211
211 212
212 213
213 214
214 215
215 216
216 217
217 218
218 219
219 220
220 221
221 222
222 223
223 224
224 225
225 226
226 227
227 228
228 229
229 230
230 231
231 232
232 233
233 234
234 235
235