Page 57 of 236

-If you switch off the ignition w ith the
windshield wiper lever still in the inter
val w ipe pos ition and then come back a
while later and drive off , the rain sensor
will reactivate itself after the vehicle
speed has exceeded 4 mph (6 km/h) .
Service position
It is only possible to change wiper blades if
you move the wiper arms to the service posi
tion .
In order to use the windshield wipers, the
front lid must be comp letely closed.
Mo ving w ipe r blade s to the service
position
.. When there is a r isk of frost, make s ure that
the wiper blades are no t frozen to the wind
shield .
.. Switch the ignition on .
.. Move the w iper leve r to position
0
c::> page 53, fig. 66 .
.. Press the I RESE T I button unt il the Display
type
menu appears in the Driver Informa
tion System display.
.. Using the rocker switc h and the
!R ESE T I but
ton, select the
Set > Wiper s > Front > Serv
i ce posit io n on
function . The windsh ield
wiper arms move to the service pos ition.
Moving w ipe r blade s to park po siti on
.. Make certain that the w ipe r arms are ly ing
against the w indshie ld .
.. Switch the ignition on and move the wiper
lever from position
O to 4 c::> page 53 ,
fig.
66. The wiper arms will move back to
t h e park pos ition .
(D Note
Never drive your vehicle when the wind
shie ld w iper arms are in the service pos i
tion and pulled away from the windshie ld.
When you dr ive faster than
4 mp h (6 km/
h), the w iper arms automat ica lly re turn to
t he par k position and could ca use pa int
damage to the front lid! Clear
vi
sion 55
@ Tips
- Yo u can also turn on t he service posit ion,
for example, if yo u want to protect the
w indshield from icing by using a cover.
- Th e service posit ion moves to
off a uto
matically when you operate the wind
shield wiper lever, or speed exceeds
4 mph (6 km/h).
Replacing front wiper blades
Wiper blades in good condition help keep the
windshield clear.
.-- --------..
Fig. 67 Unl atching w ipe r blade s
'
@
Fig. 6 8 Remov ing w iper b lades
Removing the wiper blade
.. Move the wipers to the service pos ition
c::> pageSS .
.. Fold the w indshie ld w iper arm away from
the glass .
0
i ,:. .., m
.. On the upper end of the wiper arm at the
corr uga tion, squeeze the p lastic ret ainer to
gethe r on both s ides in the direction of the
arrow
c::> fig. 67.
.. Rotate the wiper b lade in the d irect ion of
the arrow @
c::> fig. 68 away from the wiper
arm .
.. Lift the wiper b lade off in the direction of
t he arrow @.
Page 58 of 236

56 Clear vis ion
In stall ing t he wiper blade
.,. Place the rounded end of the wiper onto the
end of the w iper arm in the
op pos ite direc
tion to the arrow @
c:::> fig. 68 .
.,. Squeeze the corrugation on the wiper until
you hear it click in the wiper arm .
.,. Fold the wiper arm back onto the wind
shield .
.,. Switch the ignition on and move the wiper
lever down briefly
c:::> page 53, fig . 66 . The
wipe r will move back to the park position.
_& WARNING
- Clean yo ur wiper blades regularly w ith a
windshield washer solution to prevent
streaking. If the wiper blades are very
dirty, for examp le with insects, carefu lly
clean the w iper blades with a sponge or a
soft brush.
- For your safety, you should replace the
wiper blades once or twice a year. See
your authorized Aud i dealer for replace
ment blades.
(D Note
- The w iper blades may only be changed
c:::> page 55 in the service position! Other
wise, you r isk damaging the paint on the
front lid or the windsh ield wiper motor .
- To prevent damage to the wiper system:
-Always loosen blades which a re fro zen
to the windshield before operating
w ipers.
- Do not use gasoline, kerosene, paint
t hinner, or o ther solvents on or near
the wipe r blades .
- Do not attempt to move the wipers by
hand.
{D) Tips
The front wiper blades are different
lengths; the blade o n the dr ive r's side is
longer.
Mirrors
Dimming the mirrors
Fig . 69 Auto matic dimming rearview m irro r
.,. To dim the rearview mirror and both exteri
or m irrors, press the@ button . The diode
@ turns on. The rearview and exterior mir
rors dim automatically when light shines on
them, for example from headlights on ave
h icle to the rear .
_& WARNING
-
Elec tro lyte fluid can lea k from automatic
dimming mirrors i f the glass is b roken.
Electro lyte fluid can irritate skin, eyes and
respiratory system.
- Repeated or prolonged exposure to e lec
trolyte can cause i rr itation to the respira
tory system , especially among people
with asthma or other respiratory condi
tions. Get fresh air immediately by leav
ing the vehicle or, if that is not possib le,
open w indows and doors all the way .
- If electrolyte gets into the eyes, flus h
them thoroughly with large amou nts
of
clean water for at least 15 minutes;
medical attention is recommended.
- If electrolyte contacts skin, fl ush affect
ed area with clean wate r fo r at least 15
minutes and then wash affe cted area
wit h soap and wate r; medical attention
is recommended. Thoro ughly wash af
fected clothing and shoes before reuse .
- If swallowed and person is consc ious,
rinse mouth with water for at least 15
minutes . Do not induce vomiting unless
instructed to do so by medical professio na l. Get medical attention immediately.
Page 59 of 236

(D Note
Liquid electrolyte leaking from broken mir
ror glass will damage any plastic surfaces
it comes in contact with. Clean up spilled
electrolyte immediately with clean water
and a sponge.
(D Tips
-Switching off the dimming function of
the inside rear view mirror also deacti
vates the automatic dimming function of
the exterior mirrors .
- The automatic dimming mirrors do not
dim when the interior lighting is turned
on or the reverse gear is selected .
- Automatic dimming for the mirror only
operates properly if the sun shade* for
the rear window is not in use or the light
striking the inside mirror is not hindered
by other objects.
Exterior mirrors
N
"' ~ N
~
Fig. 70 Forwa rd sect ion of driver 's a rmr est: power mir
ror co ntrols
Turn the knob to the desired position :
Q/ P -In this position , you can adjust the
driver's and front passenger's exterior mirrors
by turning the knob in the desired direction.
(jjjl - The mirrors are heated depending on the
outside temperature.
8 -The exterior mirrors fold in*.
You ar e well-advised to fold* the exterior mir
ro rs in maneuve ring in tight spa ces or when
leaving the car pa rked close to other vehicles . Clear vision 5
7
(D Note
-Curved (i.e. convex) mirror surfaces in
crease your field of view. Remember that
vehicles or other objects will appear
smaller and farther away than when
seen in a flat mirror . If you use this mir
ror to estimate distances of following ve
hicles when changing lanes, you could
estimate incorrectly and cause an acci
dent .
- If the mirror housing is moved uninten
tionally (for example, while parking your
vehicle), then you must first fold the mir
ror electrically. Do not readjust the mir
ror housing manually. You could damage
the motor which controls the mirror.
(D Tips
If there should be a malfunction in the
electrical system, you can still adjust the
exterior mirrors by pressing the edge of
the mirror.
Digital compass
Activating or deactivating the compass
The direction is displayed on the interior rear
view mirror .
Fig. 71 Inside re arv iew mirror : digital compa ss a ctivat
ed
.. To activate or deactivate, hold the @but
ton down until the red display appears or
disappears .
The digital compass only works with the igni
tion turned on . The directions are displayed as
initials:
N (North) , NE (Northeast), E (East), II>
Page 60 of 236
, S (South), SW (Southwest),
W (West), NW (Northwest).
(D Tips
To avo id ina ccurate directions, do not a l
low any remote controls, electrical sys ")
58 Clear vis ion
SE (Southeast), S (South), SW (Southwest),
W (West), NW (Northwest).
(D Tips
To avo id ina ccurate directions, do not a l
low any remote controls, electrical sys
tems, or metal parts close to t he mirror .
Setting the magnetic deflection zone
The correct magnetic deflection zone must be
set in order to display the directions correctly.
Fig . 72 Magne tic deflection zone boundaries
.. Hold the @button ~ page 57, fig . 71 down
until the number of the set magnetic deflec
tion zone appears on the interior rear view
mirror .
.. Adjust the magnetic deflection zone by re
peatedly pressing on the @button . The set
mode automatically deactivates after a few
seconds.
Calibrating the compass
The compass has to be recalibrated if the dis
play is wrong or inaccurate .
.. Hold the@ button down until the letter C
is displayed on the inte rior rearv iew mirro r. ..
Drive in a circle at a speed o f abo ut 5 mph
(10 km/h) until a direction is shown on the
interior rearview mirror .
_& WARNING
--
The digital compass is to be used as a di
rectional aid only. Even though you may
want to look at it while you are driving, you
must st ill pay atte ntion to traffic, road a nd
weather conditions as well as othe r possi
b le hazards.
Page 61 of 236

Seats and storage
General recommen
dations
Why is your seat adjustment so important?
The safety belts and the airbag system can
only provide maximum protection if the front
seats are correctly adjusted.
There are various ways of adjusting the front
seats to provide safe and comfortable support
for the driver and the front passenger. Adjust
your seat properly so that :
- you can easily and quick ly reach all the
switches and controls in the instrument
panel
- your body is properly supported thus reduc ing physical stress and fatigue
- the safety belts and airbag system can offe r
maximum protection
¢ page 109.
In the following sections, you will see exactly
how you can best adjust your seats .
There are special regulations and instructions
for installing a child safety seat on the front passenger's seat. Always heed the informa
tion regard ing child safety provided in
¢ page 130, Child Safety.
A WARNING
Incorrect seating position of the driver and
all other passengers can result in serious
personal injury.
- Always keep your feet on the f loor when
the vehicle is in motion -never p ut your
feet on top of the instrument panel, out
of the w indow or on top of the seat cush
ion! This applies espec ially to the passen
gers . If your seating position is incorrect
you increase the r isk of injury in the case
of sudden braking or an acc ident. If the
airbag inflates and the seating position
is incorrect this could result in personal
injury or even death.
- It is important for bo th the driver and
front passenger to keep a distance of a t
Seat s an d sto rage 59
least 10 inches (25 cm) between them
selves and the steering wheel and/or in
strument panel. If you're s itting any
closer than th is, the airbag system can
not protect you properly. In addition to
this, the front seats and head restra ints
must be adjusted to yo ur body height so
that they can give you max imum prote c
tion.
- Always try to keep as much distance as
possible be tween yourself and the s teer
ing wheel o r instrument pane l.
- Do not adjust the driver's or front pas
senger's seat whi le the vehicle is moving.
Your seat may move unexpected ly, caus
ing sudden loss of vehicle control and
personal injury . If you ad just yo ur seat
while the veh icle is moving, you are out
of posit ion.
Driver's seat
The correct seat position is important for safe
and relaxed driving.
We recommend that you adjust the driver's
seat in the fo llowing manner:
.,. Adjust the seat in fo re and aft direction so
t ha t you can easily push the peda ls to the
floor whi le keeping your knee sligh tly bent
c::> A in Why is your seat adjustment so im
portant? on page
59 .
.,. Adjust the seatback so that when you sit
w ith your back against the seatback, you can
still grasp the top of the steering wheel.
.,. Pos it ion the head restraint accord ing to the
occupant 's height
c::> page 61 . For maxi
mum protection, the top of the head re
straint shou ld be at least at eye level, pref
erably higher and idea lly level with the top
of the head
¢ page 94, fig. 105 .
A WARNING
Never place any objects in the dr iver's foot
well. An object could get into the pedal
area and interfere with pedal funct ion. In
case of sudden braking or an acc ident, you
would not be able to brake or accelerate!
Page 62 of 236

60 Seats and stor age
Front passenger's seat
Always mov e th e front passeng er seat into
the rearmost position .
To avoid contact w ith the airbag wh ile it is de
p loying, do not sit any close r to the instru
ment panel tha n necessary and always wear
the three-point safety belt provided ad justed
correctly . We recommend that you adjust the
passenger's seat i n the follow ing ma nner:
• Bring the backrest up to an (almost) upright
pos it ion.
Do not r ide w it h the seat reclined .
• The idea l position for the head restra int is
with the upper edge of the rest ra in t l eve l
with the top o f your head
¢ page 61. You
sho uld
not lower the top o f the restra int be
l ow the level of your eyes .
• Place your feet on the floor in front of the
passenger's seat .
Power seats
Adjustment switches
The operating logic for the switches corre
sponds to th e construction and function of
the seat.
Fig. 7 3 Adjust men t sw it c h es : locat io ns on dr iver seat
The o perating logic for the switches corre
sponds to the constr uction, the design and
the function of the seat. Push or pull e ithe r
switch in exactly the same d irect ion you want
the correspond ing part of the seat to move.
Adjustment switch es
CD Adj usting the lumbar s upport
@ Adjusting seat height and fore-and-aft po
sition @
Adjus ting the angle of the sea tback
@ Re leas ing the seatback
Power seat adjustment
The switches can be moved in various direc
tions to allow precise adjus tment.
Read and heed all wa rni ngs befo re you adjust
yo ur seat. ¢.&, .
Adjusting the curvature of the lumbar
support
• Push the fo rward or rear dep ression on the
sw itch shell
CD ¢ page 60, fig. 73 to in
crease or decrease the backrest curvat ure.
Adjusting the height of the lumbar
support
• Push the top o r bottom depress ion on the
sw itch shell
CD to raise or lower the s upport
in the backrest.
Moving the front seat s forward or
backward
• Press the switch @forward or backward
hor izontally.
Adjusting the seat height
• Pull or push the swi tch @ even ly a t both
en ds to raise or lower the seat.
Angling the seat cushion up and down
(front )
• Pull or p ush the switch @at the front only
to ra ise or lower the seat.
Angling the seat cushion up and down
(rear)
• Pull or p ush the swi tch @ at the rea r o nl y
to ra ise or lower the seat.
Adjusting the seatback
• Push o r pull the swit ch @ in the same direc
t ion you w ant the sea tba ck t o tilt.
A WARNING
- Never a djust the drive r's or front passen -
ge r seat w hile the vehicle is moving. If ..,.
Page 63 of 236

you do this while the vehicle is moving,
you will be out of position. Always adjust the driver's or front passenger seat when
the vehicle is not moving .
- Be careful when adjusting the seat
height. Check to see that no one is in the
way, or serious injury could result!
- Because the seats can be electrically ad
justed with the ignition key removed,
never leave children unattended in the
vehicle . Unsupervised use of the e lectr ic
seat adjustments may cause serious in
jury .
- To reduce the risk of injury in the case of
sudden braking or accident, front pas
sengers must neve r ride in a moving ve
hicle with the seatback reclined. Safety
belts and the airbag system offer maxi
mum protection on ly when the seatback
is upright and the safety belts are prop
erly posit ioned on the body. The more
the seatback is reclined, the greater the risk of personal injury from an incorrect
seating posit ion and improperly posi
tioned safety belts!
- Always make sure the front seatbacks are
in the upright position when dr iv ing .
Head restraints
Adjusting head restraints
Fig. 7 4 Adjusting head restra ints
The head restraints can be adjusted to provide
safe support to head and neck at the optimum
h e ight. When optimally adjusted, the top of
the restraint shou ld be level with the top of
the head . If that is not possible, try to adjust
S ea ts a nd s to rage 61
the head restraint so that it is as close to this
position as possible¢
page 94.
1-Grasp the sides of the head restraint with
both hands and slide it upward/downward
until you fee l it click into place
¢ fig . 74.
& WARNING ~ -
-Driving without head restraints or with
head restra ints that are not properly ad
justed increases the risk of ser ious or fa
tal neck injury dramat ically.
- Read and heed all WARNINGS
¢page 94.
@ Tips
Correct ly adjusted head restraints and
safety be lts are an extreme ly effective
combination of safety features.
Cup holder
F ig. 75 Cup holder
A WARNING
0 U)
~ ., a,
-
Spilled hot liquid can cause an accident
and personal injury.
- Never carry any beverage containers with
hot liq uids, such as hot coffee or hot tea,
in the vehicle while it is moving. In case
of an acc ident, sudden braking or other
veh icle movement, hot liquid could spill,
causing scalding burns. Spilled hot liquid
can also cause an accident and personal
lnJU ry.
- Use only soft cups in the cupholder . Hard
cups and glasses can cause injury in an
accident.
Page 64 of 236

62 Seats and storage
- Never use the cupho lder or adapter as an
ashtray- risk of f ire.
CD Note
On ly drink containe rs with lids should be
carried in the cupho lder. Liquid could spill
out and damage your vehicle's e lectronic
equ ipment or sta in the upholstery, etc.
Ashtray
Fig . 76 Center console: ashtray
The asht ray is inserted in the cupholder.
Opening the ashtray
.,. Fold the cover upward .
Emptying the ashtray
.,. Lift the closed ashtray up o ut o f the cu
pholder.
A WARNING
Never put waste paper in the ashtray. Hot
ashes or other hot objects in the ashtray
could set waste paper on fire.
Cigarette Lighter/
socket
N
-"' 0 ..:. ... m
The c igarette lig hte r or socket only wo rk with
the ign ition on.
Using the cigarette lighter
.,. Slide the cover open to reach th e cigarette
lighter
qpage 62.
.,. Push the knob in.
.,. Wait un til the c igarette lighte r knob pops
out. .,.
Remove the cigarette lighter immediately
and use it.
.,. Reinsert cigarette lighter into the socket af
ter use.
Connecting an appliance
.,. Slide the cover open to reach the c igarette
lighter .
.,. Remove cigarette lighter .
.,. Plug in appliance to be used.
T he socket of the c igarette lighter may be
u sed for 12-volt appliances with maximum
consumption of up to 100 watts, such as a
flash light, small vacuum cleaner, etc.
A WARNING
--Improper use of the c igarette lig hter can
cause serious injury or start a fire .
- Be careful when using the c igarette light
er. If you do not pay attention to what
you are doing when you are us ing t he cig
arette lighter you can burn yo urself.
CD Note
-To avoid damaging the socket, only use
plugs that fit properly.
- Only use the cigarette lighter socket as a
powe r source for e lectr ica l accessories
for short durations . Use t he sockets in
the vehicle when a power source is need ed for longer du rat ions .
(0 Tips
-When the eng ine is off and accessories
are st ill plugged in and are on, t he vehi
cle battery can still be d ra in ed.
- The ve hicle battery must not be charged
w ith a standard small charger that pl ugs
into the cigarette lighter or outlet .
Storage
, General
A WARNING
- Always remove objects from the instr u
men t pa nel. A ny items not put away
-
 1
1 2
2 3
3 4
4 5
5 6
6 7
7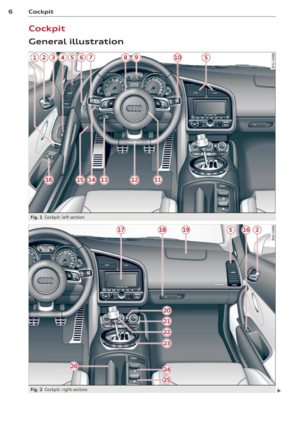 8
8 9
9 10
10 11
11 12
12 13
13 14
14 15
15 16
16 17
17 18
18 19
19 20
20 21
21 22
22 23
23 24
24 25
25 26
26 27
27 28
28 29
29 30
30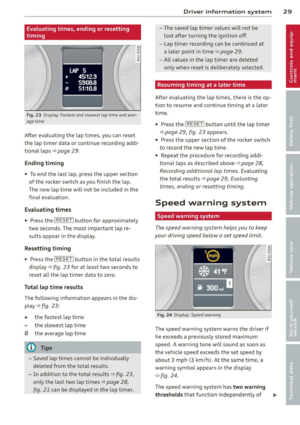 31
31 32
32 33
33 34
34 35
35 36
36 37
37 38
38 39
39 40
40 41
41 42
42 43
43 44
44 45
45 46
46 47
47 48
48 49
49 50
50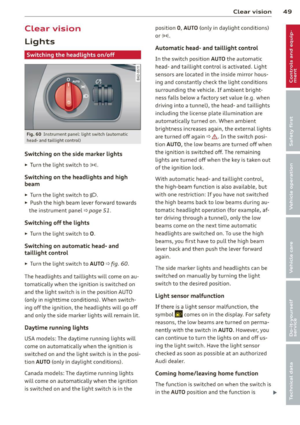 51
51 52
52 53
53 54
54 55
55 56
56 57
57 58
58 59
59 60
60 61
61 62
62 63
63 64
64 65
65 66
66 67
67 68
68 69
69 70
70 71
71 72
72 73
73 74
74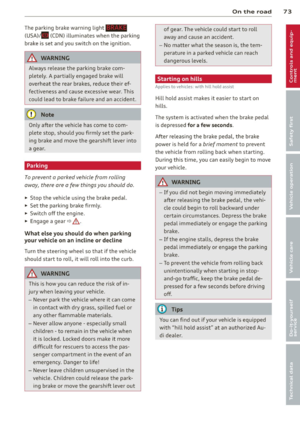 75
75 76
76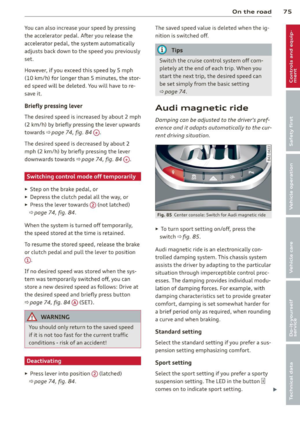 77
77 78
78 79
79 80
80 81
81 82
82 83
83 84
84 85
85 86
86 87
87 88
88 89
89 90
90 91
91 92
92 93
93 94
94 95
95 96
96 97
97 98
98 99
99 100
100 101
101 102
102 103
103 104
104 105
105 106
106 107
107 108
108 109
109 110
110 111
111 112
112 113
113 114
114 115
115 116
116 117
117 118
118 119
119 120
120 121
121 122
122 123
123 124
124 125
125 126
126 127
127 128
128 129
129 130
130 131
131 132
132 133
133 134
134 135
135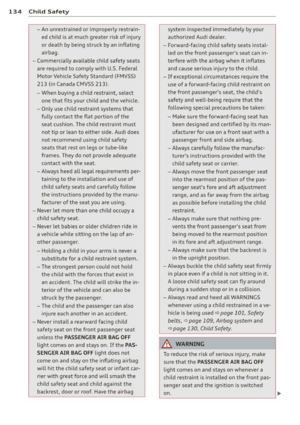 136
136 137
137 138
138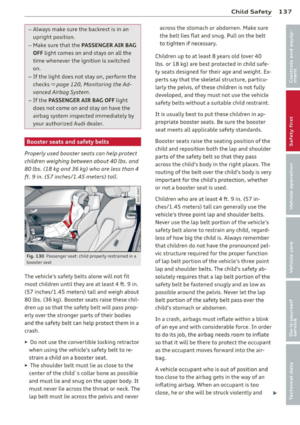 139
139 140
140 141
141 142
142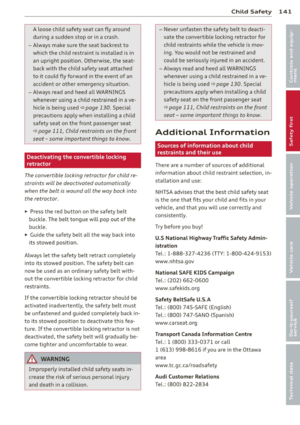 143
143 144
144 145
145 146
146 147
147 148
148 149
149 150
150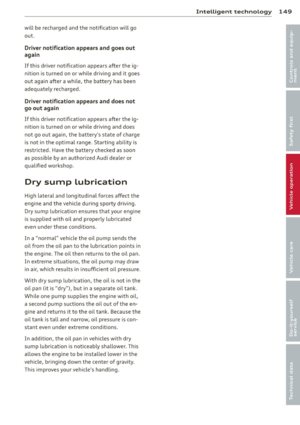 151
151 152
152 153
153 154
154 155
155 156
156 157
157 158
158 159
159 160
160 161
161 162
162 163
163 164
164 165
165 166
166 167
167 168
168 169
169 170
170 171
171 172
172 173
173 174
174 175
175 176
176 177
177 178
178 179
179 180
180 181
181 182
182 183
183 184
184 185
185 186
186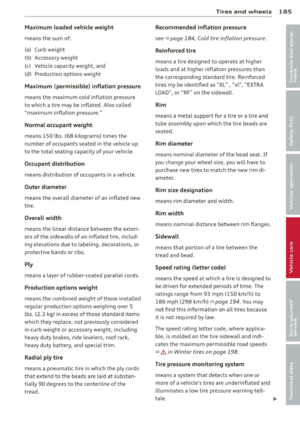 187
187 188
188 189
189 190
190 191
191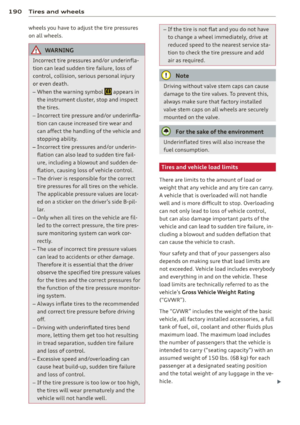 192
192 193
193 194
194 195
195 196
196 197
197 198
198 199
199 200
200 201
201 202
202 203
203 204
204 205
205 206
206 207
207 208
208 209
209 210
210 211
211 212
212 213
213 214
214 215
215 216
216 217
217 218
218 219
219 220
220 221
221 222
222 223
223 224
224 225
225 226
226 227
227 228
228 229
229 230
230 231
231 232
232 233
233 234
234 235
235