2011 SKODA YETI window
[x] Cancel search: windowPage 8 of 31

B
Go to next menu level
– Pressing the button B takes you to the next menu level.
Return to the previous menu level with the button 13 .
C Set value
– Press the button C opens up an additional screen in which it is possible to set
the required value by turning the button 15 , e.g. treble.
D “Pop-up window”
– Pressing the function key D opens a so-called “Pop-up window” with addi-
tional menu points.
– Briefly press one of the available menu points. The pop-up window will disap-
pear and the newly selected menu point is displayed in the function key.
If you do not choose any of the available menu points, the
“pop-up window” will
disappear after around 5 seconds.
In the list of DAB stations, a DAB ensemble appears after pressing this function
key ⇒ page 10, Digital radio DAB.
E “Checkbox”
Some functions can only be switched on or off. There is a so-called
“Check box” in
front of a function which can only be switched on or off:
- Function is switched on.
- Function is switched off.
– Briefly press the corresponding function key for switching on or off.
F Variable function keys
The key function is context-dependent. The function currently being offered can
be selected by pressing the appropriate function key F (or using button
17 ).
Example menu
Press the button ABC followed by the function key
DEF - buttons which must be
pressed in sequence.
■ XYZ - Description of a function key in the first menu level
■ XYZ - Description of a function key in the second menu level
■ XYZ - Description of a function key in the second menu level
■ XYZ - Description of a function key in the first menu level
ÐInput screen with keypad
Fig. 2 An example of an input screen
with keypad
The input screen with keypad appears when entering a new line, searching for a
point of interest or a telephone number, for instance.
If you press a function key with a character on the keypad, this character appears
in the input line in the upper part of the display.
You can also delete or change the string in the entry line and add special charac-
ters.
The available characters are context-dependent.
Input possibilities: - toggles between upper and lower case, or between numbers and special char-
acters (context-dependent)
áü - shows the special characters for the selected language
- switches to the Cyrillic script
ABC - switches to the Latin script
- switches to the input screen for numbers and special characters
A..Z - switches to the input screen for letters
- Enter a space
- moves the cursor in the entry line - to the left or right.
Delete - deletes characters in the entry line starting from the cursor position from
right to left. 6
General information
Page 14 of 31

■
Repeat track - repeats the track currently being played
■ In
“Repeat track” mode Repeat track - returns to normal playback
■ Repeat folder - all tracks in the current folder are repeated
■ in “
Repeat folder” mode Repeat
- returns to the normal playback
Ð
General information for CD operation Insert CD
–
Insert a CD with the written side facing up as far as possible into the CD case
9 until it is automatically drawn in. The play function will start automatically.
Eject CD
– Press the button 11
, the CD is ejected.
If the CD is not taken out within 10 seconds, it will be retracted again for safety
reasons.
CD not legible
If you insert a CD which cannot be read by the unit, a pop-up window is displayed
with a note. Press on the function key OK , the CD is driven to the initial position.
WARNING
The CD player is a 1st class laser product. There is a definite risk of injury from
invisible laser beams if it is opened. CAUTION
● Only audio-CDs (CD-A) and MP3-CDs can be played in the internal drive. Never
place DVDs into the internal drive- irreparable damage may result.
● Never place Eco Disc CDs into the internal drive.
● Inserting a second CD while a CD is being ejected can destroy the CD drive in
the unit. After pressing the Eject button there is a delay of a few seconds be-
fore the CD is ejected. During this time the lock in front of the CD case is open. It is
essential that you wait until the CD has been fully ejected before you try to insert
a new CD. ●
If the CD has mechanical damage or is incorrectly or not fully inserted, the fol-
lowing message
“ appears in the display: CD ”. Please check the CD and place it
again correctly into the drive. if the message “Error: CD ” appears again, try a dif-
ferent CD. you may need to contact a specialist garage.
● If the inside temperature of the unit is too high, no CDs will be accepted. The
unit switches into the last active operating mode. Note
● If the function key CD is inactive, no Audio CD has been inserted or the inser-
ted Audio CD is not readable.
● It is possible that CDs protected by copyright and self-made CD-R and CD-RW
are not returned at all or only in certain circumstances.
● Please comply with the national legal copyright requirements in your country.
● The CD player contains no parts that have to be serviced or repaired. If the CD
player is defective, contact a specialist garage. Ð
Inserting and removing the memory card Inserting a memory card
–
Push the memory card into the memory card case 16 with the trimmed edge to
the front right until it
“locks into place”. The play function will start automati-
cally.
Taking out a memory card
– In the “System and sound settings” menu, choose the menu point “Remove SD
card” ⇒ page 8, System and sound settings
.
– Press the inserted memory card. The memory card “jumps” into the initial posi-
tion.
Memory card empty or data not readable
If a memory card is inserted, on which no data or no legible data has been stored,
it will not be switched over into the memory card mode after the loading proce-
dure. Ð12
MEDIA mode
Page 22 of 31

Calling up additional information
Press the button
- Information about the vehicle position and access to addi-
tional functions (flagged destination, route list, route list, exclude a stretch)
⇒ page 22, Store additional window and “Flagged destination
”.
Function keys in the Navigation main menu: Map - switches to the card view
Address
- Call up the screen for entering the destination address ⇒
page 21,
Entering and saving destinations
Destination memory
- opens the list of manually stored destinations
Last destinations - opens the list of the last destinations which were automati-
cally stored
Petrol station
- opens a list of the closest petrol stations ⇒ page 21, Select
petrol station or car parks
Car park
- opens a list of the closest car parks ⇒
page 21, Select petrol station
or car parks
Point of interest
- selects a point of interest ⇒ page 22,
Selecting a point of
interest as a travel destination
Home addr. - Starting a route guidance to a stored Home address. During route
guidance, the function key Stop appears here.
Ð
Settings in the (NAV) Navigation mode Press the button
NAV →
SETUP .
Function keys in the menu - Navigation ■ Route options - setting for route options
■ Route criteria - specify the criteria for calculating the route
■ Fast - calculates the fastest route to the destination, even if a detour is
necessary.
■ Economical - calculates the quickest route possible over the shortest
route
■ Short - shortest route to the destination even if a longer journey time is
needed. Route guidance may contain unusual route sections, e.g. on a
farm track.
■ Dynamic route - switches on/off the usage of TMC traffic notifications for
route guidance ⇒
page 23, Dynamic route guidance with TMC use ■
Avoid motorways - switches on/off the use of motorways in the route calcu-
lation
■ Avoid motorways - switches on/off the use of motorways in the route calcu-
lation
■ Avoid motorways - switches on/off the use of motorways in the route calcu-
lation If no other route is available (e.g. an island can only reached by a fer-
ry), this route type is included in the route calculation despite being exclu-
ded before.
■ Vignettenpfl. Avoid toll sticker routes - opens a list of countries where toll stick-
ers are mandatory. A check means that all streets in the selected country
for which a toll sticker is mandatory are excluded.
■ Navigation volume - Setting the volume of the navigation announcements.
■ Day/Night - switches between the day/night and auto map display modes. Au-
tomatic display depends on switching the low beam on or off.
■ POIs on map -shows points of interest in the map view (car parks, petrol sta-
tions, and Škoda workshops only)
■ Autozoom - changes the map scale automatically depending on the speed and
the driven route (Motorway trip: small map scale
- City centre: large map scale)
■ Traffic sign display - switches on/off the speed restrictions in the current route
section (top left in the display)
■ Time display - switches between the following information during route guid-
ance
■ ETA - displays the expected time to destination
■ Travel time - displays the expected remaining trip time to the destination
■ Time display to - switch to the arrival time at:
■ destination - displays the expected arrival time at the final destination
■ stopover - displays the expected arrival time at the stopover destination
⇒ page 21, Entering a stopover destination
■ Enter home address - Enter home address
■ Position - saves the current position as a home address
■ Address - enter or change an address as your home address
■ Demo Mode -switches on/off the demo mode. If the demo mode is selected, you
can specify at the start of route guidance whether route guidance should be
carried out in normal mode (
“real” route guidance) or in Demo mode (virtual
route guidance). For the route guidance in the Demo mode, you only travel
along the route virtually. Virtual route guidance will be repeated after reaching
the fictitious travel destination.
■ Demo mode starting point - Entering a fictive (invented) starting point in the demo
mode. 20
NAV mode (Navigation)
Page 24 of 31

■
Store - stores in the destination memory
■ Details - shows additional details about the destination
■ Store - stores in the destination memory
■ Start - starts route guidance
Selecting a point of interest as a travel destination
Press the button NAV followed by the function key
- Point of interest
■ Town - search in the centre of a place of your choice
■ Here - search in the vicinity of the current location
A search mask opens for selecting the point of interest by means of entering a
“keyword” or a word which is part of the name for the point of interest. The point
of interest is searched for within a surrounding area of 75
km.
“Key words” which can be entered include words such as hotel, stadium, ŠKODA,
or a part of the name of a destination, e.g. lake. Words such as hunger, thirsty,
shop, relax, etc. can also be entered.
Pay attention to the correct entry of the “keyword” (including special characters).
■ Delete - deletes the entered characters
■ Find - search based on the parameters entered
■ Store - stores in the destination memory
■ Details - shows additional details about the destination
■ Store - stores in the destination memory
■ Start - starts route guidance
Store additional window and
“Flagged destination”
Press the button - opens pop-up window
If route guidance is not active, a pop-up window appears containing details about
the current position with the following info:
● Position;
● latitude and longitude;
● height above seal level (if at least 4 satellites are available);
● GPS status (GPS_FIX - the position can be determined, GPS_FIX_3D - the
height can be determined);
● The number of available and tracked satellites (the number of available satel-
lites determines the GPS status).
If route guidance is active, a pop-up of the destination appears.
■ Flagged destination - saves the current position as a “Flagged destination”.
ÐRoute guidance
Starting route guidance Press the button
NAV followed by the function key
Map - switches to the map
view
Start route guidance with the function key Start .
The route guidance can also be started from other menu points ⇒ page 21, Enter-
ing and saving destinations Ð
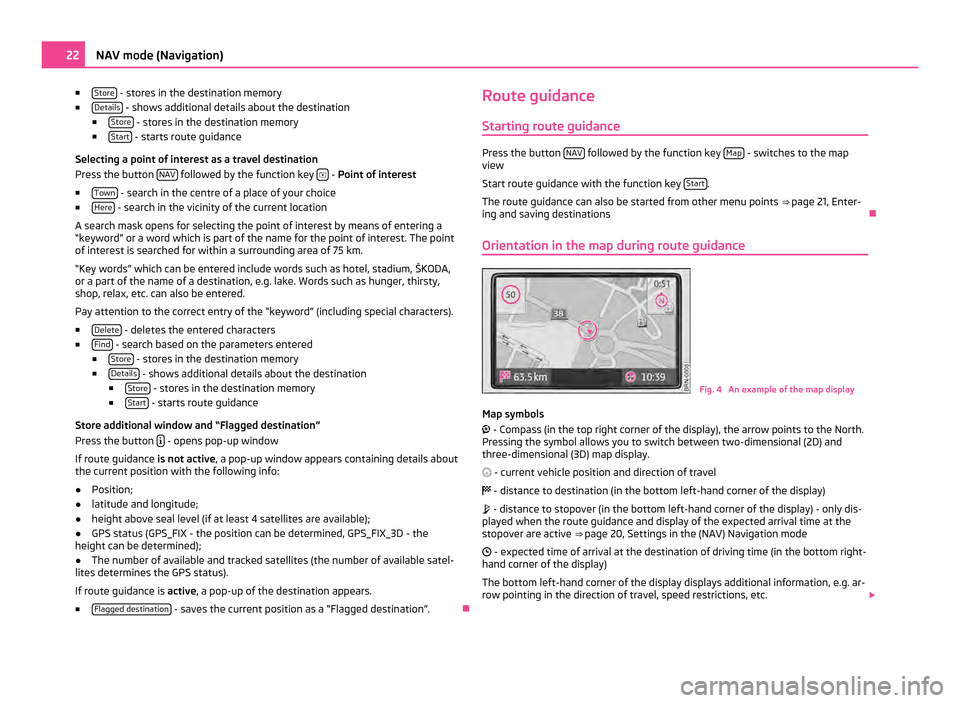
Orientation in the map during route guidance Fig. 4 An example of the map display
Map symbols
- Compass (in the top right corner of the display), the arrow points to the North.
Pressing the symbol allows you to switch between two-dimensional (2D) and
three-dimensional (3D) map display.
- current vehicle position and direction of travel
- distance to destination (in the bottom left-hand corner of the display)
- distance to stopover (in the bottom left-hand corner of the display) - only dis-
played when the route guidance and display of the expected arrival time at the
stopover are active ⇒ page 20, Settings in the (NAV) Navigation mode
- expected time of arrival at the destination of driving time (in the bottom right-
hand corner of the display)
The bottom left-hand corner of the display displays additional information, e.g. ar-
row pointing in the direction of travel, speed restrictions, etc. 22
NAV mode (Navigation)