Page 129 of 235

WARNING
•Be careful not to burn yourself with exhaust
gases.
•Do not park the vehicle over flammable mate-
rials such as dry grass, waste paper or rags,
as they may burn easily.
NISSAN GREEN PROGRAM
The diesel particulate filter reduces the amount of
materials that affect the environment by collecting
the particulate matter included in exhaust gases.
Particulate matter that has accumulated in the filter
is automatically burned and converted into harmless
substances while driving the vehicle.
CAUTION
The filter becomes extremely hot after burning
particulate matter.
If the diesel particulate filter warning light comes on,
it indicates that particulate matter has accumulated
in the filter to the specified limit. Particulate matter
collected in the filter cannot be burned under low
speed driving conditions.
As soon as safely possible, drive the vehicle at a
high speed (more than approximately 60 km/h (37.5
MPH) until the filter warning light goes out. Always
conform to local regulations.
When the accumulated particulate matter has been
completely burned, the filter warning light will go
out.
WARNING
•If the vehicle continues to be driven at a low
speed with the diesel particulate filter warn-
ing light illuminated, the fail-safe will limit en-
gine revolutions and/or torque. In this case,
the engine oil must be replaced and the pro-
cess of burning accumulated particulate mat-
ter must be carried out by a NISSAN dealer or
qualified workshop.
•Use engine oil for diesel particulate filter
equipped models. For details, see “Capaci-
ties and recommended fuel/lubricants” in the
“9. Technical information” section.Driving your vehicle to fit the circumstances is es-
sential for your safety and comfort. As a driver, you
should be the one who knows best how to drive in
the given circumstances.
ENGINE COLD START PERIOD
Due to the higher engine speeds when the engine is
cold, extra caution must be exercised when select-
ing a gear during the engine warm-up period after
starting the engine.
LOADING LUGGAGE
Loads, their distribution and the attachment of equip-
ment (coupling devices, roof luggage carriers, etc.)
will change the driving characteristics of the vehicle
considerably. Driving style and speed must be ad-
justed accordingly.
DRIVING ON WET ROADS
•Avoid starting off, accelerating and stopping sud-
denly.
•Avoid sharp turns or lane changes.
•Extra distance should be kept from the vehicle in
front.
•When water covers the road surface in puddles,
small streams, etc, REDUCE SPEED to prevent
aquaplaning which will cause skidding and loss
of control. Worn tyres increase this risk.
DRIVING UNDER WINTER
CONDITIONS
•Drive safely.
DIESEL PARTICULATE FILTER
(where fitted)CARE WHEN DRIVING
Starting and driving5-5
Page 130 of 235

•Avoid starting off, accelerating or stopping sud-
denly.
•Avoid sharp turns or lane changes.
•Avoid sudden steering actions.
•Extra distance should be kept from the vehicle in
front.
1.OFF
WARNING
Never remove the key or turn the ignition switch
to the LOCK position while driving. The steering
wheel will lock and could cause the driver to lose
control of the vehicle. This could result in serious
vehicle damage or personal injury.
The switch includes an anti-theft steering lock de-
vice.
There is an “OFF” position between the LOCK and
Acc positions, although it is not shown on the lock
cylinder. When the ignition switch is in the “OFF”
position, the steering wheel is not locked.
MANUAL TRANSMISSION
To lock the steering wheel, turn the ignition switch
to the LOCK position and remove the key from the
ignition switch, then turn the steering clockwise. Tounlock the steering wheel, insert the ignition key and
turn it gently while rotating the steering wheel slightly
right and left.
The ignition key can only be removed when the
switch is in the LOCK position (Normal parking po-
sition) (0).
AUTOMATIC TRANSMISSION
The ignition lock is designed so that the key cannot
be turned to LOCK and removed until the selector
lever is moved to the P (Park) position.
When removing the key from the LOCK position of
the ignition switch, make sure that the selector lever
is in the P (Park) position.
The selector lever can only be moved from the P
(Park) position when the ignition switch is in the ON
position and the footbrake pedal is depressed.
To remove the key from the ignition switch:
1. Move the selector lever into the P (Park) posi-
tion.
2. Turn the key to the LOCK position.
3. Remove the key from the ignition switch.
If the key is removed from the ignition switch, the
selector lever cannot be moved from the P (Park)
position.
When the key cannot be turned toward the LOCK
position, proceed as follows to remove the key:
1. Move the selector lever into the P (Park) posi-
tion.NSD238Z
IGNITION SWITCH
5-6Starting and driving
Page 131 of 235

2. Turn the key slightly in the ON direction.
3. Turn the key towards the LOCK position.
4. Remove the key.
STEERING LOCK
To lock the steering wheel
1. Turn the key to the LOCK position.
2. Remove the key from the ignition switch.
3. Turn the steering wheel 1/6 of a turn clockwise
from the straight up position.
To unlock the steering wheel
1. Insert the key into the ignition switch.
2. Gently turn the key while rotating the steering
wheel slightly right and left.
KEY POSITIONS
LOCK (Normal parking position) (0)
The ignition key can only be removed when in this
position.
The steering lock can only be locked in this position.
“OFF” (1)
The engine is turned off without locking the steering
wheel.
Acc (Accessories) (2)
This position activates electrical accessories, such
as the radio, when the engine is not running.
ON (Normal operating position) (3)
This position turns on the ignition system and elec-
trical accessories.
START (4)
The engine starter activates and the engine will start.
As soon as the engine has started, release the key
immediately. It will return to the ON position.
NISSAN ANTI-THEFT SYSTEM (NATS)
The NISSAN Anti Theft System (NATS)* will stop
the engine if someone tries to start the engine with-
out using the registered NATS key.
* Immobilizer
If you failed to start the engine using the NATS Key,
turn the ignition knob to the LOCK position, wait for
5 seconds and turn the key to the START position
again to start the engine.
For additional information, see “Security system” in
the “3. Pre-driving checks and adjustments” sec-
tion.A.MT models
B.AT models
1.OFF
2.PUSH release button
WARNING
Never turn the ignition knob to the LOCK position
while driving as the steering wheel will lock. This
may cause the driver to lose control of the ve-
hicle and could result in serious damage to the
vehicle or personal injury.
The ignition knob includes an anti-theft steering lock
device.
There is an “OFF” position between the LOCK and
Acc positions, although it is not shown on the lock
cylinder. When the ignition knob is in the “OFF”
position, the steering wheel is not locked.
NSD343
IGNITION KNOB (where fitted)
Starting and driving5-7
Page 132 of 235

CAUTION
•Make sure you carry the Intelligent Key with
you when operating the vehicle.
•Never leave the Intelligent Key inside the ve-
hicle when you leave the vehicle.
•If the Intelligent Key is too far away from the
driver, the vehicle may not start.
MANUAL TRANSMISSION
The ignition lock is designed so that the knob can
ONLY be turned to the LOCK position when the
PUSH release button has first been depressed.
NOTE
•The ignition knob warning light () blinks
and the buzzer sounds twice when the igni-
tion knob is turned to the “OFF” position. De-
press the PUSH release button
j2 , then turn
the ignition knob to the LOCK position. See
“Warning/indicator lights and audible
reminders” in the “2. Instruments and
controls” section for further details regarding
the functionality of the ignition knob warning
light.
•When the emergency key is being used, the
PUSH release buttonj2 must be depressed
in order to turn the ignition knob to the LOCK
position although the ignition knob warning
light (
) will not blink and the buzzer will not
sound.
AUTOMATIC TRANSMISSION
The ignition knob is designed so that it cannot be
turned to the LOCK position until the selector lever
is moved to the P (Park) position. The selector lever
can only be moved from the P (Park) position when
the ignition knob is in the ON position and the
footbrake pedal is depressed.
NOTE
The ignition knob warning light (
) blinks and a
buzzer sounds twice when the ignition knob is
turned to the “OFF” position. Make sure that the
selector lever is in the P (Park) position, then turn
the ignition knob to the LOCK position. See
“Warning/indicator lights and audible reminders”
in the “2. Instruments and controls” section for
further details regarding the functionality of the
ignition knob warning light.
STEERING LOCK
To lock the steering wheel
In the LOCK position, turn the steering wheel 1/6 of
a turn from the straight up position.
To unlock the steering wheel
Depress the brake pedal, push the ignition knob and
turn it towards the Acc position while gently rotating
the steering wheel right or left.
IGNITION KNOB POSITION
LOCK (Normal parking position) (0)
The steering lock can be only be locked from this
position.
“OFF” (1)
The engine can be turned off without locking the
steering wheel.
Acc (Accessories) (2)
This position activates electrical accessories, such
as the radio, when the engine is not running.
ON (Normal operating position) (3)
This position turns on the ignition system and the
electrical accessories.
START (4)
The engine starter activates and the engine will start.
As soon as the engine has started, release the knob
immediately. It will return to the ON position.
5-8Starting and driving
Page 133 of 235

EMERGENCY KEY – INTELLIGENT
KEY DEAD BATTERY SITUATION
1.Slide the locking pin to the unlock position.
2.Remove the Intelligent Key cap as illustrated.
3.Unfold the key
jA.4.Remove the ignition knob key slot cap with a
suitable tool.
5.Insert the emergency key
jA into the ignition
knob as illustrated.
6.Proceed with the emergency key as described
in “Ignition switch” earlier in this section.OnAT models, when the ignition knob cannot be
turned to the LOCK position, proceed as follows:
1.Slide the locking pin to the unlock position.
2.Remove the Intelligent Key cap as illustrated.
3.Unfold the key
jA.
4.Remove the ignition knob key slot cap with a
suitable tool.
5.Insert the emergency key
jA into the ignition
knob as illustrated.
6.Move the selector lever to the P (Park) posi-
tion.
7.Turn the emergency key slightly in the ON
direction.
8.Turn the emergency key to the LOCK position.
9.Remove the emergency key.
If the key is removed from the ignition knob, the
selector lever cannot be moved from P (Park).The
selector lever can only be moved from the P
(Park) position when the ignition knob is in the
ON position and the footbrake pedal is
depressed.
NISSAN ANTI-THEFT SYSTEM (NATS)
The NISSAN Anti-Theft System (NATS) * will stop
the engine if someone tries to start the engine with-
out the registered Intelligent Key.
* Immobilizer
If you failed to start the engine using the NATS Intel-
NSD262
Starting and driving5-9
Page 134 of 235

ligent Key, turn the ignition knob to the LOCK posi-
tion, wait for 5 seconds and turn the knob to the
START position again to start the engine.
For additional information, see “Security system” in
the “3. Pre-driving checks and adjustments” sec-
tion.1. Apply the handbrake.
2.Manual transmission models:
Move the gear lever to N (Neutral) position, and
depress the clutch pedal to the floor while start-
ing the engine.
Automatic transmission models:
Depress the brake pedal and move the selector
lever to the P (Park) or N (Neutral) position. (P
position is preferred).
NOTE
The starter is designed not to operate if the
selector lever is out of the P (Park) or N (Neu-
tral) position.
3. Models without Intelligent Key:
Rotate the steering wheel left to right to release
the ignition lock whilst turning the ignition switch
to the ON position.
Models with Intelligent key:
•MT models – keep the clutch pedal
depressed and/or depress the brake pedal
then:
•AT – depress the brake pedal then:
1) Push the ignition knob.
2) Rotate the steering wheel left to right to
release the ignition lock whilst turning the
ignition knob to the ON position.CAUTION
•Make sure you carry the Intelligent Key with
you when operating the vehicle.
•If the Intelligent Key is too far away from
the driver, the vehicle may not start.
4. For diesel engine models: Wait until the glow
indicator light
goes out.
5. Start the engine with your foot on the brake pedal,
not on the accelerator pedal, by turning the
ignition switch to START.
6. Release the ignition switch when the engine
starts. If the engine starts, but fails to run, repeat
the above procedure.
For petrol engine models:
•If the engine is very hard to start for example
in extremely cold or hot weather, or when
restarting, Proceed as follows:
a. Depress the accelerator pedal a little (ap-
proximately 1/3 to the floor) and hold it
and then start the engine.
b. Release the ignition switch and the accel-
erator pedal when the engine starts.
•If the engine is very hard to start because it is
flooded. Proceed as follows:
a. Depress the accelerator pedal all the way
to the floor and hold it.
b. Start the engine for 5-6 seconds and stop.
After starting the engine, release the ac-
celerator pedal.
STARTING THE ENGINE
5-10Starting and driving
Page 135 of 235

c. Start the engine with your foot off the ac-
celerator pedal. Release the ignition
switch when the engine starts.
If the engine starts, but fails to run, repeat
the procedure from step a.
CAUTION
•Do not operate the starter for more than 15
seconds at a time. If the engine does not start,
turn the ignition switch to the “OFF” position
and wait 10 seconds (Petrol engine models)
or 20 seconds (Diesel engine models) before
cranking again, otherwise the starter could be
damaged.
•If it becomes necessary to start the engine
with a booster battery and jumper leads, the
instructions and cautions contained in the
“Jump-starting” in the “6. In case of
emergency” section should be carefully fol-
lowed.
7.Warm-up
Allow the engine to idle for at least 30 seconds
after starting. Drive at moderate speed for a short
distance first, especially in cold weather.
WARNING
Do not leave the vehicle unattended while the
engine is warming up.
DRIVING WITH MANUAL
TRANSMISSION
CAUTION
•Do not rest your foot on the clutch pedal while
driving. This may cause clutch damage.
•Stop your vehicle completely before shifting
into the R (Reverse) position.
•When you are shifting from one gear to an-
other, be certain to depress the clutch pedal
all the way to the floor to avoid clashing or
chipping the gears.
•Avoid abrupt starts and acceleration for your
safety.
•When quick acceleration is required for some
reason, shift to a lower gear and accelerate
until the vehicle reaches the maximum speed
in each gear. Do not exceed the speed limit of
any gear. Pay special attention when acceler-
ating or when shifting into a lower gear on
slippery surfaces. Sudden acceleration or
down shifting could cause the wheels to skid
and result in loss of control.
A.RHD models
B.LHD models
1.Gear lever ring
Shifting
To change gears, fully depress the clutch pedal,
shift into the appropriate gear, then release the
clutch slowly and smoothly.
NSD340
5–speed MT
NSD292Z
6–speed MT (where fitted)
DRIVING
Starting and driving5-11
Page 136 of 235

To ensure smooth gear changes, fully depress the
clutch pedal before operating the gear lever. If the
clutch pedal is not fully depressed before the trans-
mission is shifted, a gear noise may be heard. This
could result in damage to the transmission.
Start the vehicle in 1st gear and shift through the
gears in sequence according to the vehicle speed.
Reverse gear:
•To reverse with 5–speed manual transmission,
stop the vehicle and shift the gear lever into the
“N” (Neutral) position then to the R (Reverse)
position.
•To reverse with 6–speed manual transmission,
proceed as follows:
1) Stop the vehicle.
2) Move the gear lever into the “N” position.
3) Pull and hold the gear lever ring
j1 up.
4) Move the gear lever into the R position.
5) Release the gear lever ring and safely drive
the vehicle backwards.
The gear lever ring returns to its original posi-
tion when the gear lever is moved to the “N”
position.
If it is difficult to move the gear lever into R (Re-
verse) or 1st. Shift into “N” (Neutral), then release
the clutch pedal. Fully depress the clutch pedal
again and shift into R (Reverse) or 1st.
DRIVING WITH AUTOMATIC
TRANSMISSION
CAUTION
•The cold engine idle speed is high, so use
caution when shifting into a forward or re-
verse gear before the engine has warmed up.
•Avoid revving up the engine while the vehicle
is stopped. This could cause unexpected ve-
hicle movement.
Driving precautions
•Never shift to P (Park) or R (Reverse) while
the vehicle is moving, this could result in dam-
age to the transmission.
•Start the engine in the P (Park) or N (Neutral)
position. The engine will not start in any other
selector position. If it does, have your vehicle
checked by a NISSAN dealer or qualified
workshop.
•Do not depress the accelerator pedal while
shifting from P (Park) or N (Neutral) to R (Re-
verse), D (Drive), 2 (Second gear) or 1 (Low
gear).
•On an uphill grade, do not hold the vehicle by
depressing the accelerator pedal. The foot-
brake should be used for this purpose, in or-
der to hold the vehicle in place and to prevent
overheating of the transmission.
•Shift into the N (Neutral) position and apply
the handbrake when at a standstill for longer
than a short waiting period.
•Keep the engine at idling speed while shifting
from the N (Neutral) position to any driving
position.
CAUTION (when starting the vehicle):
•DEPRESS THE FOOTBRAKE PEDAL
When the engine is running, shifting the se-
lector lever into the R (Reverse), D (Drive), 2
(Second gear) or 1 (Low gear) position with-
out depressing the brake pedal causes the
vehicle to move slowly. Be sure the brake
pedal is fully depressed and the vehicle is
stopped, before shifting the selector lever.
•BE AWARE OF THE SELECTOR LEVER POSI-
TION
Make sure that the selector lever is in the
desired position. Use the D (Drive), 2 (Second
gear) or 1 (Low gear) to move forwards and
the R (Reverse) to move backwards. Release
the handbrake lever and the footbrake pedal,
then depress the accelerator pedal to start
the vehicle in motion and merge with traffic
(avoid abrupt starting and spinning the
wheels).
•Avoid revving up the engine while the vehicle
is stopped, this could cause unexpected ve-
hicle movement [if the selector lever is in the
R (Reverse), D (Drive), 2 (Second gear) or 1
(Low gear) position] or damage the engine [if
the selector lever is in the N (Neutral) or P
(Park) position].
•WARM THE ENGINE UP
5-12Starting and driving
 1
1 2
2 3
3 4
4 5
5 6
6 7
7 8
8 9
9 10
10 11
11 12
12 13
13 14
14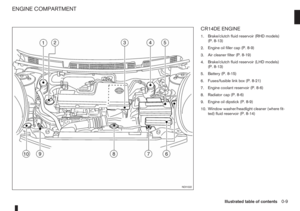 15
15 16
16 17
17 18
18 19
19 20
20 21
21 22
22 23
23 24
24 25
25 26
26 27
27 28
28 29
29 30
30 31
31 32
32 33
33 34
34 35
35 36
36 37
37 38
38 39
39 40
40 41
41 42
42 43
43 44
44 45
45 46
46 47
47 48
48 49
49 50
50 51
51 52
52 53
53 54
54 55
55 56
56 57
57 58
58 59
59 60
60 61
61 62
62 63
63 64
64 65
65 66
66 67
67 68
68 69
69 70
70 71
71 72
72 73
73 74
74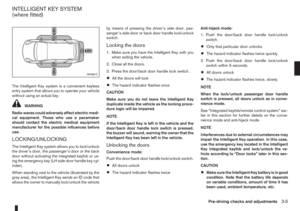 75
75 76
76 77
77 78
78 79
79 80
80 81
81 82
82 83
83 84
84 85
85 86
86 87
87 88
88 89
89 90
90 91
91 92
92 93
93 94
94 95
95 96
96 97
97 98
98 99
99 100
100 101
101 102
102 103
103 104
104 105
105 106
106 107
107 108
108 109
109 110
110 111
111 112
112 113
113 114
114 115
115 116
116 117
117 118
118 119
119 120
120 121
121 122
122 123
123 124
124 125
125 126
126 127
127 128
128 129
129 130
130 131
131 132
132 133
133 134
134 135
135 136
136 137
137 138
138 139
139 140
140 141
141 142
142 143
143 144
144 145
145 146
146 147
147 148
148 149
149 150
150 151
151 152
152 153
153 154
154 155
155 156
156 157
157 158
158 159
159 160
160 161
161 162
162 163
163 164
164 165
165 166
166 167
167 168
168 169
169 170
170 171
171 172
172 173
173 174
174 175
175 176
176 177
177 178
178 179
179 180
180 181
181 182
182 183
183 184
184 185
185 186
186 187
187 188
188 189
189 190
190 191
191 192
192 193
193 194
194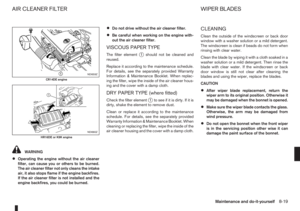 195
195 196
196 197
197 198
198 199
199 200
200 201
201 202
202 203
203 204
204 205
205 206
206 207
207 208
208 209
209 210
210 211
211 212
212 213
213 214
214 215
215 216
216 217
217 218
218 219
219 220
220 221
221 222
222 223
223 224
224 225
225 226
226 227
227 228
228 229
229 230
230 231
231 232
232 233
233 234
234