Page 223 of 3787

AT-206
< SERVICE INFORMATION >
A/T SHIFT LOCK SYSTEM
A/T SHIFT LOCK SYSTEM
DescriptionINFOID:0000000005928267
WITH INTELLIGENT KEY
• The mechanical key interlock mechanism also operates as a shift lock:With the ignition knob switch turned to ON, selector lever cannot be shifted from “P” position to any other
position unless brake pedal is depressed.
With the ignition knob switch turned to OFF, selector lever cannot be shifted from “P” position to any other
position.
• The shift lock and key interlock mechanisms are contro lled by the ON-OFF operation of the shift lock sole-
noid and by the operation of the i gnition knob switch, respectively.
WITHOUT INTELLIGENT KEY
• The mechanical key interlock mechanism also operates as a shift lock:
With the ignition switch turned to ON, selector lever cannot be shifted from “P” position to any other position
unless brake pedal is depressed.
With the key removed, selector lever cannot be shifted from “P” position to any other position.
The key cannot be removed unless selector lever is placed in “P” position.
• The shift lock and key interlock mechanisms are contro lled by the ON-OFF operation of the shift lock sole-
noid and by the operation of the rotator and slider located inside key cylinder, respectively.
Revision: May 2010 2011 Versa
Page 224 of 3787
A/T SHIFT LOCK SYSTEMAT-207
< SERVICE INFORMATION >
DE
F
G H
I
J
K L
M A
B
AT
N
O P
Shift Lock System Parts LocationINFOID:0000000005928268
1. Key interlock cable (Without Intelli- gent Key) 2. Key cylinder (Without Intelligent Key) 3. Ignition knob switch (With Intelligent
Key)
4. Key interlock cable (With Intelligent Key) 5. Brake pedal 6. Stop lamp switch
7. Shift lock release button 8. Park position switch9. Shift lock solenoid
10. Key interlock cable
AWDIA0772ZZ
Revision: May 2010 2011 Versa
Page 225 of 3787
AT-208
< SERVICE INFORMATION >
A/T SHIFT LOCK SYSTEM
Wiring Diagram - AT - SHIFT
INFOID:0000000005928269
Diagnosis ProcedureINFOID:0000000005928270
SYMPTOM 1:
• Selector lever cannot be moved from “P” position with ignition switch in ON position and brake
pedal depressed.
ABDWA0418GB
Revision: May 2010 2011 Versa
Page 226 of 3787

A/T SHIFT LOCK SYSTEMAT-209
< SERVICE INFORMATION >
DE
F
G H
I
J
K L
M A
B
AT
N
O P
• Selector lever can be moved fr om “P” position with ignition key in ON position and brake pedal
released.
• Selector lever can be moved from “P” position when ignition switch is removed from key cylinder.
SYMPTOM 2:
• Ignition key cannot be removed when sel ector lever is set to “P” position.
• Ignition key can be removed wh en selector lever is set to any position except “P” position.
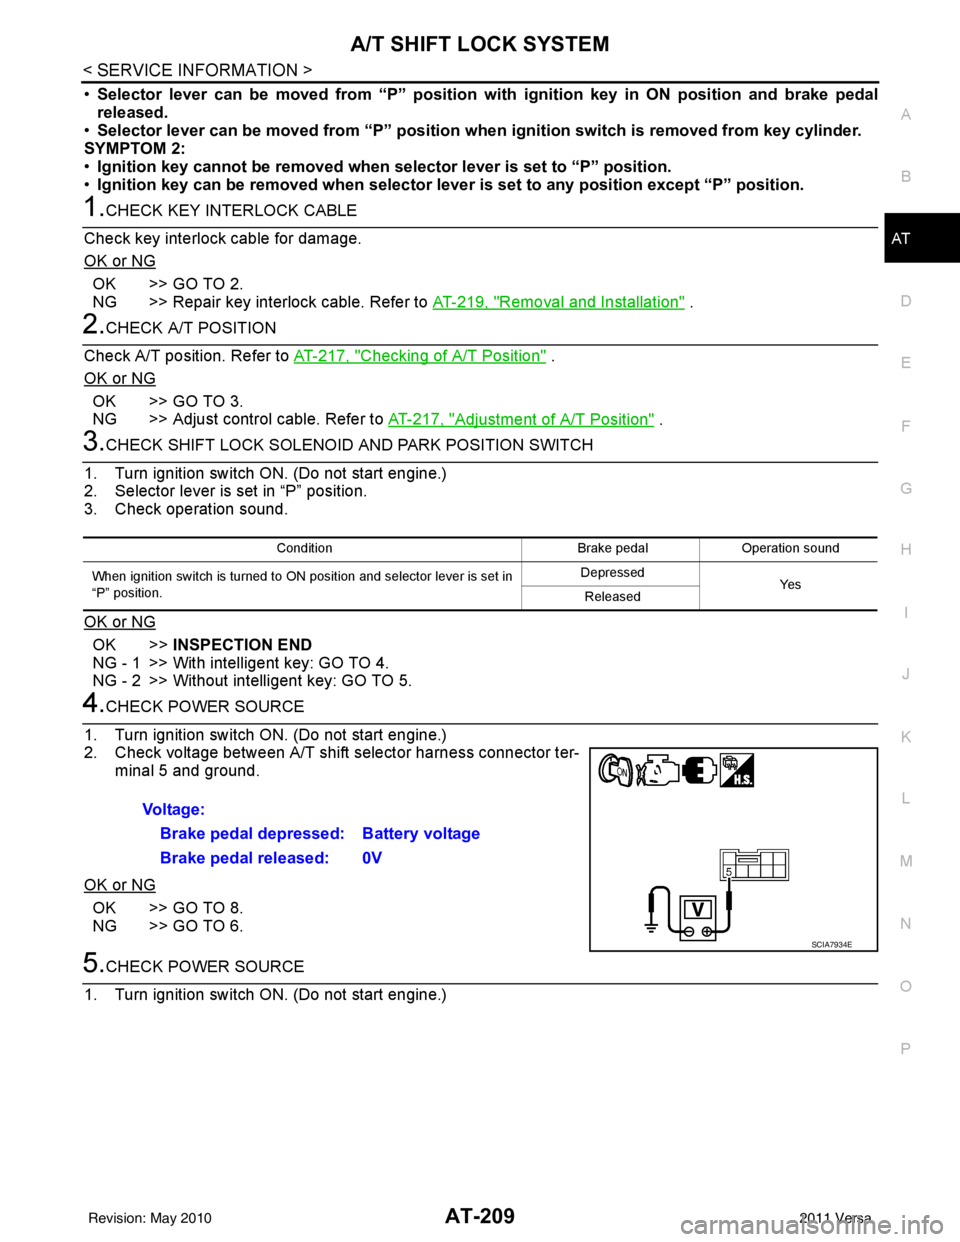
1.CHECK KEY INTERLOCK CABLE
Check key interlock cable for damage.
OK or NG
OK >> GO TO 2.
NG >> Repair key interlock cable. Refer to AT-219, "
Removal and Installation" .
2.CHECK A/T POSITION
Check A/T position. Refer to AT-217, "
Checking of A/T Position" .
OK or NG
OK >> GO TO 3.
NG >> Adjust control cable. Refer to AT-217, "
Adjustment of A/T Position" .
3.CHECK SHIFT LOCK SOLENOID AND PARK POSITION SWITCH
1. Turn ignition switch ON. (Do not start engine.)
2. Selector lever is set in “P” position.
3. Check operation sound.
OK or NG
OK >> INSPECTION END
NG - 1 >> With intelligent key: GO TO 4.
NG - 2 >> Without intelligent key: GO TO 5.
4.CHECK POWER SOURCE
1. Turn ignition switch ON. (Do not start engine.)
2. Check voltage between A/T shift selector harness connector ter- minal 5 and ground.
OK or NG
OK >> GO TO 8.
NG >> GO TO 6.
5.CHECK POWER SOURCE
1. Turn ignition switch ON. (Do not start engine.)
Condition Brake pedalOperation sound
When ignition switch is turned to ON position and selector lever is set in
“P” position. Depressed
Ye s
Released
Voltage:
Brake pedal depressed: Battery voltage
Brake pedal released: 0V
SCIA7934E
Revision: May 2010 2011 Versa
Page 227 of 3787

AT-210
< SERVICE INFORMATION >
A/T SHIFT LOCK SYSTEM
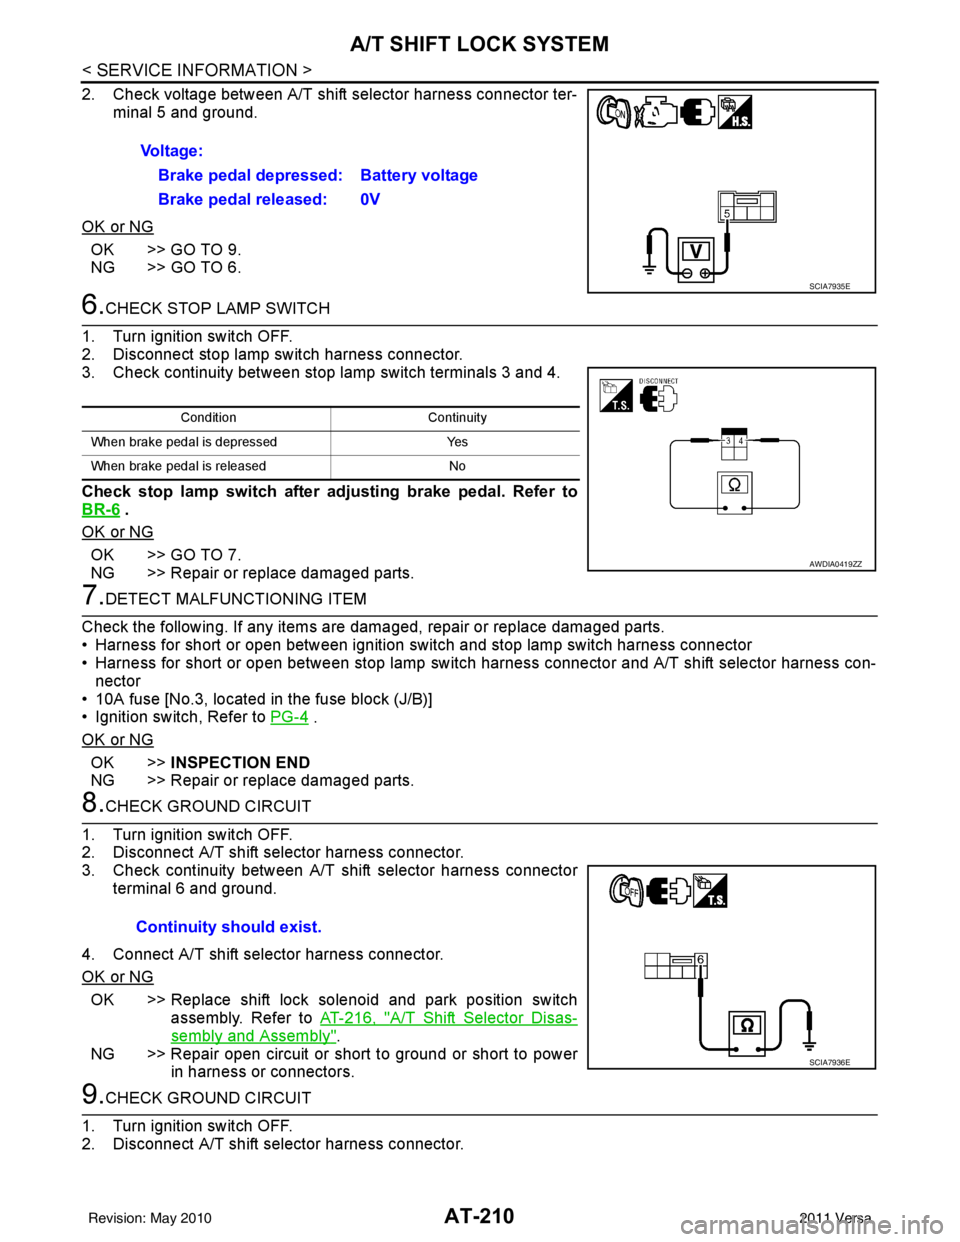
2. Check voltage between A/T shift selector harness connector ter-minal 5 and ground.
OK or NG
OK >> GO TO 9.
NG >> GO TO 6.
6.CHECK STOP LAMP SWITCH
1. Turn ignition switch OFF.
2. Disconnect stop lamp switch harness connector.
3. Check continuity between stop lamp switch terminals 3 and 4.
Check stop lamp switch after adjusting brake pedal. Refer to
BR-6
.
OK or NG
OK >> GO TO 7.
NG >> Repair or replace damaged parts.
7.DETECT MALFUNCTIONING ITEM
Check the following. If any items are damaged, repair or replace damaged parts.
• Harness for short or open between ignition switch and stop lamp switch harness connector
• Harness for short or open between stop lamp switch harness connector and A/T shift selector harness con-
nector
• 10A fuse [No.3, located in the fuse block (J/B)]
• Ignition switch, Refer to PG-4
.
OK or NG
OK >> INSPECTION END
NG >> Repair or replace damaged parts.
8.CHECK GROUND CIRCUIT
1. Turn ignition switch OFF.
2. Disconnect A/T shift selector harness connector.
3. Check continuity between A/T shift selector harness connector terminal 6 and ground.
4. Connect A/T shift selector harness connector.
OK or NG
OK >> Replace shift lock solenoid and park position switch assembly. Refer to AT-216, "
A/T Shift Selector Disas-
sembly and Assembly".
NG >> Repair open circuit or short to ground or short to power in harness or connectors.
9.CHECK GROUND CIRCUIT
1. Turn ignition switch OFF.
2. Disconnect A/T shift selector harness connector. Voltage:
Brake pedal depressed: Battery voltage
Brake pedal released: 0V
SCIA7935E
Condition Continuity
When brake pedal is depressed Yes
When brake pedal is released No
AWDIA0419ZZ
Continuity should exist.
SCIA7936E
Revision: May 2010 2011 Versa
Page 231 of 3787
AT-214
< SERVICE INFORMATION >
SHIFT CONTROL SYSTEM
REMOVAL
CAUTION:
Make sure that parking brake is applied before removal/installation.
1. Place the shift selector in the “N” position.
2. Remove the center console assembly. Refer to IP-11
.
3. Disconnect the A/T shift selector harness connector (1).
4. Remove the key interlock cable from the A/T shift selector assembly. Refer to AT-219, "
Removal and Installation".
5. Remove the bolts (A) from the A/T shift selector assembly (1).
6. Remove exhaust front tube, center muffler and heat plates. Refer to EM-141
.
1. Shift selector handle 2. A/T shift selector assembly 3. Lock plate
4. Floor panel 5. Shift selector control cable 6. Bracket
7. Lock plate 8. Lock nut 9. A/T assembly
10. Bracket 11. Bracket
WCIA0640E
SCIA6965E
WCIA0609E
Revision: May 2010 2011 Versa
Page 233 of 3787

AT-216
< SERVICE INFORMATION >
SHIFT CONTROL SYSTEM
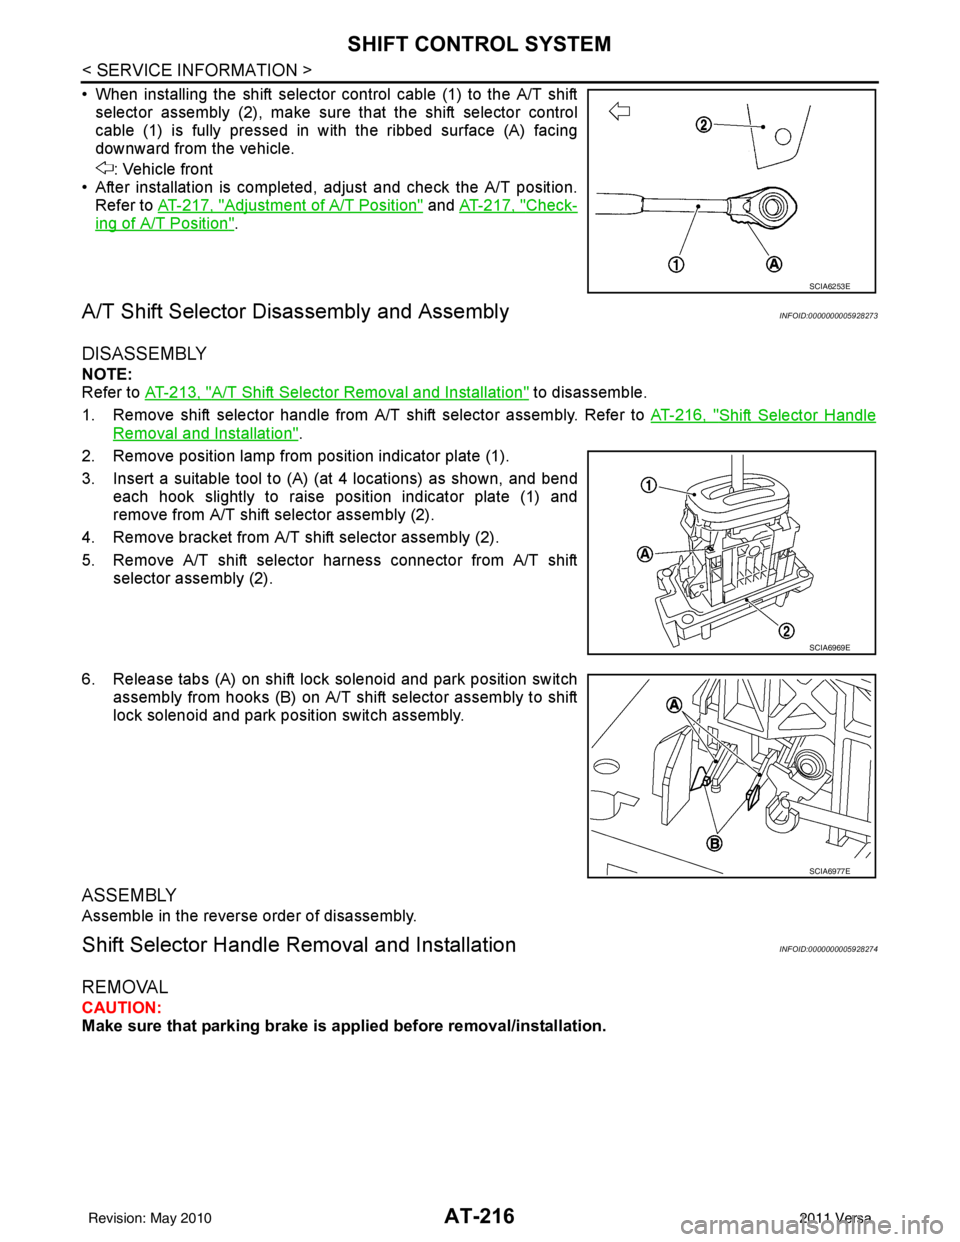
• When installing the shift selector control cable (1) to the A/T shiftselector assembly (2), make sure that the shift selector control
cable (1) is fully pressed in with the ribbed surface (A) facing
downward from the vehicle.
: Vehicle front
• After installation is completed, adjust and check the A/T position. Refer to AT-217, "
Adjustment of A/T Position" and AT-217, "Check-
ing of A/T Position".
A/T Shift Selector Di sassembly and AssemblyINFOID:0000000005928273
DISASSEMBLY
NOTE:
Refer to AT-213, "
A/T Shift Selector Removal and Installation" to disassemble.
1. Remove shift selector handle from A/T shift selector assembly. Refer to AT-216, "
Shift Selector Handle
Removal and Installation".
2. Remove position lamp from position indicator plate (1).
3. Insert a suitable tool to (A) (at 4 locations) as shown, and bend each hook slightly to raise position indicator plate (1) and
remove from A/T shift selector assembly (2).
4. Remove bracket from A/T shift selector assembly (2).
5. Remove A/T shift selector harness connector from A/T shift selector assembly (2).
6. Release tabs (A) on shift lock solenoid and park position switch assembly from hooks (B) on A/T shift selector assembly to shift
lock solenoid and park position switch assembly.
ASSEMBLY
Assemble in the reverse order of disassembly.
Shift Selector Handle Removal and InstallationINFOID:0000000005928274
REMOVAL
CAUTION:
Make sure that parking brake is applied before removal/installation.
SCIA6253E
SCIA6969E
SCIA6977E
Revision: May 2010 2011 Versa
Page 234 of 3787

SHIFT CONTROL SYSTEMAT-217
< SERVICE INFORMATION >
DE
F
G H
I
J
K L
M A
B
AT
N
O P
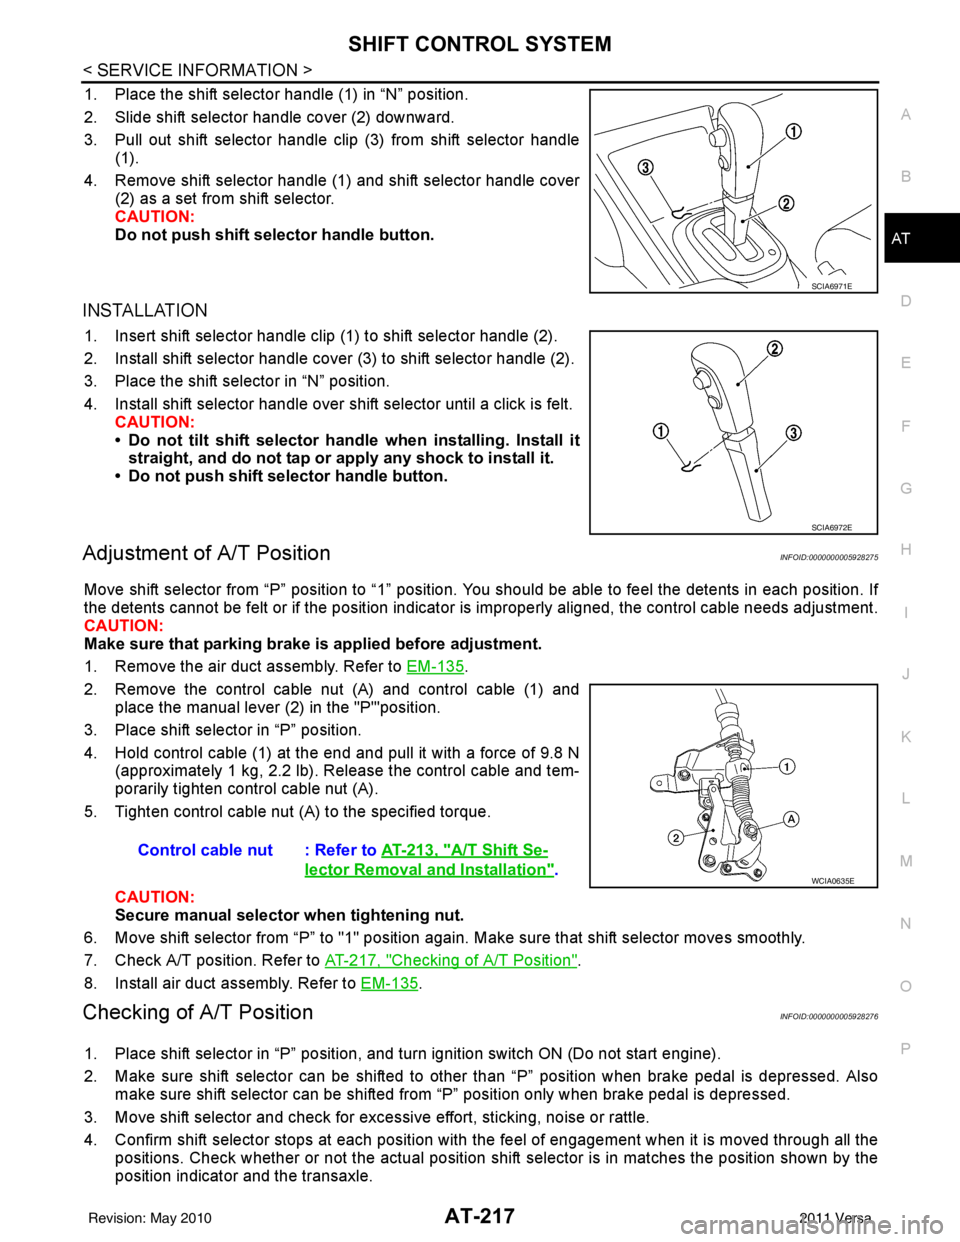
1. Place the shift selector handle (1) in “N” position.
2. Slide shift selector handle cover (2) downward.
3. Pull out shift selector handle clip (3) from shift selector handle (1).
4. Remove shift selector handle (1) and shift selector handle cover (2) as a set from shift selector.
CAUTION:
Do not push shift selector handle button.
INSTALLATION
1. Insert shift selector handle clip (1) to shift selector handle (2).
2. Install shift selector handle cover (3) to shift selector handle (2).
3. Place the shift selector in “N” position.
4. Install shift selector handle over shift selector until a click is felt.
CAUTION:
• Do not tilt shift selector hand le when installing. Install it
straight, and do not tap or ap ply any shock to install it.
• Do not push shift selector handle button.
Adjustment of A/T PositionINFOID:0000000005928275
Move shift selector from “P” position to “1” position. You should be able to feel the detents in each position. If
the detents cannot be felt or if the position indicator is improperly aligned, the control cable needs adjustment.
CAUTION:
Make sure that parking brake is applied before adjustment.
1. Remove the air duct assembly. Refer to EM-135
.
2. Remove the control cable nut (A) and control cable (1) and place the manual lever (2) in the "P'"position.
3. Place shift selector in “P” position.
4. Hold control cable (1) at the end and pull it with a force of 9.8 N (approximately 1 kg, 2.2 lb). Release the control cable and tem-
porarily tighten control cable nut (A).
5. Tighten control cable nut (A) to the specified torque.
CAUTION:
Secure manual selector when tightening nut.
6. Move shift selector from “P” to "1" position again. Make sure that shift selector moves smoothly.
7. Check A/T position. Refer to AT-217, "
Checking of A/T Position".
8. Install air duct assembly. Refer to EM-135
.
Checking of A/T PositionINFOID:0000000005928276
1. Place shift selector in “P” position, and tu rn ignition switch ON (Do not start engine).
2. Make sure shift selector can be shifted to other than “P” position when brake pedal is depressed. Also make sure shift selector can be shifted from “P” position only when brake pedal is depressed.
3. Move shift selector and check for excessive effort, sticking, noise or rattle.
4. Confirm shift selector stops at each position with the feel of engagement when it is moved through all the
positions. Check whether or not the ac tual position shift selector is in matches the position shown by the
position indicator and the transaxle.
SCIA6971E
SCIA6972E
Control cable nut : Refer to AT-213, "A/T Shift Se-
lector Removal and Installation".WCIA0635E
Revision: May 2010 2011 Versa