2011 NISSAN LATIO service interval
[x] Cancel search: service intervalPage 495 of 3787
BCM (BODY CONTROL MODULE)BCS-5
< SERVICE INFORMATION >
C
DE
F
G H
I
J
L
M A
B
BCS
N
O P
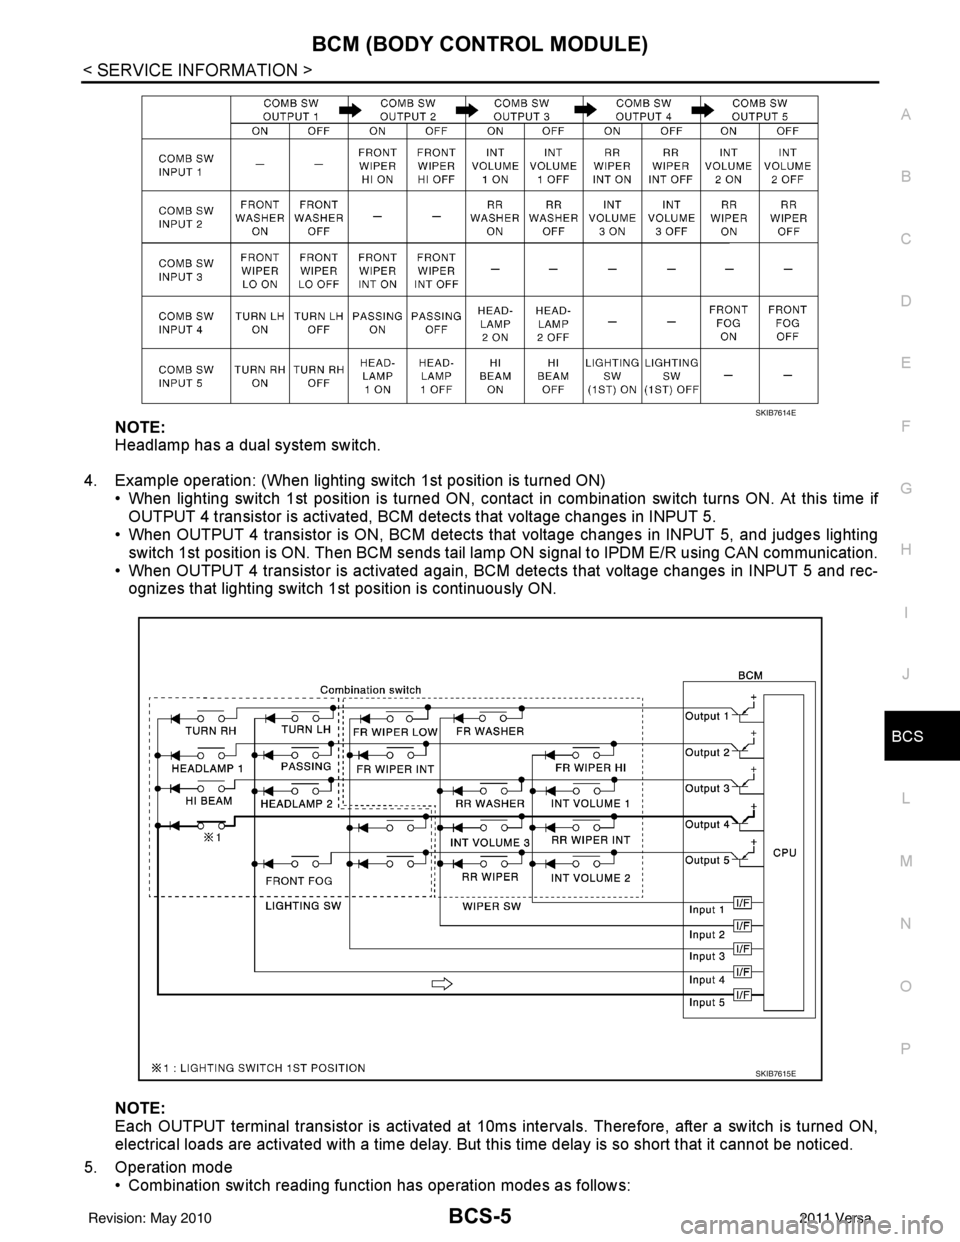
NOTE:
Headlamp has a dual system switch.
4. Example operation: (When lighting switch 1st position is turned ON) • When lighting switch 1st position is turned ON, contact in combination switch turns ON. At this time ifOUTPUT 4 transistor is activated, BCM detects that voltage changes in INPUT 5.
• When OUTPUT 4 transistor is ON, BCM detects that voltage changes in INPUT 5, and judges lighting
switch 1st position is ON. Then BCM sends tail lamp ON signal to IPDM E/R using CAN communication.
• When OUTPUT 4 transistor is activated again, BC M detects that voltage changes in INPUT 5 and rec-
ognizes that lighting switch 1st position is continuously ON.
NOTE:
Each OUTPUT terminal transistor is activated at 10ms intervals. Therefore, after a switch is turned ON,
electrical loads are activated with a time delay. But this time delay is so short that it cannot be noticed.
5. Operation mode • Combination switch reading functi on has operation modes as follows:
SKIB7614E
SKIB7615E
Revision: May 2010 2011 Versa
Page 496 of 3787
BCS-6
< SERVICE INFORMATION >
BCM (BODY CONTROL MODULE)
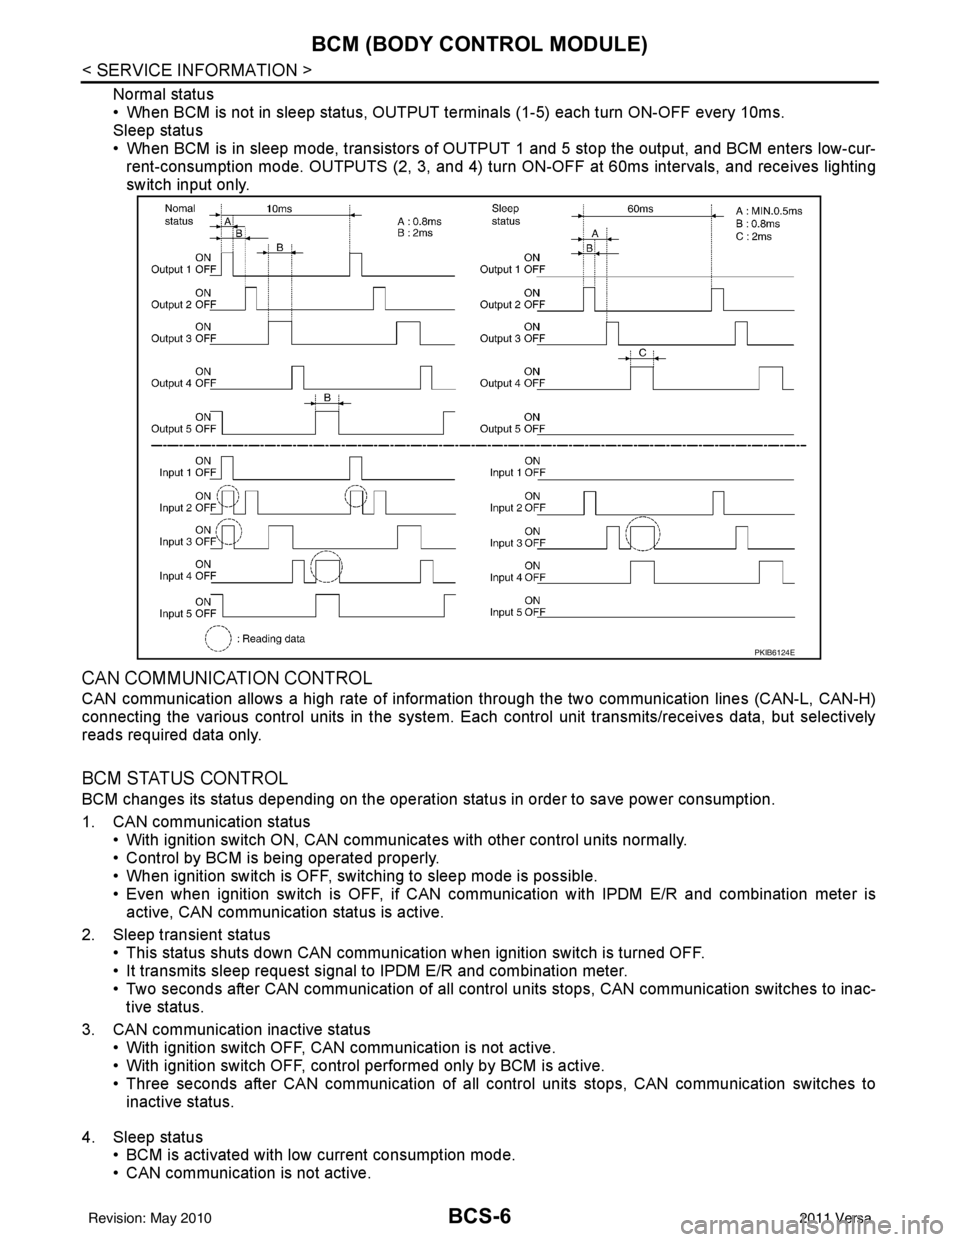
Normal status
• When BCM is not in sleep status, OUTPUT terminals (1-5) each turn ON-OFF every 10ms.
Sleep status
• When BCM is in sleep mode, transistors of OUTPUT 1 and 5 stop the output, and BCM enters low-cur-
rent-consumption mode. OUTPUTS (2, 3, and 4) turn ON-OFF at 60ms intervals, and receives lighting
switch input only.
CAN COMMUNICATION CONTROL
CAN communication allows a high rate of information through the two communication lines (CAN-L, CAN-H)
connecting the various control units in the system. Each control unit transmits/receives data, but selectively
reads required data only.
BCM STATUS CONTROL
BCM changes its status depending on the operation stat us in order to save power consumption.
1. CAN communication status • With ignition switch ON, CAN communicates with other control units normally.
• Control by BCM is being operated properly.
• When ignition switch is OFF, switching to sleep mode is possible.
• Even when ignition switch is OFF, if CAN communication with IPDM E/R and combination meter isactive, CAN communication status is active.
2. Sleep transient status • This status shuts down CAN communication when ignition switch is turned OFF.
• It transmits sleep request signal to IPDM E/R and combination meter.
• Two seconds after CAN communication of all control units stops, CAN communication switches to inac-tive status.
3. CAN communication inactive status • With ignition switch OFF, CAN communication is not active.
• With ignition switch OFF, control performed only by BCM is active.
• Three seconds after CAN communication of all control units stops, CAN communication switches to
inactive status.
4. Sleep status • BCM is activated with low current consumption mode.
• CAN communication is not active.
PKIB6124E
Revision: May 2010 2011 Versa
Page 867 of 3787
BR-20
< SERVICE INFORMATION >
BRAKE BOOSTER
BRAKE BOOSTER
On Board InspectionINFOID:0000000005928405
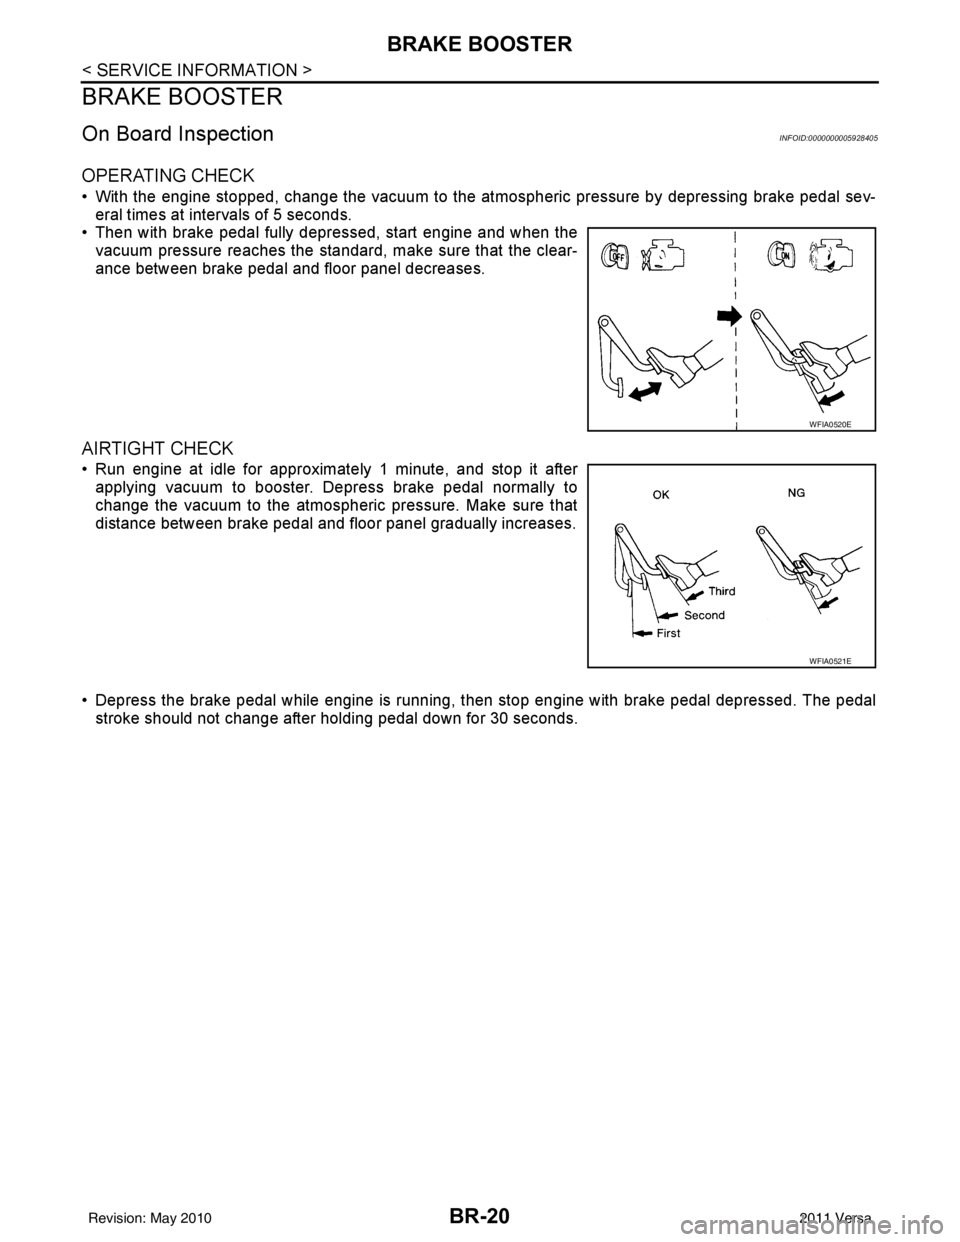
OPERATING CHECK
• With the engine stopped, change the vacuum to the atmospheric pressure by depressing brake pedal sev-
eral times at intervals of 5 seconds.
• Then with brake pedal fully depressed, start engine and when the vacuum pressure reaches the standard, make sure that the clear-
ance between brake pedal and floor panel decreases.
AIRTIGHT CHECK
• Run engine at idle for approximately 1 minute, and stop it afterapplying vacuum to booster. Depress brake pedal normally to
change the vacuum to the atmospheric pressure. Make sure that
distance between brake pedal and floor panel gradually increases.
• Depress the brake pedal while engine is running, then stop engine with brake pedal depressed. The pedal
stroke should not change after holding pedal down for 30 seconds.
WFIA0520E
WFIA0521E
Revision: May 2010 2011 Versa
Page 990 of 3787
CLUTCH FLUIDCL-9
< SERVICE INFORMATION >
DE
F
G H
I
J
K L
M A
B
CL
N
O P
CLUTCH FLUID
Air Bleeding ProcedureINFOID:0000000005928996
CAUTION:
Do not spill clutch fluid onto painted surfaces. If it spills, wipe up immediately and wash the affected
area with water.
NOTE:
• Do not use a vacuum assist or any other type of power bleeder on this system. Use of a vacuum assist or power bleeder will not purge all the air from the system.
• Carefully monitor fluid level in reservoir tank during bleeding operation.
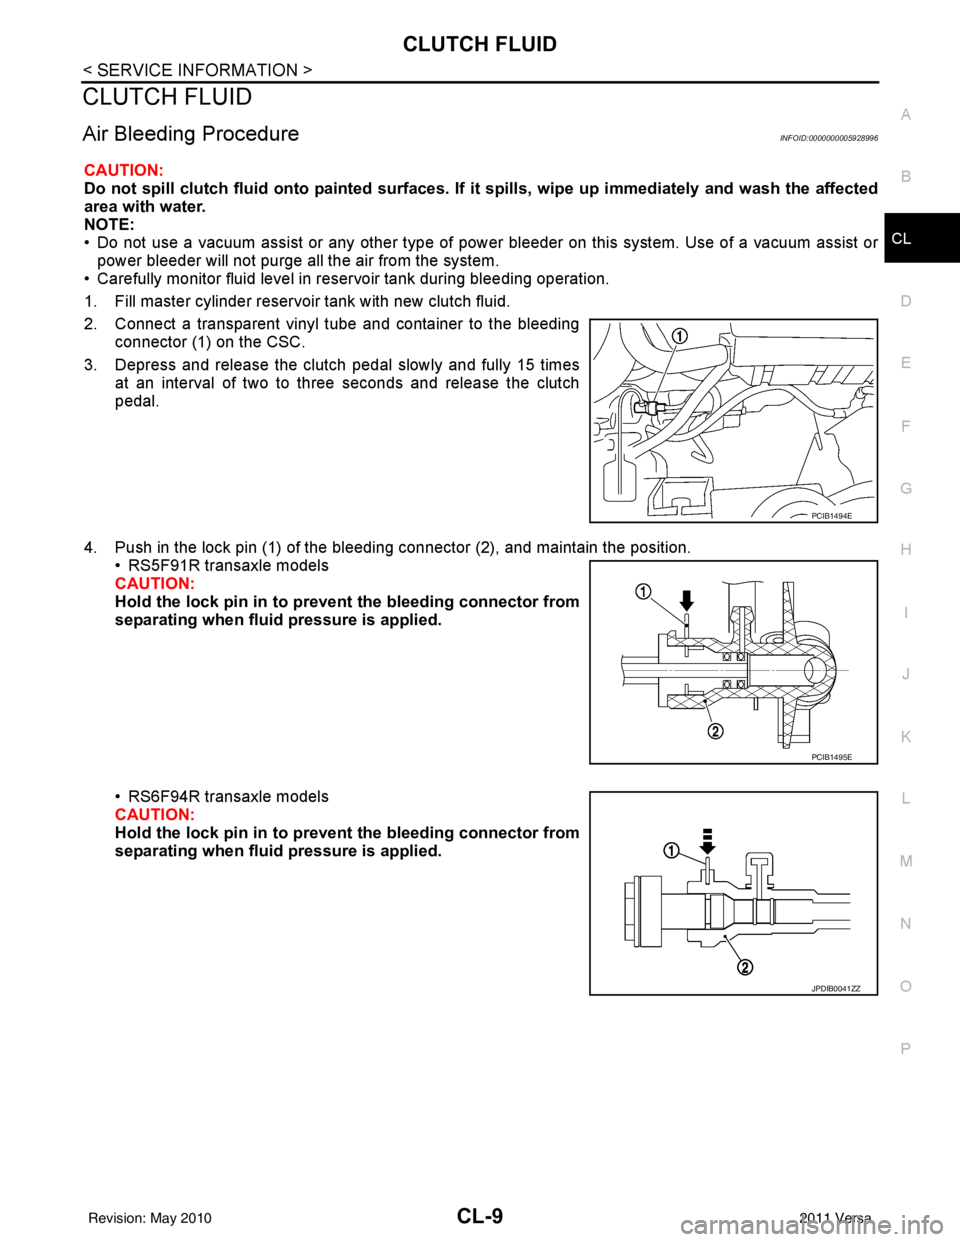
1. Fill master cylinder reservoir tank with new clutch fluid.
2. Connect a transparent vinyl tube and container to the bleeding connector (1) on the CSC.
3. Depress and release the clutch pedal slowly and fully 15 times at an interval of two to three seconds and release the clutch
pedal.
4. Push in the lock pin (1) of the bleeding connector (2), and maintain the position. • RS5F91R transaxle models
CAUTION:
Hold the lock pin in to preven t the bleeding connector from
separating when fluid pressure is applied.
• RS6F94R transaxle models
CAUTION:
Hold the lock pin in to preven t the bleeding connector from
separating when fluid pressure is applied.
PCIB1494E
PCIB1495E
JPDIB0041ZZ
Revision: May 2010 2011 Versa
Page 1862 of 3787
![NISSAN LATIO 2011 Service Repair Manual EC-568
< SERVICE INFORMATION >[MR18DE]
ON BOARD DIAGNOSTIC (OBD) SYSTEM
tified codes can be identified by using the CONSULT-II
I or GST. A DTC will be used as an example for how to
read a code.
A part NISSAN LATIO 2011 Service Repair Manual EC-568
< SERVICE INFORMATION >[MR18DE]
ON BOARD DIAGNOSTIC (OBD) SYSTEM
tified codes can be identified by using the CONSULT-II
I or GST. A DTC will be used as an example for how to
read a code.
A part](/manual-img/5/57357/w960_57357-1861.png)
EC-568
< SERVICE INFORMATION >[MR18DE]
ON BOARD DIAGNOSTIC (OBD) SYSTEM
tified codes can be identified by using the CONSULT-II
I or GST. A DTC will be used as an example for how to
read a code.
A particular trouble code can be identified by the number of four-digit numeral flashes. The “zero” is indicated
by the number of ten flashes. The “A” is indicated by the number of eleven flash. The length of time the
1,000th-digit numeral flashes on and off is 1.2 seconds consisting of an ON (0.6-second) - OFF (0.6-second)
cycle. The 100th-digit numeral and lower digit numer als consist of a 0.3-second ON and 0.3-second OFF
cycle. A change from one digit numeral to another occurs at an interval of 1.0-second OFF. In other words, the
later numeral appears on the display 1.3 seconds after the former numeral has disappeared.
A change from one trouble code to another occu rs at an interval of 1.8-second OFF.
In this way, all the detected malfunctions are classi fied by their DTC numbers. The DTC 0000 refers to no mal-
function. (See EC-504
)
How to Erase Diagnostic Test Mode II (Self-diagnostic Results)
The DTC can be erased from the back-up memory in the ECM by depressing accelerator pedal.
Refer to "How to Erase Diagnostic Test Mode II (Self-diagnostic Results)".
• If the battery is disconnected, the DTC will be lost from the backup memory within 24 hours.
• Be careful not to erase the stored memo ry before starting trouble diagnoses.
OBD System Operation ChartINFOID:0000000006341721
RELATIONSHIP BETWEEN MIL, 1ST TRIP DTC, DTC, AND DETECTABLE ITEMS
• When a malfunction is detected for the first time, the 1st trip DTC and the 1st trip freeze frame data are
stored in the ECM memory.
• When the same malfunction is detected in two consec utive trips, the DTC and the freeze frame data are
stored in the ECM memory, and the MIL will come on. For details, refer to EC-541, "
Two Trip Detection
Logic".
• The MIL will go off after the vehicle is driven 3 time s (driving pattern B) with no malfunction. The drive is
counted only when the recorded driving pattern is met (as stored in the ECM). If another malfunction occurs
while counting, the counter will reset.
• The DTC and the freeze frame data will be stored until the vehicle is driven 40 times (driving pattern A) with-
out the same malfunction recurring (except for Misfire and Fuel Injection System). For Misfire and Fuel Injec-
tion System, the DTC and freeze frame data will be stored until the vehicle is driven 80 times (driving pattern
PBIB3005E
Revision: May 2010 2011 Versa
Page 2526 of 3787
![NISSAN LATIO 2011 Service Repair Manual EM-136
< SERVICE INFORMATION >[MR18DE]
AIR CLEANER AND AIR DUCT
INSTALLATION
Installation is in the reverse order of removal.
• Align marks.
• Attach each joint securely.
• Screw clamps firmly.
NISSAN LATIO 2011 Service Repair Manual EM-136
< SERVICE INFORMATION >[MR18DE]
AIR CLEANER AND AIR DUCT
INSTALLATION
Installation is in the reverse order of removal.
• Align marks.
• Attach each joint securely.
• Screw clamps firmly.](/manual-img/5/57357/w960_57357-2525.png)
EM-136
< SERVICE INFORMATION >[MR18DE]
AIR CLEANER AND AIR DUCT
INSTALLATION
Installation is in the reverse order of removal.
• Align marks.
• Attach each joint securely.
• Screw clamps firmly.
Changing Air Cleaner FilterINFOID:0000000005931005
REMOVAL
1. Push the tabs (A) of both ends of the air cleaner cover (1) into
the inside (B).
2. Pull up the air cleaner cover (1) and remove it (C).
3. Remove the air cleaner filter (1) and holder (2) assembly from the air cleaner case.
4. Remove the air cleaner filter (1) from the holder (2).
INSPECTION AFTER REMOVAL
It is necessary to replace the air cleaner filter at the recommended intervals, more often under dusty driving
conditions. Refer to MA-9, "
Introduction of Periodic Maintenance".
INSTALLATION
Installation is in the reverse order of removal.
• Install the air cleaner cover (1) in the direction shown.
• Air cleaner filter (2)
• Holder (3)
PBIC3557J
PBIC3558J
PBIC3559J
Revision: May 2010 2011 Versa
Page 2542 of 3787
![NISSAN LATIO 2011 Service Repair Manual EM-152
< SERVICE INFORMATION >[MR18DE]
IGNITION COIL, SPARK PLUG AND ROCKER COVER
4. Remove rocker cover.
• Loosen bolts in reverse order as shown.
• Engine front
INSPECTION AFTER REMOVAL
CAUTION NISSAN LATIO 2011 Service Repair Manual EM-152
< SERVICE INFORMATION >[MR18DE]
IGNITION COIL, SPARK PLUG AND ROCKER COVER
4. Remove rocker cover.
• Loosen bolts in reverse order as shown.
• Engine front
INSPECTION AFTER REMOVAL
CAUTION](/manual-img/5/57357/w960_57357-2541.png)
EM-152
< SERVICE INFORMATION >[MR18DE]
IGNITION COIL, SPARK PLUG AND ROCKER COVER
4. Remove rocker cover.
• Loosen bolts in reverse order as shown.
• Engine front
INSPECTION AFTER REMOVAL
CAUTION:
• Never drop or shock spark plug.
• Checking and adjusting spar k plug gap is not required
between change intervals.
• If spark plug tip is covered with car bon, a spark plug cleaner may be used.
• Never use wire brush for cleaning spark plug.
INSTALLATION
1. Install the rocker cover gasket to the rocker cover.
2. Install rocker cover. • Tighten bolts in two steps separately in numerical order asshown.
• Engine front
CAUTION:
Check if rocker cover gasket is not dropped from the instal-
lation groove of rocker cover.
PBIC3151J
SMA806CA
Cleaner air pressure : Less than 588 kPa (5.88 bar, 6 kg/cm2, 85 psi)
Cleaning time : Less than 20 seconds
SMA773C
1st step : 1.96 N·m (0.20 kg-m, 17 in-lb)
2nd step : 8.33 N·m (0.85 kg-m, 73 in-lb)
PBIC3151J
Revision: May 2010 2011 Versa
Page 3180 of 3787
PERIODIC MAINTENANCEMA-9
< SERVICE INFORMATION >
C
DE
F
G H
I
J
K
M A
B
MA
N
O P
PERIODIC MAINTENANCE
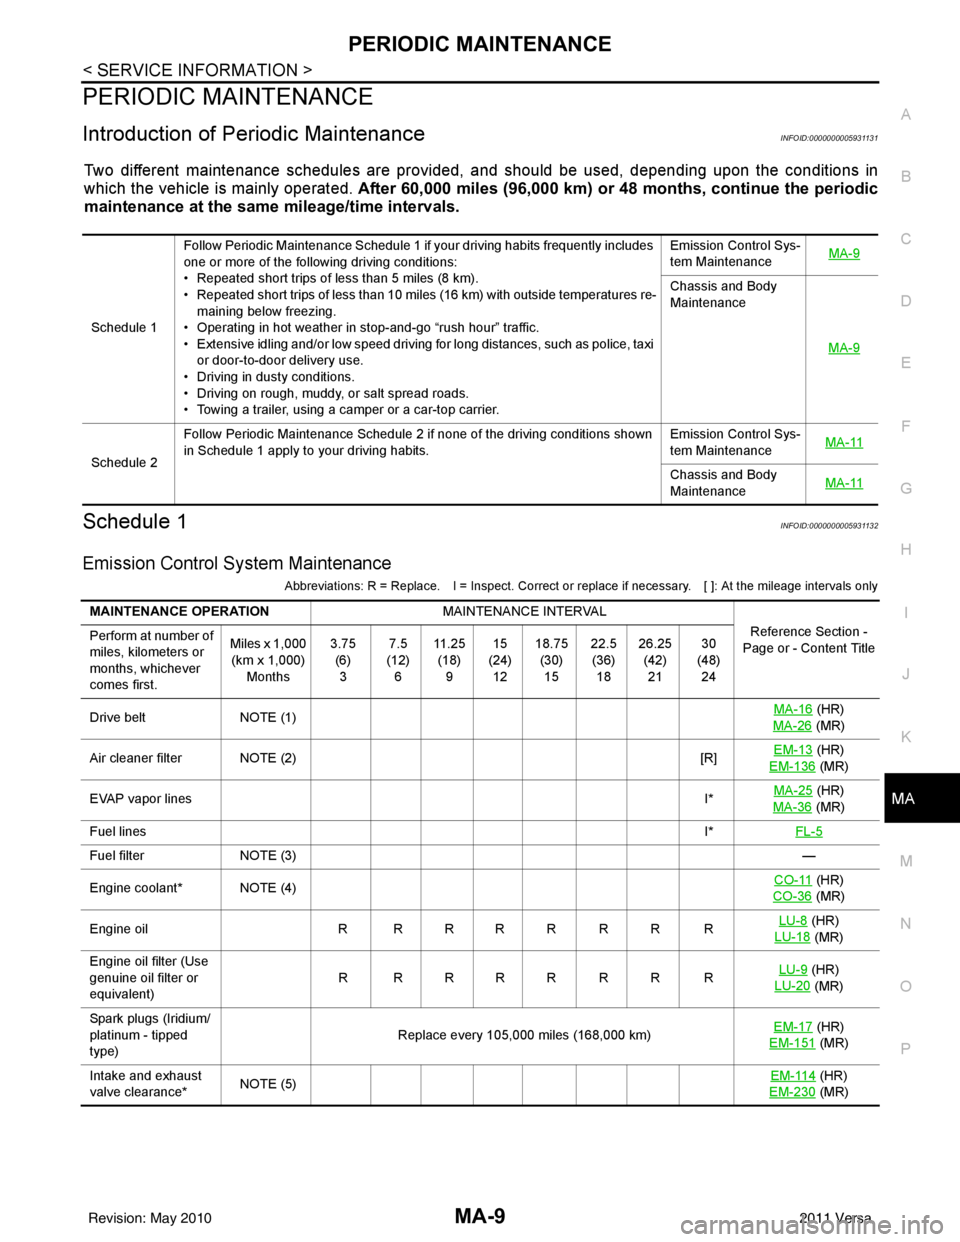
Introduction of Periodic MaintenanceINFOID:0000000005931131
Two different maintenance schedules are provi ded, and should be used, depending upon the conditions in
which the vehicle is mainly operated. After 60,000 miles (96,000 km) or 48 months, continue the periodic
maintenance at the same mileage/time intervals.
Schedule 1INFOID:0000000005931132
Emission Control System Maintenance
Abbreviations: R = Replace. I = Inspect. Correct or r eplace if necessary. [ ]: At the mileage intervals only
Schedule 1Follow Periodic Maintenance Schedule 1 if your driving habits frequently includes
one or more of the following driving conditions:
• Repeated short trips of less than 5 miles (8 km).
• Repeated short trips of less than 10 miles (16 km) with outside temperatures re-
maining below freezing.
• Operating in hot weather in stop-and-go “rush hour” traffic.
• Extensive idling and/or low speed driving for long distances, such as police, taxi
or door-to-door delivery use.
• Driving in dusty conditions.
• Driving on rough, muddy, or salt spread roads.
• Towing a trailer, using a camper or a car-top carrier. Emission Control Sys-
tem Maintenance
MA-9
Chassis and Body
Maintenance
MA-9
Schedule 2Follow Periodic Maintenance Schedule 2 if none of the driving conditions shown
in Schedule 1 apply to your driving habits.
Emission Control Sys-
tem Maintenance
MA-11Chassis and Body
Maintenance
MA-11
MAINTENANCE OPERATION
MAINTENANCE INTERVAL
Reference Section -
Page or - Content Title
Perform at number of
miles, kilometers or
months, whichever
comes first. Miles x 1,000
(km x 1,000) Months 3.75
(6)3 7.5
(12) 6 11 . 2 5
(18) 9 15
(24) 12 18.75
(30)15 22.5
(36) 18 26.25
(42)21 30
(48) 24
Drive belt NOTE (1) MA-16
(HR)
MA-26
(MR)
Air cleaner filter NOTE (2) [R]EM-13
(HR)
EM-136
(MR)
EVAP vapor lines I*MA-25
(HR)
MA-36
(MR)
Fuel lines I*FL-5
Fuel filter NOTE (3) —
Engine coolant* NOTE (4) CO-11
(HR)
CO-36
(MR)
Engine oil R R R R R R R R LU-8
(HR)
LU-18
(MR)
Engine oil filter (Use
genuine oil filter or
equivalent) RRRRRRRR
LU-9
(HR)
LU-20
(MR)
Spark plugs (Iridium/
platinum - tipped
type) Replace every 105,000 miles (168,000 km)
EM-17
(HR)
EM-151
(MR)
Intake and exhaust
valve clearance* NOTE (5) EM-114
(HR)
EM-230
(MR)
Revision: May 2010 2011 Versa