Page 241 of 330
Remove the securing band (C), and then take
out the tools (D).
3. Remove the securing nut (E), and then take
out the jack (F).
4. Remove the jack handle (G) from the holder
(H), and take out the handle.
5. Reverse the removing procedure when stor-
ing the tool, jack and jack handle.
NOTE l When stowing the jack handle, align the black-
marked part (I) of the jack handle with the
holder (H).
Vehicles with rear retractable power window
The tools, jack, and jack handle are located behind
the rear seat.
1. Tip forward the seatback of the rear seat. (Refer to “Folding the seatback forward” on
page 2-07.)
2. Remove the wheel nut wrench (A) from the
holder of the back panel (B), and take out the
wrench.
Take out the tools (C) from the rear back
trim (D).
3. Remove the securing nut (E), and then take
out the jack (F).
For emergencies
6-11
6
Page 242 of 330
4.Remove the jack handle (G) from the holder
of the back panel (H), and take out the handle.
5. Reverse the removing procedure when stor-
ing the tool, jack and jack handle.
NOTE l When stowing the wheel nut wrench, insert it
into the holder on the back panel as illustrated.
To use the jack handle (Club cab, Dou-
ble cab with rear retractable power
window only) E00802400124
1. While pressing the snap pin (A) on the han-
dle that has a black marking, withdraw and re-
move the inner handle (B).
2. Reverse the inner handle (B) then, while press-
ing the snap pin (C), insert it into the outer
handle (D) until it is locked by snap pin as il-
lustrated.
3. While pressing the snap pin (F) on the assem-
bled handle (E), insert the white-marked han-
dle (G) until it is locked by snap pin as illus-
trated.
For emergencies
6-12
6
Page 243 of 330

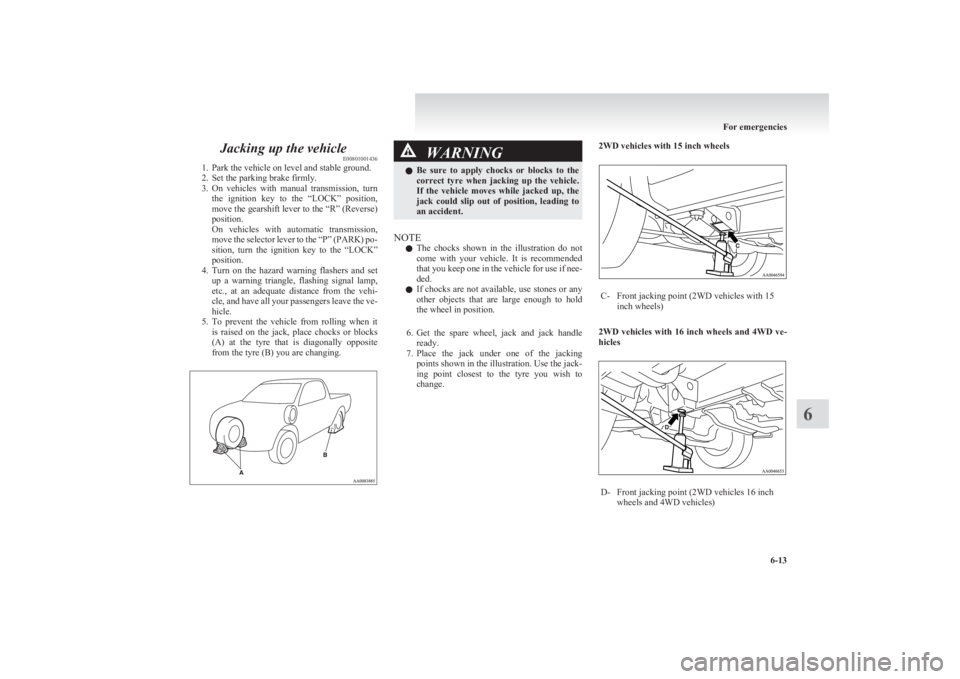
Jacking up the vehicleE00801001436
1. Park the vehicle on level and stable ground.
2. Set the parking brake firmly.
3. On vehicles with manual transmission, turn
the ignition key to the “LOCK” position,
move the gearshift lever to the “R” (Reverse)
position.
On vehicles with automatic transmission,
move the selector lever to the “P” (PARK) po-
sition, turn the ignition key to the “LOCK”
position.
4. Turn on the hazard warning flashers and set
up a warning triangle, flashing signal lamp,
etc., at an adequate distance from the vehi-
cle, and have all your passengers leave the ve-
hicle.
5. To prevent the vehicle from rolling when it
is raised on the jack, place chocks or blocks
(A) at the tyre that is diagonally opposite
from the tyre (B) you are changing.WARNINGl Be sure to apply chocks or blocks to the
correct tyre when jacking up the vehicle.
If the vehicle moves while jacked up, the
jack could slip out of position, leading to
an accident.
NOTE
l The chocks shown in the illustration do not
come with your vehicle. It is recommended
that you keep one in the vehicle for use if nee-
ded.
l If chocks are not available, use stones or any
other objects that are large enough to hold
the wheel in position.
6. Get the spare wheel, jack and jack handle
ready.
7. Place the jack under one of the jacking
points shown in the illustration. Use the jack-
ing point closest to the tyre you wish to
change.
2WD vehicles with 15 inch wheelsC-Front jacking point (2WD vehicles with 15
inch wheels)
2WD vehicles with 16 inch wheels and 4WD ve-
hicles
D-Front jacking point (2WD vehicles 16 inch
wheels and 4WD vehicles)
For emergencies
6-13
6
Page 244 of 330

E-Rear jacking pointWARNINGlSet the jack only at the positions shown
here. If the jack is set at a wrong position,
it could dent your vehicle or the jack
might fall over and cause personal injury.
l Do not use the jack on a tilted or soft sur-
face. Otherwise, the jack might slip and
cause personal injury. Always use the
jack on a flat, hard surface. Before set-
ting the jack, make sure there are no
sand or pebbles under the jack base.
NOTE
l When jacking up the rear of the vehicle, turn
the tip of the jack so that the grooved portion
(F) properly meets the designated point.
To raise the vehicle
1.Using the jack handle, turn the release valve
(G) clockwise until it stops.
2. Insert the jack handle in the bracket of the
jack and hook the notch (H) on the jack han-
dle end to the claw (I) of the bracket.
3. Move the jack handle up and down to raise
the ram until just before the jack contacts the
jacking point of the vehicle. Ensure that the
jack will properly contact the vehicle jacking
point.
Move the jack handle up and down to raise
the vehicle.
NOTE
l This jack is a 2 stage expansion type.
To lower the vehicle 1.Put the notch (J) provided on the jack handle
end on the valve (K) of the jack.
For emergencies
6-14
6
Page 245 of 330

2.Using the jack handle, turn the release valve
anticlockwise slowly to lower the ram and re-
move the jack.
3. Press the piston down all the way, and turn
the release valve clockwise as far as possible.
4. Store jack, jack handle and chocks.
WARNINGl Be sure to open the release valve slowly.
If it is opened quickly, the vehicle will
drop abruptly and the jack may come out
of position, causing a serious accident.CAUTIONl If the release valve is loosened too much
(2 or more turns) in the anticlockwise di-
rection, the jack’s oil will leak and the
jack cannot be used.CAUTIONl Close the release valve slowly when lower-
ing the vehicle, or the valve may be dam-
aged.
NOTE
l Occasionally when the vehicle is jacked up,
the grooved portion of the designated point
will not come off. When this happens, rock
the vehicle to lower the ram.
l If the jack is difficult to remove by hand, in-
sert the jack handle (L) into the bracket (M).
Then using the handle, remove the jack.
WARNINGl Stop jacking up the vehicle as soon as the
tyre is raised off the ground. It is danger-
ous to raise the vehicle any higher.
l Do not get under your vehicle while using
the jack.WARNINGl Do not bump the raised vehicle or leave it
sitting on the jack for a long time. Both
are very dangerous.
l Do not use a jack except the one that
came with your vehicle.
l The jack should not be used for any pur-
pose other than to change a tyre.
l No one should be in your vehicle when us-
ing the jack.
l Do not start or run the engine while your
vehicle is on the jack.
l Do not turn the raised wheel. The tyres
still on the ground could turn and make
your vehicle fall off the jack.
For emergencies
6-15
6
Page 246 of 330

Spare wheelE00801100094
The spare wheel is stored under the floor of the car-
go bed.
A- Spare wheel
CAUTIONl When removing the spare wheel, put on
gloves. Removing the spare wheel with
your bare hands may cause injury to the
fingers.CAUTIONl Check the air pressure of the spare wheel
frequently and make sure it is ready for
emergency use at any time.
Driving with an insufficient tyre pressure
can lead to an accident. If you have no
choice but to drive with an insufficient
tyre pressure, keep your speed down and
inflate the tyre to the correct pressure as
soon as possible. (Refer to “Tyre inflation
pressures” on page 8-12.)
Maintaining the spare wheel at the high-
est specified air pressure will ensure that
it can always be used under any condi-
tions (city/high-speed driving, varying
load weight, etc.).
To remove
1.Set the jack handle. (Club cab, Double cab
with rear retractable power window only)
( Refer to “To use the jack handle” on page
6-12.)
2. Insert the jack handle (A) in the hole (B) be-
low the rear gate.
3. Securely insert the pin (C) on the jack handle
into the holder (D) of the spare wheel carrier.
4. Insert the wheel nut wrench (E) through the
end of the jack handle hole (F), and then turn
it anticlockwise to lower the spare wheel com-
pletely to the ground and to slack the chain.
For emergencies
6-16
6
Page 247 of 330

5.Remove the hanger disc (G) from the spare
wheel.
To install
1.Install the hanger disc (A) in the wheel disc
hole.
2. Turn the wheel nut wrench (B) clockwise to
wind up the chain.
NOTE
l Confirm that the hanger disc is securely fit-
ted in the wheel disc hole when the wheel is
just lifted off the ground.
3. After winding up the spare wheel sufficient-
ly, make sure it is not loose (the tightening
torque should be approximately 40 Nm) then
withdraw the jack handle, taking care not to
turn it in the reverse direction.
CAUTIONl The spare wheel should always be secure-
ly in position.
If a flat tyre is changed, put the flat tyre
in the spare wheel mounting position
with the wheel outer surface upward, and
use the wheel nut wrench to secure it firm-
ly.How to change a tyre E00801202653
Before changing a tyre, first stop your vehicle in a
safe, flat location. 1. Park the vehicle on level and stable ground.
2. Set the parking brake firmly.
3. On vehicles with manual transmission, turn
the ignition key to the “LOCK” position,
move the gearshift lever to the “R” (Reverse)
position.
On vehicles with automatic transmission,
move the selector lever to the “P” (PARK) po-
sition, turn the ignition key to the “LOCK”
position.
4. Turn on the hazard warning flashers and set
up a warning triangle, flashing signal lamp,
etc., at an adequate distance from the vehi-
cle, and have all your passengers leave the ve-
hicle.
5. To prevent the vehicle from rolling when it
is raised on the jack, place chocks or blocks
(A) at the tyre that is diagonally opposite
from the tyre (B) you are changing.
For emergencies
6-17
6
Page 248 of 330

WARNINGlBe sure to apply chocks or blocks to the
correct tyre when jacking up the vehicle.
If the vehicle moves while jacked up, the
jack could slip out of position, leading to
an accident.
NOTE
l The chocks shown in the illustration do not
come with your vehicle. It is recommended
that you keep one in the vehicle for use if nee-
ded.
l If chocks are not available, use stones or any
other objects that are large enough to hold
the wheel in position.
6. Get the spare wheel, jack, jack handle and
wheel nut wrench ready.
NOTE
l Put the spare wheel under the vehicle body
near the flat tyre. This makes it safer if the
jack slips out of position.
7. Loosen the wheel nuts with the wheel nut
wrench. Do not remove the wheel nuts yet.Five wheel nutsSix wheel nuts
8. Find the closest jacking point to the flat tyre
(refer to “Jacking up the vehicle” on page
6-13 ). Then position the jack and raise the ve-
hicle until the tyre is slightly off the ground.
9. Remove the wheel nuts with the wheel nut
wrench, then take the wheel off.
CAUTIONl Handle the wheel carefully when chang-
ing the tyre, to avoid scratching the wheel
surface.
10. Clean out any mud, etc. on the hub surface
(C), hub bolts (D) or in the installation holes
(E) in the wheel, and then mount the spare
wheel.
WARNINGl Mount the spare wheel with the valve
stem (F) facing outboard. If you cannot
see the valve stem (F), you have installed
the wheel backwards.
Operating the vehicle with the spare
wheel installed backwards can cause vehi-
cle damage and result in an accident.
For emergencies
6-18
6