2011 MITSUBISHI L200 lock
[x] Cancel search: lockPage 264 of 330

Service precautionsE01000100706
Adequate care of your vehicle at regular intervals
serves to preserve the value and appearance as long
as possible.
Maintenance items as described in this owner’s man-
ual can be performed by the owner.
We recommend you to have the periodic inspection
and maintenance performed by a MITSUBISHI
MOTORS Authorized Service Point or another spe-
cialist.
In the event a malfunction or other problem is dis-
covered, we recommend you to have it checked
and repaired. This section contains information on
inspection maintenance procedures that you can do
yourself. Follow the instructions and cautions for
each of the various procedures.WARNINGl When checking or servicing the inside of
the engine compartment, make sure the
engine is switched off and has had a
chance to cool down.
l If it is necessary to do work in the engine
compartment with the engine running, be
especially careful that your clothing, hair,
etc., does not become caught by the fans,
drive belts, or other moving parts.
l For vehicle with air conditioning, the fan
may turn on automatically even if the en-
gine is not running; turn the ignition key
to “LOCK” position and remove the key
to ensure safety while you work in the en-
gine compartment.WARNINGl Do not smoke, cause sparks or allow open
flames around fuel or battery. The fumes
are flammable.
l Be extremely cautious when working
around the battery. It contains poisonous
and corrosive sulphuric acid.
l Do not get under your vehicle with just
the body jack supporting it. Always use
automotive jack stands.
l Improper handling of components and
materials used in the vehicle can endan-
ger your personal safety. We recommend
you to consult a specialist for necessary in-
formation.Catalytic converter E01000200925
For ordinary use, there are no particular precautions.
The exhaust gas scavenging devices used with the
catalytic converter are extremely efficient for the re-
duction of noxious gases. The catalytic converter is
installed in the exhaust system.
It is important to keep the engine properly tuned to
ensure proper catalyst operation and prevent possi-
ble catalyst damage.CAUTIONl Damage to the catalytic converter can re-
sult if your vehicle is not kept in proper
operating condition. In the event of an en-
gine malfunction particularly involving
engine misfire or other apparent loss of
performance, have your vehicle serviced
promptly.
Continued operation of your vehicle with
a severe overheated condition may result
in possible damage to the converter and
vehicle.WARNINGl As with any vehicle, do not park or oper-
ate this vehicle in areas where combusti-
ble materials such as dry grass or leaves
can come in contact with a hot exhaust
since a fire could occur.
l Paint should not be applied to the catalyt-
ic converter.
Maintenance
8-02
8
Page 265 of 330

The catalytic converter itself gets hot quickly, and
may be damaged if overheated. The following
points should be noted in order to prevent the igni-
tion of unburned fuel within the catalytic converter.
l Do not drive with an extremely low fuel lev-
el; running out of fuel could cause damage to
the catalytic converter.
l Do not switch OFF the ignition switch while
driving.
l Do not attempt to start the engine by pushing
the vehicle. If the battery is weak or dis-
charged, use another battery to start the en-
gine.
l Do not idle the engine for prolonged periods
during very rough idle or malfunctioning op-
erating conditions.
l Do not race the engine when turning off the
ignition switch. This will cause the catalytic
converter to be damaged due to contact with
unburnt fuel.
l Stop driving the vehicle if you think the per-
formance is noticeably low, or if the engine
has a malfunction such as with the ignition,
etc.
If it is impractical to stop driving immediate-
ly, reduce the speed and drive for only a
short time. We recommend you to have your
vehicle inspected as soon as possible.
l In unusual situations involving major engine
problems, a burnt smell may indicate severe
and abnormal catalyst overheating.
If this occurs, the vehicle should be stopped
in a safe place, the engine switched off and
the vehicle allowed to cool. Once the engine
is cool, a service, including a tune-up to man-
ufacturer’s specifications, should be obtained
immediately.Bonnet E01000302281
To open
Pull the release lever towards you to unlock the bon-
net.Raise the bonnet while pressing the safety lock.
NOTE
l Only open the bonnet when the wipers are in
the parked position. Failure to do so may
cause damage to the bonnet, wiper arms or
front windscreen.
Support the bonnet by inserting the support bar in
its slot.
Maintenance
8-03
8LHD RHD
Page 266 of 330

CAUTIONlNote that the support bar may disengage
the bonnet if the open bonnet is lifted by
a strong wind.
l Always insert the support bar into the
hole provided specifically for this pur-
pose. Supporting the bonnet at any other
location could result in the support bar
slipping out and lead to an accident.
To close
Unlatch the support bar and clip it in its holder.
Slowly lower the bonnet to a position about 20 cm
above the closed position, then let it drop.
NOTE
l If this does not close the bonnet, release it
from a slightly higher position.
l Do not press down the bonnet hard with a
hand as it may damage the bonnet.
CAUTIONl Be careful that hands or fingers are not
trapped when closing the bonnet.
l Before driving, make sure that the bon-
net is securely locked. An incompletely
locked bonnet can suddenly open while
driving. This can be extremely dangerous.Engine oil E01000402455
To check and refill engine oil
Type 1Type 2
The engine oil used has a significant effect on the
engine’s performance, service life and startability.
Be sure to use oil of the recommended quality and
appropriate viscosity.
All engines consume a certain amount of oil during
normal operation, and engine oil consumption is
greatly influenced by payload, engine speed, etc.
Therefore, it is important to check the oil level at
regular intervals or before starting a long trip.
This check must be made with the engine warm but
not running. Park the vehicle on a level surface,
stop the engine, and then wait a few moments to al-
low the engine oil in circulation to return to the oil
pan to ensure accurate measurement.
Remove the dipstick and wipe it with a clean cloth.
Reinsert the dipstick as far as it goes. Remove the
dipstick and read the oil level, which should al-
ways be within the range indicated.
Maintenance
8-04
8
Page 268 of 330

WARNINGlDo not open the radiator cap while the en-
gine is hot.
The coolant system is under pressure and
any hot coolant escaping could cause se-
vere burns.
Anti-freeze
The engine coolant contains an ethylene glycol anti-
corrosion agent. The cylinder head and water pump
housing are cast aluminium alloy, and periodic
changing of the engine coolant is necessary to pre-
vent corrosion of these parts.
Use “DIA QUEEN SUPER LONG LIFE COOL-
ANT” or equivalent.
MITSUBISHI Genuine Coolant has excellent pro-
tection against corrosion and rust formation of all
metals including aluminium and can avoid block-
ages in the radiator, heater, cylinder head, engine
block, etc.
Because of the necessity of this anti-corrosion
agent, the coolant must not be replaced with plain
water even in summer. The required concentration
of anti-freeze differs depending on the expected am-
bient temperature.
Ambient
temperature
( minimum) °C-15-20-25-30-35-50Anti-freeze
concentra- tion %303540455060CAUTIONl Do not use alcohol or methanol anti-
freeze or any engine coolants mixed with
alcohol or methanol anti-freeze. The use
of an improper anti-freeze can cause cor-
rosion of the aluminium components.
l For effective anti-corrosion and anti-
freeze performance, keep the anti-freeze
concentration within the range of 30 to
60 %.
Concentrations exceeding 60 % will re-
sult in a reduction of both the anti-freeze
and cooling performance thus adversely
affecting the engine.
l Do not top up with water only.
Water by itself reduces the rust-protec-
tive and anti-freeze qualities of the cool-
ant and has a lower boiling point. It can
also cause damage to the cooling system if
it should freeze. Do not use tapwater, as it
can cause corrosion and rust formation.
During cold weather
If the temperatures in your area drop below freez-
ing, there is the danger that the coolant in the en-
gine or radiator could freeze and cause severe dam-
age to the engine and/or radiator. The concentra-
tion should be checked before the start of cold weath-
er and anti-freeze added to the system if necessary.
Add a sufficient amount of anti-freeze to the cool-
ant to prevent it from freezing.
The concentration should be checked before the
start of cold weather and anti-freeze added to the
system if necessary.
Automatic transmission fluid* E01000600974
The proper amount of automatic transmission fluid
is essential to the life and operation of the automat-
ic transmission. Either insufficient fluid or exces-
sive fluid could cause transmission trouble. The
transmission fluid filler port cap is equipped with a
dipstick. Use the following procedure to check the
fluid level.
Procedure for checking the fluid level 1.Check the fluid level after the vehicle has
been driven enough to warm up the transmis-
sion fluid.
2. Park the vehicle on a flat, level surface and
apply the parking brake.
3. With the engine idling and the brake pedal
fully depressed, move the transmission selec-
tor lever through all the positions from the
"P” (PARK) to “L” (LOW) (with 4A/T), the
“P” (PARK) to “D” (DRIVE) (with 5A/T),
stopping momentarily at each position.
4. Move the selector lever to the “P” (PARK)
position.
5. Remove the dipstick and wipe it with a clean
lint-free cloth.
6. Reinsert the dipstick as far as it goes.
Maintenance
8-06
8
Page 282 of 330

FusesE01003000849Fuse block location E01007600032
To prevent damage to the electrical system due to
shortcircuiting or overloading, each individual cir-
cuit is provided with a fuse.
There are fuse blocks in the passenger compart-
ment and in the engine compartment.
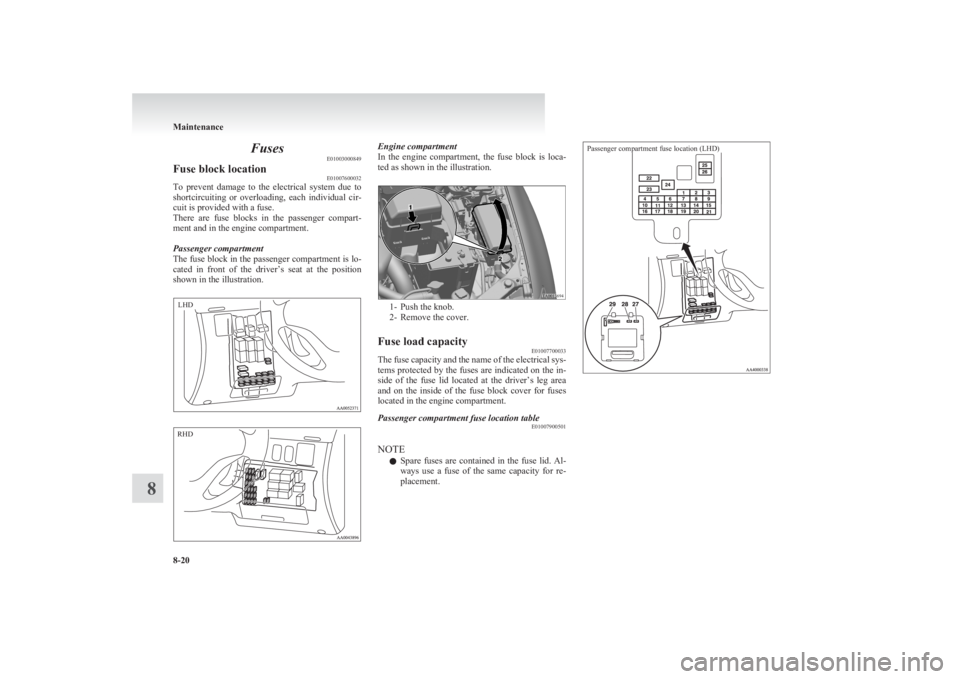
Passenger compartment
The fuse block in the passenger compartment is lo-
cated in front of the driver’s seat at the position
shown in the illustration.
Engine compartment
In the engine compartment, the fuse block is loca-
ted as shown in the illustration.
1- Push the knob.
2- Remove the cover.
Fuse load capacity E01007700033
The fuse capacity and the name of the electrical sys-
tems protected by the fuses are indicated on the in-
side of the fuse lid located at the driver’s leg area
and on the inside of the fuse block cover for fuses
located in the engine compartment.
Passenger compartment fuse location table E01007900501
NOTE
l Spare fuses are contained in the fuse lid. Al-
ways use a fuse of the same capacity for re-
placement.
Passenger compartment fuse location (LHD)
Maintenance
8-20
8LHD RHD
Page 283 of 330

Passenger compartment fuse location (RHD)
No.SymbolElectrical systemCa-
pacity1Tail lamp (left)7.5 A2Cigarette lighter15 A3Ignition coil10 A4Starter motor7.5 A5Sunroof20 A6Accessory socket15 ANo.SymbolElectrical systemCa-
pacity7Tail lamp (right)7.5 A8Outside rear-view mirrors7.5 A9Engine control unit7.5 A10Control unit7.5 A11Rear fog lamp10 A12Central door lock15 A13Room lamp10 A14Rear window wiper15 A15Gauge7.5 A16Relay7.5 A17Heated seat20 A18Option10 A19Heated door mirror7.5 A20Windscreen wiper20 A21Reversing lamps7.5 A22Demister30 A23Heater30 A24Power seat40 A25Radio10 ANo.SymbolElectrical systemCa-
pacity26Electronic controlled unit15 A27—Spare fuse7.5 A28—Spare fuse20 A29—Spare fuse30 A
l Some fuses may not be installed on your ve-
hicle, depending on the vehicle model or spec-
ifications.
l The table above shows the main equipment
corresponding to each fuse.
The fuse block does not contain spare 10 A
and 15 A fuses. If a fuse of one of these ca-
pacities blows, replace it temporarily by bor-
rowing the one that matches from:
10 A: Radio
15 A: Cigarette lighter
Replace the borrowed fuse as soon as possible.
Maintenance
8-21
8
Page 284 of 330

Engine compartment fuse location tableE01008000583Engine compartment fuse locationFront
No.SymbolElectrical systemCa-
pacity1———2Electric window system40 A3Ignition switch40 A4Air conditioning compres-
sor10 A5Condenser fan motor20 ANo.SymbolElectrical systemCa-
pacity6Headlamp high-beam
(left)10 A7Headlamp high-beam
(right)10 A8Headlamp low beam (left)10 A9Headlamp low beam
(right)10 A10Engine control20 A11Alternator7.5 A12Stop lamps15 A13Horn10 A14Automatic transmission20 A15Hazard warning flasher10 A16Fuel pump15 A17Front fog lamps15 A18Audio amp20 A
l Some fuses may not be installed on your ve-
hicle, depending on the vehicle model or spec-
ifications.
l The table above shows the main equipment
corresponding to each fuse.
Identification of fuse E01008100308CapacityColour7.5 ABrown10 ARed15 ABlue20 AYellow30 AGreen (fuse type)/
Pink (fusible link type)40 AGreen (fusible link type)Fuse replacement E01007800656
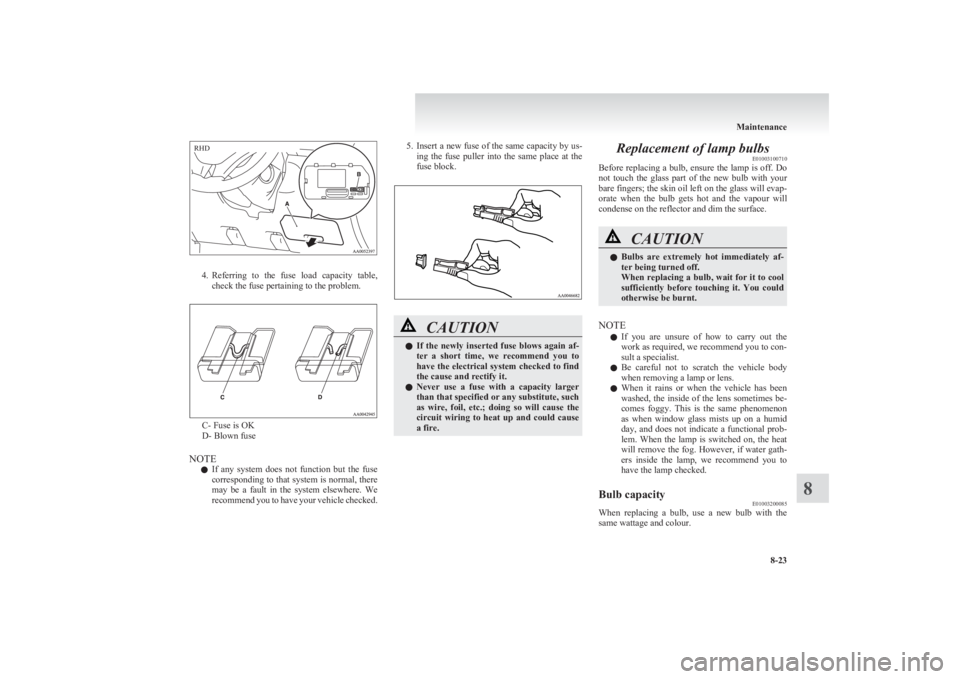
1.Before replacing a fuse, always turn off the
electrical circuit concerned and place the ig-
nition switch in the “LOCK” position.
2. Pull the fuse lid (A) to remove it.
3. Remove the fuse puller (B) from the fuse lid
(A).
Maintenance
8-22
8 LHD
Page 285 of 330

4.Referring to the fuse load capacity table,
check the fuse pertaining to the problem.
C- Fuse is OK
D- Blown fuse
NOTE l If any system does not function but the fuse
corresponding to that system is normal, there
may be a fault in the system elsewhere. We
recommend you to have your vehicle checked.
5. Insert a new fuse of the same capacity by us-
ing the fuse puller into the same place at the
fuse block.CAUTIONl If the newly inserted fuse blows again af-
ter a short time, we recommend you to
have the electrical system checked to find
the cause and rectify it.
l Never use a fuse with a capacity larger
than that specified or any substitute, such
as wire, foil, etc.; doing so will cause the
circuit wiring to heat up and could cause
a fire.Replacement of lamp bulbs E01003100710
Before replacing a bulb, ensure the lamp is off. Do
not touch the glass part of the new bulb with your
bare fingers; the skin oil left on the glass will evap-
orate when the bulb gets hot and the vapour will
condense on the reflector and dim the surface.CAUTIONl Bulbs are extremely hot immediately af-
ter being turned off.
When replacing a bulb, wait for it to cool
sufficiently before touching it. You could
otherwise be burnt.
NOTE
l If you are unsure of how to carry out the
work as required, we recommend you to con-
sult a specialist.
l Be careful not to scratch the vehicle body
when removing a lamp or lens.
l When it rains or when the vehicle has been
washed, the inside of the lens sometimes be-
comes foggy. This is the same phenomenon
as when window glass mists up on a humid
day, and does not indicate a functional prob-
lem. When the lamp is switched on, the heat
will remove the fog. However, if water gath-
ers inside the lamp, we recommend you to
have the lamp checked.
Bulb capacity E01003200085
When replacing a bulb, use a new bulb with the
same wattage and colour.
Maintenance
8-23
8RHD