2011 MITSUBISHI L200 wheel torque
[x] Cancel search: wheel torquePage 151 of 330

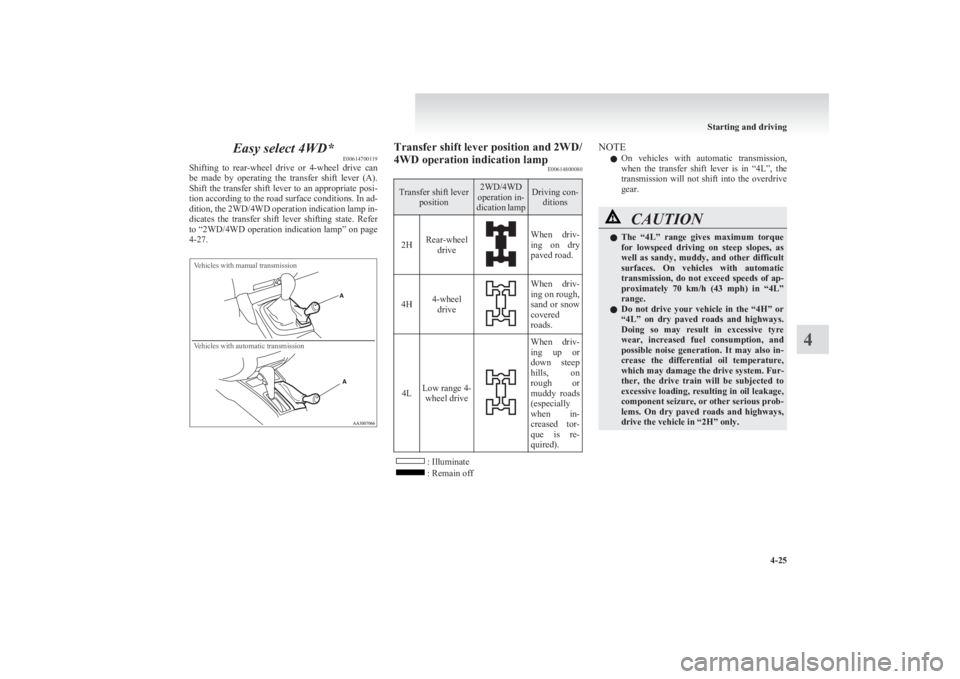
Easy select 4WD*E00614700119
Shifting to rear-wheel drive or 4-wheel drive can
be made by operating the transfer shift lever (A).
Shift the transfer shift lever to an appropriate posi-
tion according to the road surface conditions. In ad-
dition, the 2WD/4WD operation indication lamp in-
dicates the transfer shift lever shifting state. Refer
to “2WD/4WD operation indication lamp” on page
4-27.
Vehicles with manual transmissionVehicles with automatic transmissionTransfer shift lever position and 2WD/
4WD operation indication lamp E00614800080Transfer shift lever
position2WD/4WD
operation in-
dication lampDriving con- ditions
2HRear-wheel driveWhen driv-
ing on dry
paved road.4H4-wheel drive
When driv-
ing on rough,
sand or snow
covered
roads.
4LLow range 4- wheel drive
When driv-
ing up or
down steep
hills, on
rough or
muddy roads
(especially
when in-
creased tor-
que is re-
quired).
: Illuminate: Remain off
NOTE
l On vehicles with automatic transmission,
when the transfer shift lever is in “4L”, the
transmission will not shift into the overdrive
gear.CAUTIONl The “4L” range gives maximum torque
for lowspeed driving on steep slopes, as
well as sandy, muddy, and other difficult
surfaces. On vehicles with automatic
transmission, do not exceed speeds of ap-
proximately 70 km/h (43 mph) in “4L”
range.
l Do not drive your vehicle in the “4H” or
“4L” on dry paved roads and highways.
Doing so may result in excessive tyre
wear, increased fuel consumption, and
possible noise generation. It may also in-
crease the differential oil temperature,
which may damage the drive system. Fur-
ther, the drive train will be subjected to
excessive loading, resulting in oil leakage,
component seizure, or other serious prob-
lems. On dry paved roads and highways,
drive the vehicle in “2H” only.
Starting and driving
4-25
4
Page 156 of 330

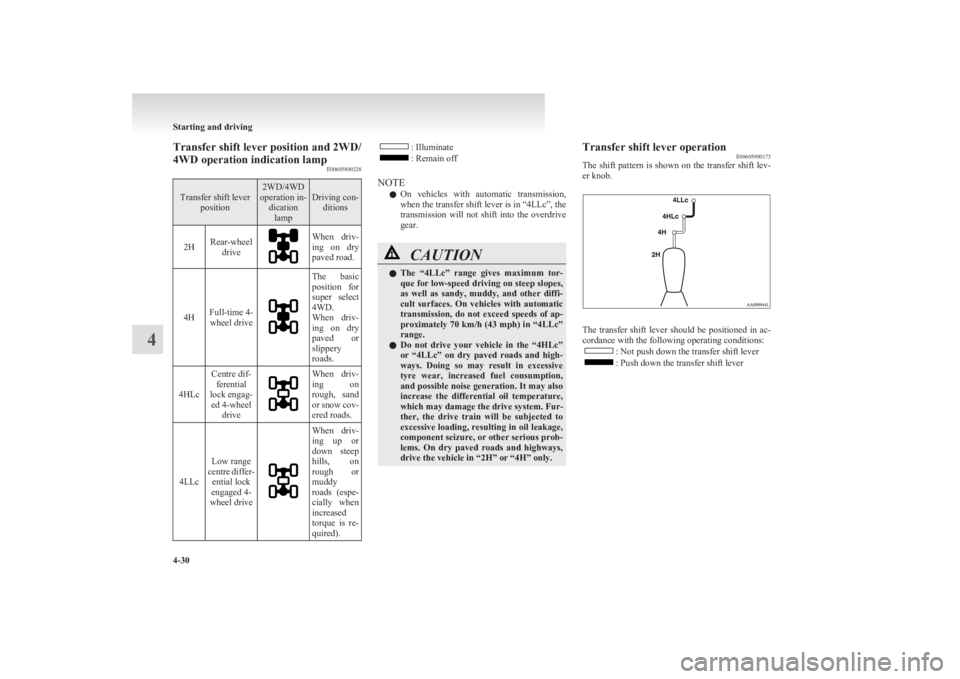
Transfer shift lever position and 2WD/
4WD operation indication lamp E00605800228Transfer shift lever
position2WD/4WD
operation in- dicationlampDriving con- ditions2HRear-wheel driveWhen driv-
ing on dry
paved road.
4HFull-time 4- wheel drive
The basic
position for
super select
4WD.
When driv-
ing on dry
paved or
slippery
roads.
4HLc
Centre dif- ferential
lock engag- ed 4-wheel driveWhen driv-
ing on
rough, sand
or snow cov-
ered roads.
4LLc
Low range
centre differ- ential lock
engaged 4-
wheel drive
When driv-
ing up or
down steep
hills, on
rough or
muddy
roads (espe-
cially when
increased
torque is re-
quired).: Illuminate: Remain off
NOTE l On vehicles with automatic transmission,
when the transfer shift lever is in “4LLc”, the
transmission will not shift into the overdrive
gear.CAUTIONl The “4LLc” range gives maximum tor-
que for low-speed driving on steep slopes,
as well as sandy, muddy, and other diffi-
cult surfaces. On vehicles with automatic
transmission, do not exceed speeds of ap-
proximately 70 km/h (43 mph) in “4LLc”
range.
l Do not drive your vehicle in the “4HLc”
or “4LLc” on dry paved roads and high-
ways. Doing so may result in excessive
tyre wear, increased fuel consumption,
and possible noise generation. It may also
increase the differential oil temperature,
which may damage the drive system. Fur-
ther, the drive train will be subjected to
excessive loading, resulting in oil leakage,
component seizure, or other serious prob-
lems. On dry paved roads and highways,
drive the vehicle in “2H” or “4H” only.Transfer shift lever operation E00605900173
The shift pattern is shown on the transfer shift lev-
er knob.
The transfer shift lever should be positioned in ac-
cordance with the following operating conditions:
: Not push down the transfer shift lever: Push down the transfer shift lever
Starting and driving
4-30
4
Page 165 of 330

WARNINGlWhen attempting to rock your vehicle out
of a stuck position, be sure that the area
around the vehicle is clear of people and
physical objects. The rocking motion may
cause the vehicle to suddenly launch for-
ward or backward, causing injury or dam-
age to nearby people or objects.
NOTE
l Avoid sudden braking, acceleration, and turn-
ing; such operations could result in the vehi-
cle becoming stuck.
l If the vehicle becomes stuck in sandy or mud-
dy roads, it can often be moved a rocking mo-
tion. Move the selector lever rhythmically be-
tween the “D” (DRIVE) and “R” (RE-
VERSE) position (with M/T, between 1 st
and
Reverse), while applying slight pressure to
the accelerator pedal.
l It is recommended to start the vehicle with
parking brake partially, but not completely,
applied by slightly pulling the parking brake
lever.
After the vehicle has become free, do not for-
get to release the parking brake.
l If it is necessary to drive in extremely muddy
conditions, the use of tyre chains is recom-
mended. Because the extent of muddy condi-
tions is difficult to judge and the vehicle
could become bogged down very deeply, op-
eration should be at a low speed. If possible,
get out of the vehicle and check the condi-
tions ahead before proceeding.
l Driving over roads in coastal areas or roads
on which anti-skid preparations have been
spread can cause rust on the vehicle; wash
the vehicle thoroughly as soon as possible af-
ter such use.
Climbing sharp grades
Set the transfer shift lever to “4L” position (easy se-
lect 4WD), “4LLc” position (super select 4WD) to
maximize the engine torque.WARNINGl Go straight up. Do not try to traverse
across a steep slope.
l If you begin to lose traction, ease off the
accelerator pedal and gently turn the
steering wheel alternatively left and right
to regain adequate traction again.
NOTE
l Choose as smooth a slope as possible with
few stones or other obstacles.
l Before attempting to drive up the slope, walk
up it to confirm that the vehicle can handle
the grade.
Descending sharp grades
Set the transfer shift lever to “4L” position (easy se-
lect 4WD), “4LLc” position (super select 4WD),
use the engine brake (downshifting) and descend
slowly.
WARNINGl Avoid snaking down a sharp grade. De-
scend the grade as straight as possible.
NOTE
l When descending a sharp grade, if the brakes
are applied suddenly because of an obstacle
encountered, control of the vehicle could be
lost. Before descending the slope, walk down
it and confirm the path.
l Before descending a grade, it is necessary to
choose the appropriate gear. Avoid changing
gears or depressing the clutch while descend-
ing the grade.
l MITSUBISHI
MOTORS is not responsible
to the operator for any damage or injury
caused or liability incurred by improper and
negligent operation of a vehicle. All techni-
ques of vehicle operation described herein de-
pend on the skill and experience of the opera-
tor and other participating parties and any de-
viation from the recommended operation in-
structions above is at their own risk.
Turning sharp corners
When turning a sharp corner in “4H” or “4L” posi-
tion (easy select 4WD), “4HLc” or “4LLc” posi-
tion (super select 4WD) at low speed, a slight dif-
ference in steering may be experienced similar to
as if the brakes were applied. This is called tight cor-
ner braking and results from each of the 4 tyres be-
ing at a different distance from the corner.
The phenomenon is peculiar to 4-wheel drive vehi-
cles. If this occurs, either straighten the steering
wheel, or change to rear-wheel drive.
Starting and driving
4-39
4
Page 166 of 330

Crossing a stream
4-wheel drive vehicles are not necessarily water-
proof. If the electrical circuits become wet, further
operation of the vehicle will be impossible; there-
fore, avoid crossing streams unless absolutely nec-
essary. If crossing a stream is unavoidable, use the
following procedure: 1.Check depths of a stream and geographical
features before attempting to cross a stream
and ford the stream where the water is as shal-
low as practicable.
2. Set the transfer shift lever to “4L” position
(easy select 4WD), “4LLc” position (super se-
lect 4WD).
3. Drive slowly at a speed of approximately
5 km/h (3 mph) to avoid splashing too much
water.CAUTIONl Never cross a stream where the water is
deep.
Do not change gears while crossing the
stream.
Frequent crossing of streams can adverse-
ly affect the life span of the vehicle; we rec-
ommend you to take the necessary meas-
ures to prepare, inspect, and repair the ve-
hicle.
After crossing a stream, apply the brakes to be sure
they are functioning properly. If the brakes are wet
and not functioning properly, dry them out by driv-
ing slowly while lightly depressing the brake pedal.
Inspect each part of the vehicle carefully.
Inspection and maintenance
following rough road operation E00606700048
After operating the vehicle in rough road condi-
tions, be sure to perform the following inspection
and maintenance procedures:
l Check that the vehicle has not been damaged
by rocks, gravel, etc.
l Carefully wash the vehicle with water.
After washing, drive the vehicle slowly
while lightly depressing the brake pedal in or-
der to dry out the brakes. If the brakes still
do not function properly, we recommend you
to have the brakes checked as soon as possible.
l Remove the insects, dried grass, etc. clog-
ging the radiator core.
l After crossing a stream, be sure to have the
following items inspected at a MITSUBISHI
MOTORS Authorized Service Point and take
the necessary measures. •Check the brake system and, if necessary,
have it serviced.
• Check the engine, transmission, transfer,
and differential oil or grease level and tur-
bidity. If the oil or grease is milky, it indi-
cates water contamination. Replace it
with new oil or grease.
• Grease the propeller shaft.
• Check the inside of the vehicle. If ingress
of water is found, dry the carpet etc.
• Inspect the headlamps. If the headlamp
bulb is flooded with water, we recom-
mend you to have it drained.Cautions on handling of 4-wheel
drive vehicles E00606800368
Tyres and wheels
Since the driving torque can be applied to the 4
wheels, the performance of the vehicle when oper-
ating in 4-wheel drive is greatly affected by the con-
dition of the tyres.
Pay close attention to the tyres.
l Install specified tyres on all wheels. Refer to
“Tyres and wheels” on page 9-17.
l Be sure to fit all 4 tyres and wheels of the
same size and type.
When replacement of any of the tyres or
wheels is necessary, replace all of them.
l All tyres should be rotated whenever the
wear difference between the front and rear
tyres is recognizable.
Good vehicle performance cannot be expected if
there is a difference in wear between tyres. Refer to
“Tyre rotation” on page 8-13.
l Check the tyre inflation pressure regularly.
Starting and driving
4-40
4
Page 168 of 330

Limited-slip differential*E00606900037
A limited-slip differential is applied for the rear
wheel differential only. The features of this limited-
slip differential are described below:
Just as with a conventional differential, the wheel
on one side is allowed to turn at a different speed
from the wheel on the other side when the vehicle
is cornering. The difference between the limited-
slip differential and a conventional differential is
that if the wheel on one side of the vehicle loses trac-
tion, a greater amount of torque is applied to the
wheel on the other side to improve traction.
NOTE l Even if there is a difference in the amount of
traction the wheels can get, if both of them
are spinning, the limited-slip differential will
not be effective.CAUTIONl Never start the engine while one of the
rear wheels is jacked up and the other in
contact with the ground; doing so may
cause the vehicle to jump forward.
l When attempting to extract the vehicle
from snow, mud, etc., and the engine is
run continuously at high speed, the limi-
ted-slip differential will be adversely af-
fected.Braking E00607001494
All the parts of the brake system are critical to safe-
ty. We recommend you to have the vehicle
checked at regular intervals according to the serv-
ice booklet.CAUTIONl Avoid driving habits that cause heavy
braking and never “ride” the brakes by
resting your foot on the brake pedal
while driving.
It causes brake overheating and fade.
Brake system
The service brake is divided into two brake cir-
cuits. And your vehicle is equipped with power
brakes. If one brake circuit fails, the other is availa-
ble to stop the vehicle. If you should lose the pow-
er assist for some reason, the brakes will still work.
In these situations, even if the brake pedal moves
down to the very end of its possible stroke or re-
sists being depressed, keep depressing the brake ped-
al down harder and further than usual; stop driving
as soon as possible and have the brake system re-
paired.
WARNINGl Do not turn off the engine while your ve-
hicle is in motion. If you turn off the en-
gine while driving, the power assistance
for the braking system will stop working
and your brakes will not work effectively.WARNINGl If the power assist is lost or if either
brake hydraulic system stops working
properly, have your vehicle checked im-
mediately.
Warning lamp
The brake warning lamp illuminates to indicate a
fault in the braking system. Refer to “Brake warn-
ing lamp” on page 3-08.
When brakes are wet
Check the brake system while driving at a low
speed immediately after starting, especially when
the brakes are wet, to confirm they work normally.
A film of water can be formed on the brake discs
or brake drums and prevent normal braking after
driving in heavy rain or through large puddles, or
after the vehicle is washed. If this occurs, dry the
brakes out by driving slowly while lightly depress-
ing the brake pedal.
When driving downhill
It is important to take advantage of the engine brak-
ing by shifting to a lower shift position while driv-
ing on steep downhill roads in order to prevent the
brakes from overheating.
Starting and driving
4-42
4
Page 247 of 330

5.Remove the hanger disc (G) from the spare
wheel.
To install
1.Install the hanger disc (A) in the wheel disc
hole.
2. Turn the wheel nut wrench (B) clockwise to
wind up the chain.
NOTE
l Confirm that the hanger disc is securely fit-
ted in the wheel disc hole when the wheel is
just lifted off the ground.
3. After winding up the spare wheel sufficient-
ly, make sure it is not loose (the tightening
torque should be approximately 40 Nm) then
withdraw the jack handle, taking care not to
turn it in the reverse direction.
CAUTIONl The spare wheel should always be secure-
ly in position.
If a flat tyre is changed, put the flat tyre
in the spare wheel mounting position
with the wheel outer surface upward, and
use the wheel nut wrench to secure it firm-
ly.How to change a tyre E00801202653
Before changing a tyre, first stop your vehicle in a
safe, flat location. 1. Park the vehicle on level and stable ground.
2. Set the parking brake firmly.
3. On vehicles with manual transmission, turn
the ignition key to the “LOCK” position,
move the gearshift lever to the “R” (Reverse)
position.
On vehicles with automatic transmission,
move the selector lever to the “P” (PARK) po-
sition, turn the ignition key to the “LOCK”
position.
4. Turn on the hazard warning flashers and set
up a warning triangle, flashing signal lamp,
etc., at an adequate distance from the vehi-
cle, and have all your passengers leave the ve-
hicle.
5. To prevent the vehicle from rolling when it
is raised on the jack, place chocks or blocks
(A) at the tyre that is diagonally opposite
from the tyre (B) you are changing.
For emergencies
6-17
6
Page 249 of 330

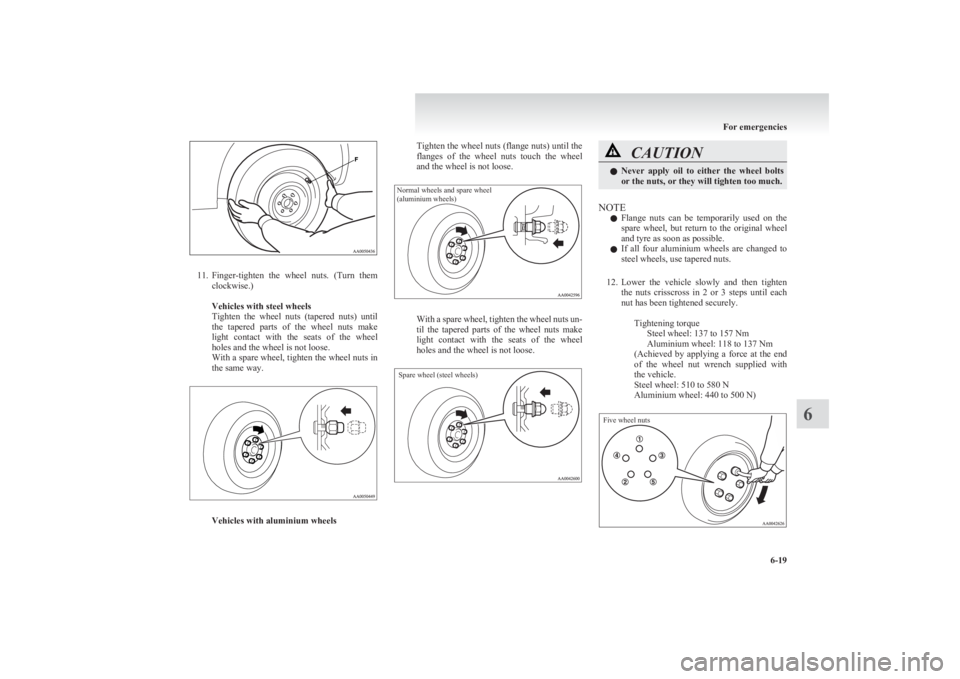
11.Finger-tighten the wheel nuts. (Turn them
clockwise.)
Vehicles with steel wheels
Tighten the wheel nuts (tapered nuts) until
the tapered parts of the wheel nuts make
light contact with the seats of the wheel
holes and the wheel is not loose.
With a spare wheel, tighten the wheel nuts in
the same way.
Vehicles with aluminium wheels
Tighten the wheel nuts (flange nuts) until the
flanges of the wheel nuts touch the wheel
and the wheel is not loose.Normal wheels and spare wheel
(aluminium wheels)
With a spare wheel, tighten the wheel nuts un-
til the tapered parts of the wheel nuts make
light contact with the seats of the wheel
holes and the wheel is not loose.
Spare wheel (steel wheels)
CAUTIONl Never apply oil to either the wheel bolts
or the nuts, or they will tighten too much.
NOTE
l Flange nuts can be temporarily used on the
spare wheel, but return to the original wheel
and tyre as soon as possible.
l If all four aluminium wheels are changed to
steel wheels, use tapered nuts.
12. Lower the vehicle slowly and then tighten
the nuts crisscross in 2 or 3 steps until each
nut has been tightened securely.
Tightening torqueSteel wheel: 137 to 157 Nm
Aluminium wheel: 118 to 137 Nm
( Achieved by applying a force at the end
of the wheel nut wrench supplied with
the vehicle.
Steel wheel: 510 to 580 N
Aluminium wheel: 440 to 500 N)
Five wheel nuts
For emergencies
6-19
6