2011 MITSUBISHI L200 light
[x] Cancel search: lightPage 6 of 330

Instruments and Controls (Single cab)E001001045771. Hazard warning flasher switch p. 3-34
2. Heater/Manual air conditioning* p. 5-03
3. Rear window demister switch p. 3-40
4. Utility box p. 5-43
5. Ventilators p. 5-02
6. Supplemental restraint system (SRS) - airbag (for front passen- ger’s seat) p. 2-27
7. Front passenger’s airbag OFF indication lamp p. 2-31
8. Glove box p. 5-42 Front passenger’s airbag ON-OFF switch p. 2-30
9. Cigarette lighter p. 5-37
10. Gearshift lever p. 4-14
11. Transfer shift lever (4WD only) p. 4-20
12. Cup holder* p. 5-44
13. Parking brake lever Type 1* p. 4-07
14. Parking brake lever Type 2* p. 4-07
15. Ashtray p. 5-36
Overview12
3
4
5
6
78
9
10
11
12
13
14 15
LHD
Page 7 of 330

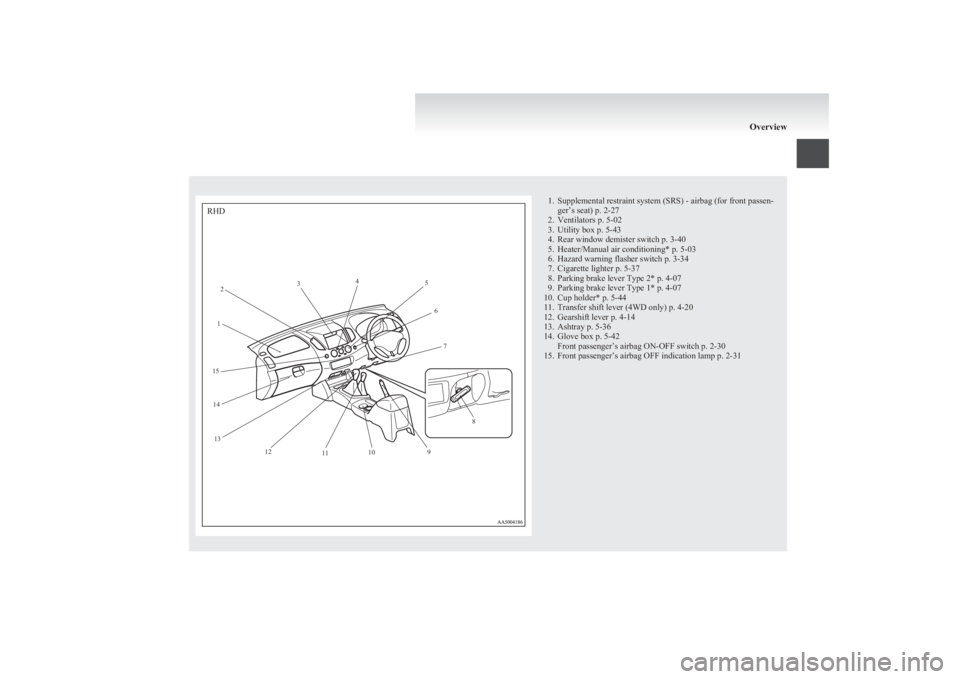
1. Supplemental restraint system (SRS) - airbag (for front passen-ger’s seat) p. 2-27
2. Ventilators p. 5-02
3. Utility box p. 5-43
4. Rear window demister switch p. 3-40
5. Heater/Manual air conditioning* p. 5-03
6. Hazard warning flasher switch p. 3-34
7. Cigarette lighter p. 5-37
8. Parking brake lever Type 2* p. 4-07
9. Parking brake lever Type 1* p. 4-07
10. Cup holder* p. 5-44
11. Transfer shift lever (4WD only) p. 4-20
12. Gearshift lever p. 4-14
13. Ashtray p. 5-36
14. Glove box p. 5-42 Front passenger’s airbag ON-OFF switch p. 2-30
15. Front passenger’s airbag OFF indication lamp p. 2-31
Overview12
3
4
5
6
7
8
9
10
11
12
13
14
15
RHD
Page 8 of 330

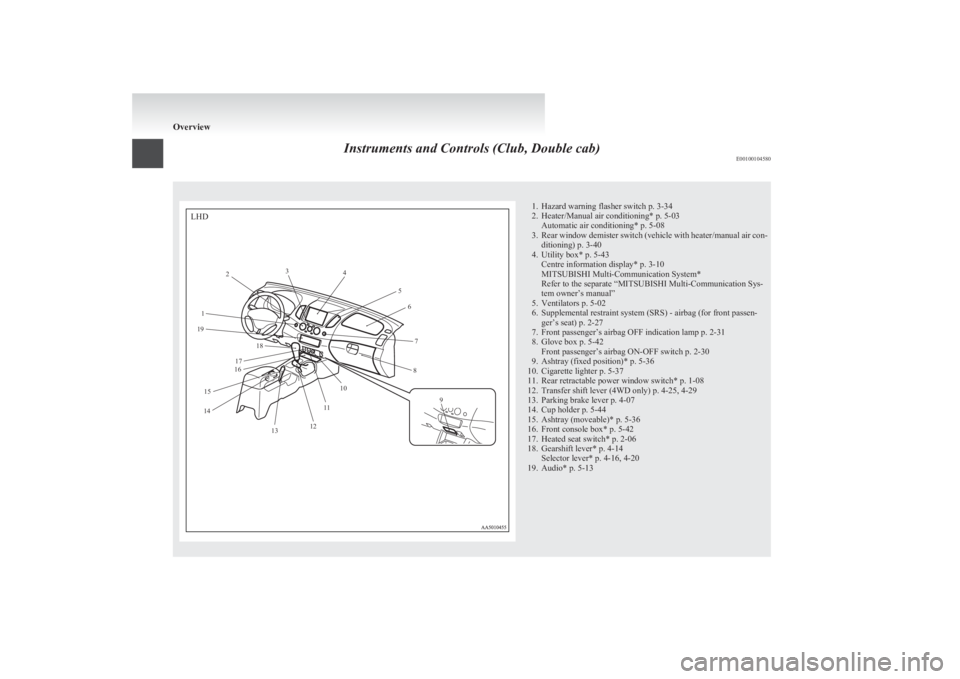
Instruments and Controls (Club, Double cab)E001001045801. Hazard warning flasher switch p. 3-34
2. Heater/Manual air conditioning* p. 5-03 Automatic air conditioning* p. 5-08
3. Rear window demister switch (vehicle with heater/manual air con-
ditioning) p. 3-40
4. Utility box* p. 5-43 Centre information display* p. 3-10
MITSUBISHI Multi-Communication System*
Refer to the separate “MITSUBISHI Multi-Communication Sys-
tem owner’s manual”
5. Ventilators p. 5-02
6. Supplemental restraint system (SRS) - airbag (for front passen- ger’s seat) p. 2-27
7. Front passenger’s airbag OFF indication lamp p. 2-31
8. Glove box p. 5-42 Front passenger’s airbag ON-OFF switch p. 2-30
9. Ashtray (fixed position)* p. 5-36
10. Cigarette lighter p. 5-37
11. Rear retractable power window switch* p. 1-08
12. Transfer shift lever (4WD only) p. 4-25, 4-29
13. Parking brake lever p. 4-07
14. Cup holder p. 5-44
15. Ashtray (moveable)* p. 5-36
16. Front console box* p. 5-42
17. Heated seat switch* p. 2-06
18. Gearshift lever* p. 4-14 Selector lever* p. 4-16, 4-20
19. Audio* p. 5-13
OverviewLHD1 2
3
4
56
7
8
9
10
11
12
13
14 15 16
17 18
19
Page 9 of 330

1. Supplemental restraint system (SRS) - airbag (for front passen-ger’s seat) p. 2-27
2. Ventilators p. 5-02
3. Utility box* p. 5-43 Centre information display* p. 3-10
MITSUBISHI Multi-Communication System*
Refer to the separate “MITSUBISHI Multi-Communication Sys-
tem owner’s manual”
4. Rear window demister switch (vehicle with heater/manual air con-
ditioning) p. 3-40
5. Heater/Manual air conditioning* p. 5-03 Automatic air conditioning* p. 5-08
6. Hazard warning flasher switch p. 3-34
7. Audio* p. 5-13
8. Transfer shift lever (4WD only) p. 4-25, 4-29
9. Heated seat switch* p. 2-06
10. Parking brake lever p. 4-07
11. Cup holder p. 5-44
12. Ashtray (moveable)* p. 5-36
13. Gearshift lever* p. 4-14 Selector lever* p. 4-16, 4-20
14. Front console box* p. 5-42
15. Cigarette lighter p. 5-37
16. Rear retractable power window switch* p. 1-08
17. Glove box p. 5-42 Front passenger’s airbag ON-OFF switch p. 2-30
18. Front passenger’s airbag OFF indication lamp p. 2-31
OverviewRHD12
3
4
5
6
7
8 9 10
11
12
13
14
15 16
17
18
Page 32 of 330

KeysE00300101608
Two keys are provided. The key fits all locks.
Keep one in a safe place as a spare key.
Type 1Type 2
WARNINGl When taking a key on flights, do not
press any switches on the key while on
the plane. If a switch is pressed on the
plane, the key emits electromagnetic
waves, which could adversely affect the
plane’s flight operation.
When carrying a key in a bag, be careful
that no switches on the key can be easily
pressed by mistake.
NOTE
l The key number is stamped on the tag as in-
dicated in the illustration.
Make a record of the key number and store
the key and key number tag in separate pla-
ces, so that you can order a key in the event
the original keys are lost.
l The key is a precision electronic device with
a built-in signal transmitter. Please observe
the following in order to prevent a malfunc-
tion. •Do not leave in a place that is exposed to
direct sunlight, for example on the dash-
board.
• Do not disassemble or modify.
• Do not excessively bend the key or sub-
ject it to strong impacts.
• Do not expose to water.
• Keep away from magnetic key holders.
• Keep away from audio systems, personal
computers, TVs, and other equipment
that generates a magnetic field.
• Do not clean with ultrasonic cleaners or
similar equipment.
• Do not leave the key where it may be ex-
posed to high temperature or high humid-
ity.
l The engine is designed so that it will not
start if the ID code registered in the immobil-
izer computer and the key’s ID code do not
match. Refer to the “Electronic immobilizer”
section for details and key usage.
Locking and unlocking
1-02
1
Page 39 of 330

Driver’s switch (RHD)
1- Driver’s door window
2- Front passenger’s door window
3- Rear left door window (Double cab)
4- Rear right door window (Double cab)
5- Lock switch
6- Rear retractable power window (Double cab)*
The switches can be used to operate all door win-
dows. A window can be opened or closed by oper-
ating the corresponding switch.
Press the switch down to open the window, and
pull up the switch to close it.
If the switch is fully pressed down/pulled up, the
door window automatically opens/closes complete-
ly.
If you want to stop the window movement, operate
the switch lightly in the reverse direction.
NOTE l Repeated operation with the engine stopped
will run down the battery. Operate the win-
dow switches only while the engine is running.
l The rear door windows only open halfway.
Rear retractable power window switch (Double
cab)*
The rear retractable power window switch can be
used to operate the rear retractable power window.
The rear retractable power window stops in three
positions: the fully closed position, a ventilation po-
sition, and the fully open position.
1- Close
2- Open
NOTE
l It is not possible to stop the rear retractable
power window in any position other than the
fully closed position, ventilation position,
and fully open position.
If the rear retractable power window is
opened while the rear window demister is op-
erating, the rear window demister automati-
cally stops. When the rear retractable power
window is subsequently fully closed, the be-
haviour of the rear window demister depends
upon the elapsed time of the rear window de-
mister’s timer. (The timer runs for about 20
minutes in total.) •If the rear window demister’s timer is run-
ning, the rear window demister restarts
for the remaining time.
• If the rear window demister’s timer has
finished, the rear window demister does
not operate. If you wish to activate the
rear window demister, press the rear win-
dow demister switch again.
Locking and unlocking
1-09
1
Page 40 of 330

A- Fully closed positionIn this position, the rear retractable power win-
dow is fully closed.
To place the rear retractable power window
in the fully closed position, firmly press the
rear retractable power window switch (1).
B- Ventilation position In this position, the rear retractable power win-
dow is slightly open.
To place the rear retractable power window
in the ventilation position, lightly press the
rear retractable power window switch (1) or
(2).WARNINGl In each of the following circumstances,
the operating direction of the rear retract-
able power window switch and the operat-
ing direction of the rear retractable pow-
er window do not match each other. Exer-
cise caution to avoid the risk of accidental-
ly trapping a hand or your head when op-
erating the rear retractable power win-
dow. •Even if the rear retractable power win-
dow switch (1) is lightly pressed while
the rear retractable power window is
moving from the fully closed position
towards the ventilation position, the
rear retractable power window does
not return to the fully closed position.WARNING• Even if the rear retractable power win-
dow switch (2) is lightly pressed while
the rear retractable power window is
moving from the fully open position to-
wards the ventilation position, the
rear retractable power window does
not return to the fully open position.
C- Fully open position In this position, the rear retractable power win-
dow is fully open.
To place the rear retractable power window
in the fully open position, firmly press the
rear retractable power window switch (2).
WARNINGl If the rear retractable power window
switch (1) is lightly pressed while the rear
retractable power window is moving
from the fully closed position towards the
fully open position, the rear retractable
power window will come up to the ventila-
tion position. To avoid the risk of acciden-
tally trapping a hand or your head, do
not operate the switch while the rear re-
tractable power window is moving.
NOTE
l The rear retractable power window only
opens halfway.
Lock switch E00303100396
When this switch is operated, the passenger’s
switches and the rear retractable power window
switch cannot be used to open or close the windows.
To unlock, press it once again.
1- Lock
2- Unlock
NOTE l The driver’s switch can open or close any
door windows.
WARNINGl A child may tamper with the switch at
the risk of its hands or head being trap-
ped in the window. When driving with a
child in the vehicle, please press the win-
dow lock switch to disable the passen-
ger’s switches and rear retractable power
window switch.
Locking and unlocking
1-10
1
Page 50 of 330

Power type
Adjust the seat by operating the switch as indicated
by the arrows.
1- Adjustment forward
2- Adjustment backward
NOTE l To prevent the battery from running down,
operate the power type seat with the engine
running.
To recline the seatback E00400600593
Manual type
In order to recline the seatback, lean forward slight-
ly, pull the seatback lock lever up, and then lean
backward to the desired position and release the lev-
er. The seatback will lock in that position.CAUTIONl The reclining mechanism of the seatback
is spring loaded, causing it to return to
the vertical position when the lock lever
is operated. When operating the lever, sit
close to the seatback or hold it with your
hand to control its return motion.Power type
Adjust the seatback angle by operating the switch
as indicated by the arrows.
1- To move to forward direction
2- To recline rearward
NOTE l To prevent the battery from running down,
operate the power type seat with the engine
running.
Seat and seat belts
2-04
2