2011 MITSUBISHI L200 radio
[x] Cancel search: radioPage 28 of 330

Installation of accessoriesE00200300875
We recommend you to consult your MITSUBISHI
MOTORS Authorized Service Point.
l The installation of accessories, optional
parts, should only be carried out within the
limits prescribed by law in your country, and
in accordance with the guidelines fitting in-
structions and warnings contained within the
documents accompanying the parts or acces-
sories.
l Improper installation of electrical compo-
nents may cause an electrical fire if incorrect-
ly fitted. Please refer to the Modification/al-
teration to the electrical or fuel systems sec-
tion within this owner’s manual.
l Using a cellular phone or radio set inside the
vehicle without an external antenna may
cause electrical system interference, which
could lead to unsafe vehicle operation.
l Tyres and wheels which do not meet specifi-
cations must not be used.
Refer to the “Specifications” section for in-
formation regarding wheel and tyre sizes.
l When fitting accessories, ensure that maxi-
mum gross vehicle weight and maximum
axle weight are not exceeded.
Important points!
Due to large number of accessory and replacement
parts of different manufactures available in the mar-
ket, it is not possible, not only for MITSUBISHI
MOTORS , but also for a MITSUBISHI MOTORS
Authorized Service Point, to check whether the at-
tachment or installation of such parts affects the
overall safety of your MITSUBISHI-vehicle.
Even when such parts are officially authorized, for
example by a “general operators permit” (an ap-
praisal for the part) or through the execution of the
part in an officially approved manner of construc-
tion, or when a single operation permit following
the attachment or installation of such parts, it can-
not be deduced from that alone, that the driving safe-
ty of your vehicle has not been affected.
Consider also that there basically exists no liability
on the part of the appraiser or the official. Only in
the case of parts ( MITSUBISHI MOTORS original
replacement or exchange parts as well as
MITSUBISHI MOTORS genuine accessories) that
are recommended and released by a MITSUBISHI
MOTORS Authorized Service Point and that are at-
tached or installed by a MITSUBISHI MOTORS
Authorized Service Point can you assume, that op-
timal safety has been provided. The same also per-
tains to modifications of MITSUBISHI vehicle
with respect to the production specifications. For
your own safety, in such cases, you should only un-
dertake modifications according to the recommen-
dations of a MITSUBISHI MOTORS Authorized
Service Point.Modification/alterations to the
electrical or fuel systems E00200400238
MITSUBISHI MOTORS CORPORATION has al-
ways manufactured safe, high quality vehicles. In
order to maintain this safety and quality, it is impor-
tant that any accessory that is to be fitted, or any
modifications carried out which involve the electri-
cal or fuel systems, should be carried out in accord-
ance with MITSUBISHI guidelines.CAUTIONl If the wiring interferes with any part of
the vehicle bodywork or improper instal-
lation methods are used, i.e. protective
fuses not installed, etc.), electronic devi-
ces may be adversely affected, possibly re-
sulting in an electrical fire or other fail-
ures that may cause an accident.
General information
04
Page 34 of 330

Keyless entry system*E00300301860
Press the remote control switch, and all doors will
be locked or unlocked as desired.
1- LOCK switch
2- UNLOCK switch
3- Indication lamp
To lock
Press the LOCK switch (1), and all doors will be
locked. When they are locked with the room lamp
at the [•] position, the room lamp and the turn-sig-
nal lamps blink once.
To unlock
Press the UNLOCK switch (2), and all doors will
be unlocked. When unlocked with the room lamp
at the [•] position, the room lamp will be turned on
for approximately 15 seconds and the turn-signal
lamps will blink twice.
NOTE l The indication lamp (3) comes on each time
a switch is pressed.
l If the UNLOCK switch (2) is pressed and
any of the doors is not opened within approx-
imately 30 seconds, relocking will automati-
cally occur.
l It is possible to modify functions as follows:
For further information, please contact your
MITSUBISHI MOTORS Authorized Service
Point. •The time from pressing the UNLOCK
switch (2) to the moment of automatic
locking can be changed.
• The confirmation function (flashing of
the turn-signal lamps) can be set to oper-
ate only when the doors are locked or on-
ly when the doors are unlocked.
• The confirmation function (this indicates
locking or unlocking of the doors with
the blink of the turn-signal lamps) can be
deactivated.
• The number of times the turn-signal
lamps are flashed by the confirmation
function can be changed.
l The keyless entry system does not operate in
the following conditions: • The key is left in the key cylinder.
• The door is open.
l The remote control switch will operate with-
in approximately 4 m from the vehicle. How-
ever, the operating range of the remote con-
trol switch may change if the vehicle is loca-
ted near a power station, or radio/TV broad-
casting station.
l If either of the following problems occurs,
the battery may be exhausted. •The remote control switch is operated at
the correct distance from the vehicle, but
the doors are not locked/unlocked in re-
sponse.• The indication lamp (3) is dim or does
not come on.
For further information, please contact
your MITSUBISHI MOTORS Author-
ized Service Point.
If you replace the battery yourself, refer
to “Procedure for replacing the remote
control switch battery” on page 1-04.
l If your remote control switch is lost or dam-
aged, please contact your MITSUBISHI
MOTORS Authorized Service Point for a re-
placement remote control switch.
l If you wish to add a remote control switch,
we recommend you to contact a
MITSUBISHI MOTORS Authorized Service
Point.
A maximum of 4 remote control switches are
available for your vehicle.Procedure for replacing the remote
control switch battery E00309500015
1.Remove the screw (A) from the remote con-
trol switch.
Locking and unlocking
1-04
1
Page 98 of 330

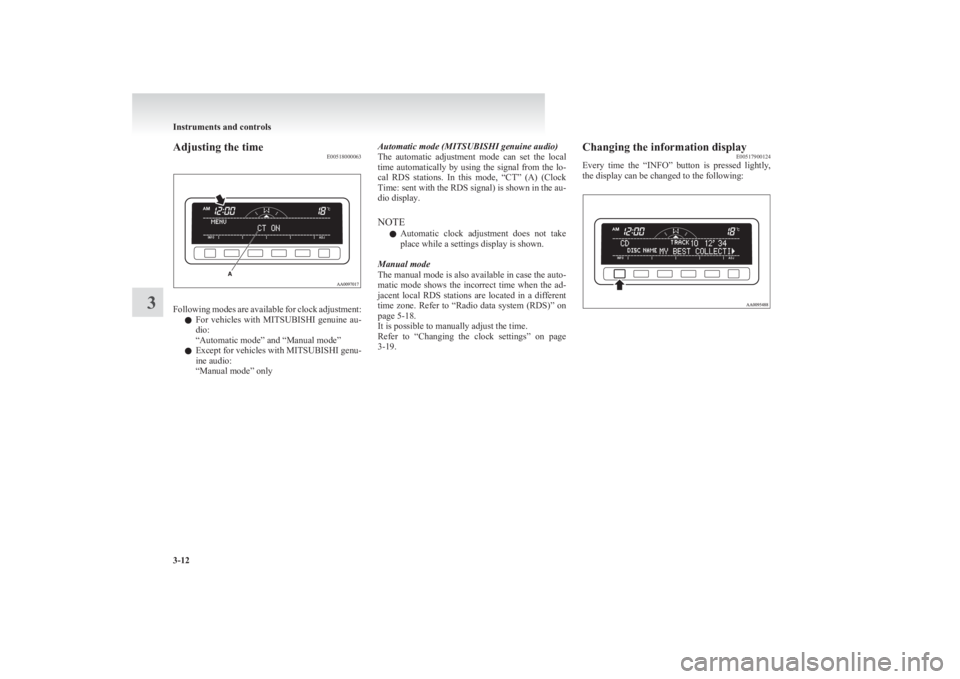
Adjusting the timeE00518000063
Following modes are available for clock adjustment:
l For vehicles with
MITSUBISHI genuine au-
dio:
“Automatic mode” and “Manual mode”
l Except for vehicles with
MITSUBISHI genu-
ine audio:
“Manual mode” only
Automatic mode (MITSUBISHI genuine audio)
The automatic adjustment mode can set the local
time automatically by using the signal from the lo-
cal RDS stations. In this mode, “CT” (A) (Clock
Time: sent with the RDS signal) is shown in the au-
dio display.
NOTE l Automatic clock adjustment does not take
place while a settings display is shown.
Manual mode
The manual mode is also available in case the auto-
matic mode shows the incorrect time when the ad-
jacent local RDS stations are located in a different
time zone. Refer to “Radio data system (RDS)” on
page 5-18.
It is possible to manually adjust the time.
Refer to “Changing the clock settings” on page
3-19.Changing the information display E00517900124
Every time the “INFO” button is pressed lightly,
the display can be changed to the following:
Instruments and controls
3-12
3
Page 137 of 330

Push the switch to fold the mirrors inward, and
push the switch again to return them to extended po-
sition.
NOTE
l It is also possible to fold and return the mir-
rors by hand.
l When freezing has occurred and mirrors fail
to operate as intended, please refrain from re-
peated pushing of the retractor switch as this
action can result in burn-out of the mirror mo-
tor circuits.
Heated mirror* E00601200253
When the rear window demister switch (C) is press-
ed, the outside rear-view mirrors are demisted or de-
frosted. Current will flow through the heater ele-
ment inside the mirrors, thus clearing away frost or
condensation.
The indication lamp (D) will illuminate while the
demister is on. The heater will be turned off auto-
matically in about 20 minutes.Type 1Type 2
Ignition switch E00601401874
LOCK
The engine is stopped and the steering wheel
locked. The key can only be inserted and removed
when the switch in this position.
ACC
The engine is stopped, but the electrical devices
such as the radio and cigarette lighter can be operat-
ed.
ON
The engine is running, and all the vehicle’s electri-
cal devices can be operated.
START
The starter motor operates. After the engine has star-
ted, release the key and it will automatically return
to the “ON” position.
Starting and driving
4-11
4
Page 183 of 330

Ventilators.................................................................................... 5-02
Heater/Manual air conditioning* ..................................................5-03
Automatic air conditioning* ......................................................... 5-08
Important operation tips for the air conditioning..........................5-12
Air purifier* .................................................................................. 5-12
LW/MW/FM electronic tuning radio with CD player* ................5-13
To use the external audio input function* ....................................5-27
Steering wheel remote control switch* ........................................5-28
Error codes .................................................................................... 5-30
Audio system anti-theft feature .................................................... 5-32
Handling of compact discs ........................................................... 5-32
Antenna ......................................................................................... 5-34
Sun visors ..................................................................................... 5-35
Vanity mirror* .............................................................................. 5-36
Ashtray..........................................................................................5-36
Cigarette lighter ............................................................................ 5-37
Accessory socket* ........................................................................ 5-38
Digital clock* ............................................................................... 5-39
Interior lamps ................................................................................ 5-39
Storage spaces...............................................................................5-41
Cup holder* .................................................................................. 5-44
Bottle holder ................................................................................. 5-45
Convenient hook ........................................................................... 5-46
Coat hook* .................................................................................... 5-46
First-aid kit and warning triangle securing bands* ......................5-46For pleasant driving5
Page 195 of 330

LW/MW/FM electronic tuning radio with CD player*E00708501745
The audio system can be used when the ignition switch is in the “ON” or “ACC” position.A- Display windowB- Audio system
NOTE
l To listen to the audio system while the engine is stopped, turn the ignition key to the “ACC” position.
l If a cellular phone is used inside the vehicle, it may create noise from the audio equipment. This does not mean that anything is wrong with your audio
equipment. In such a case, use the cellular phone at a place as far away as possible from the audio equipment.
l If foreign objects or water get into the audio equipment, or if smoke or a strange odour comes from it, immediately turn off the audio system. We recom-
mend your to have it checked. Never try to repair it by yourself. Avoid continuous usage without inspection by a qualified person.
l The audio system’s control knob can be removed to deter thieves. For details, refer to “Audio system anti-theft feature” on page 5-32.
l The audio amplifier (if so equipped) is located under the front right seat.
Do not subject the amplifier to a strong impact.
It could damage the amplifier or malfunctioning could result.
For pleasant driving
5-13
5
Page 197 of 330

To adjust the volumeE00708700548
VOL (Volume control)
Turn the VOL knob (2) clockwise to increase the
volume; anticlockwise to decrease the volume. The
status will be displayed in the display (7).
NOTE l The volume control mode will shut off auto-
matically if either the radio or CD is selec-
ted, or if no adjustment is made within about
2 seconds.To adjust the tone E00708801070
Press the AUDIO button (5) to select BASS TRE-
BLE FADER BALANCE Audio adjust
mode off. The status will be displayed in the dis-
play (7).
BASS (Bass tone control)
Press the audio adjust button (6) either
or to select the desired bass tone quality.
TREBLE (Treble tone control)
Press the audio adjust button (6) either
or to select the desired treble tone quality.
FADER (Front/Rear balance control)
Press the audio adjust button (6) either
or to balance the volume of sound from the front and
the rear speakers.
BALANCE (Left/Right balance control)
Press the audio adjust button (6) either
or to balance the volume of sound from the left and
the right speakers.
NOTE
l Audio adjust mode will be cancelled when ra-
dio or CD operation is performed or no ad-
justment is performed for more than
7 seconds.
To enter audio tone settings into the memory E00733000079
It is possible to enter the audio adjustment condi-
tion (BASS, TREBLE, FADER, BALANCE) into
the memory. 1.Make the desired adjustments in the audio ad-
just mode.
Refer to “To adjust the tone” on page 5-15.
2. In the audio adjust mode, press and hold one
of the memory select buttons (3) [1-6]. The
display will show the button number
[SOUND1-SOUND6] for which the settings
were memorized.
3. In future, when you gently press the memory
select button in the audio adjust mode, the au-
dio adjustment condition memorized for that
button will take effect.To change the information display E00735100032
Press the DISP button (4) to change the informa-
tion display. The display switches in the following
sequence: Audio information → Average fuel con-
sumption → Driving range → Average speed →
Outside temperature → Altimeter → Barometer →
Calendar → Clock-only → Blank. For details, refer
to “Changing the information display” on page
3-12.
NOTE l Audio information is displayed when the au-
dio system is on.
For pleasant driving
5-15
5
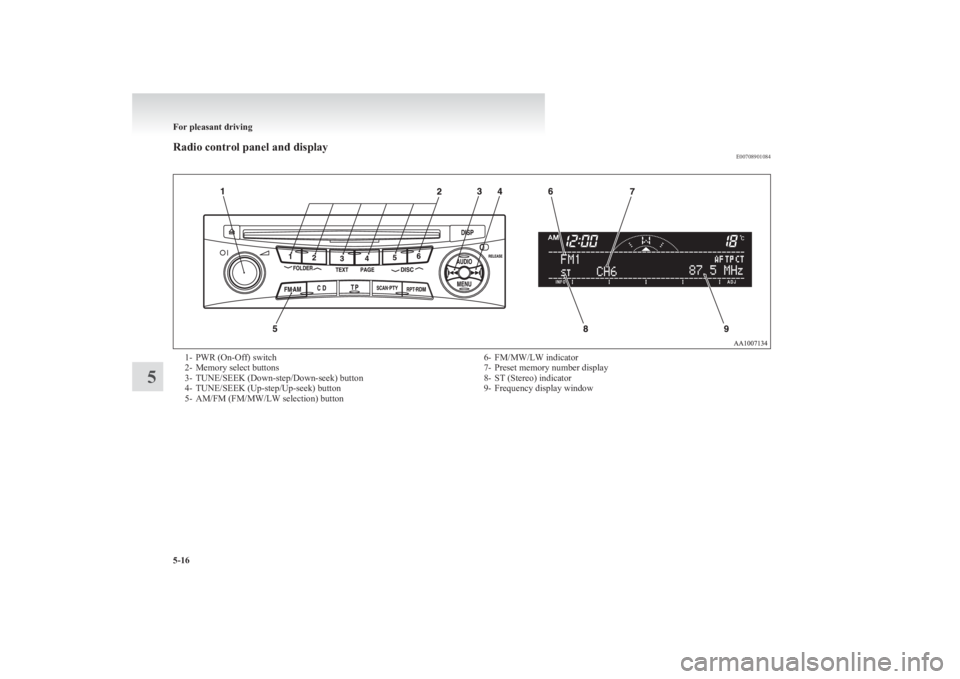
Page 198 of 330

Radio control panel and displayE007089010841- PWR (On-Off) switch
2- Memory select buttons
3- TUNE/SEEK (Down-step/Down-seek) button
4- TUNE/SEEK (Up-step/Up-seek) button
5- AM/FM (FM/MW/LW selection) button6- FM/MW/LW indicator
7- Preset memory number display
8- ST (Stereo) indicator
9- Frequency display window
For pleasant driving
5-16
5