Page 197 of 514

3-108 Features and controls
3
Setting and customization
N00533500055
It is possible to adjust/set/customize the specifications and dis-
plays of the items shown in the table below.
Condition
Item
Condition
Reference
page
DisplayDisplay brightness adjust-
ment*
1
P. 3 - 1 1 2
Turn off display
*
1
P. 3 - 1 1 4
Record maintenance
*
1, *3
P. 3 - 1 1 5
Display settings
*
1, *3
P. 3 - 1 1 8
Units
*
1, *3
P.3-120
Door open warning
*
1, *3
P.3-123
Rheostat synchronization
*
1, *3
P.3-125
Timer buzzer setting
*
1, *3
P.3-126
History
*
1, *3
P.3-127
Opening display setting
*
1, *3
P.3-128
Calendar Date setting
*
1, *3
P.3-130
CompassZone code setting
*
2, *3
P.3-131
Compass calibration
*
2, *3
P.3-133
Customi-
zationLights
*
1, *3
P.3-135
Wipers
*
1, *3
P.3-139
Keyless entry system &
power door lock system*
1, *3
P.3-142
Buzzers
*
1, *3
P.3-147
Number of keyless entry
registration*
1, *3
P.3-150
Defaults
*
1, *3
P.3-151
*
1Adjustment/setting/customization is possible with the igni-
tion key in the “ACC” or “ON” position.
*2Adjustment/setting is possible with the ignition key in the
“ON” position.
*3Setting/customization is possible when the vehicle speed is
no higher than 1mph (2 km/h).
Item
Condition
Reference
page
BK0121600US.book 108 ページ 2010年4月12日 月曜日 午前10時39分
Page 198 of 514
Features and controls
3-109
3
Basic operation
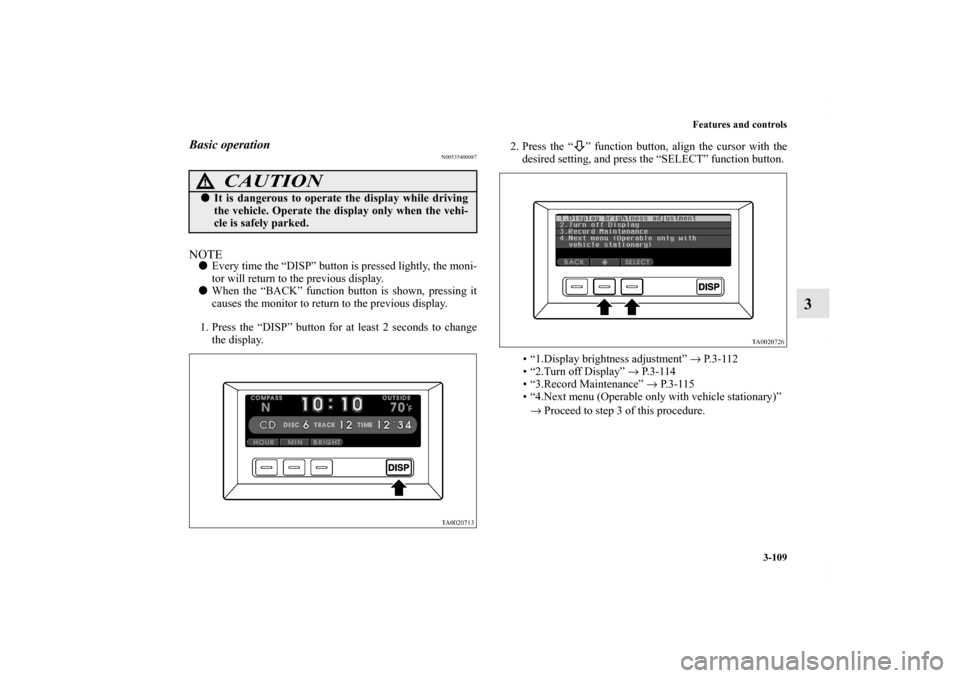
N00535400087
NOTE�Every time the “DISP” button is pressed lightly, the moni-
tor will return to the previous display.
�When the “BACK” function button is shown, pressing it
causes the monitor to return to the previous display.
1. Press the “DISP” button for at least 2 seconds to change
the display.2. Press the “ ” function button, align the cursor with the
desired setting, and press the “SELECT” function button.
• “1.Display brightness adjustment” → P. 3 - 1 1 2
• “2.Turn off Display” → P. 3 - 1 1 4
• “3.Record Maintenance” → P. 3 - 1 1 5
• “4.Next menu (Operable only with vehicle stationary)”
→ Proceed to step 3 of this procedure.
CAUTION
!�It is dangerous to operate the display while driving
the vehicle. Operate the display only when the vehi-
cle is safely parked.
BK0121600US.book 109 ページ 2010年4月12日 月曜日 午前10時39分
Page 201 of 514

3-112 Features and controls
3
7. Press the “ ” function button, align the cursor with the
desired setting, and press the “SELECT” function button.
• “Lights”
→ Refer to “Lights customization” on page 3-135
•“Wipers”
→ Refer to “Wipers customization” on page 3-139
• “Keyless entry system & power door lock system”
→ Refer to “Keyless entry system & power door lock
system customization” on page 3-142
• “Buzzers”
→ Refer to “Buzzers customization” on page 3-147
Display brightness adjustment
N00533800074
It is possible to adjust the display brightness that is seen when
the light switch is “OFF”.
When the light switch is in the “ ” or “ ” position, it is
possible to make fine adjustments after making adjustments
using the instrument panel light dimmer control.NOTE�When the light switch is in the “ ” or “ ” position,
pressing the “BRIGHT” function button causes the bright-
ness to change to that seen when the light switch is
“OFF”.
To return the brightness to the original level, press the
“BRIGHT” function button again.
BK0121600US.book 112 ページ 2010年4月12日 月曜日 午前10時39分
Page 214 of 514
Features and controls
3-125
3
2. Press the “ ” function button, align the cursor with the
function you wish to change, and press the “SELECT”
function button.
• “Rheostat synchronization” → P. 3 - 1 2 5
• “Timer buzzer setting” → P. 3 - 1 2 6
•“History” → P.3-127
• “Opening display setting” → P.3-128
Rheostat synchronization
N00502300028
It is possible to disable the function that adjusts the monitor
brightness in synchronization with the instrument panel light
dimmer control.
1. Press the “ ” function button, align the cursor with the
desired setting, and press the “SELECT” function button.
• ON: Display brightness synchronized with instrument
panel light dimmer control
• OFF: Display brightness not synchronized with instru-
ment panel light dimmer controlNOTE�The initial (default) setting is “ON”.
BK0121600US.book 125 ページ 2010年4月12日 月曜日 午前10時39分
Page 224 of 514
Features and controls
3-135
3
When compass calibration has been completed success-
fully, the tone will sound once and the monitor will return
to the “Compass setting” display.
If compass calibration is not successful, the monitor will
show “The setting failed.” then return to the “Compass
setting” display.
NOTE�Spend at least 30 seconds turning the vehicle through
360°.
�The 360 ° turn may be performed clockwise or counter-
clockwise.
�It is possible to perform compass calibration by driving in
a 360 ° loop around the neighborhood.
�If you press the “DISP” function button to change the dis-
play during compass calibration, the compass will not be
displayed correctly until compass calibration has been
completed.
Lights customization
N00534500065
1. Display “Lights” on the monitor in accordance with
“Basic operation” (see page 3-109), align the cursor with
it, and press the “SELECT” function button.
BK0121600US.book 135 ページ 2010年4月12日 月曜日 午前10時39分
Page 225 of 514
3-136 Features and controls
3
2. Press the “ ” function button, align the cursor with the
function you wish to change, and press the “SELECT”
function button.
• “Headlight auto-shutoff function” → P.3-136
• “Dome light shutoff time” → P. 3 - 1 3 7
• “Interior light auto-shutoff time” → P.3-138Headlight auto-shutoff function
N00535500105
It is possible to change the setting for the headlight auto-shut-
off function.1. Press the “ ” function button, align the cursor with the
desired setting, and press the “SELECT” function button.BK0121600US.book 136 ページ 2010年4月12日 月曜日 午前10時39分
Page 226 of 514
 setting is “A”.
2. The monitor will show “The setting is progressing” while
the setting change is in progress.
When the setting change")
Features and controls
3-137
3
NOTE�The initial (default) setting is “A”.
2. The monitor will show “The setting is progressing” while
the setting change is in progress.
When the setting change has been completed successfully,
the tone will sound once and the monitor will return to the
“Headlight auto-shutoff function” display.
If the setting change is not successful, the monitor will
show “The setting failed.” then return to the “Headlight
auto-shutoff function” display.
Dome light shutoff time
N00535600119
It is possible to change the period over which the interior lights
(dome light, reading lights, rear personal lights, luggage room
light and door lights) gradually dims when the doors and the
liftgate have been closed with the dome light switch in the
“DOOR” position.
1. Press the “ ” function button, align the cursor with the
desired setting, and press the “SELECT” function button.
• A:0 second (The interior light goes out immediately
without being dimmed.)
• B:15 seconds
• C:30 seconds
• D:60 seconds
• E:120 seconds
• F:180 seconds
A: When the ignition key is turned from the “ON” position to the
“LOCK” or “ACC” position with the light switch in the
“ ” or “ ” position, the exterior lights automatically go
off 3 minutes later or if the driver’s door is opened.
B: When the ignition key has been turned from the “ON” posi-
tion to the “LOCK” or “ACC” position with the light switch
in the “ ” or “ ” position, the exterior lights automati-
cally go off 3 minutes later or if the driver’s door is opened.
When the light switch has been placed in the “ ” or “ ”
position with the ignition key in the “LOCK” or “ACC” posi-
tion, the exterior lights automatically go off 3 minutes later.
C:
With the light switch in the “ ” or “ ” position, the exte-
rior lights remain on regardless of the position of the ignition
key. (No headlight auto-shutoff takes place.)
BK0121600US.book 137 ページ 2010年4月12日 月曜日 午前10時39分
Page 227 of 514
 setting is “C”.
2. The monitor will show “The setting is progressing” while
the setting change is in progress.
When the setting change")
3-138 Features and controls
3
NOTE�The initial (default) setting is “C”.
2. The monitor will show “The setting is progressing” while
the setting change is in progress.
When the setting change has been completed successfully,
the tone will sound once and the monitor will return to the
“Dome light shutoff time” display.
If the setting change is not successful, the monitor will
show “The setting failed.” then return to the “Dome light
shutoff” display.
Interior light auto-shutoff time
N00535700064
It is possible to change the period that elapses until each inte-
rior light whose switch is in the “ON” position automatically
goes off when the ignition key is turned from the “ON” posi-
tion to the “LOCK” or “ACC” position.
1. Press the “ ” function button, align the cursor with the
desired setting, and press the “SELECT” function button.
• A: 3 minutes
• B: 30 minutes
• C: 60 minutes
• D: No auto-shutoff
(Interior light auto-shutoff does not take place.)NOTE�The initial (default) setting is “B”.
BK0121600US.book 138 ページ 2010年4月12日 月曜日 午前10時39分