2011 MERCEDES-BENZ SLS AMG light
[x] Cancel search: lightPage 199 of 436
This function is not available within
playlists, for example.XSelect a category, e.g. artists.
The available artists appear.XPress the corresponding number key once
or repeatedly to select the initial letter of
the desired artist. For example, to select an
artist whose name begins with C, press the
number key "2" three times.
You see the available letters at the bottom
edge of the display.
After a message, the first entry in the list
which matches the letter entered is
highlighted.
i If there is no entry which matches the
letter which has been entered, the last
entry in the list which matches a previous
letter is highlighted.
USB Devices
i This function is available for directories
which are arranged in alphabetical order.
This function is not available within
playlists.
XPress the number key in question once or
repeatedly in a directory to select the initial
letter of the desired artist.
For example, to select an artist whose
name begins with C, press the number key
“2” three times.
You see the available letters at the bottom
edge of the display.
If the directory only contains folders,
COMAND searches for folders. The first
entry in the list that matches the letter is
highlighted.
If this does not happen, COMAND searches
for tracks. After a message, the first entry
in the list which matches the letter entered
is highlighted.
i If there is no entry which matches the
letter which has been entered, the last
entry in the list which matches a previous
letter is highlighted.
Selecting the Active Partition (USB
Devices Only)
You can select this function for USB devices
when the storage device is partitioned. Up to
four partitions (primary or logical and FAT-
formatted) are supported.
i The Windows formatting program
supports FAT partitions with either FAT16
or FAT32.
XSelect Media Interface £ Select
Active partition .
Playback Options
The following options are available to you:
R Normal Track Sequence:
You hear the tracks in their normal order
(numerical or alphabetical).
R Random Tracks:
You hear all tracks in random order.
R Random Categories or Random Folder
(in the case of USB devices when Folder
has been selected):
You hear the tracks in the current active
category or folder and any subfolders in
random order.
XTo select an option: Select Media
Interface in the basic display.
The option list appears. A R dot indicates
the option selected.XSelect an option.
Audio Aux
An external audio source (Aux) can be
connected to COMAND via the adapter
socket 1 located inside the glovebox.
Audio197COMAND APSBA 197 USA, CA Edition A 2011; 1; 27, en-UShereepeVersion: 3.0.3.52010-03-24T15:31:10+01:00 - Seite 197Z
Page 201 of 436
Vehicle Equipment
iThis Operator’s Manual describes all
features, standard or optional, potentially
available for your vehicle at the time of
purchase. Please be aware that your
vehicle might not be equipped with all
features described in this manual.
Automatic Picture Switch-off
The video picture is only displayed if the
gearshift lever is in “P” position.
When the gearshift lever is moved out of the
“P” position, the following message is
displayed: In order not to distract
you from the traffic situation, the
picture is faded out while the
vehicle is in motion.
When the gearshift lever is moved back into
the “P” position, the picture switches back
on.
Notes on Storage Media
i When playing copied discs, problems may
occur with the playback. A wide variety of
disc-writing software and writers are
available. Due to this variety we cannot
guarantee that the system will be able to
play discs that you have written/copied
yourself.
! Do not affix stickers or labels to the discs,
as they could peel off and damage
COMAND. Stickers can cause the disc to
bend, which can result in read errors and
disc recognition problems.
! COMAND is designed to hold discs which
comply with the EN 60908 standard. You
can therefore only use discs with a
maximum thickness of 1.3 mm.
If you insert thicker discs, e.g. those that
contain data on both sides (DVD on one
side and audio data on the other), they
cannot be ejected and can damage
COMAND.
Do not use discs with a diameter of 8 cm,
even with an adapter. Only use round discs
with a diameter of 12 cm.
Notes on the Care of Discs
R Only hold discs by the edge.
R Handle discs with care in order to prevent
malfunctions during playback.
R Avoid scratching, leaving fingerprints and
dust on the discs.
R Clean the discs occasionally with a
commercially available cleaning cloth.
Always wipe in a straight line from the
inside outwards, never in a circular motion.
R The discs must only be labelled using pens
specially designed for this purpose.
R After use, replace the discs into the sleeve.
R Protect the discs from heat and direct
sunlight.
DVD Playback Conditions
Some DVDs may not comply with the NTSC
or PAL TV playback standards. Sound, picture
and other playback problems may occur
when you play such DVDs.
As standard, COMAND can play video DVDs
which meet the following criteria:
R Region code 1 or region code 0 (all regions)
i With a video DVD having another region
code, a corresponding message will be
displayed.
R PAL or NTSC TV standard
Information on this can usually be found
either on the DVD itself or on the DVD sleeve.
i The factory setting for COMAND is region
code 1. An authorized Mercedes-Benz
Center can change this setting up to five
times. This will enable you to play video
DVDs with other region codes, provided
that they have been made to the PAL or
NTSC TV standard.
Video199COMAND APSBA 197 USA, CA Edition A 2011; 1; 27, en-UShereepeVersion: 3.0.3.52010-03-24T15:31:10+01:00 - Seite 199Z
Page 207 of 436
Setting the Language and Audio Format
iThis function is not available on all DVDs.
Where available, you can set the DVD menu
language and the audio language or audio
format. The number of possible settings is
dependent on the DVD content. It is
possible that the settings may also be
accessed in the DVD menu (Y page 203).
XDisplay the menu system if necessary
(Y page 202).
XSelect DVD-Video £ DVD Functions.XSelect Menu Language or Audio
Language.
Both of these will bring up a selection menu
after a few seconds. The R dot in front of
an entry indicates the currently selected
language.
XTo change the setting: Rotate y m z or
slide q m r until the desired setting is
reached.
XTo save the setting: Press n.
Subtitles and Camera Angle
iThese functions are not available on all
DVDs. The number of subtitle languages
and camera angles available depends on
the content of the DVD. The settings may
also be accessed in the DVD menu
(Y page 203).
XDisplay the menu system if necessary
(Y page 202).
XSelect DVD-Video £ DVD Functions.XSelect Subtitles or Camera Angle.
Both of these will bring up a selection
menu. The R dot in front of an entry
indicates the current setting.
XTo change the setting: Rotate y m z or
slide q m r until the desired setting is
reached.
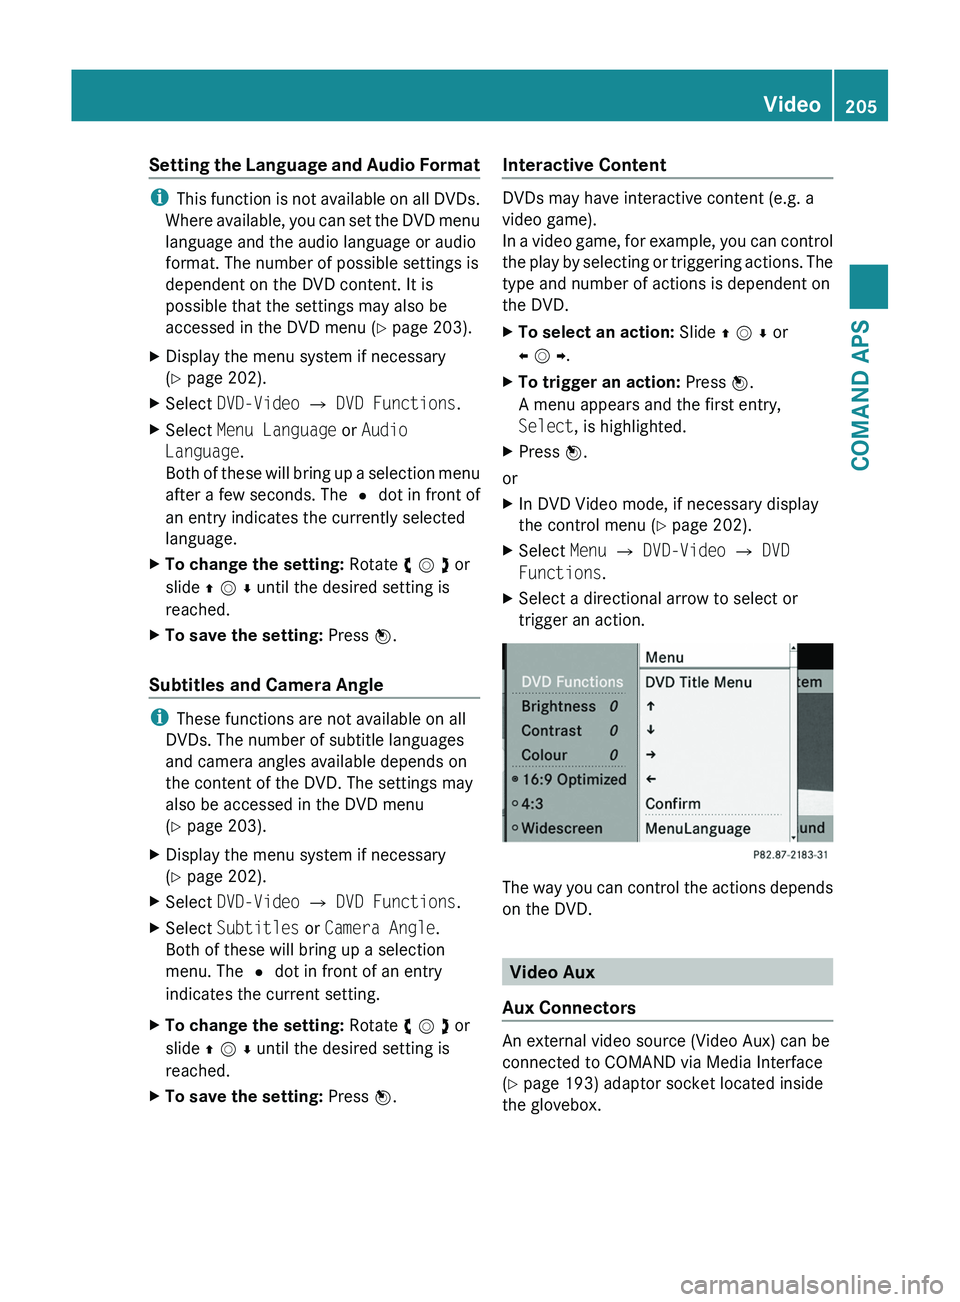
XTo save the setting: Press n.Interactive Content
DVDs may have interactive content (e.g. a
video game).
In a video game, for example, you can control
the play by selecting or triggering actions. The
type and number of actions is dependent on
the DVD.
XTo select an action: Slide q m r or
o m p.
XTo trigger an action: Press n.
A menu appears and the first entry,
Select, is highlighted.
XPress n.
or
XIn DVD Video mode, if necessary display
the control menu (Y page 202).
XSelect Menu £ DVD-Video £ DVD
Functions.
XSelect a directional arrow to select or
trigger an action.
The way you can control the actions depends
on the DVD.
Video Aux
Aux Connectors
An external video source (Video Aux) can be
connected to COMAND via Media Interface
(Y page 193) adaptor socket located inside
the glovebox.
Video205COMAND APSBA 197 USA, CA Edition A 2011; 1; 27, en-UShereepeVersion: 3.0.3.52010-03-24T15:31:10+01:00 - Seite 205Z
Page 214 of 436
NavigationGWarning!
For safety reasons, you should only select a
destination when the vehicle is stationary.
While the navigation system provides
directional assistance, the driver must remain
focused on safe driving behavior, especially
pay attention to traffic and street signs, and
should utilize the system’s audio cues while
driving.
The navigation system does not supply any
information on stop signs, yield signs, traffic
regulations or traffic safety rules. Their
observance always remains in the driver’s
personal responsibility. DVD maps do not
cover all areas nor all routes within an area.
Traffic regulations always have priority over
any route recommendations given. Bear in
mind that at a speed of just 30 mph
(approximately 50 km/h), your vehicle is
covering a distance of 44 feet (approximately
14 m) every second.
During route guidance, you will not receive
information on:
R traffic lights
R stop and yield signs
R parking or stopping zones
R one-way streets
R narrow bridges
R other traffic regulation data
You should therefore always strictly observe
traffic regulations while driving. Drive
carefully and always obey traffic laws and
road signs, even if they contradict navigation
system instructions.
GWarning!
Please do not use the Voice Control System
in an emergency, as the tone of your voice
may change in a stressful situation. This could
cause a delay in completing your phone call
in a timely manner. This could distract you in
an emergency situation and cause you to be
involved in an accident.
Operation
You can use voice control to:
R enter a state
R enter a province
R enter a city
R enter a district (center)
R enter a street
R enter an intersection
R enter a house number
R enter an entire address
R enter a zip code
R find address
R enter a point of interest
R select one of your previous destinations
R call up route information
R store a destination
R display the map
R enlarge/reduce the size of the map
R listen to the destination memory
R start and stop route guidance
R switch the guidance instructions on and off
XTo select the navigation application press
the 0062 button on the multifunction
steering wheel.XGive the “Navigation” command.XPress the 0062 button.XGive one of the navigation commands
explained below.
Commands
You cannot start the route guidance until all
the necessary address data has been
entered.
“Help Navigation”/“Help”
Using the “Help navigation” command, you
can have all the essential commands for the
navigation system read out.
212Voice ControlCOMAND APS
BA 197 USA, CA Edition A 2011; 1; 27, en-UShereepeVersion: 3.0.3.52010-03-24T15:31:10+01:00 - Seite 212
Page 237 of 436
Vehicle equipment ............................236
Locking and unlocking .....................236
Starter switch positions ...................241
Seats .................................................. 243
Multifunction steering wheel ..........245
Mirrors ............................................... 246
Memory function .............................. 249
Lighting .............................................. 249
Wipers ................................................ 253
Power windows ................................. 255
Driving and parking ..........................257
AMG SPEEDSHIFT DCT 7-SPEED
Transmission ..................................... 263
Instrument cluster ............................271
Control system .................................. 272
Driving systems ................................ 290
Climate control system ....................298
Rear window defroster .....................304
Loading and storing ..........................304
Useful features ................................. 306235Controls in detailBA 197 USA, CA Edition A 2011; 1; 27, en-UShereepeVersion: 3.0.3.52010-03-24T15:31:10+01:00 - Seite 235
Page 242 of 436
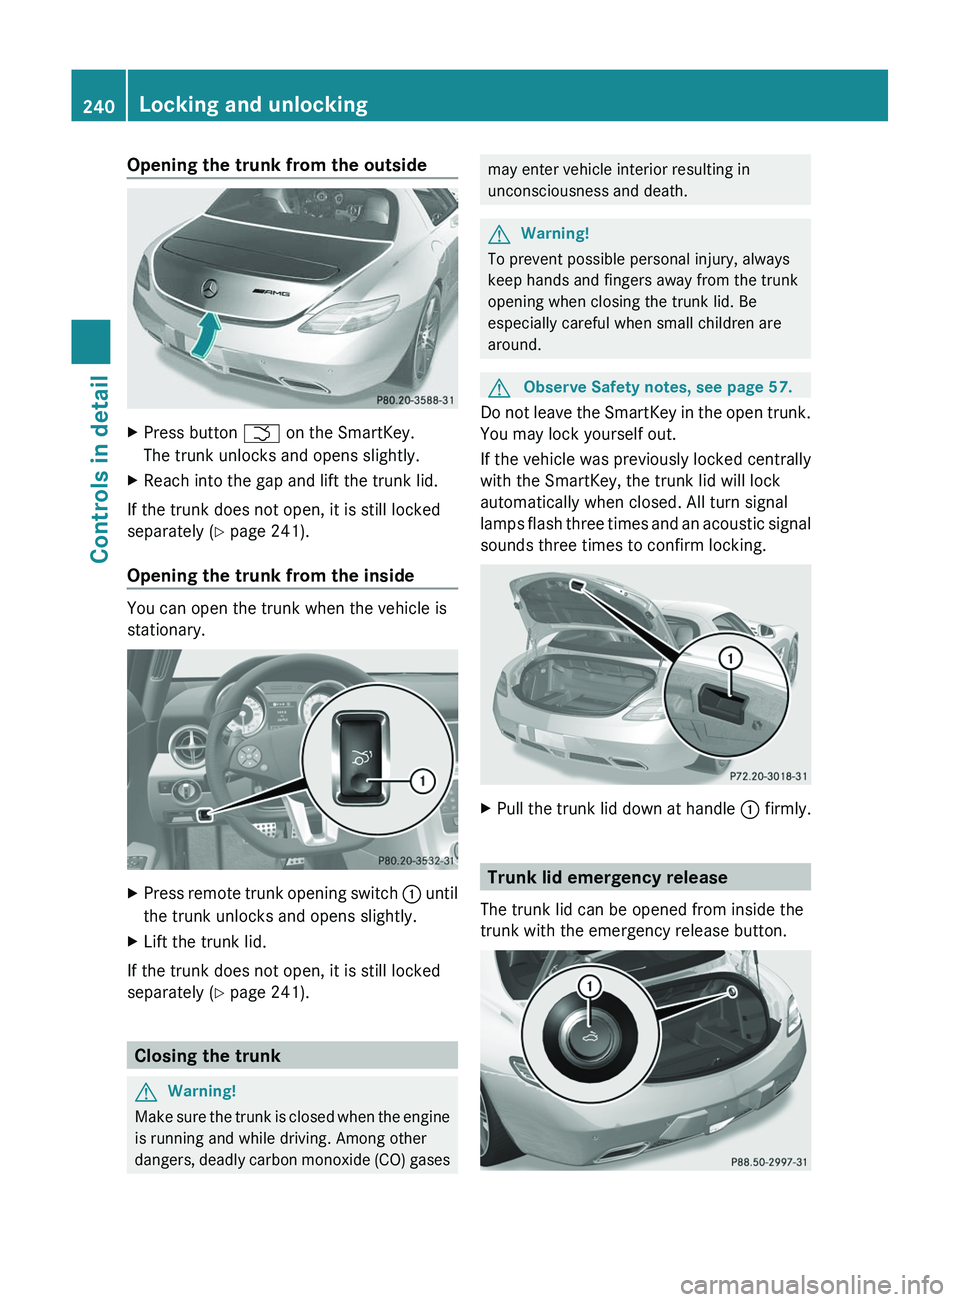
Opening the trunk from the outsideXPress button \000T on the SmartKey.
The trunk unlocks and opens slightly.
XReach into the gap and lift the trunk lid.
If the trunk does not open, it is still locked
separately (Y page 241).
Opening the trunk from the inside
You can open the trunk when the vehicle is
stationary.
XPress remote trunk opening switch \000F until
the trunk unlocks and opens slightly.
XLift the trunk lid.
If the trunk does not open, it is still locked
separately (Y page 241).
Closing the trunk
GWarning!
Make sure the trunk is closed when the engine
is running and while driving. Among other
dangers, deadly carbon monoxide (CO) gases
may enter vehicle interior resulting in
unconsciousness and death.
GWarning!
To prevent possible personal injury, always
keep hands and fingers away from the trunk
opening when closing the trunk lid. Be
especially careful when small children are
around.
GObserve Safety notes, see page 57.
Do not leave the SmartKey in the open trunk.
You may lock yourself out.
If the vehicle was previously locked centrally
with the SmartKey, the trunk lid will lock
automatically when closed. All turn signal
lamps flash three times and an acoustic signal
sounds three times to confirm locking.
XPull the trunk lid down at handle \000F firmly.
Trunk lid emergency release
The trunk lid can be opened from inside the
trunk with the emergency release button.
240Locking and unlockingControls in detail
BA 197 USA, CA Edition A 2011; 1; 27, en-UShereepeVersion: 3.0.3.52010-03-24T15:31:10+01:00 - Seite 240
Page 243 of 436

XBriefly press emergency release
button \000F.
The trunk lid unlocks and opens slightly.
XPush up the trunk lid to fully open.
The emergency release button unlocks the
trunk while the vehicle is standing still or in
motion.
Illumination of the emergency release button:
RThe button flashes for 30 minutes after
opening the trunk.
RThe button flashes for 60 minutes after
closing the trunk.
The emergency release button does not
unlock the trunk, if the vehicle battery is
discharged or disconnected.
If the vehicle has previously been locked
centrally with the SmartKey, opening the
trunk from the inside using the emergency
release button will trigger the anti-theft alarm
system.
To cancel the alarm, see (Y page 67).
Valet locking
You can lock the trunk separately with the
mechanical key. This denies unauthorized
access to the trunk, e.g. when you valet park
the vehicle.
XLeave only the SmartKey less its
mechanical key with the vehicle.
XValet locking: Close the trunk
(Y page 240).
XRemove the mechanical key from the
SmartKey (Y page 397).
XOpen the rear storage compartment in the
center console (Y page 304).
XInsert the mechanical key into trunk lid
lock \000F.
XTurn the mechanical key clockwise as far
as it will go.
XIn this position, pull out the mechanical
key.
XCheck whether the trunk is locked.
The trunk remains locked even when the
vehicle is centrally unlocked.
You can then only open the trunk with the
mechanical key.
XCanceling: Insert the mechanical into
trunk lid lock \000F.
XTurn the mechanical key counterclockwise
as far as it will go.
XIn this position, pull out the mechanical
key.
You can now open the trunk.
Starter switch positions
KEYLESS-GO
GObserve Safety notes, see page 57.
You can start the engine and turn it off again
using the KEYLESS-GO start/stop button.
The KEYLESS-GO start/stop button is located
in the center console. The KEYLESS-GO
start/stop button is illuminated when the
vehicle is unlocked.
The SmartKey must be located in the vehicle.
It will, however, not be detected in the trunk.
Pressing the KEYLESS-GO start/stop button
without depressing the brake pedal
Starter switch positions241Controls in detailBA 197 USA, CA Edition A 2011; 1; 27, en-UShereepeVersion: 3.0.3.52010-03-24T15:31:10+01:00 - Seite 241Z
Page 245 of 436
beam headlamp indicator lamp, high-beam
headlamp indicator lamp, and the turn signal
indicator lamps will only come on if activated.
If a lamp in the instrument cluster fails to
come on when the ignition is switched on,
have it checked and replaced if necessary. If
a lamp in the instrument cluster remains on
after starting the engine or comes on while
driving, refer to “Lamps in instrument cluster”
( Y page 388).XAlways remove the SmartKey from the
starter switch when the engine is not in
operation.
This will help to prevent accelerated vehicle
battery discharge or a completely
discharged vehicle battery.
If the SmartKey cannot be turned in the
starter switch, the vehicle battery may not be
sufficiently charged.
XCheck the vehicle battery and charge it if
necessary ( Y page 410).
or
XGet a jump start ( Y page 413).
i
If the SmartKey does not belong to the
vehicle, the SmartKey can be turned in the
starter switch. However, the ignition does
not switch on and the engine does not start.
Seats
Safety notes
GWarning!
In order to avoid possible loss of vehicle
control the following must be done before the
vehicle is put into motion:
R seat adjustment
R steering wheel adjustment
R rear view mirror adjustment
R fastening of seat belts
GWarning!
Do not adjust the driver’s seat while driving.
Adjusting the seat while driving could cause
the driver to lose control of the vehicle.
Never ride in a moving vehicle with the seat
backrest in an excessively reclined position as
this can be dangerous. You could slide under
the seat belt in a collision. If you slide under
it, the seat belt would apply force at the
abdomen or neck. That could cause serious
or fatal injuries. The seat backrest and seat
belts provide the best restraint when the
wearer is in a position that is as upright as
possible and seat belts are properly
positioned on the body.
GWarning!
Your seat must be adjusted so that you can
correctly fasten your seat belt.
Observe the following points:
R Adjust the seat backrest until your arms are
slightly angled when holding the steering
wheel.
R Adjust the seat to a comfortable seating
position that still allows you to reach the
accelerator/brake pedal safely. The
position should be as far back as possible
with the driver still able to operate the
controls properly.
R Never place hands under the seat or near
any moving parts while a seat is being
adjusted.
Failure to do so could result in an accident
and/or serious personal injury.
GWarning!
The power seats can be operated at any time.
Therefore, do not leave children unattended
in the vehicle, or with access to an unlocked
vehicle. A child’s unsupervised access to a
vehicle could result in an accident and/or
serious personal injury.
Seats243Controls in detailBA 197 USA, CA Edition A 2011; 1; 27, en-UShereepeVersion: 3.0.3.52010-03-24T15:31:10+01:00 - Seite 243Z