2011 MERCEDES-BENZ SLS AMG light
[x] Cancel search: lightPage 164 of 436
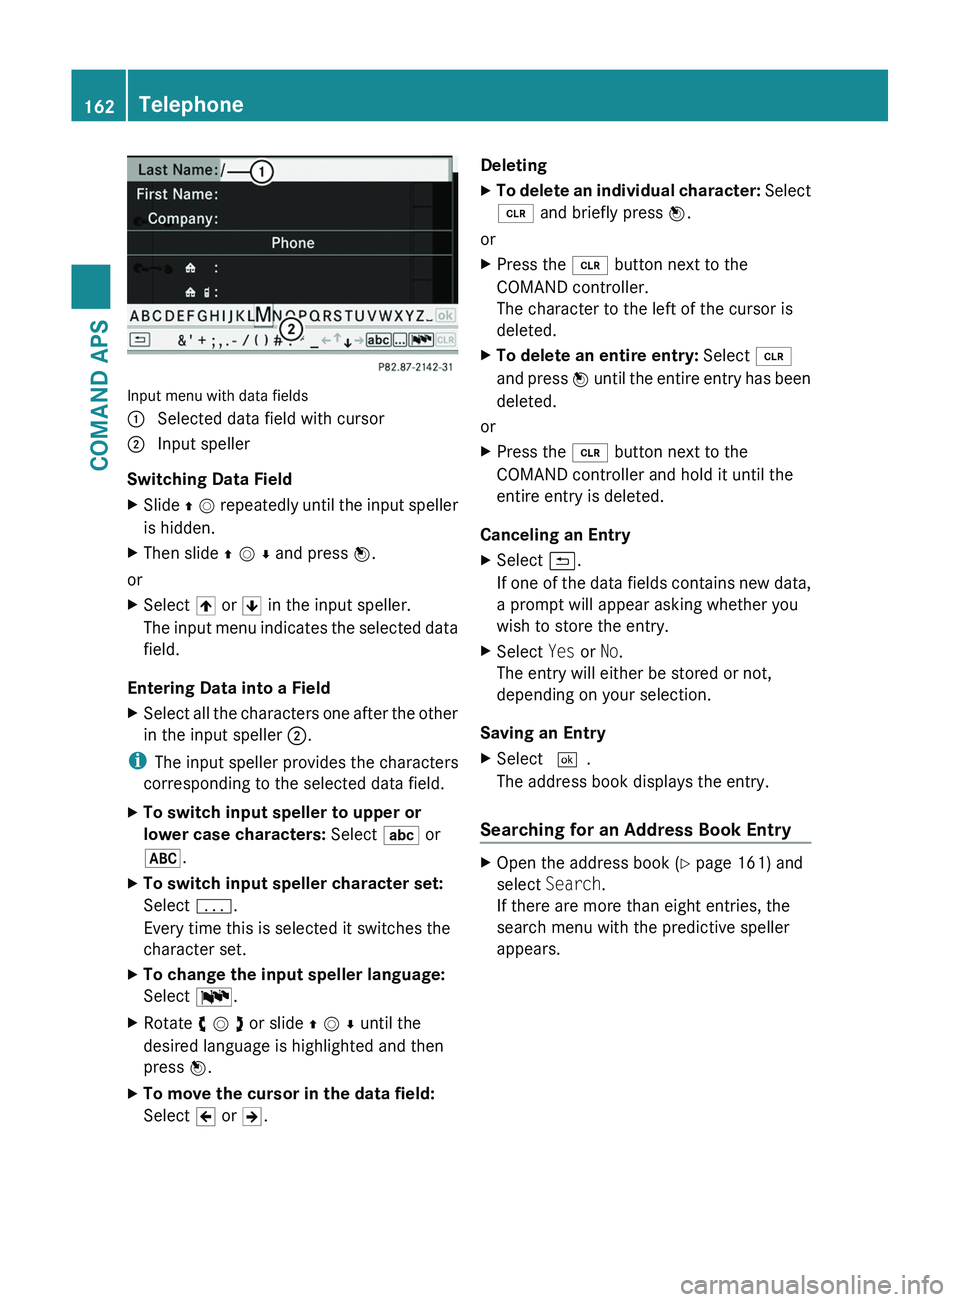
Input menu with data fields
1 Selected data field with cursor2 Input speller
Switching Data Field
XSlide q m repeatedly until the input speller
is hidden.
XThen slide q m r and press n.
or
XSelect [ or ] in the input speller.
The input menu indicates the selected data
field.
Entering Data into a Field
XSelect all the characters one after the other
in the input speller 2.
iThe input speller provides the characters
corresponding to the selected data field.
XTo switch input speller to upper or
lower case characters: Select ( or
&.
XTo switch input speller character set:
Select k.
Every time this is selected it switches the
character set.
XTo change the input speller language:
Select !.
XRotate y m z or slide q m r until the
desired language is highlighted and then
press n.
XTo move the cursor in the data field:
Select Y or Z.
DeletingXTo delete an individual character: Select
õ and briefly press n.
or
XPress the \000
Page 166 of 436
Searching via the ListXIf necessary, switch from the predictive
speller to the list (Y page 162).
XTurn y m z or slide q m r until the desired
entry is highlighted in the list.
Deleting Entry
XSearch for the required entry
(Y page 162).
XSelect Options £ Delete.
or
XSelect Delete from the address book
(Y page 161).
A deletion prompt appears.
XSelect Yes or No.
The entry will be deleted or retained on the
basis of the selection.
iDeleting an entry in the phone book on
the mobile phone does not delete the entry
in the address book.
Displaying Details About an Address
Book Entry
XSwitch from the predictive speller to the list
(Y page 162).
or
XSelect an address book entry from the
address book (Y page 161).
XPress n.
The detailed display appears.
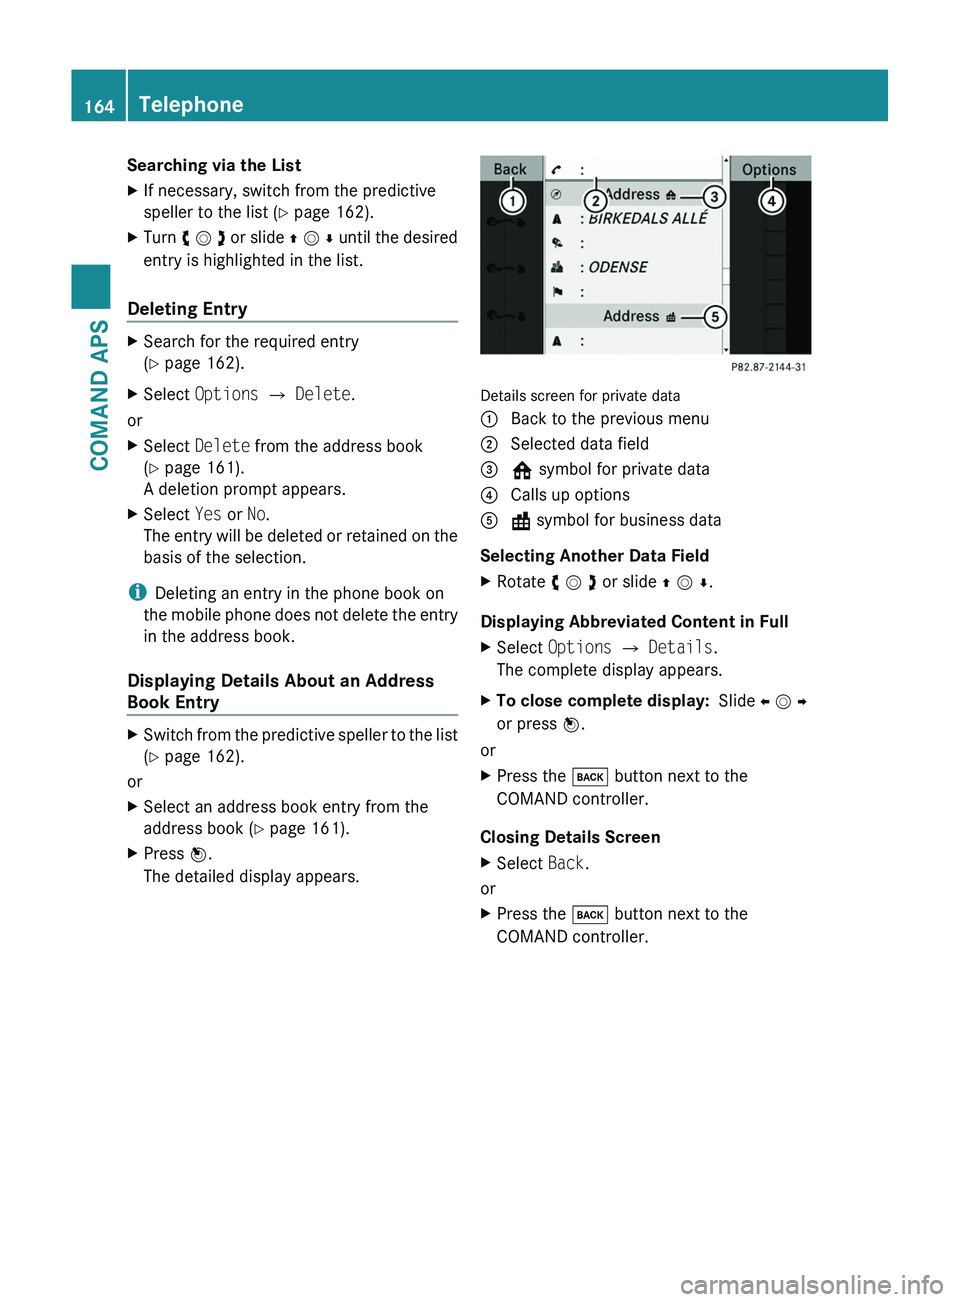
Details screen for private data
1 Back to the previous menu2 Selected data field3 @ symbol for private data4 Calls up options5 \ symbol for business data
Selecting Another Data Field
XRotate y m z or slide q m r.
Displaying Abbreviated Content in Full
XSelect Options £ Details.
The complete display appears.
XTo close complete display: Slide o m p
or press n.
or
XPress the \000= button next to the
COMAND controller.
Closing Details Screen
XSelect Back.
or
XPress the \000= button next to the
COMAND controller.
164TelephoneCOMAND APS
BA 197 USA, CA Edition A 2011; 1; 27, en-UShereepeVersion: 3.0.3.52010-03-24T15:31:10+01:00 - Seite 164
Page 167 of 436
Changing Entry
Changing an Address Book Entry
XSearch for the address book entry
(Y page 162).
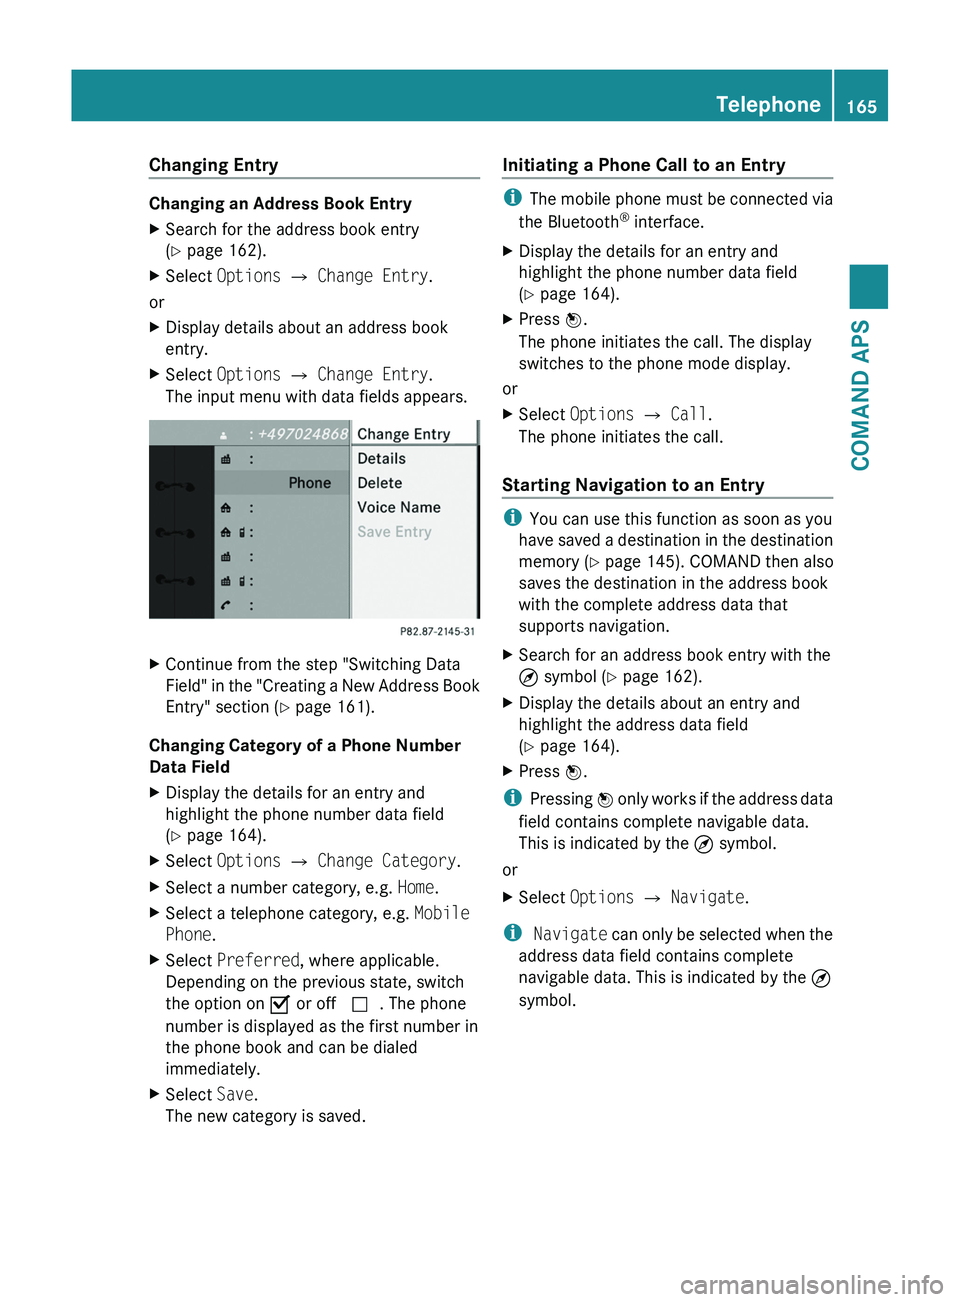
XSelect Options £ Change Entry.
or
XDisplay details about an address book
entry.
XSelect Options £ Change Entry.
The input menu with data fields appears.
XContinue from the step "Switching Data
Field" in the "Creating a New Address Book
Entry" section (Y page 161).
Changing Category of a Phone Number
Data Field
XDisplay the details for an entry and
highlight the phone number data field
(Y page 164).
XSelect Options £ Change Category.XSelect a number category, e.g. Home.XSelect a telephone category, e.g. Mobile
Phone.
XSelect Preferred, where applicable.
Depending on the previous state, switch
the option on Ç or off c. The phone
number is displayed as the first number in
the phone book and can be dialed
immediately.
XSelect Save.
The new category is saved.
Initiating a Phone Call to an Entry
iThe mobile phone must be connected via
the Bluetooth® interface.
XDisplay the details for an entry and
highlight the phone number data field
(Y page 164).
XPress n.
The phone initiates the call. The display
switches to the phone mode display.
or
XSelect Options £ Call.
The phone initiates the call.
Starting Navigation to an Entry
iYou can use this function as soon as you
have saved a destination in the destination
memory (Y page 145). COMAND then also
saves the destination in the address book
with the complete address data that
supports navigation.
XSearch for an address book entry with the
¤ symbol (Y page 162).
XDisplay the details about an entry and
highlight the address data field
(Y page 164).
XPress n.
iPressing n only works if the address data
field contains complete navigable data.
This is indicated by the ¤ symbol.
or
XSelect Options £ Navigate.
i Navigate can only be selected when the
address data field contains complete
navigable data. This is indicated by the ¤
symbol.
Telephone165COMAND APSBA 197 USA, CA Edition A 2011; 1; 27, en-UShereepeVersion: 3.0.3.52010-03-24T15:31:10+01:00 - Seite 165Z
Page 173 of 436
Tuning to a Station via Station SearchXRotate y m z or slide o m p when the main
area is highlighted.
or
XPress \000H or \000I on the COMAND
control unit.
The search proceeds upwards or
downwards and stops at the next
receivable station.
Tuning to a Station via Manual Frequency
Input
XSelect Radio £ Enter Frequency in the
radio display.
An input menu appears.
or
XPress \000
Page 177 of 436
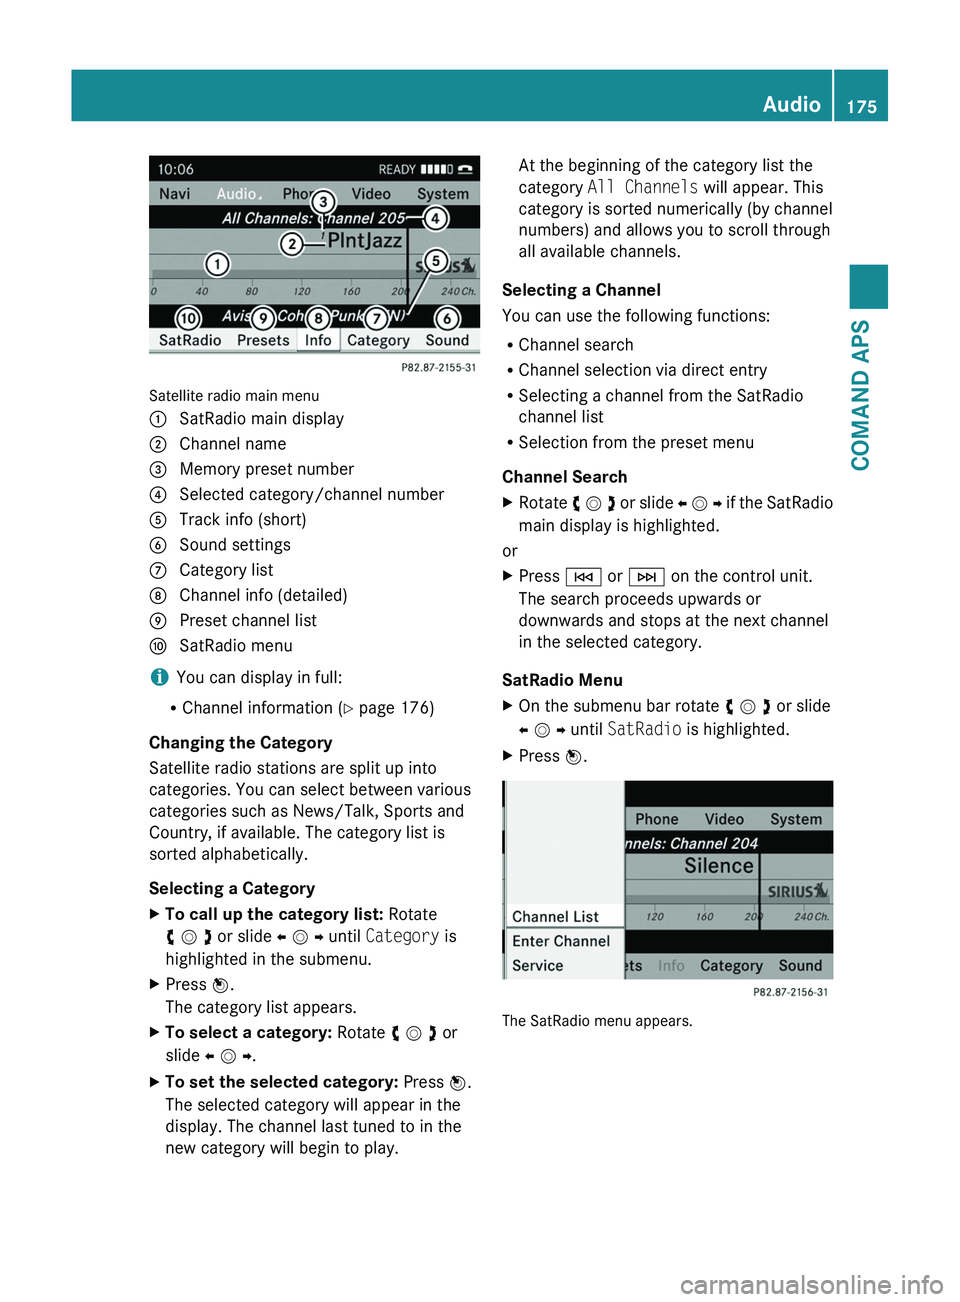
Satellite radio main menu
1 SatRadio main display2 Channel name3 Memory preset number4 Selected category/channel number5 Track info (short)6 Sound settings7 Category list8 Channel info (detailed)9 Preset channel lista SatRadio menu
iYou can display in full:
RChannel information (Y page 176)
Changing the Category
Satellite radio stations are split up into
categories. You can select between various
categories such as News/Talk, Sports and
Country, if available. The category list is
sorted alphabetically.
Selecting a Category
XTo call up the category list: Rotate
y m z or slide o m p until Category is
highlighted in the submenu.
XPress n.
The category list appears.
XTo select a category: Rotate y m z or
slide o m p.
XTo set the selected category: Press n.
The selected category will appear in the
display. The channel last tuned to in the
new category will begin to play.
At the beginning of the category list the
category All Channels will appear. This
category is sorted numerically (by channel
numbers) and allows you to scroll through
all available channels.
Selecting a Channel
You can use the following functions:
RChannel search
RChannel selection via direct entry
RSelecting a channel from the SatRadio
channel list
RSelection from the preset menu
Channel Search
XRotate y m z or slide o m p if the SatRadio
main display is highlighted.
or
XPress \000H or \000I on the control unit.
The search proceeds upwards or
downwards and stops at the next channel
in the selected category.
SatRadio Menu
XOn the submenu bar rotate y m z or slide
o m p until SatRadio is highlighted.
XPress n.
The SatRadio menu appears.
Audio175COMAND APSBA 197 USA, CA Edition A 2011; 1; 27, en-UShereepeVersion: 3.0.3.52010-03-24T15:31:10+01:00 - Seite 175Z
Page 182 of 436
Notes on the Care of CD/DVD Discs
ROnly touch the discs at the edges.
RHandle discs with care in order to prevent
malfunctions during playback.
RAvoid scratching, leaving fingerprints and
dust on the discs.
RClean the discs occasionally with a
commercially available cleaning cloth.
Always wipe in a straight line from the
inside outwards, never in a circular motion.
RThe discs must only be labelled using pens
specially designed for this purpose.
RAfter use, put the discs back into the box.
RProtect the discs from heat and direct
sunlight.
Loading CDs and DVDs
GWarning
Only load a CD or DVD when the vehicle is
stationary. There is a risk of accident by being
distracted from road and traffic conditions if
you load a CD/DVD while the vehicle is in
motion.
Bear in mind that at a speed of just 30 mph
(appr. 50 km/h), your vehicle is covering a
distance of 44 feet (appr. 14 m) every second.
iIf the CD/DVD is printed on one side, this
side must face upwards when loaded. If
neither side is printed, the side to be played
must face downwards.
The system may not be able to play copy-
protected CDs/DVDs.
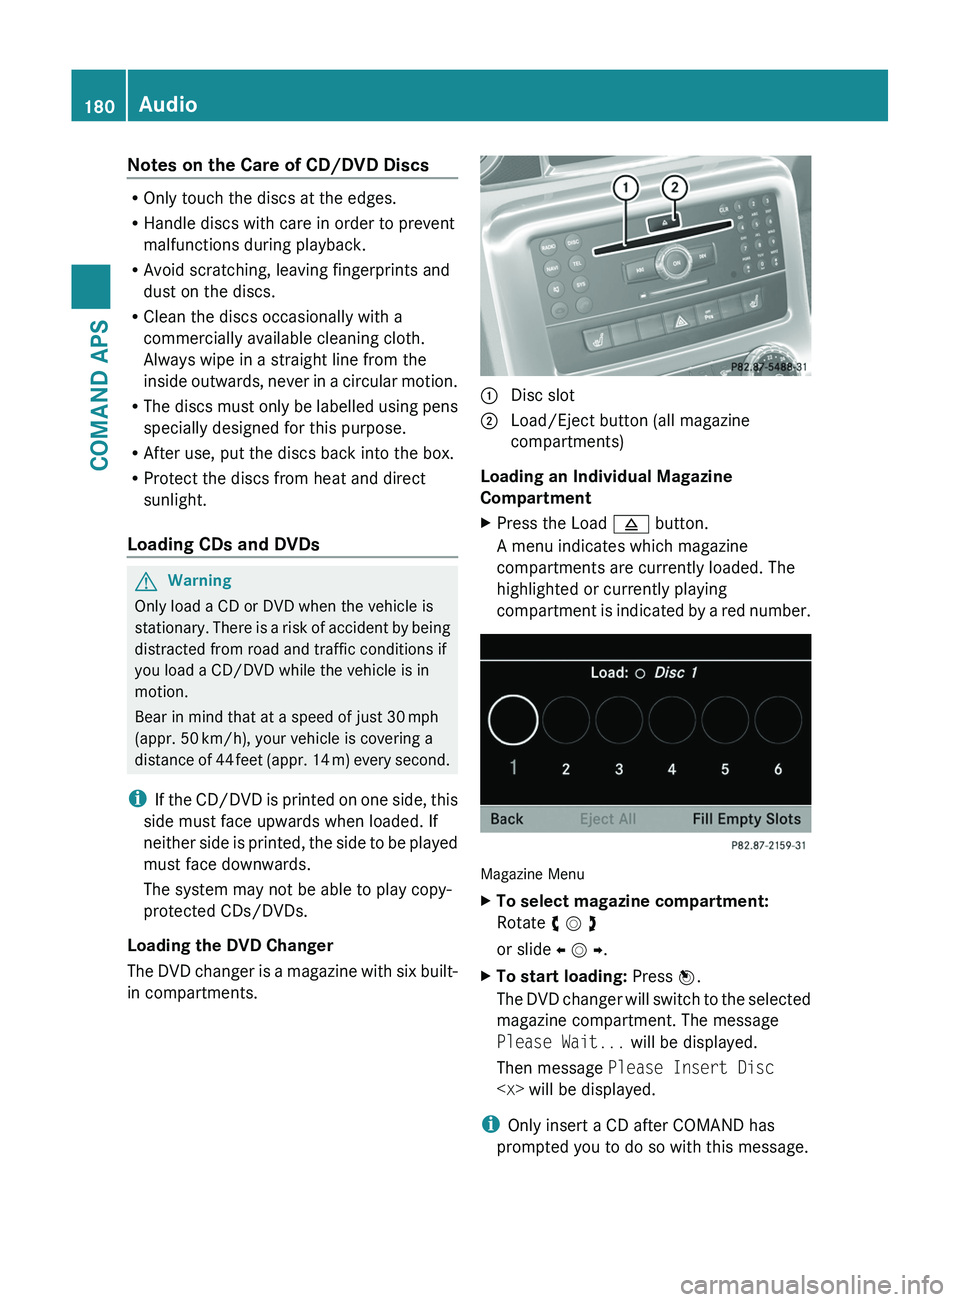
Loading the DVD Changer
The DVD changer is a magazine with six built-
in compartments.
1 Disc slot2 Load/Eject button (all magazine
compartments)
Loading an Individual Magazine
Compartment
XPress the Load \000; button.
A menu indicates which magazine
compartments are currently loaded. The
highlighted or currently playing
compartment is indicated by a red number.
Magazine Menu
XTo select magazine compartment:
Rotate y m z
or slide o m p.
XTo start loading: Press n.
The DVD changer will switch to the selected
magazine compartment. The message
Please Wait... will be displayed.
Then message Please Insert Disc
iOnly insert a CD after COMAND has
prompted you to do so with this message.
180AudioCOMAND APS
BA 197 USA, CA Edition A 2011; 1; 27, en-UShereepeVersion: 3.0.3.52010-03-24T15:31:10+01:00 - Seite 180
Page 184 of 436
distracted from road and traffic conditions if
you load a memory card while the vehicle is
in motion.
Bear in mind that at a speed of just 30 mph
(appr. 50 km/h), your vehicle is covering a
distance of 44 feet (appr. 14 m) every second.
COMAND supports 16-bit full-size type I and II
PCMCIA memory cards.
iCOMAND supports commercially
available PCMCIA cards or PCMCIA card
adapters with storage media that may not
be designed for the temperatures which
occur in the vehicle. You should therefore
remove the PCMCIA card from the vehicle
when not in use since extreme
temperatures could damage these devices.
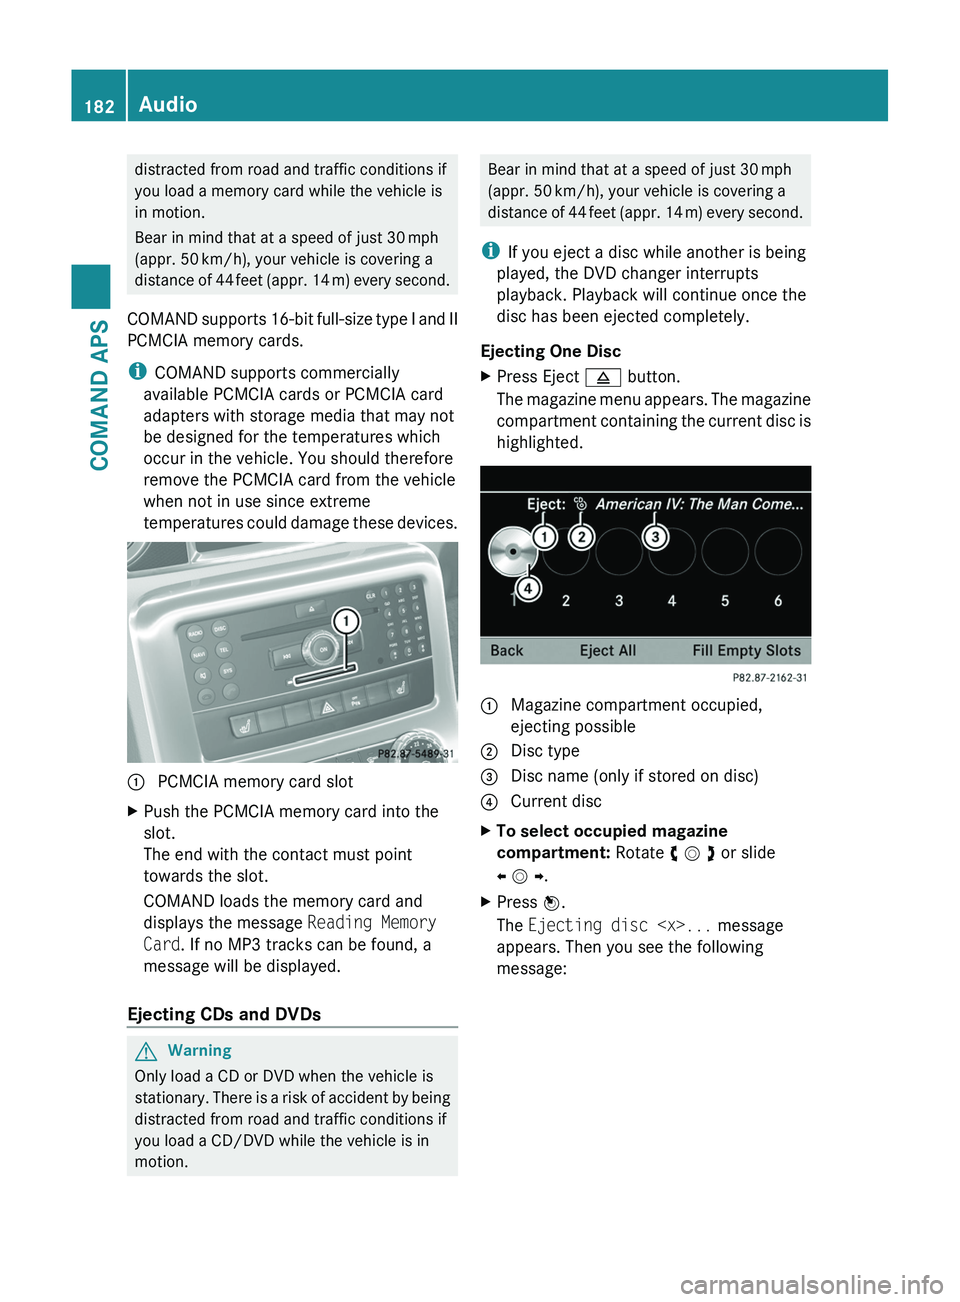
1 PCMCIA memory card slotXPush the PCMCIA memory card into the
slot.
The end with the contact must point
towards the slot.
COMAND loads the memory card and
displays the message Reading Memory
Card. If no MP3 tracks can be found, a
message will be displayed.
Ejecting CDs and DVDs
GWarning
Only load a CD or DVD when the vehicle is
stationary. There is a risk of accident by being
distracted from road and traffic conditions if
you load a CD/DVD while the vehicle is in
motion.
Bear in mind that at a speed of just 30 mph
(appr. 50 km/h), your vehicle is covering a
distance of 44 feet (appr. 14 m) every second.
iIf you eject a disc while another is being
played, the DVD changer interrupts
playback. Playback will continue once the
disc has been ejected completely.
Ejecting One Disc
XPress Eject \000; button.
The magazine menu appears. The magazine
compartment containing the current disc is
highlighted.
1 Magazine compartment occupied,
ejecting possible
2 Disc type3 Disc name (only if stored on disc)4 Current discXTo select occupied magazine
compartment: Rotate y m z or slide
o m p.
XPress n.
The Ejecting disc
appears. Then you see the following
message:
182AudioCOMAND APS
BA 197 USA, CA Edition A 2011; 1; 27, en-UShereepeVersion: 3.0.3.52010-03-24T15:31:10+01:00 - Seite 182
Page 188 of 436
7 Sound settings8 Media selection9 Current foldera Display folder listb Disc position in the media listc Playback options
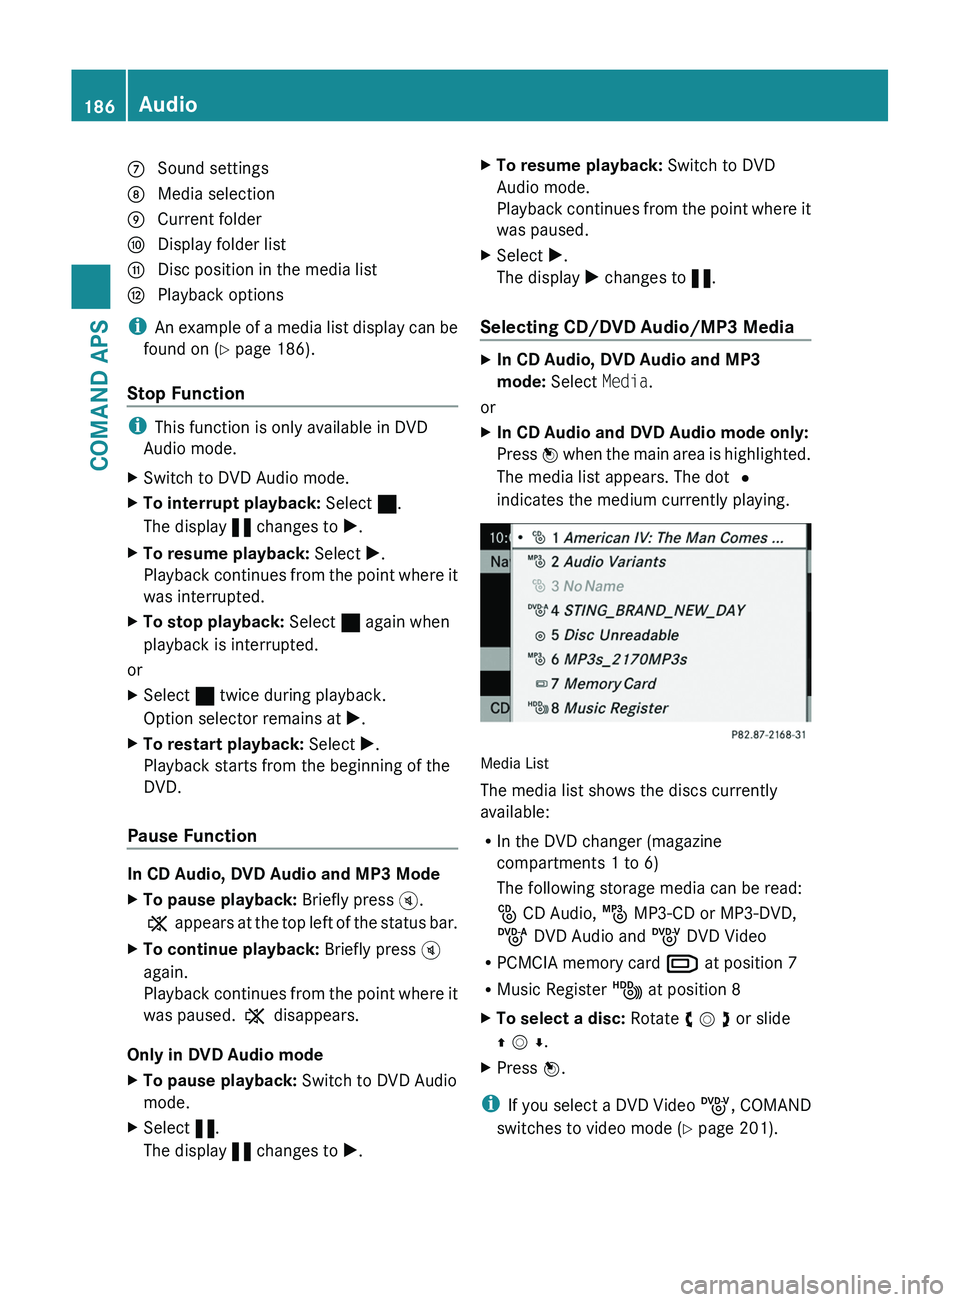
iAn example of a media list display can be
found on (Y page 186).
Stop Function
iThis function is only available in DVD
Audio mode.
XSwitch to DVD Audio mode.XTo interrupt playback: Select ±.
The display « changes to X.
XTo resume playback: Select X.
Playback continues from the point where it
was interrupted.
XTo stop playback: Select ± again when
playback is interrupted.
or
XSelect ± twice during playback.
Option selector remains at X.
XTo restart playback: Select X.
Playback starts from the beginning of the
DVD.
Pause Function
In CD Audio, DVD Audio and MP3 Mode
XTo pause playback: Briefly press \000{.
X appears at the top left of the status bar.
XTo continue playback: Briefly press \000{
again.
Playback continues from the point where it
was paused. X disappears.
Only in DVD Audio mode
XTo pause playback: Switch to DVD Audio
mode.
XSelect «.
The display « changes to X.
XTo resume playback: Switch to DVD
Audio mode.
Playback continues from the point where it
was paused.
XSelect X.
The display X changes to «.
Selecting CD/DVD Audio/MP3 Media
XIn CD Audio, DVD Audio and MP3
mode: Select Media.
or
XIn CD Audio and DVD Audio mode only:
Press n when the main area is highlighted.
The media list appears. The dot R
indicates the medium currently playing.
Media List
The media list shows the discs currently
available:
RIn the DVD changer (magazine
compartments 1 to 6)
The following storage media can be read:
_ CD Audio, þ MP3-CD or MP3-DVD,
ü DVD Audio and ý DVD Video
RPCMCIA memory card º at position 7
RMusic Register Ñ at position 8
XTo select a disc: Rotate y m z or slide
q m r.
XPress n.
iIf you select a DVD Video ý, COMAND
switches to video mode (Y page 201).
186AudioCOMAND APS
BA 197 USA, CA Edition A 2011; 1; 27, en-UShereepeVersion: 3.0.3.52010-03-24T15:31:10+01:00 - Seite 186