2011 MERCEDES-BENZ SLS AMG light
[x] Cancel search: lightPage 247 of 436
Seat heating
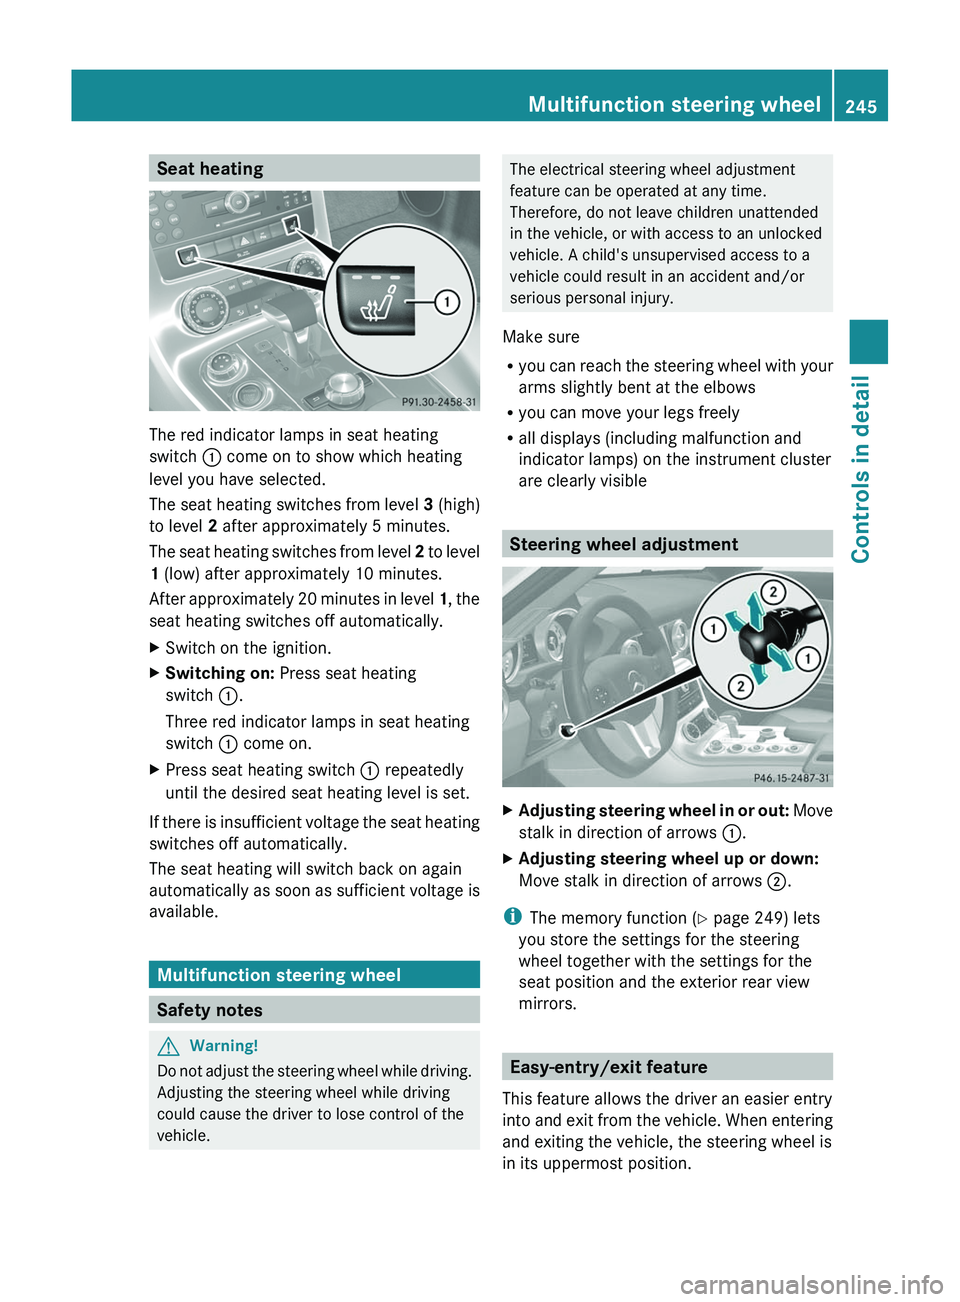
The red indicator lamps in seat heating
switch \000F come on to show which heating
level you have selected.
The seat heating switches from level 3 (high)
to level 2 after approximately 5 minutes.
The seat heating switches from level 2 to level
1 (low) after approximately 10 minutes.
After approximately 20 minutes in level 1, the
seat heating switches off automatically.
XSwitch on the ignition.XSwitching on: Press seat heating
switch \000F.
Three red indicator lamps in seat heating
switch \000F come on.
XPress seat heating switch \000F repeatedly
until the desired seat heating level is set.
If there is insufficient voltage the seat heating
switches off automatically.
The seat heating will switch back on again
automatically as soon as sufficient voltage is
available.
Multifunction steering wheel
Safety notes
GWarning!
Do not adjust the steering wheel while driving.
Adjusting the steering wheel while driving
could cause the driver to lose control of the
vehicle.
The electrical steering wheel adjustment
feature can be operated at any time.
Therefore, do not leave children unattended
in the vehicle, or with access to an unlocked
vehicle. A child's unsupervised access to a
vehicle could result in an accident and/or
serious personal injury.
Make sure
Ryou can reach the steering wheel with your
arms slightly bent at the elbows
Ryou can move your legs freely
Rall displays (including malfunction and
indicator lamps) on the instrument cluster
are clearly visible
Steering wheel adjustment
XAdjusting steering wheel in or out: Move
stalk in direction of arrows \000F.
XAdjusting steering wheel up or down:
Move stalk in direction of arrows \000G.
iThe memory function (Y page 249) lets
you store the settings for the steering
wheel together with the settings for the
seat position and the exterior rear view
mirrors.
Easy-entry/exit feature
This feature allows the driver an easier entry
into and exit from the vehicle. When entering
and exiting the vehicle, the steering wheel is
in its uppermost position.
Multifunction steering wheel245Controls in detailBA 197 USA, CA Edition A 2011; 1; 27, en-UShereepeVersion: 3.0.3.52010-03-24T15:31:10+01:00 - Seite 245Z
Page 251 of 436
The exterior rear view mirrors fold out
automatically as soon as the vehicle is
unlocked and the driver’s or passenger door
is subsequently opened.
Memory function
Notes
With the memory function you can store up
to three different configurations per front
seat.
Each memory position button on the driver’s
side can store all of the following settings:
RSeat position and dorsal support
RSteering wheel position
RExterior rear view mirrors’ position
GWarning!
Do not activate the memory function while
driving. Activating the memory function while
driving could cause the driver to lose control
of the vehicle.
Each memory position button on the
passenger side can store the setting of the
seat position and dorsal support.
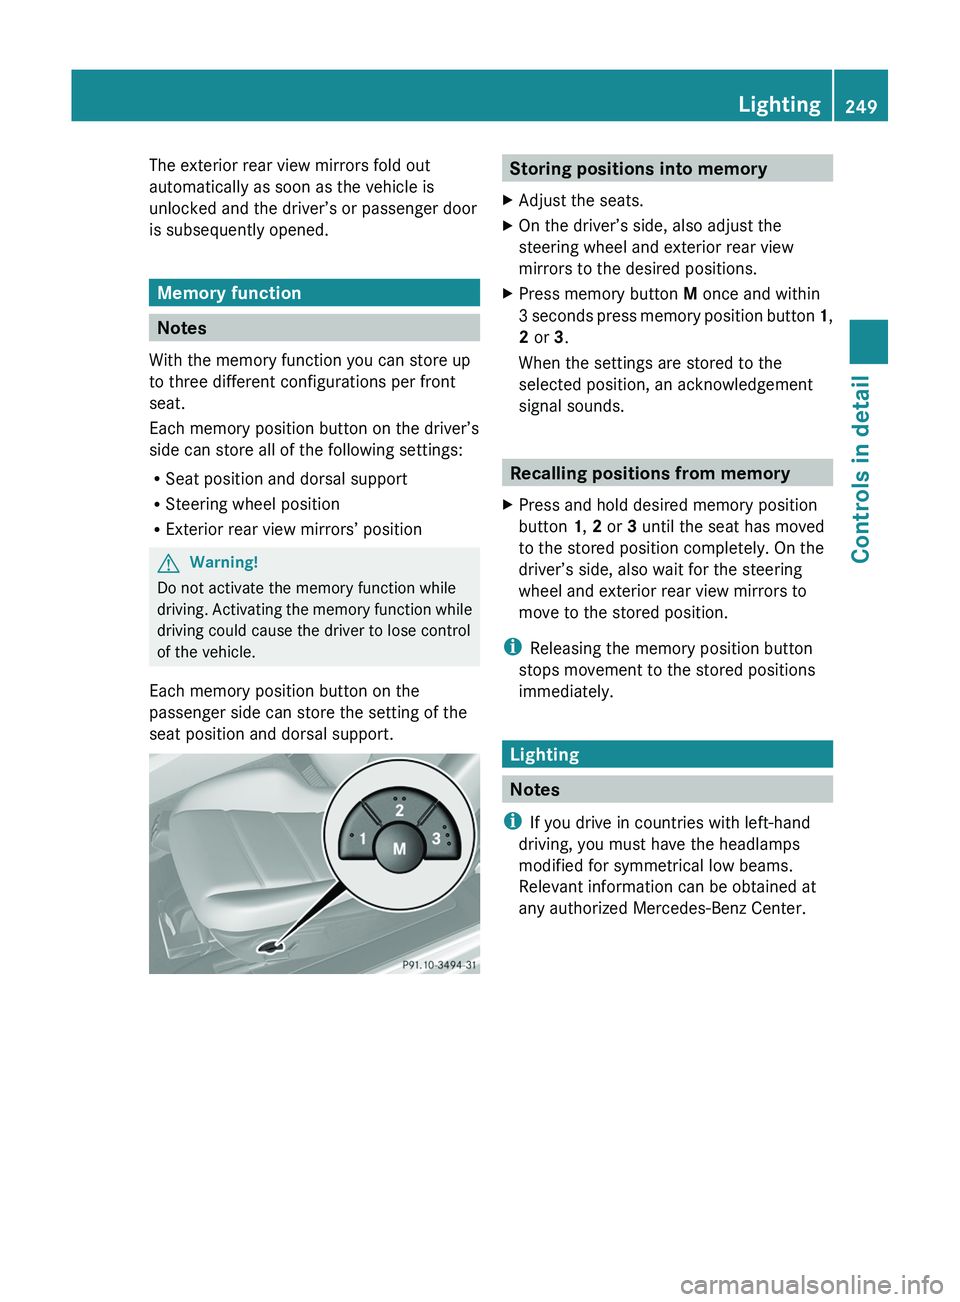
Storing positions into memoryXAdjust the seats.XOn the driver’s side, also adjust the
steering wheel and exterior rear view
mirrors to the desired positions.
XPress memory button M once and within
3 seconds press memory position button 1,
2 or 3.
When the settings are stored to the
selected position, an acknowledgement
signal sounds.
Recalling positions from memory
XPress and hold desired memory position
button 1, 2 or 3 until the seat has moved
to the stored position completely. On the
driver’s side, also wait for the steering
wheel and exterior rear view mirrors to
move to the stored position.
iReleasing the memory position button
stops movement to the stored positions
immediately.
Lighting
Notes
iIf you drive in countries with left-hand
driving, you must have the headlamps
modified for symmetrical low beams.
Relevant information can be obtained at
any authorized Mercedes-Benz Center.
Lighting249Controls in detailBA 197 USA, CA Edition A 2011; 1; 27, en-UShereepeVersion: 3.0.3.52010-03-24T15:31:10+01:00 - Seite 249Z
Page 252 of 436
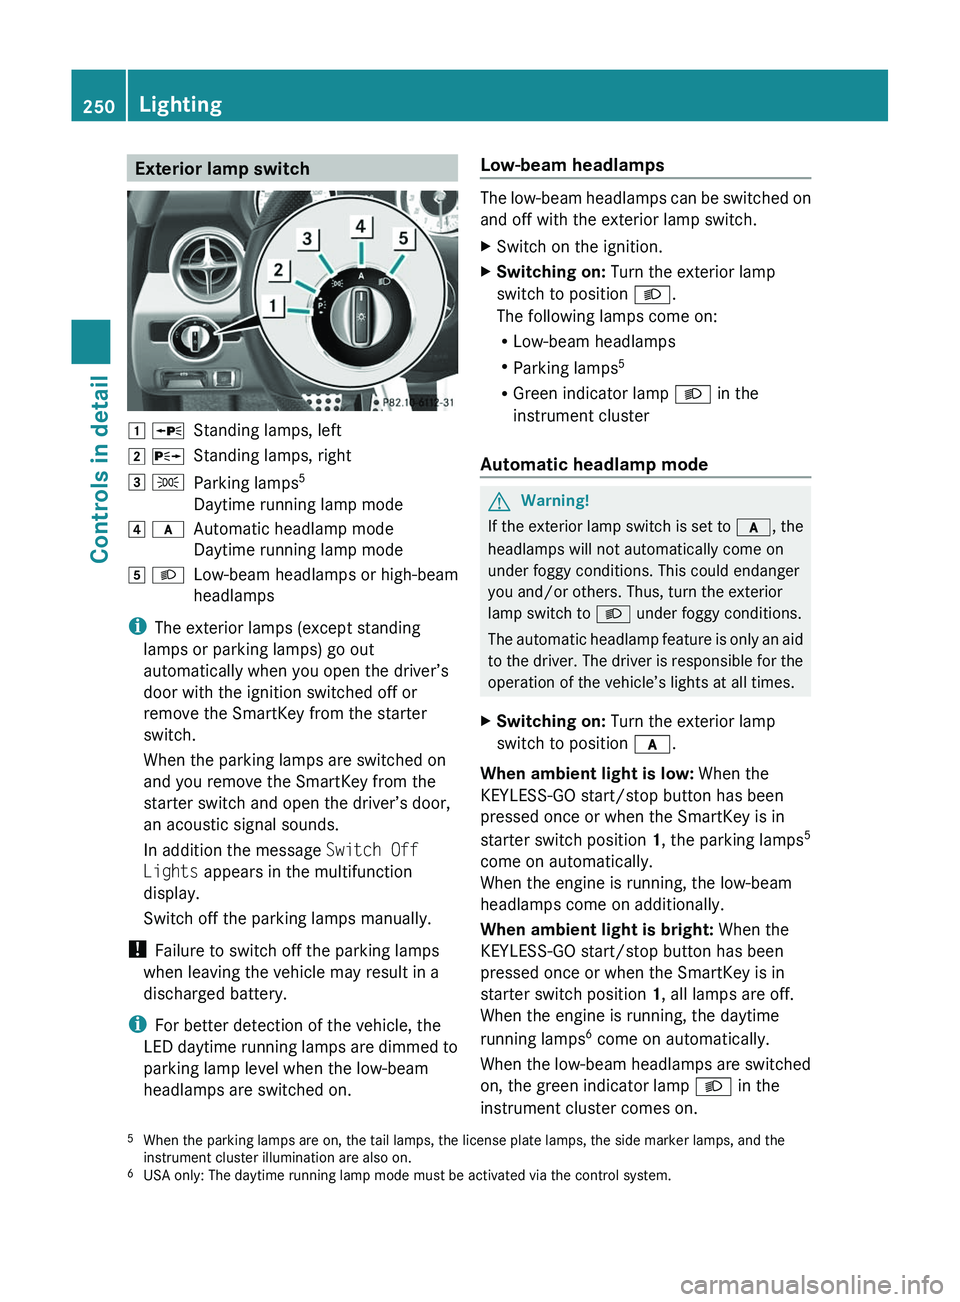
Exterior lamp switch004A 006FStanding lamps, left004B 0070Standing lamps, right004C 006CParking lamps 5
Daytime running lamp mode004D 0066Automatic headlamp mode
Daytime running lamp mode004E 0064Low-beam headlamps or high-beam
headlamps
i The exterior lamps (except standing
lamps or parking lamps) go out
automatically when you open the driver’s
door with the ignition switched off or
remove the SmartKey from the starter
switch.
When the parking lamps are switched on
and you remove the SmartKey from the
starter switch and open the driver’s door,
an acoustic signal sounds.
In addition the message Switch Off
Lights appears in the multifunction
display.
Switch off the parking lamps manually.
! Failure to switch off the parking lamps
when leaving the vehicle may result in a
discharged battery.
i For better detection of the vehicle, the
LED daytime running lamps are dimmed to
parking lamp level when the low-beam
headlamps are switched on.
Low-beam headlamps
The low-beam headlamps can be switched on
and off with the exterior lamp switch.
XSwitch on the ignition.XSwitching on: Turn the exterior lamp
switch to position 0064.
The following lamps come on:
R Low-beam headlamps
R Parking lamps 5
R Green indicator lamp 0064 in the
instrument cluster
Automatic headlamp mode
GWarning!
If the exterior lamp switch is set to 0066, the
headlamps will not automatically come on
under foggy conditions. This could endanger
you and/or others. Thus, turn the exterior
lamp switch to 0064 under foggy conditions.
The automatic headlamp feature is only an aid
to the driver. The driver is responsible for the
operation of the vehicle’s lights at all times.
XSwitching on: Turn the exterior lamp
switch to position 0066.
When ambient light is low: When the
KEYLESS-GO start/stop button has been
pressed once or when the SmartKey is in
starter switch position 1, the parking lamps 5
come on automatically.
When the engine is running, the low-beam
headlamps come on additionally.
When ambient light is bright: When the
KEYLESS-GO start/stop button has been
pressed once or when the SmartKey is in
starter switch position 1, all lamps are off.
When the engine is running, the daytime
running lamps 6
come on automatically.
When the low-beam headlamps are switched
on, the green indicator lamp 0064 in the
instrument cluster comes on.
5 When the parking lamps are on, the tail lamps, the license plate lamps, the side marker lamps, and the
instrument cluster illumination are also on.
6 USA only: The daytime running lamp mode must be activated via the control system.250LightingControls in detail
BA 197 USA, CA Edition A 2011; 1; 27, en-UShereepeVersion: 3.0.3.52010-03-24T15:31:10+01:00 - Seite 250
Page 253 of 436
Once the low-beam headlamps are on, the
high-beam headlamps are also available.
Daytime running lamp mode
In Canada, the daytime running lamp mode is
mandatory and therefore in a constant mode.
In the USA, the daytime running lamp mode
is activated by default.
XMake sure the daytime running lamp mode
is activated in the control system, see
“Switching daytime running lamp mode on
or off (USA only)” ( Y page 284).XTurn the exterior lamp switch to position
0066 .
When the engine is running and the
ambient light is bright, the daytime running
lamps come on.
In low ambient lighting conditions, the
following lamps will come on additionally:
R Low-beam headlamps
R Parking lamps 5
R green indicator lamp 0064 in the
instrument cluster
You can only switch on the high-beam
headlamps when the low-beam headlamps
are on.
The high-beam flasher is available at all times.
Canada only
When the engine is running, and you
R shift from a driving position to park
position P with the vehicle at a standstill,
the daytime running lamps or the low-beam
headlamps will go out with a delay of
3 minutes
R turn the exterior lamp switch to position
006C , the daytime running lamps and the
parking lamps 5
come on in bright ambient
lighting conditions.
R turn the exterior lamp switch to position
0064 , the manual headlamp mode has
priority over the daytime running lamp
mode
The corresponding exterior lamps come on
( Y page 250).
USA only
When the engine is running, and you turn the
exterior lamp switch to position 006C or
0064 , the manual headlamp mode has
priority over the daytime running lamp mode.
The corresponding exterior lamps come on
( Y page 250).
Locator lighting
The locator lighting is described in the
“Control system” section, see “Switching
locator lighting on or off” ( Y page 285).
Combination switch
Turn signals
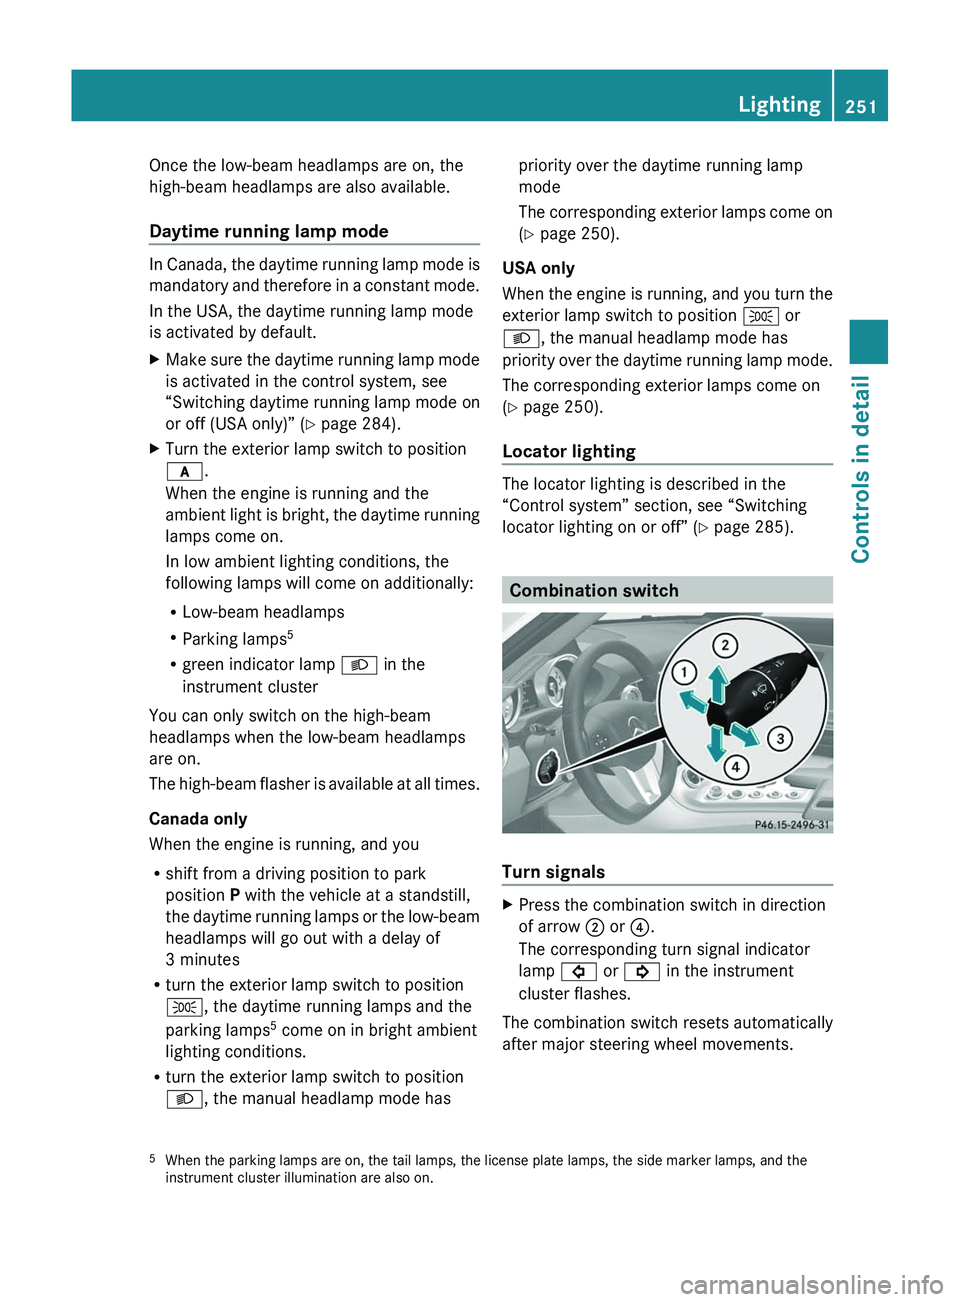
XPress the combination switch in direction
of arrow 0047 or 0088.
The corresponding turn signal indicator
lamp 0026 or 0024 in the instrument
cluster flashes.
The combination switch resets automatically
after major steering wheel movements.
5 When the parking lamps are on, the tail lamps, the license plate lamps, the side marker lamps, and the
instrument cluster illumination are also on.Lighting251Controls in detailBA 197 USA, CA Edition A 2011; 1; 27, en-UShereepeVersion: 3.0.3.52010-03-24T15:31:10+01:00 - Seite 251Z
Page 255 of 436
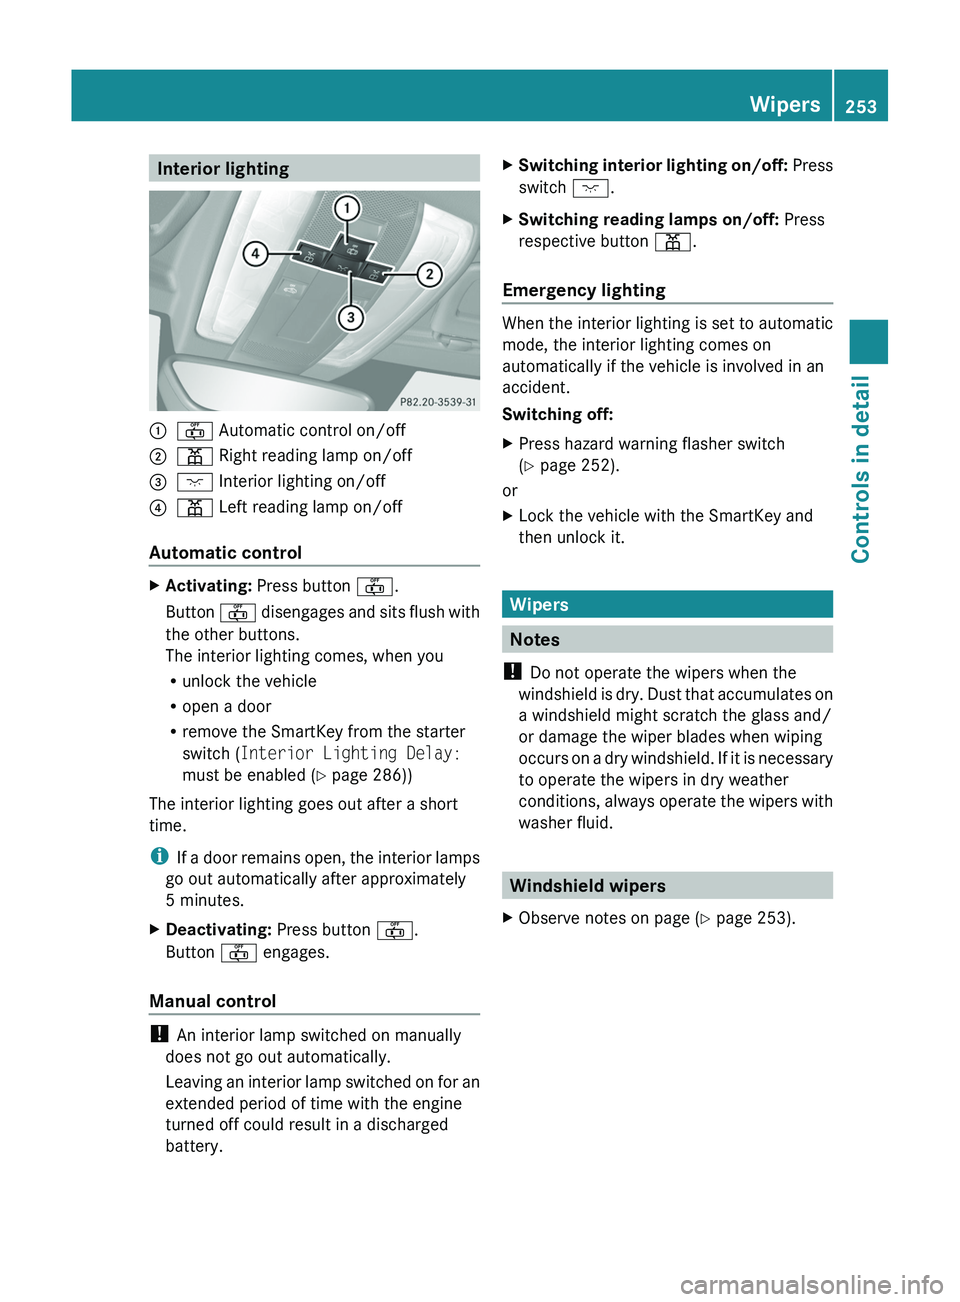
Interior lighting\000F\000= Automatic control on/off\000G\000I Right reading lamp on/off\000
Page 257 of 436
For information on filling up the washer
reservoir, see “Washer system and headlamp
cleaning system” ( Y page 325).
For information on cleaning the headlamps
with washer fluid, see “Headlamp cleaning
system” ( Y page 252).
Problems with wipers
! If anything blocks the windshield wipers
(leaves, snow, etc.), switch them off
immediately.
For safety reasons, do the following before
attempting to remove any blockage:
R Stop the vehicle in a safe location.
R Turn off the engine by pressing the
KEYLESS-GO start/stop button and
open the driver’s door (with the driver’s
door open, starter switch is in position
0 , same as with SmartKey removed from
starter switch).
or
R Remove the SmartKey from the starter
switch.
R Engage the electronic parking brake.
R Remove blockage.
R Turn the windshield wipers on again.
If the windshield wipers fail to function at
all with the combination switch in position
0062 or 0063 ,
R set the combination switch to the next
higher wiper speed
R have the windshield wipers checked at
the nearest authorized Mercedes-Benz
Center
Power windows
Opening and closing
The door windows are opened and closed
electrically. The switches for all windows are
located on the driver’s door. The switch for
operating the passenger-side windows is
located on the passenger door.GObserve Safety notes, see page 57.GWarning!
When opening or closing the door windows,
make sure there is no danger of anyone being
harmed by the opening/closing procedure.
The door windows are equipped with the
express operation and automatic reversal
function. If in express operation mode a door
window encounters an obstruction that
blocks its path, the automatic reversal
function will stop the door window and open
it slightly.
The door windows operate differently when
the switch is pulled and held. See the “Closing
when a door window is blocked” section in
this chapter for details.
The closing of the door windows can be
immediately halted by releasing the switch or,
if the switch was pulled past the resistance
point and released, by either pressing or
pulling the respective switch.
If a door window encounters an obstruction
that blocks its path in a circumstance where
you are closing the door windows by pressing
and holding button 0037 on the SmartKey the
automatic reversal function will not operate.
i You can also open or close the door
windows using the SmartKey, see
“Summer opening feature” ( Y page 256)
and “Convenience closing feature”
( Y page 257).
i After switching off the ignition or
removing the SmartKey from the starter
switch, you can operate the door windows
until you open a door. If no door was
opened you can operate the door windows
for up to 5 minutes.
Power windows255Controls in detailBA 197 USA, CA Edition A 2011; 1; 27, en-UShereepeVersion: 3.0.3.52010-03-24T15:31:10+01:00 - Seite 255Z
Page 258 of 436
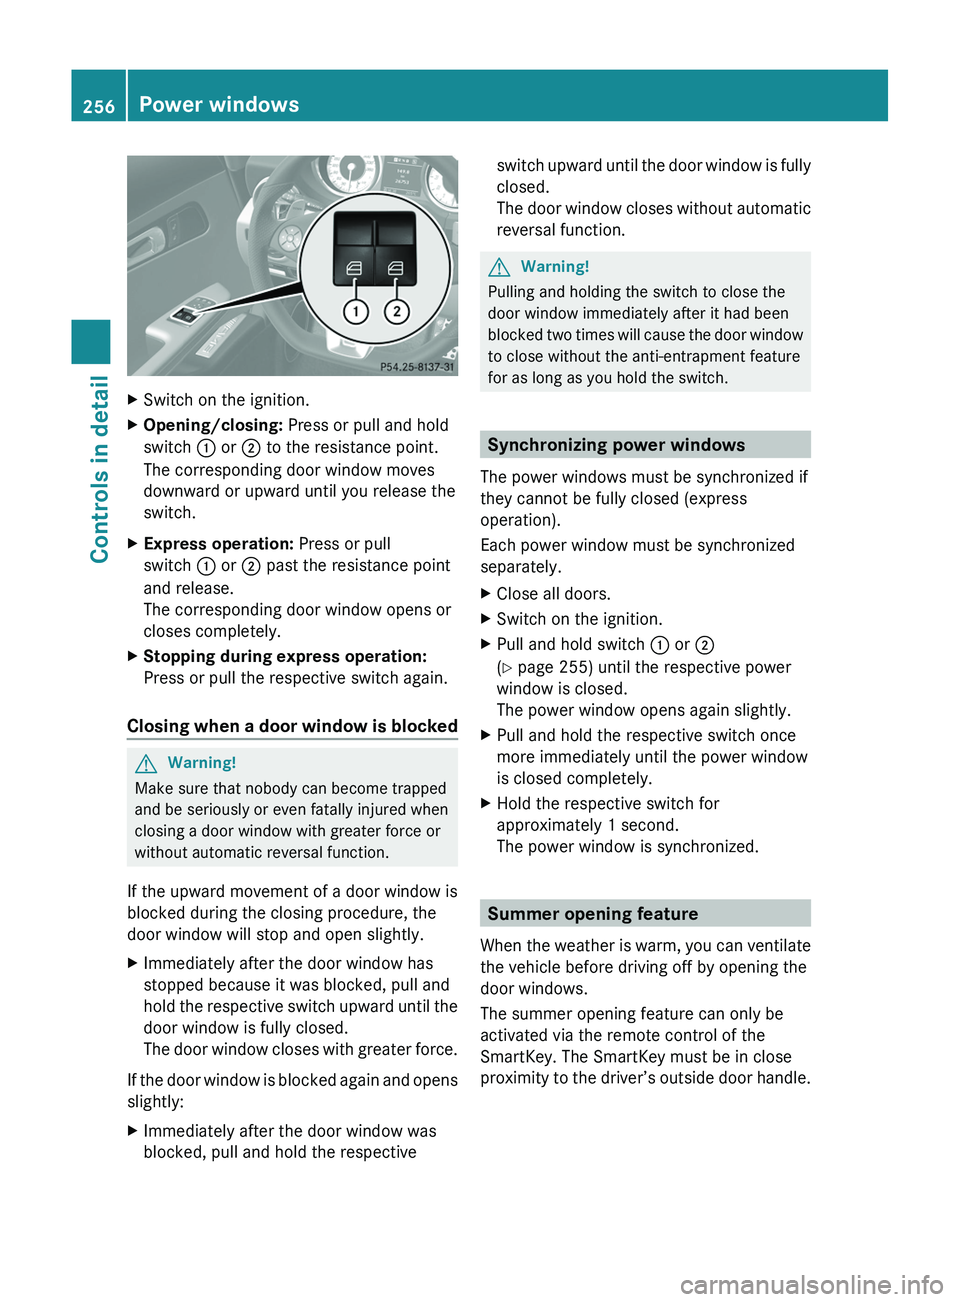
XSwitch on the ignition.XOpening/closing: Press or pull and hold
switch \000F or \000G to the resistance point.
The corresponding door window moves
downward or upward until you release the
switch.
XExpress operation: Press or pull
switch \000F or \000G past the resistance point
and release.
The corresponding door window opens or
closes completely.
XStopping during express operation:
Press or pull the respective switch again.
Closing when a door window is blocked
GWarning!
Make sure that nobody can become trapped
and be seriously or even fatally injured when
closing a door window with greater force or
without automatic reversal function.
If the upward movement of a door window is
blocked during the closing procedure, the
door window will stop and open slightly.
XImmediately after the door window has
stopped because it was blocked, pull and
hold the respective switch upward until the
door window is fully closed.
The door window closes with greater force.
If the door window is blocked again and opens
slightly:
XImmediately after the door window was
blocked, pull and hold the respective
switch upward until the door window is fully
closed.
The door window closes without automatic
reversal function.
GWarning!
Pulling and holding the switch to close the
door window immediately after it had been
blocked two times will cause the door window
to close without the anti-entrapment feature
for as long as you hold the switch.
Synchronizing power windows
The power windows must be synchronized if
they cannot be fully closed (express
operation).
Each power window must be synchronized
separately.
XClose all doors.XSwitch on the ignition.XPull and hold switch \000F or \000G
(Y page 255) until the respective power
window is closed.
The power window opens again slightly.
XPull and hold the respective switch once
more immediately until the power window
is closed completely.
XHold the respective switch for
approximately 1 second.
The power window is synchronized.
Summer opening feature
When the weather is warm, you can ventilate
the vehicle before driving off by opening the
door windows.
The summer opening feature can only be
activated via the remote control of the
SmartKey. The SmartKey must be in close
proximity to the driver’s outside door handle.
256Power windowsControls in detail
BA 197 USA, CA Edition A 2011; 1; 27, en-UShereepeVersion: 3.0.3.52010-03-24T15:31:10+01:00 - Seite 256
Page 284 of 436
RVehicle status message memory
( Y page 282)
R Checking tire inflation pressure
electronically with the Advanced TPMS
( Y page 329)
R Calling up the maintenance service
indicator display ( Y page 353)
Vehicle status message memory
Use the vehicle status message memory
function to scan malfunction and warning
messages that may be stored in the system.
Such messages appear in the multifunction
display and are based on conditions or
system status the vehicle’s system has
recorded.
GWarning!
Malfunction and warning messages are only
indicated for certain systems and are
intentionally not very detailed. The
malfunction and warning messages are
simply a reminder with respect to the
operation of certain systems. They do not
replace the owner’s and/or driver’s
responsibility to maintain the vehicle’s
operating safety. Have all required
maintenance and safety checks performed on
the vehicle. Bring the vehicle to an authorized
Mercedes-Benz Center to address the
malfunction and warning messages.
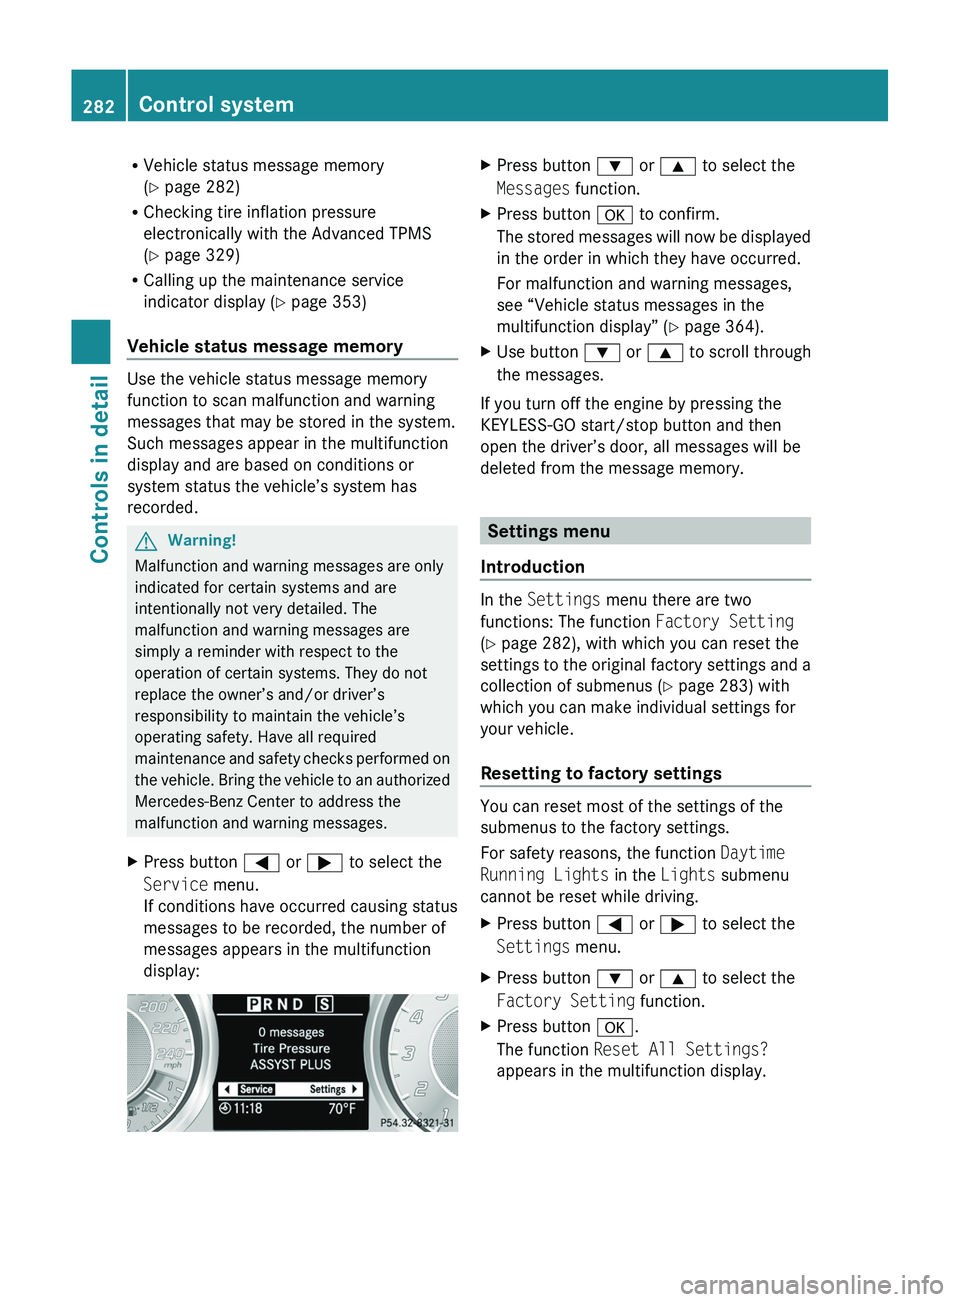
XPress button 0040 or 003E to select the
Service menu.
If conditions have occurred causing status
messages to be recorded, the number of
messages appears in the multifunction
display:XPress button 003D or 003C to select the
Messages function.XPress button 0064 to confirm.
The stored messages will now be displayed
in the order in which they have occurred.
For malfunction and warning messages,
see “Vehicle status messages in the
multifunction display” ( Y page 364).XUse button 003D or 003C to scroll through
the messages.
If you turn off the engine by pressing the
KEYLESS-GO start/stop button and then
open the driver’s door, all messages will be
deleted from the message memory.
Settings menu
Introduction
In the Settings menu there are two
functions: The function Factory Setting
( Y page 282), with which you can reset the
settings to the original factory settings and a
collection of submenus ( Y page 283) with
which you can make individual settings for
your vehicle.
Resetting to factory settings
You can reset most of the settings of the
submenus to the factory settings.
For safety reasons, the function Daytime
Running Lights in the Lights submenu
cannot be reset while driving.
XPress button 0040 or 003E to select the
Settings menu.XPress button 003D or 003C to select the
Factory Setting function.XPress button 0064.
The function Reset All Settings?
appears in the multifunction display.282Control systemControls in detail
BA 197 USA, CA Edition A 2011; 1; 27, en-UShereepeVersion: 3.0.3.52010-03-24T15:31:10+01:00 - Seite 282