2011 MERCEDES-BENZ SLS AMG light
[x] Cancel search: lightPage 358 of 436
Have paintwork repairs performed at an
authorized Mercedes-Benz Center.
Have stone chipping repairs as soon as
possible.
Remove the following immediately if possible.
Do not apply strong force.
R Soak insect remains with insect remover
and rinse them of with water afterwards.
Use a soft bristle toothbrush for remains
that have not come off.
R Soak bird droppings with water and rinse
them of with water afterwards. Use a soft
bristle toothbrush for remains that have not
come off.
R Remove tree resins, grease, oil, wax, and
gasoline with commercially available
benzine.
R Dab off tar splashes or tar stains with tar
remover.
Engine cleaning
Prior to cleaning the engine compartment,
make sure to protect electrical components
and connectors from contact with water and
cleaning agents.
Corrosion protection, such as MB
Anticorrosion Wax should be applied to the
engine compartment after every engine
cleaning. Before applying, all control linkage
bushings and joints should be lubricated. The
poly-V-belt and all pulleys should be
protected from any wax.
Vehicle washing
In the winter, thoroughly remove all traces of
road salt as soon as possible.
When washing the vehicle underbody, do not
forget to clean the inner sides of the wheels.
GWarning!
After washing the vehicle, braking efficiency
may be reduced. Reduced braking efficiency
could cause an accident.
Brake the vehicle significantly after washing
the vehicle. Observe the traffic situation when
doing so. The brake discs will warm up and
dry faster. Drive carefully after washing the
vehicle until the brakes have dried and you
can notice that brake efficiency has been
restored.
Hand-washXDo not use hot water or wash your vehicle
in direct sunlight.XOnly use a soft, wet cloth or sponge to
clean the vehicle.XOnly use a mild vehicle wash detergent,
such as Mercedes-Benz approved Car
Shampoo.XThoroughly spray the vehicle with a
diffused jet of water.XDo not spray directly towards the
ventilation intake.XUse plenty of water and rinse the sponge
and chamois frequently.XRinse with clean water and dry with a
chamois thoroughly.
Do not allow cleaning agents to dry on the
finish.
Automatic car wash
You can have your vehicle washed in an
automatic car wash from the start. Brushless
car washes are preferable.
XTo protect the filter system, activate the air
recirculation mode using button 0074 on
the climate control panel.
! Do not clean your vehicle in an automatic
touchless car wash which uses caustic
spray. Caustic spray will damage the paint
or ornamental moldings.
If the vehicle is very dirty, prewash it before
running it through the automatic car wash.
! Make sure the combination switch is set
to wiper setting 0027. Otherwise, the rain
sensor could activate and cause the wipers
to move unintentionally. This may lead to
vehicle damage.
356Vehicle careOperation
BA 197 USA, CA Edition A 2011; 1; 27, en-UShereepeVersion: 3.0.3.52010-03-24T15:31:10+01:00 - Seite 356
Page 360 of 436
XOnly use clean water and a soft, non-
scratching cloth to clean rear view camera
lens 0046.
Be careful not to apply wax to rear view
camera lens 0046 when waxing the vehicle. If
necessary, remove the wax using the
Mercedes-Benz approved Car Shampoo with
plenty of water.
! Do not clean the camera and the area
around the camera
R with a high-pressure cleaner
R with a dry cloth and strong pressure
R with aggressive cleaning agents
You could otherwise damage the camera.
Cleaning the windows and the wiper
blades
! The windshield wipers must be in a
vertical position before folding them away
from the windshield. They could otherwise
damage the hood.
Never open the hood when the wiper arms
are folded forward.
XMake sure the hood is fully closed.XSwitch on the ignition.XTurn combination switch to wiper setting
00B6 (Y page 253).XWith wiper arms in vertical position, switch
off the ignition.GWarning!
For safety reasons, switch off wipers and
remove SmartKey from starter switch before
cleaning the windshield and/or the wiper
blades. KEYLESS-GO: Make sure the vehicle’s
on-board electronics have status 0.
Otherwise, the wiper motor could suddenly
turn on and cause injury.
! Do not pull on the wiper blade inserts.
They could tear.
XFold the wiper arms forward until they snap
into place.XClean the windshield and the wiper blade
inserts with a clean cloth and mild
detergent solution.XUse a soft, clean cloth and a mild window
cleaning solution on all outside and inside
glass surfaces.
An automotive glass cleaner is
recommended.
! Fold the windshield wiper arms back onto
the windshield before pressing the
KEYLESS-GO start/stop button or turning
the SmartKey in the starter switch.
Hold on to the wiper when folding the wiper
arm back. If released, the force of the
impact from the tensioning spring could
crack the windshield.
! To clean the window interior, do not use
a dry cloth, abrasives, solvents or cleaners
containing solvents. Do not touch the
inside of the windows with hard objects
such as an ice scraper or ring. Doing so may
damage the windows.
Light alloy wheels
If possible, clean wheels once a week.
XUse Mercedes-Benz approved Wheel Care,
a soft bristle brush and a strong spray of
water for cleaning the light alloy wheels.
! Only use acid-free cleaning materials.
Acid may cause corrosion or damage the
clear coat.
! The vehicle should not be parked for an
extended period of time immediately after
it has been cleaned. This applies especially
after the wheel rims have been cleaned
with wheel rim cleaner. Wheel rim cleaners
can lead to increased corrosion of the
brake disks and brake pads. Non-approved
wheel cleaners may also damage the wheel
paint if the vehicle is not driven after
cleaning.
358Vehicle careOperation
BA 197 USA, CA Edition A 2011; 1; 27, en-UShereepeVersion: 3.0.3.52010-03-24T15:31:10+01:00 - Seite 358
Page 361 of 436
Therefore, the vehicle’s brake system
should always be warmed-up before it is
parked after cleaning. Drive your vehicle for
several minutes to allow the brakes to dry.
When applying Mercedes-Benz approved
Tire Care and Mercedes-Benz approved
Wheel Care products, take care not to
spray them on the brake disks.
Plastic and rubber partsXUse a gentle dishwashing detergent or mild
detergent for delicate fabrics as a washing
solution.XWipe with a cloth moistened in a lukewarm
solution.
The surface may temporarily change color.
If this is the case, wait for it to dry.GWarning!
Do not use cleaners or cockpit care sprays
containing solvents to clean the cockpit or the
steering wheel. Cleaners containing solvents
will make the surface porous and vehicle
occupants could suffer serious injuries from
plastic parts coming loose in the event of air
bag deployment.
! Do not use oil, wax or scouring agents.
Otherwise you may scratch or damage the
surface.
Hard plastic trim items
XUse Mercedes-Benz approved Interior Care
on a soft, lint-free cloth and apply with light
pressure.
COMAND display
! You must switch off the COMAND display
and allow it to cool prior to cleaning.
! Do not use any liquids or cleaning agents.
These can damage or even destroy the
COMAND display screen.
XUse a standard microfiber cloth and apply
with light pressure.Steering wheel and gear selector leverXWipe with a damp cloth and dry thoroughly
or clean with Mercedes-Benz approved
Leather Care.
Carpets
XUse Mercedes-Benz approved Carpet and
Fabric Care for cleaning the carpets.
Headliner
XUse a soft bristle brush or a dry-shampoo
cleaner in case of excessive dirt.
Seat belts
XOnly use clear, lukewarm water and soap.
! The seat belts must not be treated with
chemical cleaning agents. Do not dry the
seat belts at temperatures above 176‡
(80†) or in direct sunlight.
GWarning!
Do not bleach or dye seat belts as this may
severely weaken them. In a crash they may
not be able to provide adequate protection.
Upholstery
Using aftermarket seat covers or wearing
clothing that have the tendency to give off
coloring (e.g. when wet, etc.) may cause the
upholstery to become permanently
discolored. By lining the seats with a proper
intermediate cover, contact-discoloration will
be prevented.
GWarning!
Only use seat covers which have been tested
and approved by Mercedes-Benz for your
vehicle model. Using other seat covers may
interfere with or prevent the deployment of
the side impact air bags. Contact an
authorized Mercedes-Benz Center for
availability.
Vehicle care359OperationBA 197 USA, CA Edition A 2011; 1; 27, en-UShereepeVersion: 3.0.3.52010-03-24T15:31:10+01:00 - Seite 359Z
Page 362 of 436
Leather upholstery
Please note that leather upholstery is a
natural product and is therefore subject to a
natural aging process. Leather upholstery
may also react to certain ambient influences
such as high humidity or high temperature by
showing wrinkles for example.
XWipe leather upholstery with a damp cloth
and dry thoroughly or clean with Mercedes-
Benz approved Leather Care.
! To avoid damage to leather upholstery:
RWipe with light pressure only.
RDo not clean with abrasive cleaning
agents such as scouring milk or powder.
RDo not soak the leather upholstery.
As leather is a natural product, it could
otherwise harden or become porous.
RExercise particular care when cleaning
perforated leather as its underside
should not become wet.
Chrome-plated exhaust tip
Regular cleaning and care of chrome-plated
exhaust tips will help to maintain their shine
and the classy appearance.
XUse Mercedes-Benz approved Chrome
Polishing Paste each time the vehicle has
been washed, especially during the winter.
! Do not use alkaline cleaners such as
wheel cleaners as they could cause
corrosion.
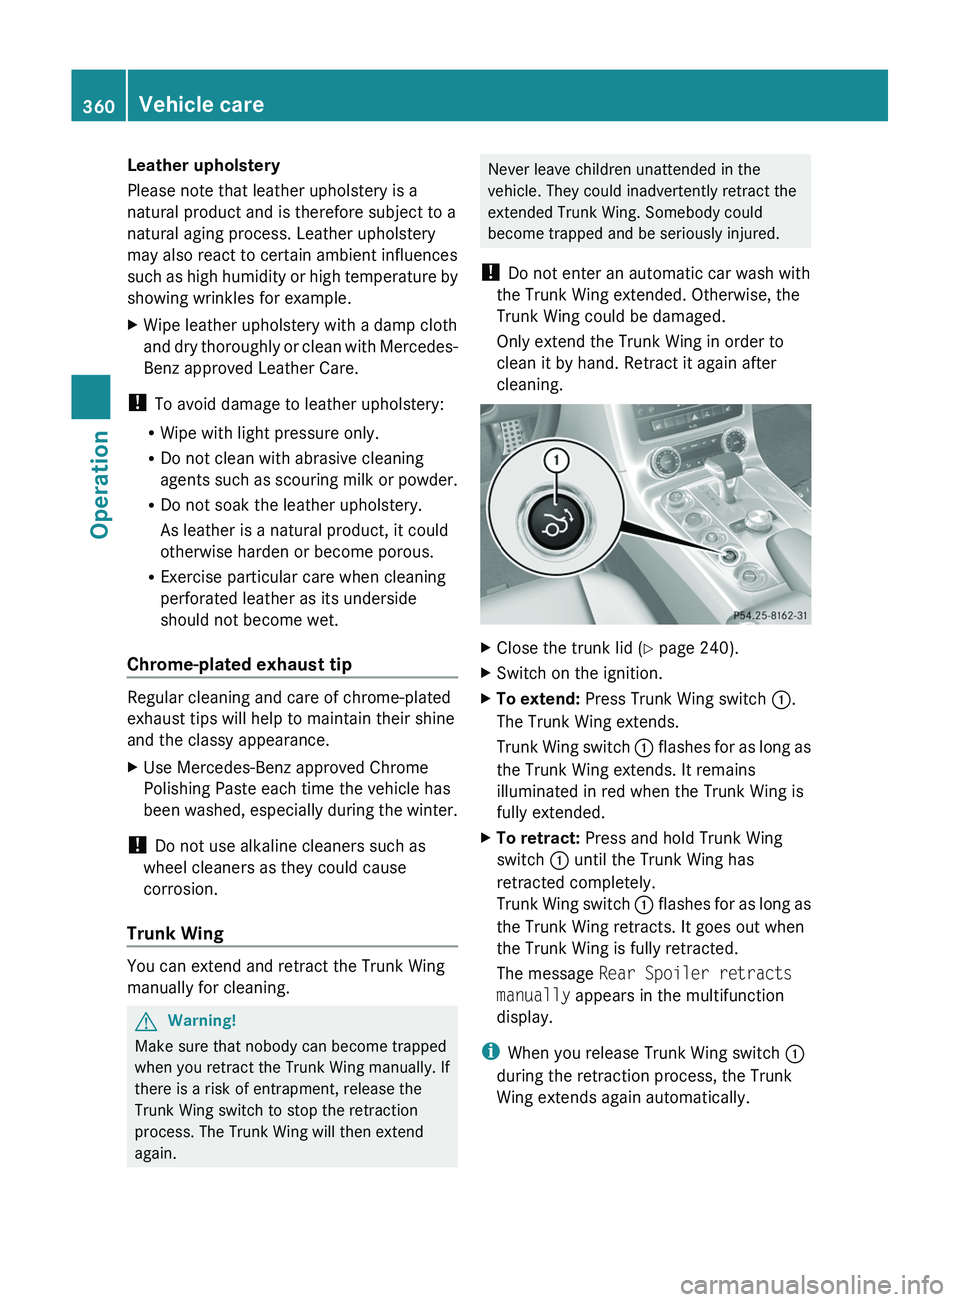
Trunk Wing
You can extend and retract the Trunk Wing
manually for cleaning.
GWarning!
Make sure that nobody can become trapped
when you retract the Trunk Wing manually. If
there is a risk of entrapment, release the
Trunk Wing switch to stop the retraction
process. The Trunk Wing will then extend
again.
Never leave children unattended in the
vehicle. They could inadvertently retract the
extended Trunk Wing. Somebody could
become trapped and be seriously injured.
! Do not enter an automatic car wash with
the Trunk Wing extended. Otherwise, the
Trunk Wing could be damaged.
Only extend the Trunk Wing in order to
clean it by hand. Retract it again after
cleaning.
XClose the trunk lid (Y page 240).XSwitch on the ignition.XTo extend: Press Trunk Wing switch \000F.
The Trunk Wing extends.
Trunk Wing switch \000F flashes for as long as
the Trunk Wing extends. It remains
illuminated in red when the Trunk Wing is
fully extended.
XTo retract: Press and hold Trunk Wing
switch \000F until the Trunk Wing has
retracted completely.
Trunk Wing switch \000F flashes for as long as
the Trunk Wing retracts. It goes out when
the Trunk Wing is fully retracted.
The message Rear Spoiler retracts
manually appears in the multifunction
display.
iWhen you release Trunk Wing switch \000F
during the retraction process, the Trunk
Wing extends again automatically.
360Vehicle careOperation
BA 197 USA, CA Edition A 2011; 1; 27, en-UShereepeVersion: 3.0.3.52010-03-24T15:31:10+01:00 - Seite 360
Page 386 of 436
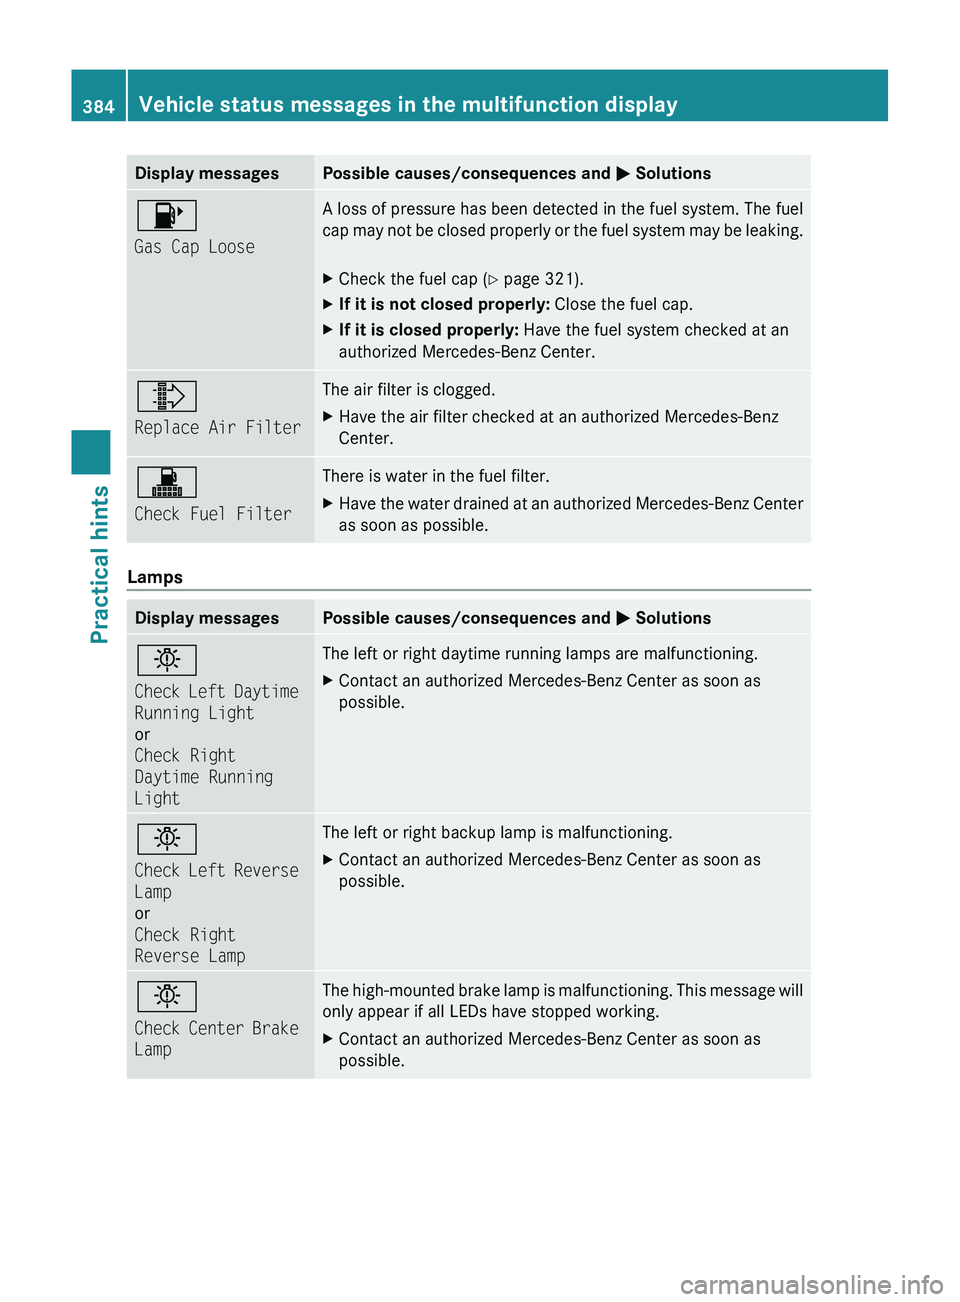
Display messagesPossible causes/consequences and 0050 Solutions00B8
Gas Cap LooseA loss of pressure has been detected in the fuel system. The fuel
cap may not be closed properly or the fuel system may be leaking.XCheck the fuel cap ( Y page 321).XIf it is not closed properly: Close the fuel cap.XIf it is closed properly: Have the fuel system checked at an
authorized Mercedes-Benz Center.00A0
Replace Air FilterThe air filter is clogged. XHave the air filter checked at an authorized Mercedes-Benz
Center.0049
Check Fuel FilterThere is water in the fuel filter.XHave the water drained at an authorized Mercedes-Benz Center
as soon as possible.
Lamps
Display messagesPossible causes/consequences and 0050 Solutions0055
Check Left Daytime
Running Light
or
Check Right
Daytime Running
LightThe left or right daytime running lamps are malfunctioning.XContact an authorized Mercedes-Benz Center as soon as
possible.0055
Check Left Reverse
Lamp
or
Check Right
Reverse LampThe left or right backup lamp is malfunctioning. XContact an authorized Mercedes-Benz Center as soon as
possible.0055
Check Center Brake
LampThe high-mounted brake lamp is malfunctioning. This message will
only appear if all LEDs have stopped working.XContact an authorized Mercedes-Benz Center as soon as
possible.384Vehicle status messages in the multifunction displayPractical hints
BA 197 USA, CA Edition A 2011; 1; 27, en-UShereepeVersion: 3.0.3.52010-03-24T15:31:10+01:00 - Seite 384
Page 388 of 436
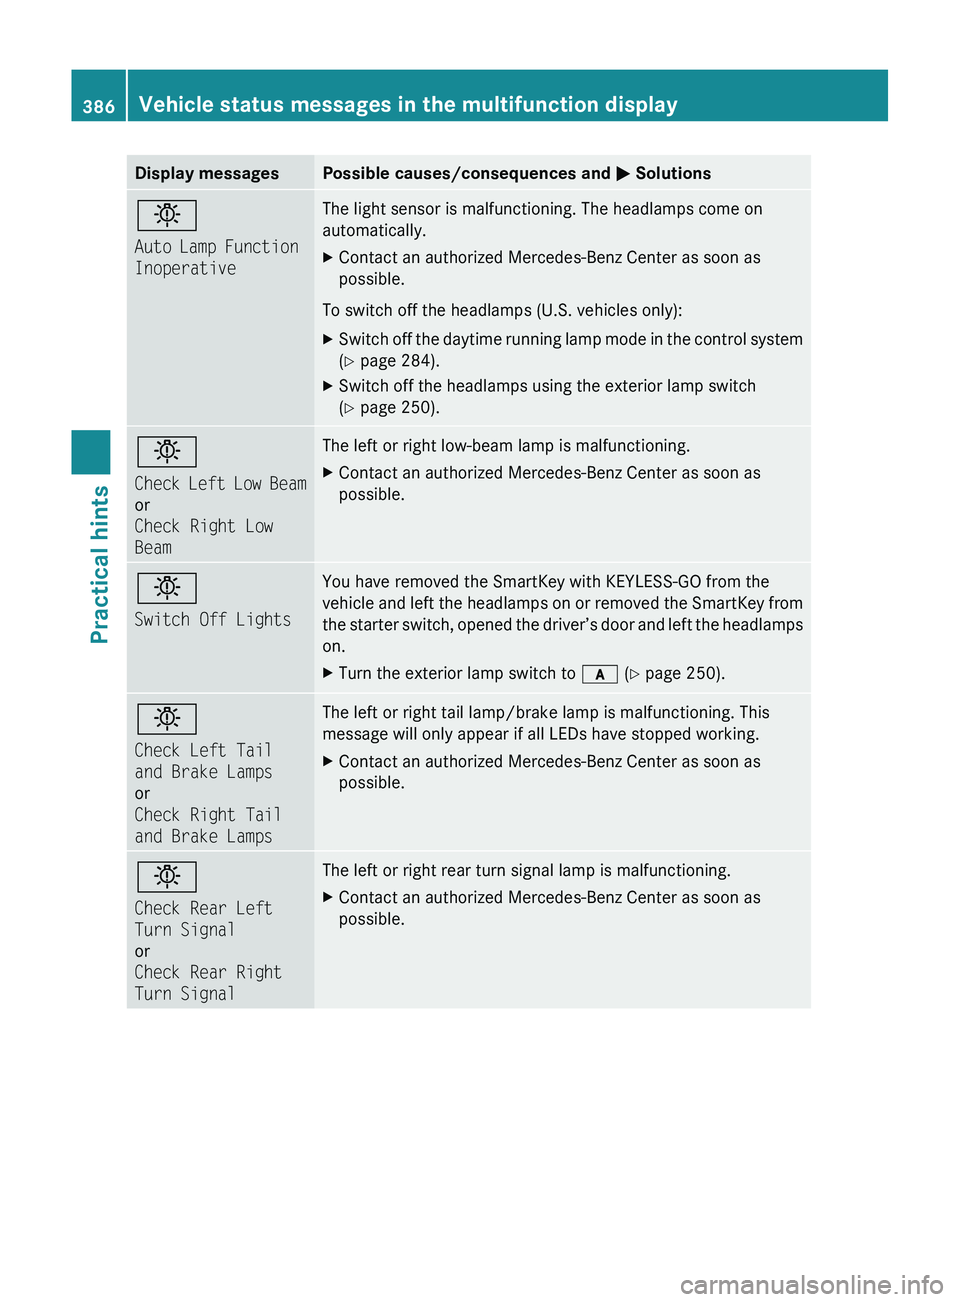
Display messagesPossible causes/consequences and 0050 Solutions0055
Auto Lamp Function
InoperativeThe light sensor is malfunctioning. The headlamps come on
automatically. XContact an authorized Mercedes-Benz Center as soon as
possible.
To switch off the headlamps (U.S. vehicles only):
XSwitch off the daytime running lamp mode in the control system
( Y page 284).XSwitch off the headlamps using the exterior lamp switch
( Y page 250).0055
Check Left Low Beam
or
Check Right Low
BeamThe left or right low-beam lamp is malfunctioning. XContact an authorized Mercedes-Benz Center as soon as
possible.0055
Switch Off LightsYou have removed the SmartKey with KEYLESS-GO from the
vehicle and left the headlamps on or removed the SmartKey from
the starter switch, opened the driver’s door and left the headlamps
on.XTurn the exterior lamp switch to 0066 (Y page 250).0055
Check Left Tail
and Brake Lamps
or
Check Right Tail
and Brake LampsThe left or right tail lamp/brake lamp is malfunctioning. This
message will only appear if all LEDs have stopped working.XContact an authorized Mercedes-Benz Center as soon as
possible.0055
Check Rear Left
Turn Signal
or
Check Rear Right
Turn SignalThe left or right rear turn signal lamp is malfunctioning.XContact an authorized Mercedes-Benz Center as soon as
possible.386Vehicle status messages in the multifunction displayPractical hints
BA 197 USA, CA Edition A 2011; 1; 27, en-UShereepeVersion: 3.0.3.52010-03-24T15:31:10+01:00 - Seite 386
Page 400 of 436
Unlocking/locking the vehicle
If you cannot lock or unlock the vehicle
centrally with the SmartKey, use the
mechanical key.
The anti-theft alarm system will be triggered
when you
Runlock the driver’s door with the
mechanical key
and
Ropen the driver’s door
To cancel the alarm, see “Canceling the
alarm” (Y page 67).
XRemove the mechanical key from the
SmartKey (Y page 397).
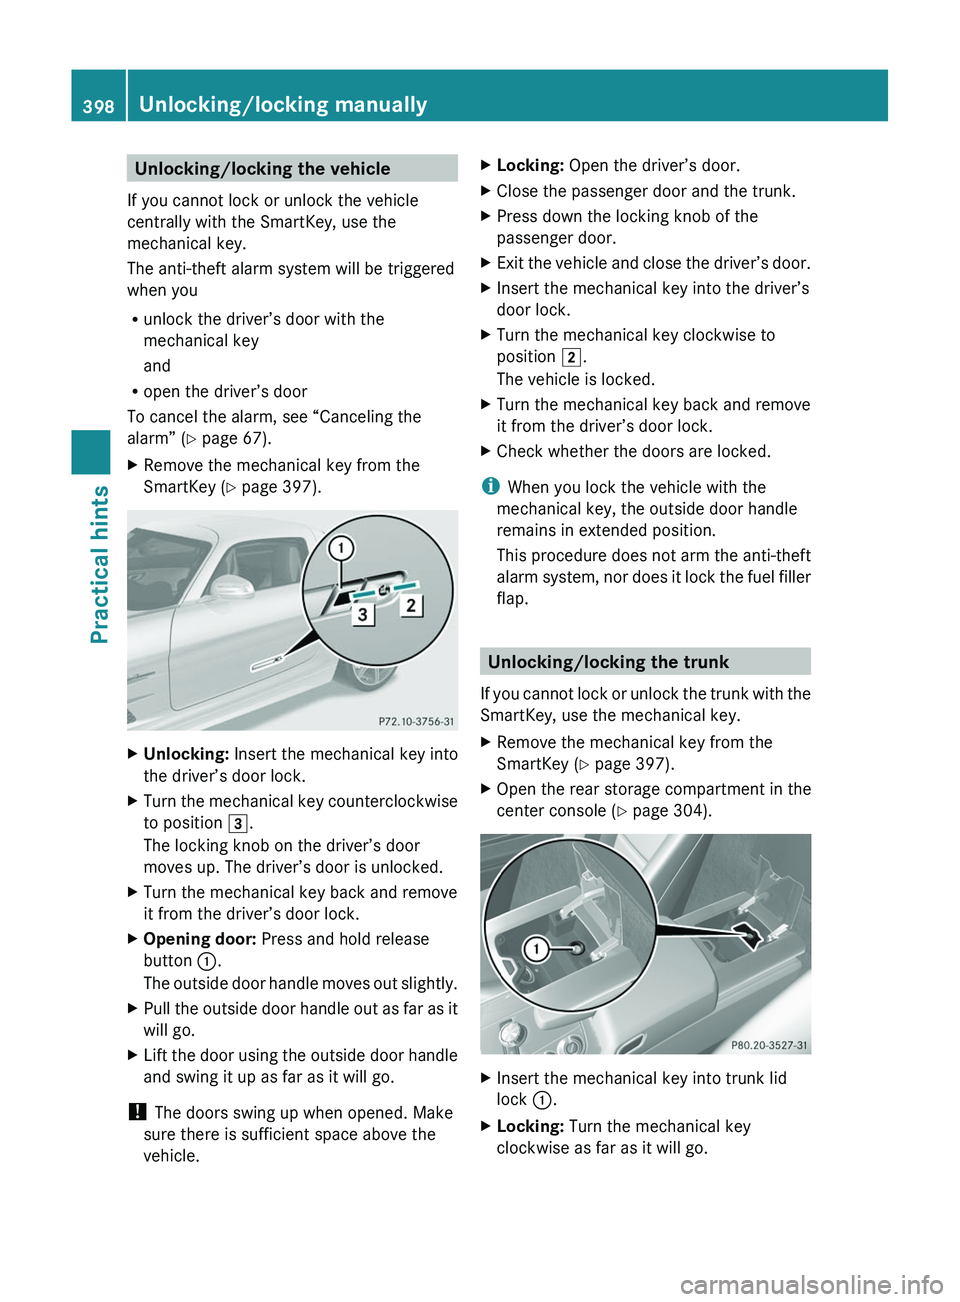
XUnlocking: Insert the mechanical key into
the driver’s door lock.
XTurn the mechanical key counterclockwise
to position \000L.
The locking knob on the driver’s door
moves up. The driver’s door is unlocked.
XTurn the mechanical key back and remove
it from the driver’s door lock.
XOpening door: Press and hold release
button \000F.
The outside door handle moves out slightly.
XPull the outside door handle out as far as it
will go.
XLift the door using the outside door handle
and swing it up as far as it will go.
! The doors swing up when opened. Make
sure there is sufficient space above the
vehicle.
XLocking: Open the driver’s door.XClose the passenger door and the trunk.XPress down the locking knob of the
passenger door.
XExit the vehicle and close the driver’s door.XInsert the mechanical key into the driver’s
door lock.
XTurn the mechanical key clockwise to
position \000K.
The vehicle is locked.
XTurn the mechanical key back and remove
it from the driver’s door lock.
XCheck whether the doors are locked.
iWhen you lock the vehicle with the
mechanical key, the outside door handle
remains in extended position.
This procedure does not arm the anti-theft
alarm system, nor does it lock the fuel filler
flap.
Unlocking/locking the trunk
If you cannot lock or unlock the trunk with the
SmartKey, use the mechanical key.
XRemove the mechanical key from the
SmartKey (Y page 397).
XOpen the rear storage compartment in the
center console (Y page 304).
XInsert the mechanical key into trunk lid
lock \000F.
XLocking: Turn the mechanical key
clockwise as far as it will go.
398Unlocking/locking manuallyPractical hints
BA 197 USA, CA Edition A 2011; 1; 27, en-UShereepeVersion: 3.0.3.52010-03-24T15:31:10+01:00 - Seite 398
Page 402 of 436
Replacing bulbs
Safety notes
Safe vehicle operation depends on proper
exterior lighting and signaling to a large
degree.
Correct headlamp adjustment is extremely
important. Have headlamps checked and
readjusted at regular intervals and when a
bulb has been replaced. Contact an
authorized Mercedes-Benz Center for
headlamp adjustment.
GWarning!
Bulbs and bulb sockets can be very hot. Allow
the lamp to cool down before changing a bulb.
Keep bulbs out of reach of children.
Halogen lamps contain pressurized gas. A
bulb can explode if you
R touch or move it when hot
R drop the bulb
R scratch the bulb
Wear eye and hand protection.
Because of high voltage in Xenon lamps, it is
dangerous to replace the bulb or repair the
lamp and its components. We recommend
that you have such work done by a qualified
technician.
i Since replacing bulbs is a technically
highly demanding process, we recommend
to have them replaced at an authorized
Mercedes-Benz Center.
i If the headlamps are fogged up on the
inside as a result of high humidity, driving
the vehicle a distance with the lights on
should clear up the fogging.
Replacing bulbs for front lamps
You cannot replace the bulbs in the front
lamps yourself. Contact an authorized
Mercedes-Benz Center or a qualified
workshop.
Replacing bulbs for rear lamps
Except for the license plate lamp bulbs, you
cannot replace the bulbs in the rear lamps
yourself.
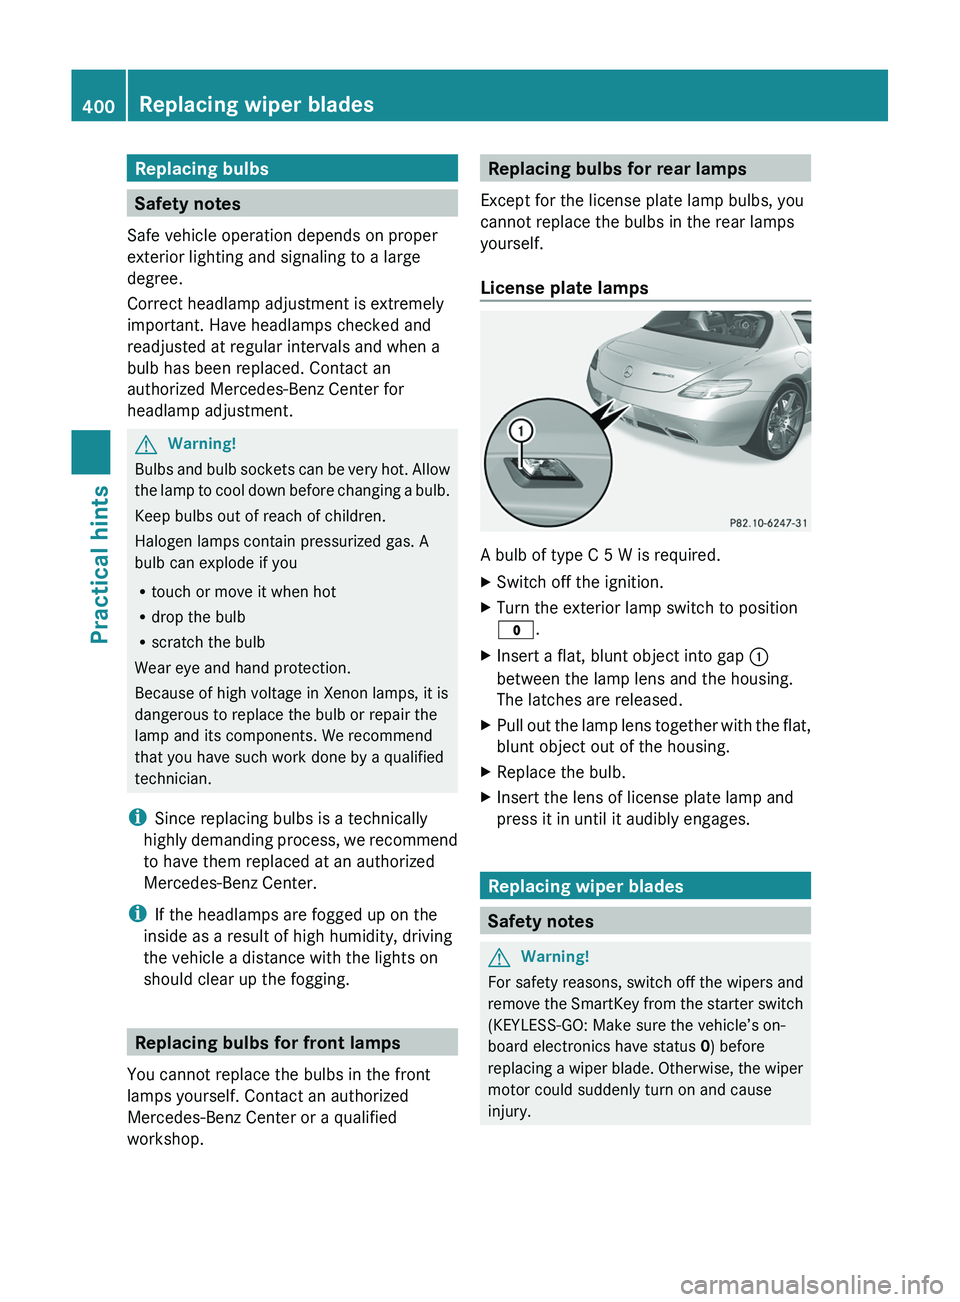
License plate lamps
A bulb of type C 5 W is required.
XSwitch off the ignition.XTurn the exterior lamp switch to position
0027 .XInsert a flat, blunt object into gap 0046
between the lamp lens and the housing.
The latches are released.XPull out the lamp lens together with the flat,
blunt object out of the housing.XReplace the bulb.XInsert the lens of license plate lamp and
press it in until it audibly engages.
Replacing wiper blades
Safety notes
GWarning!
For safety reasons, switch off the wipers and
remove the SmartKey from the starter switch
(KEYLESS-GO: Make sure the vehicle’s on-
board electronics have status 0) before
replacing a wiper blade. Otherwise, the wiper
motor could suddenly turn on and cause
injury.
400Replacing wiper bladesPractical hints
BA 197 USA, CA Edition A 2011; 1; 27, en-UShereepeVersion: 3.0.3.52010-03-24T15:31:10+01:00 - Seite 400