2011 MERCEDES-BENZ M-CLASS SUV wheel
[x] Cancel search: wheelPage 172 of 389

The table shows approach and departure
angles :and ;when the vehicle is loaded
and ready to drive.
For vehicles with steel springs, loaded and
ready to driv emeans: afull tank, all fluids
topped up and the driver is in the vehicle.
On vehicles with the AIRMATI Cpackag eor
the ON&OFFROAD package, load suptothe
maximu mpermissible load have no influence
on approach/departur eangles. :
: 13
;
Steel-sp
rung
vehicles 26
°14 25
°15 25
°16 Vehicles with
th
eA IRMATIC
package Highway level
23° 22°
22°
17 Raised level
28° 27° 27°
Vehicles with
th
eO N&O FF-
ROA Dpackage Highway level
23° 22°
22°
17 Off-roa
dleve l1 26° 25° 25°
Off-road level 2
28° 27° 27°
Off-road level 3
31° 29° 29°
R
Follo wthe lineoff all when driving on slopes
and steep inclines.
R Before driving on extreme uphill and down-
hill gradients ,select th eoff-roa dprogram
(Y page 222) or the LOW RANGE off-road
gear (Y page 223).
R Observ ethe warnings fo roff-roa ddriving
(Y page 166).
R Drive slowly. R
Accelerat egentl yand mak esure that the
wheels are gripping.
R Avoid high engin espeeds, excep twhen
drivin gons andy and muddy routes with
high driving resistance.
R Select ashift range appropriate to the gra-
dient.
R Before tacklin gsteep downhill gradients,
select shift range 1.
Maximum gradient-climbin gcapability On good road surfaces and wit
hthe LOW
RANGE off-road gear selected, the full gradi-
ent -climbing capability is available.
i If the load on the front axle is reduced
when pulling away on asteep uphill slope,
the front wheels have atendency to spin.
4ETS recognises this and brakes the
wheels accordingly. The rear wheel torque
is increased and it is easier to pull away.
Brow of hill When driving up an uphill gradient, slightly
reduc epressure on th eaccelerator immedi-
atel ybefor ereachin gthe brow of the hill.
Make use of the vehicle' sown impetus to
travel over the brow.
This style of driving prevents:
R the vehicle from lifting off the ground on the
brow of ahill
R the vehicle from travelling too quickly down
the other side
Driving downhill R
Driv eslowly.
R Do not drive at an angle down steep
inclines. Steer into the line of fall and drive
with the front wheels aligned straight. Oth-
13
14
15
16
17 Drivin
gtips
169Driving and park ing Z
The ML 25
0BlueTEC 4MATIC model has an approach angle of 25°.
The ML 250 BlueTEC 4MATIC model with AMG bodystyling has an approach angle of 24°.
The ML 250 BlueTEC 4MATIC model has adeparture angle of 24°.
With AMG bodystyling.
The ML 35 04MATI Cmodel has adeparture angle of 23°.
Page 173 of 389

erwise, the vehicle could slip sideways, tip
and over turn.
R Before tackling steep downhill gradients,
select shift range 1.
R Activat eDSR. If this is not suffici ent, brake
gently. Whe ndoing so, make sure that the
vehicle is facing in the direction of the line
of fall.
R Check that the brakes ar eworking normally
after along downhil lstretch.
i Off-road ABS is activated when the off-
road program or LOW RANGE off-road gear
is selected.
At speeds belo w30km/h, th efront wheels
lock cyclicall yduring braking. The digging-
in effect achieved in the process reduces
the stopping distance when driving off-
road. The steerability of the vehicle is con-
siderably reduced if the wheel slock. Driving systems
Cruise control
Important safety notes G
WARNING
Do not change down for additiona lengine
braking on aslippery road surface. This could
cause the drive wheels to lose their grip and
the vehicle could skid. G
WARNING
Cruise control cannot take account of road
and traffic conditions.
Always pay attention to traffic conditions
even when cruise control is activated.
Cruise control is only an aid designed to assist
driving. You are responsible for the vehicle's
speed and for braking in good time. G
WARNING
Do not use cruise control
R in traffic conditions that do not allow you to
drive at aconstant speed (e.g. heavy traffic or winding roads). You may otherwise
cause an accident.
R on slipper yroads. The driv ewheels may
lose their grip when brakin goraccelerating
and the vehicle may skid.
R whe nthere is low visibility, e.g. due to fog,
heav yrain or snow.
General notes Cruise control maintains
aconstant road
speed for you. It brakes automatically in order
to avoid exceeding the set speed. On long and
steep downhil lgradients ,especially if the
vehicle is laden or towing atrailer, yo umust
select shift range 1,2or 3in good time. By
doing so, you will make use of the braking
effect of the engine. This relieves the load on
the brake system and prevent sthe brakes
from overheating and wearing too quickly.
Use cruise con trol only if roa dand traffic con-
ditions make it appropriate to maintain a
steady speed for aprolonged period. Yo ucan
store any road spee dabove 30 km/h.
Cruise contro llever :
To activate or increase speed
; LIMi ndicato rlamp
= To activate at the current speed/last
stored speed
? To activate or reduce speed
A To switch between cruise control and var-
iable SPEEDTRONIC
B To deactivate cruise control 170
Driving systemsDriving and parking
Page 175 of 389
X
Makin gadjustments in 1km/h incre-
ments: briefly press the cruise control
leve rtot he pressur epoint.
The last stored speed increases or decrea-
ses in 1km/h increments.
X Makin gadjustments in 10 km/h incre-
ments: briefly pres sthe cruise con trol
leve rbeyond the pressur epoint.
The last stored speed increases or decrea-
ses in 10 km /hincrements.
i Cruise control is not deactivated if you
depress the accelerator pedal. For exam-
ple, if you accelerate briefly to overta ke,
cruis econtrol adjusts the vehicle' sspeed
to the last speed stored after you have fin-
ished overtaking.
Deactivating cruise control There are several ways to deactivat
ecruise
con trol:
X Briefl ypres sthe cruise con trol leve rfor-
wards B.
or
X Brake
or
X Briefl ypres sthe cruise con trol leve rinthe
direction of arrow A.
Variable SPE EDTRONIC is selected. LIM
indicator lamp ;in the cruise control lever
lights up.
Cruise control is automatically deactivated if:
R you engage the electric parkin gbrake.
R yo ua re driving at less than 30 km/h.
R ESP ®
intervenes or if yo udeactivate ESP ®
.
R you activate DSR.
R you activate off-road program 2onvehicles
with the ON&OFFROA Dpackage.
R you shift the transmissio ntoposition N
while driving.
If cruise control is deactiva ted, you will hear
aw arning tone. You will see the Cruisecontro
loff message in th
emultifunction
display for approximately five seconds. i
When you switch off the engine, the last
spee dstored is cleared. SPEEDTRONIC
Important safet ynotes G
WARNING
Never depress the brake pedal continuously
while the vehicle is in motion ,e.g. never cause
the brakes to rub by applying constant slight
pedal pressure. This causes the brake system
to ove rheat, increases the braking distance
and can lead to the brakes failing completely. G
WAR
NING
Do not change down for additional engine
braking on aslippery road surface. This could
cause the drive wheels to lose their grip and
the vehicle could skid. G
WARNING
SPEEDTRONIC is only an aid designed to
assist driving. You are responsible for the
vehicle's speed and for braking in good time. G
WARNING
If ther eisac hange of drivers, advise the new
drive rofthe limit speed stored.
Only use variable SPE EDTRONI Cifyou will not
have to accelerate suddenl ytoaspeed above
that stored as the limit speed. You could oth-
erwise cause an accident.
You can only exceed the limit speed stored if
you deactivate variable SPE EDTRONIC:
R using the cruise control lever
R by depressin gthe accelerator pedal
beyon dthe pressure point (kickdown)
It is not possible to deactivate variable
SPE EDTRONI Cbybraking.
General notes SPE
EDTRONIC brakes automatically so that
you do not exceed the set speed. On long and
steep downhil lgradients ,especially if the 172
Driving systemsDriving and parking
Page 177 of 389
X
Release the cruise con trol lever.
The ne wspeed is stored.
X Makin gadjustments in1k m/ hincre-
ments: brieflypress the cruis econtrol
lever to the pressurepoint.
The last store dspeed increase sordecrea-
ses in 1km/ hincre ments.
X Mak ing adjustment sin10km/hincre-
ments: brieflypress the cruis econtrol
lever beyon dthe pressur epoint.
The last store dspeed increase sordecrea-
ses in 10 km/h increments.
Deactivating variabl eSPEED TRONIC G
WARNING
It is not possible to deactivate variable Speed-
tronic by braking.
There are severa lways to deactivate variable
SPEEDTRONIC:
X Briefly press the cruise control lever for-
wards B.
or
X Briefly press the cruise control lever in the
direction of arrow A.
LIM indicator lamp ;in the cruise control
lever goes out. Variable SPEEDTRONIC is
deactivated.
Cruise control or DISTRONIC PLUS is selec-
ted.
Variable SPEEDTRONIC is automatically
deactivated if:
R you depress the accelerator pedal beyond
the pressure point (kickdown), but only if
your current spee ddoes not differ by more
than 20 km /h from the stored speed. You
will hear awarning tone if this is the case.
R you activate DSR.
R you activate off-road program 2(vehicles
wit hthe ON&OFFROAD package).
i When you switch off the engine, the last
speed stored is cleared. Permane
nt SPEEDTRONIC You can use the on-board computer to limit
the speed permanently to
avalue between
16 0k m/ h(e.g. for driving on winter tyres)
and th emaximum speed ( Ypage 249).
Shor tlyb efore th estore dspeed is reached, it
appear sinthe multifunction display.
Permanent SPEEDTRONIC remain sactive,
even if variabl eSPEEDTRONI Cisdeactivated.
You can note xceed the sto redl imit speed,
even if you depress the accelerator pedal
beyond the pressure point (kickdown). DISTRONIC PLUS
Importan tsafety notes G
WARNING
Do not change down for additiona lengine
braking on aslippery road surface. This could
cause the drive wheels to lose their grip and
the vehicle could skid. G
WARNING
DISTRONIC PLU Siso nly an aid designe dto
assis tdriving. Th edrive rremain sfully respon-
sible for the vehicle's distance from other
vehicles, the vehicle's spee dand for braking
in goo dtime.
DISTRONIC PLU Sdoes not react in particular
to:
R pedestrians
R stationar yobstacles on the road, e.g. stop-
ped or parked vehicles
R oncoming and crossin gtraffic
DISTRONIC PLUS may not detect narrow vehi-
cle sdriving in front, e.g .motorcycles, or vehi-
cles driving on adifferen tline. Therefore,
always pay attention to traffic condition seven
when DISTRO NICP LUS is activated. Other-
wise ,you may fai ltorecognise danger sin
time, cause an accident and injure yourself
and others. 174
Drivin
gsystemsDrivin gand parking
Page 178 of 389

G
WARNING
DISTRONIC PLUS canno ttake account of road
and traffic conditions. If DISTRONI Cdoes not
recognise or no longer recognises the vehicle
in front, do not activate DISTRONIC or, if it is
alr eady active, deactivate it. This is especially
the case:
R befor ecorners
R on filter lanes
R when changing to alane with faster moving
traffic
R in comple xdriving situations or where lanes
are diverte d,e.g. at roadworks on amotor-
way
DISTRONIC PLU Sotherwise maintains the
current spe ed setbyyou or accelerates up to
the set speed.
DISTRONIC PLU Scannot take account of
weather conditions. Deactivate, or do not
activate, DISTRONI CPLUS:
R if th eroads are slippery, snow-covered or
icy .The wheels coul dlose their grip when
brakin goraccelerating .The vehicle could
star ttos kid.
R if the sensors are dirty or there is poo rvis-
ibility, e.g. due to snow, rain or fog. Dis-
tance control may be impaired.
Always pay attention to traffic conditions
even when DISTRONIC PLU Sisactivate d.
Otherwise, you ma yfail to recognise dangers
in time, caus eanaccident and injure yourself
and others. G
WARNING
DISTRONIC PLUS brake syourvehicle up to a
maximu mof4m /s2
depending on its speed.
This corresponds to approximately 40% of
your vehicle's maximum braking power. You
must als oapply the brakes yourself if this
braking power is not sufficient.
If DISTRONI CPLUS detects arisk of collision
with avehicle in front, an intermit tent warning
tone sounds. In addition, the ·distance
warning lamp in the instrument cluste rlights
up. Brak etoavoidac ollision. G
WAR
NING
The vehicle can be braked when DISTRONIC
PLUS is activated. For this reason, deactivate
DISTRONIC PLUS if the vehicle is to be set in
motion by othe rmeans (e.g. in acar wash or
by towing).
The radar senso rsystem is automatically
deactivated near radio teles cope facilities
(Y page 38 0).
If you want DISTRONIC PLUS to assist you,
the radar sensor syste mmust be activated
(Y page 249 )and operational.
General notes DISTRONIC PLUS regulates the speed and
automati cally helps you maintain the dis-
tanc etot he vehicle detected in front. It
brakes automatically in orde rtoavoid
exceedi ngthe set speed.
On long and stee pdownhil lgradients, espe-
ciall yifthe vehicle is laden or towing atrailer,
yo um ust select shift range 1,2or 3in good
time. By doing so, you will make use of the
braking effec tofthe engine. This relieves the
load on the brake system and prevents the
brakes from overheating and wearing too
quickly.
If DI STRONIC PLUS detects aslower-moving
vehicle in front ,your vehicle is braked in order
to maintain the preset distance to the vehicle
in front.
If ther eisnov ehicle in front ,DISTRONIC
PLUS operate sinthe sam eway as cruise
control in the spee drange between
30 km/h and 200 km/h. If avehicle is driving
in fron tofyou, DI STRONIC operates in the
speed range betwee n0km/h and
200 km/h.
Do not us eDISTRONIC PLUS on roa dswith
steep gradients. Driving systems
175Drivingand parking Z
Page 186 of 389
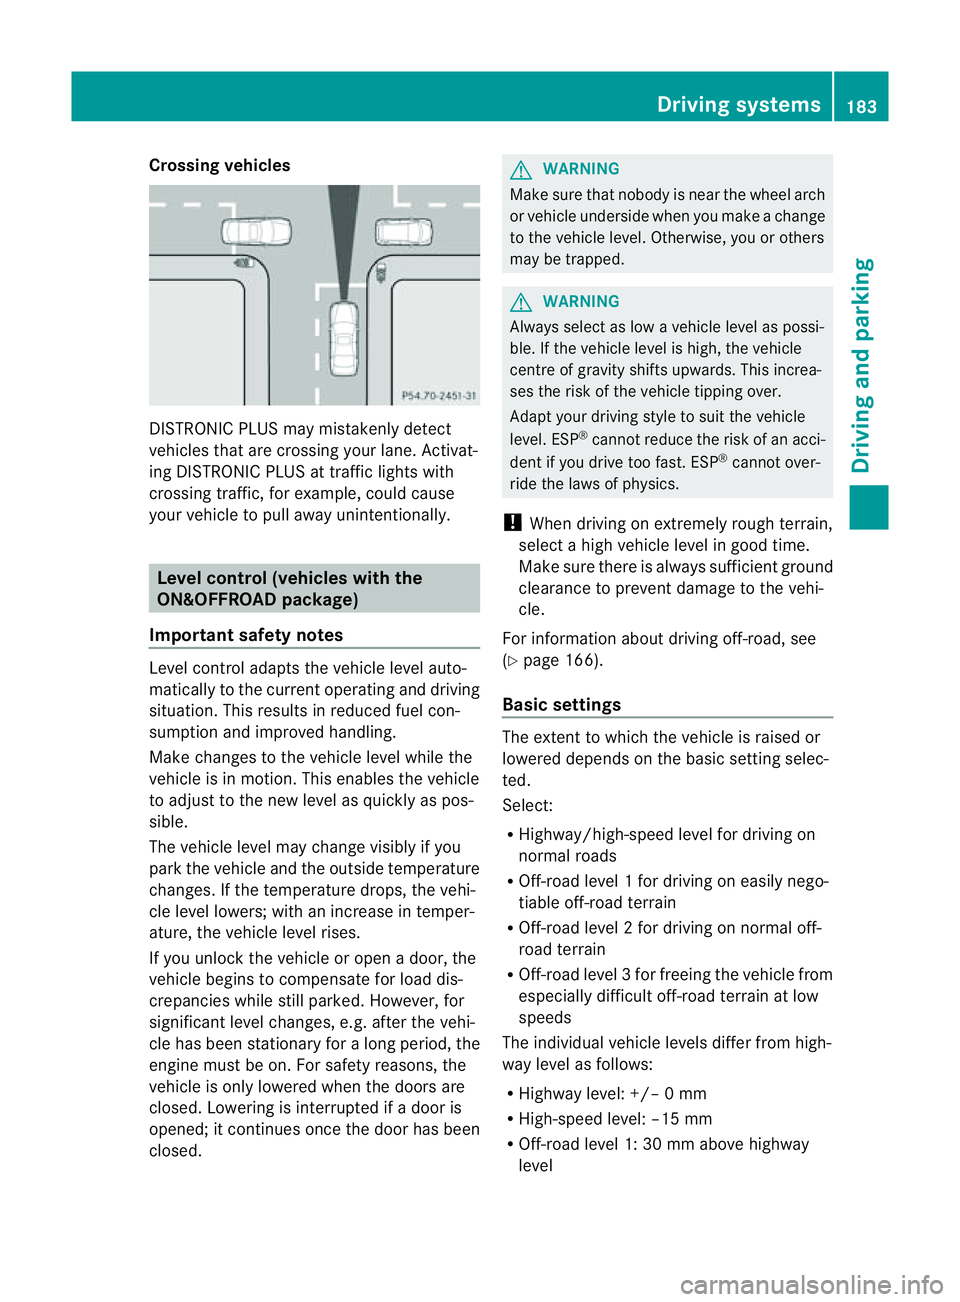
Crossing vehicles
DISTRONIC PLU
Smay mistakenly detect
vehicles that are crossin gyour lane .Activat-
ing DISTRONIC PLUS at traffi cligh ts with
crossing traffic, for example, could cause
your vehicle to pull away unintentionally. Leve
lcon trol (vehicle switht he
ON&OFFROA Dpackage)
Importan tsafety notes Leve
lcontrol adapts the vehicle level auto-
matically to the current operating and driving
situation. Thi sresults in reduced fuel con-
sumption and improved handling.
Make changes to the vehicle level whil ethe
vehicle is in motion. Thi senable sthe vehicle
to adjus ttothe new level as quickly as pos-
sible.
The vehicle level ma ychange visibly if you
par kthe vehicle and the outside temperature
changes. If the temperatur edrops, th evehi-
cle level lowers; with an increase in temper-
ature, the vehicle level rises.
If you unloc kthe vehicle or open adoor, the
vehicle begins to compensate for load dis-
crepancies while still parked. However, for
significant leve lchanges, e.g. after the vehi-
cle has been stationar yfor along period, the
engin emust be on. For safety reasons, the
vehicle is only lowered when the doors are
closed .Lowering is interrupted if adoor is
opened; it con tinues once the doo rhas been
closed. G
WARNING
Make sure that nobody is near the wheel arch
or vehicle underside when you make achange
to the vehicle level. Otherwise, you or others
ma ybet rapped. G
WARNING
Always select as lo wavehicle level as possi-
ble. If the vehicle level is high, the vehicle
centre of gravity shifts upwards. This increa-
ses the risk of the vehicle tipping over.
Adapt your driving style to suit the vehicle
level. ESP ®
can notreduce the risk of an acci-
dent if you driv etoo fast .ESP ®
cannot over-
ride the laws of physics.
! When driving on extremely roug hterrain,
select ahigh vehicle level in good time.
Make sure there is always sufficient ground
clearance to prevent damage to the vehi-
cle.
For information about drivin goff-road, see
(Y pag e166).
Basi csettings The exten
ttowhich the vehicle is raised or
lowered depend sonthe basic setting selec-
ted.
Select:
R Highway/high-spee dlevel for driving on
normal roads
R Off -road level 1for drivin goneasily nego-
tiable off-road terrain
R Off-road level 2for drivin gonnormal off-
roa dterrain
R Off -road level 3for freeing the vehicle from
especially difficult off -road terrain at low
speeds
The individual vehicle levels differ from high-
way level as follows:
R Highway level: +/– 0mm
R High-speed level: –15 mm
R Off-road leve l1:30mma bove highway
level Driving systems
183Drivingand parking Z
Page 187 of 389
R
Off-road level 2: 60 mm abov ehighway
level
R Off-road level 3: 90 mm above highway
level
Highway/high-speed level !
Make sure there is enough ground clear-
ance when the vehicle is being lowered .It
could oth erwise hit the ground, damaging
the underbody. :
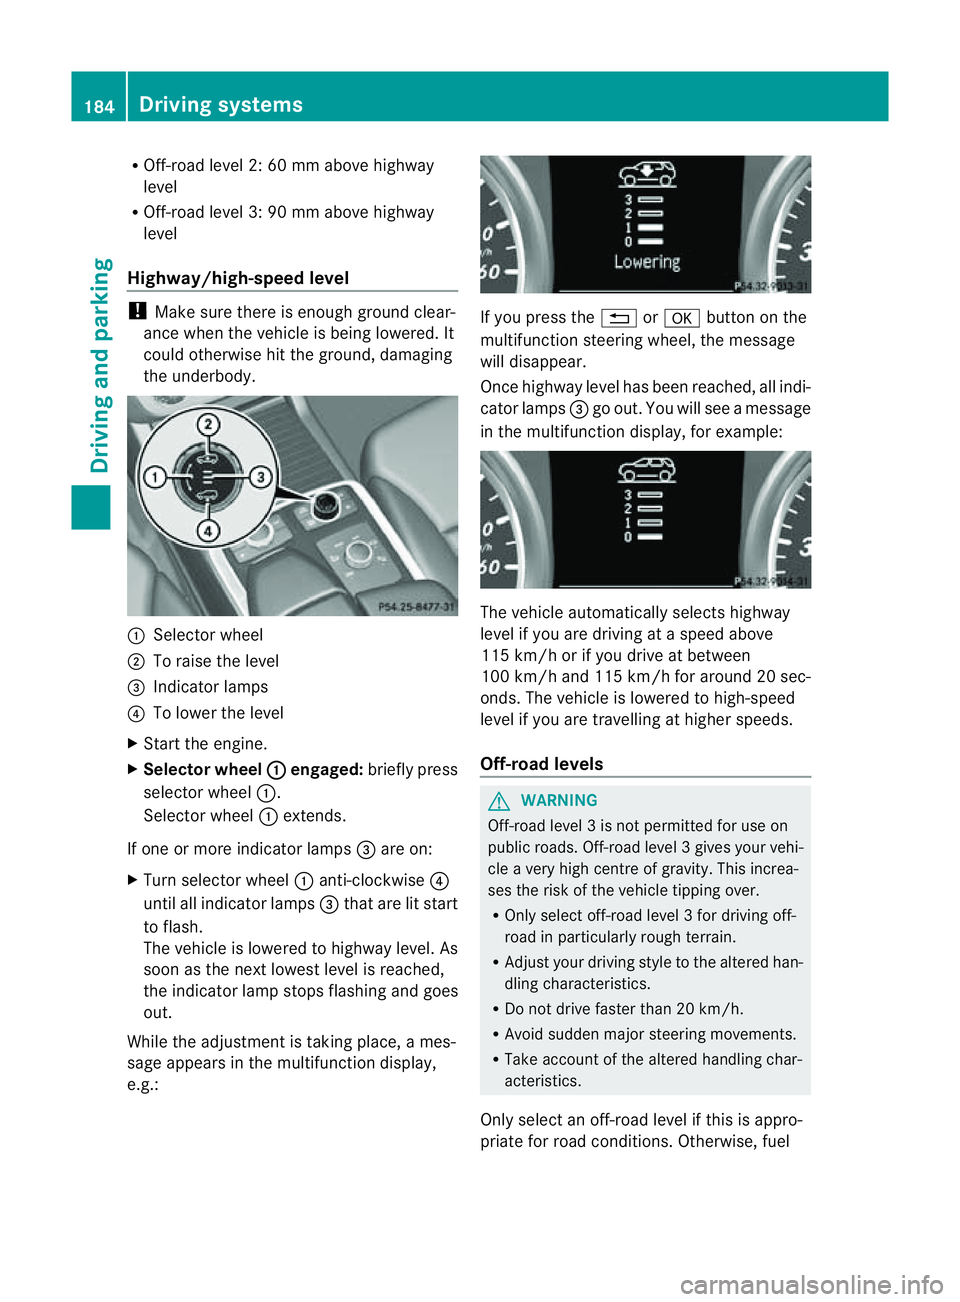
Selector wheel
; To raise the level
= Indicator lamps
? To lowe rthe level
X Star tthe engine.
X Selector wheel : engaged:
brieflypress
selecto rwheel :.
Selector wheel :extends.
If one or mor eindicato rlamps =are on:
X Turn selector wheel :anti-clockwise ?
until all indicator lamps =that are lit start
to flash.
The vehicle is lowered to highway level. As
soon as the next lowes tlevel is reached,
the indicator lam pstops flashing and goes
out.
While the adjustment is taking place, ames-
sage appears in the multifunction display,
e.g.: If you press the
%ora button on the
multifunction steerin gwheel, the message
will disappear.
Onc ehighway level has been reached, all indi-
cator lamps =go out. You will see amessage
in the multifunction display, for example: The vehicle automatically select
shighway
level if you are drivin gataspeed above
11 5k m/ horify ou drive at between
10 0k m/ hand 11 5km/ hfor aroun d20sec-
onds. The vehicle is lowered to high-speed
level if you are travelling at higher speeds.
Off-road levels G
WARNING
Off-road level 3isnot perm itted for use on
public roads. Off-road leve l3gives your vehi-
cle avery high centr eofgravity. This increa-
se st he risk of the vehi clet ippin gover.
R Onl yselec toff-road level 3for drivin goff-
road in particularl yrough terrain.
R Adjust your drivin gstyle to the altered han-
dling charac teristics.
R Do not drive faster than 20 km/h.
R Avoid sudden majo rsteering movements.
R Take account of th ealtered handling char-
acteristics.
Only select an off-road level if this is appro-
priate for road conditions. Otherwise, fuel 184
Drivin
gsystemsDrivin gand parking
Page 188 of 389
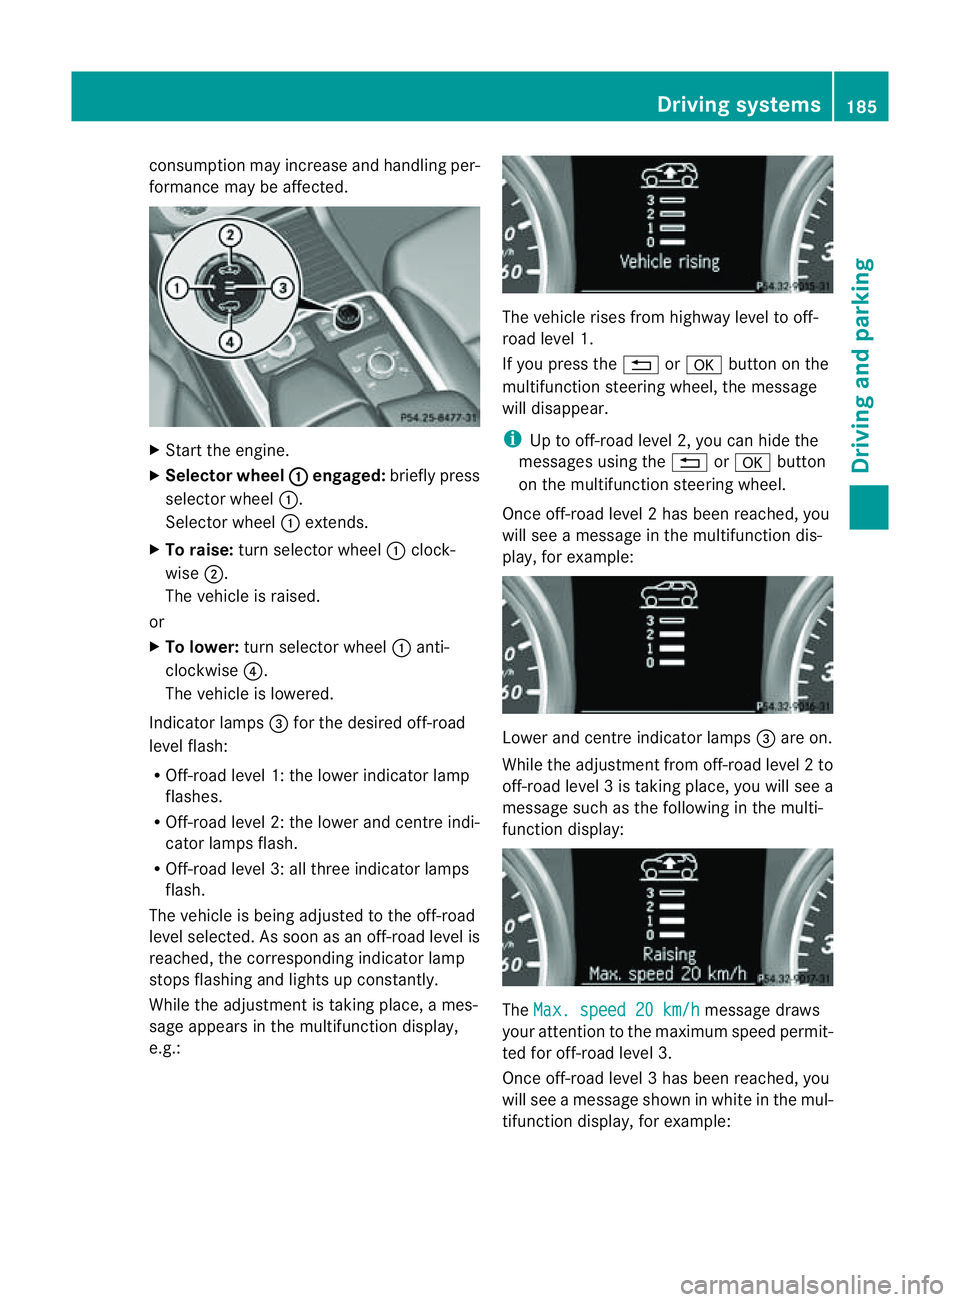
cons
umption may incr easeand handling per-
formance may be affected. X
Start the engine.
X Selecto rwheel : en
gaged: briefly press
selector wheel :.
Selector wheel :extends.
X To raise: turns elector wheel :clock-
wise ;.
The vehicle is raised.
or
X To lower: turns elector wheel :anti-
clockwise ?.
The vehicle is lowered.
Indicator lamps =for the desired off-road
level flash:
R Off-road level 1: thel ower indicator lamp
flashes.
R Off-road level 2: thel ower and centr eindi-
cator lamps flash.
R Off-road leve l3:allthree indicator lamps
flash.
The vehicle is being adjusted to the off-road
leve lselected. As soon as an off-road level is
reached, the corresponding indicator lamp
stops flashing and lights up constantly.
Whil ethe adjustment is taking place, ames-
sage appears in the multifunction display,
e.g.: The vehicle rises from highway level to off-
road level 1.
If you press the %ora button on the
multifunction stee ring wheel, the message
will disappear.
i Up to off-road level 2, you can hid ethe
messages usin gthe % ora button
on the multifunction steering wheel.
Onc eoff-roa dlevel 2has been reached, you
will see amessage in th emultifunction dis-
play, for example: Lower and
centre indicator lamps =areo n.
While the adjustment from off-ro adlevel 2to
off -ro ad level 3istaking place, you will see a
message such as the following in the multi-
function displ ay: The
Max. speed 20 km/h message draws
your attentio ntothe maximum speed permit-
ted for off-road level 3.
Onc eoff-roa dlevel 3has been reached, you
will see amessage shown in whit einthe mul-
ti fu nction display, for example: Driving systems
185Drivingand pa rking Z