2011 MERCEDES-BENZ M-CLASS SUV wheel
[x] Cancel search: wheelPage 113 of 389

Active:
R
if you are driving at speeds below
40 km/h, the cor neringl ight function is
activated either by th eturns ignal or by the
steerin gwheel being turned.
R if you ar edriving at speeds between
40 km/h and 70 km/h ,the cornering light
func tion is activated by the steering wheel
being turned.
Not active: if you aredriving at speeds above
40 km/h or switc hoff th eturn signal or turn
the steering wheel to the straight-ahead posi-
tion.
The cornering light function may remain lit for
as hort time, but is automatically switched off
after no mor ethan three minutes.
Motorwa ymode Motorway mode increases the range of the
beam.
Active:
R if you are drivin gatspeeds above
11 0k m/h and do not make any larg esteer-
ing movement sfor 1000 m
R if you ar edriving at speeds above
130 km/h
Not active: if youare driving at speeds below
80 km/h followin gactivation. Extende
drang efoglamps The extended range foglamps reduce the
glare experienced by the driver and improve
the illumination of the edge of the carriage-
way.
Active: if you are drivin gatspeeds below
70 km/ hand you switch on the rear foglamp
Not active: if you are driving at speeds above
100 km/h or if you switch off the rear foglamp
following activation Adaptive Highbeam Assist
You can use this function to set the head-
lamps to chang ebetween dipped beam and
mai nbeam automatically. The system recog-
nises vehicles with their lights on, either
approaching from the opposite direction or
travelling in front of your vehicle, and conse-
quently switches the headlamps from main
beam to dipped beam.
The system automatically adapts the dipped-
beam headlamp range dependin gonthe dis-
tance to the other vehicle. Onc ethe system
no longer detec tsany other vehicles, it reac-
tivates the main-beam headlamps.
The system's optical senso risl ocated behind
the windscreen near the overhead con trol
panel. 110
Exterior lightingLights and windscreen wipers
Page 117 of 389

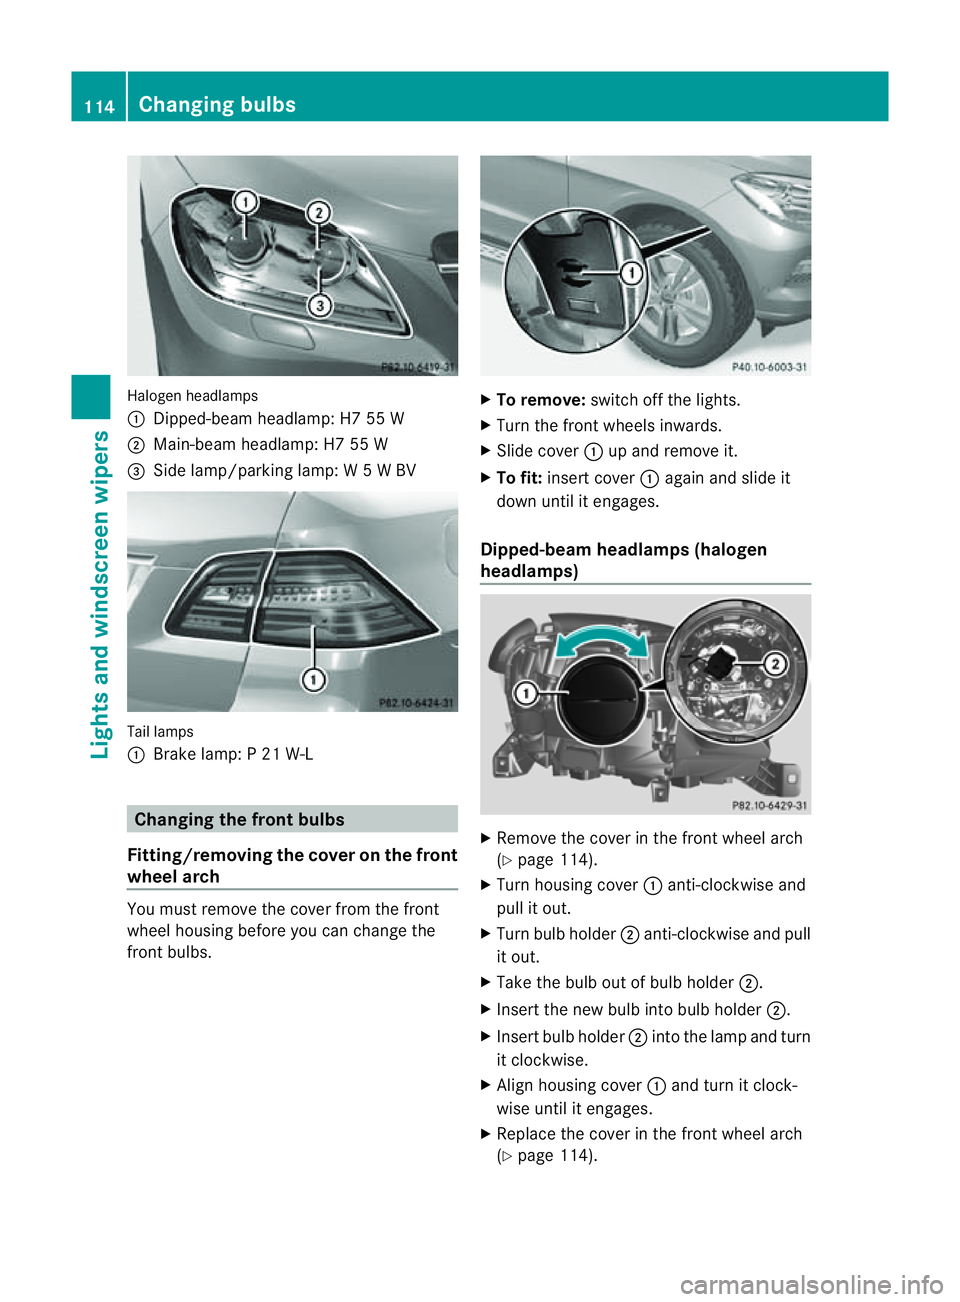
Halogen he
adlamps
: Dipped-bea mheadlamp: H7 55 W
; Main-beam headlamp: H7 55 W
= Side lamp/parkin glamp: W5WBV Tail lamps
:
Brak elamp: P21W -L Changing the front bulbs
Fitting/removing the cover on the front
wheel arch You must remove the cover from the front
wheel housing before you can chang ethe
fron tbulbs. X
To remove: switchoff the lights.
X Turn the front wheels inwards.
X Slide cover :up and remove it.
X To fit: insert cover :again and slide it
down until it engages.
Dipped-beam headlamps (halogen
headlamps) X
Remove the cover in the front wheel arch
(Y page 114).
X Turn housing cover :anti-clockwise and
pull it out.
X Turn bulb holder ;anti-clockwise and pull
it out.
X Take the bulb out of bulb holder ;.
X Insert the new bulb into bulb holder ;.
X Insert bulb holder ;into the lamp and turn
it clockwise.
X Align housing cover :and turn it clock-
wise until it engages.
X Replace the cover in the front wheel arch
(Y page 114). 114
Changin
gbulbsLight sand windscreen wipers
Page 138 of 389

Displa
ymessages Possible causes/consequences and
M Solutions
If th
eauxiliar yheating is faulty:
X Hav ethe auxil iaryh eatin gchecked at aqualified specialist
workshop. Adjusting th
eair vents Important safet
ynotes G
WARNING
Ver yhot or ver ycold ai rcan flo wfromt he air
vents. This coul dcause burns or frostbite to
bare skin in the immediate vicinity of the
vents. Keep bare skin away from these air
outlets. If necessary, direct the airflow away
to ad ifferent area of the vehicle interior.
In order to ensure the direct flow of fresh air
through the air vent sinto the vehicl einterior,
please observe the following notes:
R keep the air inlet grill eonthe bonnet and
in the engin ecompartmen tonthe front-
passenger side free of blockages, such as
ice, snow or leaves.
R never cover the ven tsor ven tilation grilles
in the vehicle interior.
i For virtually draught-free ventilation,
adjust the sliders of the air vent stothe
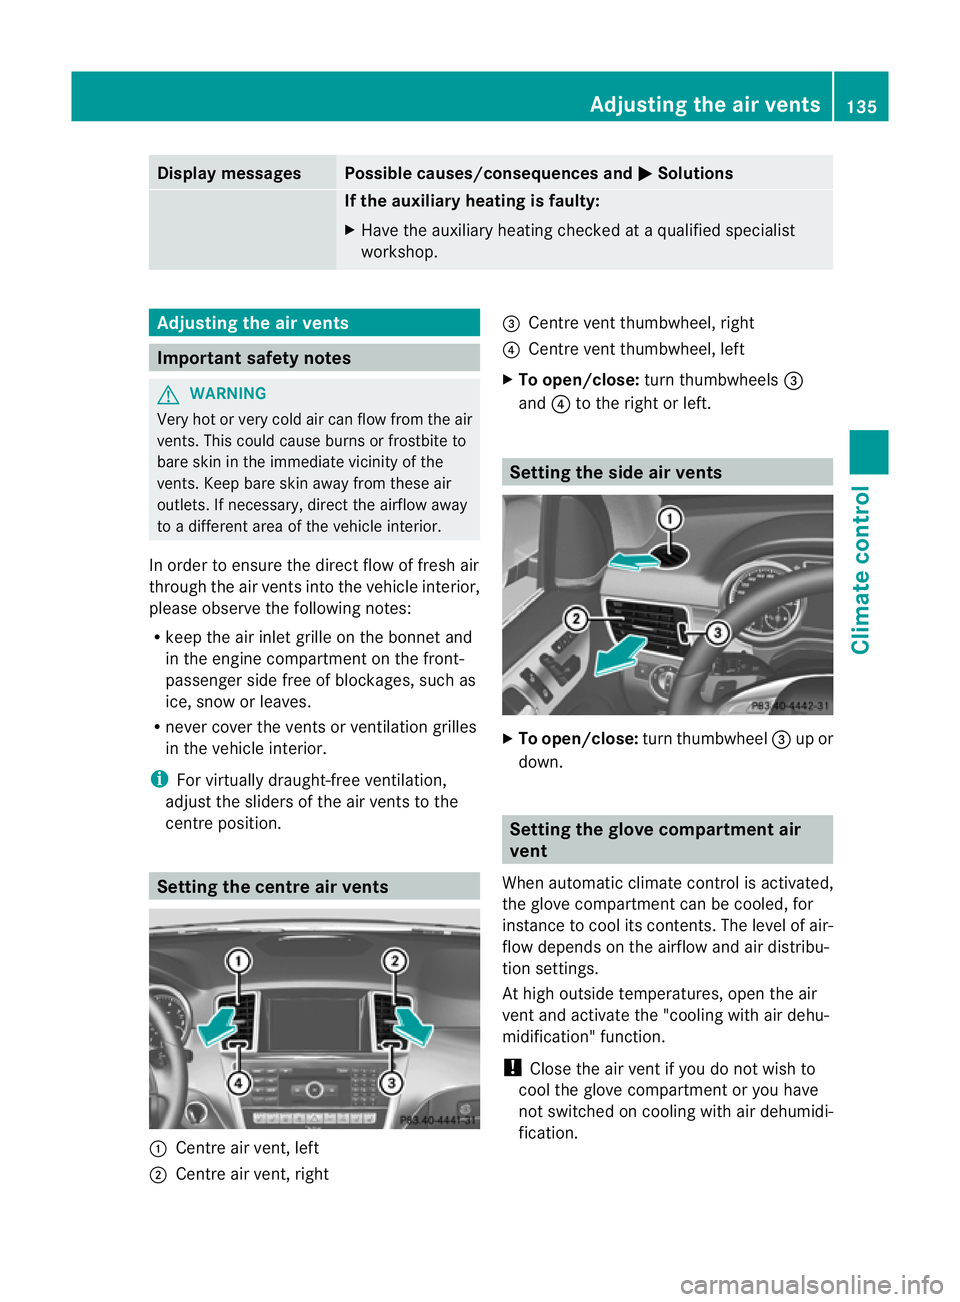
cen treposition. Setting the centre air vents
:
Centr eair vent ,left
; Centre air ven t, right =
Centre ven tthumbwheel, right
? Centre ven tthumbwheel, left
X To open/close: turnthumbwheels =
and ?to the right or left. Setting th
eside air vents X
To open/close: turnthumbwheel =up or
down. Setting th
eglove compartment air
vent
When automatic climate control is activated,
the glove compartmen tcan be cooled, for
instance to cool its con tents.The level of air-
flo wd epends on the airflow and air distribu-
tion settings.
At high outside temperatures, open the air
ven tand activate the "cooling with air dehu-
midification" function.
! Clos ethe air ven tifyou do not wish to
cool the glove compartmen toryou have
not switched on coolin gwith air dehumidi-
fication. Adjusting the air vents
135Climate control Z
Page 139 of 389

Moisture-sensitive item
sstored in the
glove compartmen tcould otherwise be
damaged. :
Air ven tthumbwheel
; Air vent
X To open: turnthumbwheel :anti-cloc k-
wise.
X To close: turn thumbwheel :clockwise. Setting the rear-compartment air
vents
Setting the centre vents in the rear com-
partment Centre vent
sinthe rea rcompart ment with rear
control panel (example)
: Rear-compartment air vent thumbwheel
; Rear-compartment air vent, right
= Rear control panel
? Rear-compartment air vent, left
X To open/close: turn thumbwheel :up or
down. Setting the rear-compartment side air
vents Thes
erear-compartmen tside air vents are
only available if you have THERMOTRONIC
automatic climate control. :
Rear-compartment side air vent
; Thumbwheel for rear -compar tment side
air vent
X To open/close: turnthumbwheel ;to the
lef torr ight. 136
Adjusting the air ventsClimate control
Page 141 of 389

Usefu
linfor mati on
i This Owner's Manual describes all models
and all standard and optional equipment
available to your vehicle at the time of pub-
lication of the Owner's Manual. Country-
specific deviation sare possible .Please
not ethat your vehicle ma ynot be equipped
with all featur es described. This also
applies to safety-releva ntsystems and
functions.
i Please read the information on qualified
specialist workshops (Y page 24).Running-i
nnotes Important safet
ynotes G
WARNING
New brake pads/lining sonlyh aveo ptimal
braking performanc eafter se veral hu ndred
kilometres. Until then ,compensate for this by
applying greater force to the brake pedal. This
also applies whe nbrake pads/linings or
brak ediscs have been changed. The first 1,500 km
The more you look after the engine when it is
new, the more satisfied you will be with its
performanc einthe future.
R Therefore, drive at varying speeds and
engin espeeds for the first 1,500 km.
R Avoi dheavy loads on the engine during this
period, e.g. driving at ful lthrottle.
R Change gear in good time, at the latest
when the rev counter needl eis2
/ 3 of the
way to the red area in the rev coun terd is-
play.
R Do not manually shift to alower gear to
brake the vehicle. R
If possible, do not depress the accelerator
pedal past the point of resistanc e(kick-
down).
R Only select shift ranges 3,2or 1whe ndriv-
ing slowly, e.g .inmountainou sterrain.
Af ter1 ,50 0km, yo umay gradually bring the
vehicle up to full road and engine speeds.
i You should also observe these notes on
runnin ginift he engin eorparts of the drive
train on your vehicle have been replaced. Driving
Important safety notes
G
WARNING
Do not keep any object sinthe driver's foot-
well. If you use afloormat or carpet in the
driver's footwell, make sure that they are cor-
rectly secured and that there is sufficient
clearance for the pedals.
Do not place several floormats on top of one
another.
The object sorfloormats could otherwise get
between the pedals in the event of sudden
braking or acceleration. You may then no lon-
ger be able to brake or accelerate as intended.
This may result in an accident and injury. G
WARNING
Do not change down for additional engine
braking on aslippery road surface. This could
cause the drive wheels to lose their grip and
the vehicle could skid. This could cause you
to lose control of your vehicle and cause an
accident.
! Warm up the engine quickly. Do not use
the engine's full performanc euntil it has
reache doperating temperature.
Only set the automatic transmission to the
respective driv eposition swhen the vehicle
is stationary.
Where possible, avoid spinnin gthe drive
wheels when pulling away on slippery 138
DrivingDriving and parking
Page 148 of 389

Problem Possible causes/consequences and
M Solutions
Vehicles with
apetrol
engine:
The engine is not run-
ning smoothly and is
misfiring. There is
amalfunction in the engine electronics or in amechanical
componen tofthe engin emanagement system.
X Only depress the accelerator pedal slightly.
X Have the cause rectified immediately at aqualified specialist
workshop, e.g. aMercedes-Benz Servic eCentre.
Otherwise, non-combusted fuel may get into the catalytic con-
verter and damage it. The coolan
ttempera-
tur ed isplay is showing
more than 120 †. The
coolant warnin glamp
may also be on and a
warning tone may
sound. The coolant level is too low. The coolant is too hot and the engine
is no longer being cooled sufficiently.
X Stop as soon as possible and allow the engine and the coolant
to cool down.
X Check the coolant level (Y page 321). Observe the warning
notes as you do so and top up the coolant if necessary. If the coolant level is correct
,the radiator fa nmay be faulty. The
coolant is too hot and the engine is no longer being cooled suffi-
ciently.
X At coolant temperatures under 120 †, drive on to the nearest
qualified specialis tworkshop, e.g. to aMercedes-Benz Service
Centre.
X Avoid heavy loads on the engine as you do so, e.g. driving on
mountain roads and stop-start traffic. Automa
tict ransmission Important safety notes
G
WARNING
The movement of the pedal smust not be
impaired in any way. Do not keep any objects
in the driver's footwell. Make sure that floor-
mats or carpets are correctly secured and
that there is sufficient clearance for the ped-
als.
Do not place several floormats on top of one
another. G
WARNING
Do not change down for additional engine
braking on aslippery road surface. This could
cause the drive wheels to lose their grip and
the vehicle could skid. This could cause you to lose control of your vehicle and cause an
accident. DIRECT SELECT lever
Overview of transmissio npositions The DIRECT SELECT leve
risonthe right of the
steering column. Automa
tict ran smission
145Drivingand park ing Z
Page 151 of 389

A
Neutral
Do not shift the transmiss
ionto N
whil edriving. Otherwise, th eauto-
matic transmission could be dam-
aged.
No powe ristransmitte dfromt he
engine to the drive wheels.
Releasing the brakes will allo wyou
to move the vehicl efreely, e.g .to
push it or tow it.
If ESP ®
is deacti vated or faulty:
only shift the transmission to posi-
tion Nif the vehicle is in dange rof
skidding, e.g. on icy roads.
If you swit choff the engin eusing
the key or the Start/Stop but ton,
the automatic transmission shifts
to neutral Nautomatically.
! Rolling in neutral Ncan lead to
damage to the transmission. 7
Drive
The automatic transmission
changes gear automatically. All
forward gears are available. Changin
ggear
The automatic transmission shift stothe indi-
vidual gear sautomatically when it is in trans-
missio nposition D.This automatic gearshift-
ing behaviour is determined by:
R ap ossible limitation of the shift range
R the selected drive program
R the position of the accelerator pedal
R the roa dspeed Driving tips
Accelerator peda lposition Your style of drivin
ginfluences how the auto-
matic transmissio nshift sgear:
R littl ethrot tle: earl yupshifts
R mor ethrot tle: late upshifts
Kickdown Use kickdown for maximu
macceleration.
X Depress the accelerato rpedal beyond the
pressur epoint.
The transmission shift stoalower gear
depending on the engin espeed.
X Ease off the accelerator pedal once the
desired speed is reached.
The automatic transmission shifts back up.
Trailer towing X
Drive in the middle of the engine speed
range on uphill gradients.
X Shift down to shift range 3or
2 (Y page 150) depending on the uphill or
downhill gradient, even if cruise control,
DISTRONIC PLU SorSPEEDTRONIC is acti-
vated. Progra
mselector button
General notes The program selector button allow
syou to
choose between differen tdriving character-
istics. 148
Automatic transmissionDri
ving and parking
Page 152 of 389

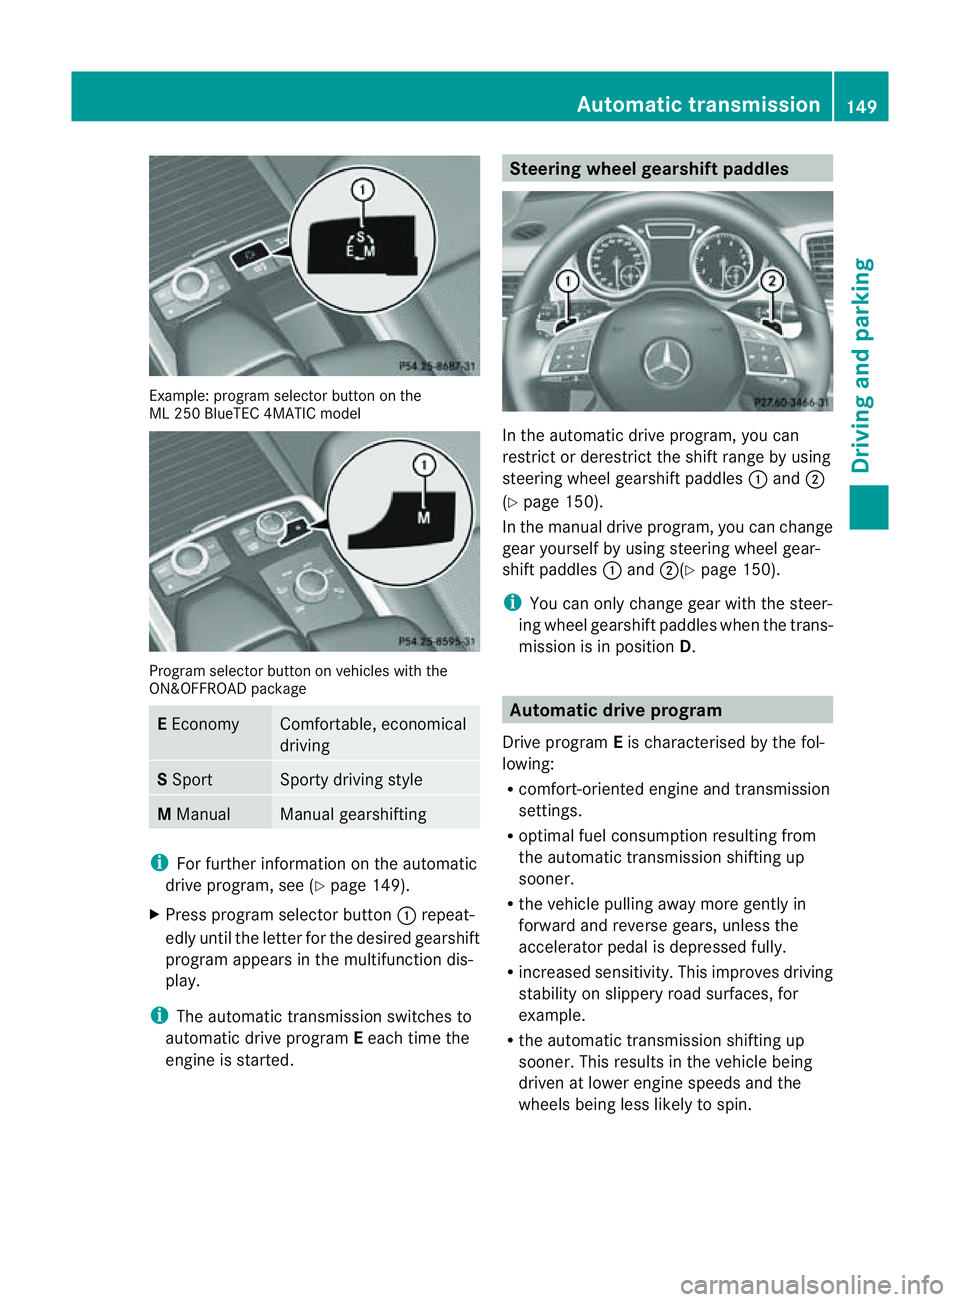
Examp
le:p rogra mselector button on the Progra
mselector button on vehicles with the
ON&OFFROAD package E
Economy Comfortable, economical
driving
S
Sport Sport
ydriving style M
Manual Manua
lgearshif ting i
Forfurther information on the automatic
drive program, see (Y page 149).
X Press program selector button :repeat-
edly until the letter for the desired gearshift
program appears in the multifunction dis-
play.
i The automatic transmission switches to
automatic drive program Eeach time the
engine is started. Steering wheel gearshift paddles
In the automatic drive program, you can
restrict or derestric
tthe shift range by using
steerin gwheel gearshift paddles :and ;
(Y page 150).
In the manua ldrive program, yo ucan change
gear yourself by using steering wheel gear-
shift paddles :and ;(Y page 150).
i You can only change gear with the steer-
ing wheel gearshift paddles when the trans-
mission is in position D. Automatic drive program
Drive program Eis characterised by the fol-
lowing:
R comfort-oriented engine and transmission
settings.
R optimal fuel consumption resulting from
the automatic transmission shifting up
sooner.
R the vehicle pulling away more gently in
forward and reverse gears, unless the
accelerator pedal is depressed fully.
R increased sensitivity. This improves driving
stability on slippery road surfaces, for
example.
R the automatic transmission shifting up
sooner. This results in the vehicle being
driven at lower engine speeds and the
wheel sbeing less likely to spin. Automatic transmission
149Drivingand parking Z
ML 25
0BlueTEC 4MA TICm odel