2011 MERCEDES-BENZ M-CLASS SUV ECU
[x] Cancel search: ECUPage 234 of 389
X
To switc hthe conn ected powe rsupply
on or off: turn thekey in the ignition lock
to position 2or 0respectivel y. Bulb failure indi
cator for LE Dlamps
i If LED lamps are fitte dinthe trailer, an
error message ma yappear in the multi-
function display even if there is no fault. The
reason for the error message may be that
the current has fallen below the minimum
of 50 milliamper es(mA).
To ensure reliabl eoperation of the bul bfailure
indicator, each LED chai ninthe trailer lighting
must be guaranteed aminimum current of
50 mA. Trailer with 7-pin connector
Genera linforma tion If your trailer has
a7-pin connector, you can
connect it to the 13-pin socket on the ball
coupling using an adapter or, if necessary, an
adapter cable .Both of these can be obtained
at aq ualified specialist workshop, e.g. at a
Mercedes-Ben zService Centre.
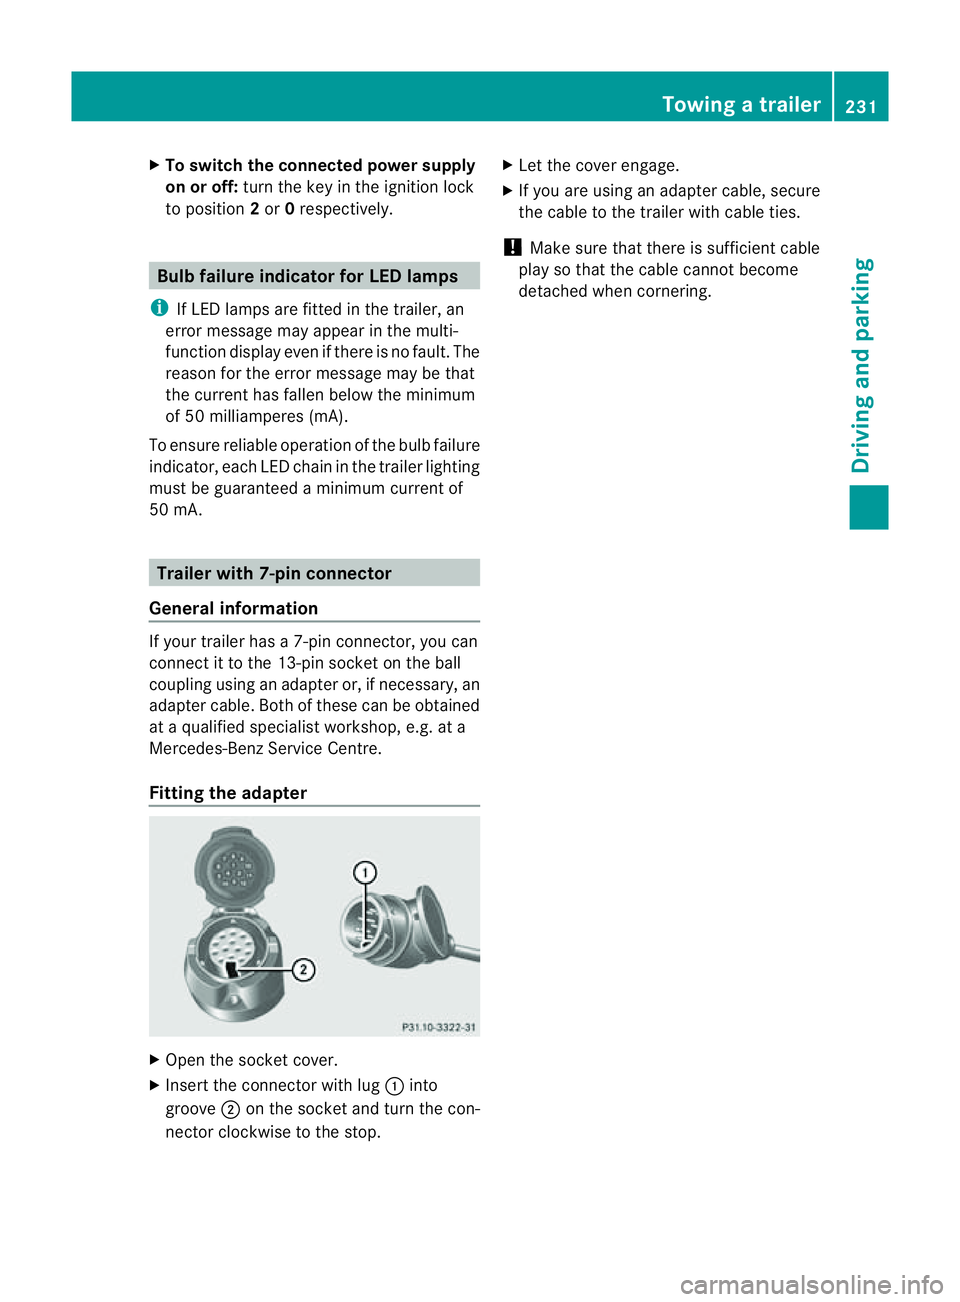
Fitting the adapter X
Open the socket cover.
X Insert the connector with lug :into
groove ;on the socket and tur nthe con-
nec torc lockwise to the stop. X
Let the cover engage.
X If you are using an adapter cable, secure
the cable to the trailer with cable ties.
! Make sure that there is sufficient cable
play so that the cable cannot become
detached when cornering. Towing
atrailer
231Driving andparki ng Z
Page 254 of 389
Changing th
edeparture time
X Pres sthe = or; button on th esteer-
ing wheel to selec tthe Settings menu.
X Press the :or9 button to selec tthe
Heating submenu.
X Press the abutton to confir m.
You will see the selected setting.
X Press the abutton to confirm.
X Press the :or9 button to select
Change A ,
B or
C .
X Press the abutton to confirm.
You can now change the departur etime.
X Press the =or; button to select the
displa ytobec hanged: hours, minutes.
X Press the :or9 button to set the
selected display.
X Press the abutton to stor ethe ent ry.
The yellow indicator lam ponthe auxiliary
heating button lights up.
Convenience Activating/deactivating th
eEASY-
ENTRY/EXIT featu re
You can use the Easy Entry/Exit: func
tion
to activate or deactivate the EAS YENTRY/
EXIT feature (Y page 99). G
WARNING
Th es teering whee lmoves when the EASY-
ENTRY/EXI Tfeatur eisa ctive. There is arisk
of occupant sbecoming trapped. Before acti-
vating the EASY-ENTRY/EXI Tfeature, make
sure that nobody can becom etrapped.
Do not leave children unsupervised in the
vehicle, eve nifthey ar esecured in achild
restraint system .The children coul dopen the
driver' sdoor and thereby unintentionally acti-
vat ethe EASY-ENTRY/EXI Tfeatur eand
become trapped.
X Pres sthe = or; button on the steer-
ing wheel to selec tthe Settings menu.
X Press the :or9 button to selec tthe
Convenience submenu.X
Press the abutton to confir m.
X Press the :or9 button to select the
Easy Entry/Exit: function.
You will see the selected setting: on or
off .
X Press the abutton to save the setting.
Switching th ebelt adjustment on/off
For further information on belt adjustment,
see (Y page 48).
X Press the =or; button on the steer-
ing wheel to select the Settings menu.
X Press the :or9 button to select the
Convenience submenu.
X Press the abutton to confir m.
X Press the :or9 button to select the
Belt adjustment function.
You will see the selected setting: on or
off .
X Press the abutton to save the setting.
Switching th efold in mirrors when lock-
ing function on/off
If you switch on the Fold mirrors in when
locking func
tion, the exterior mirror sfold in
when you lock the vehicle. When you unlock
the vehicle and then open the driver's or
front-passenger door, the exterior mirrors
fold out again.
If you have switched the func tion on and you
fold the exterior mirror sinusing the button
on the door (Y page 101), they will not fold
out automatically. The exterior mirrors can
then only be folded out usin gthe button on
the door.
X Press the =or; button on the steer-
ing wheel to selec tthe Settings menu.
X Press the :or9 button to selec tthe
Convenience submenu.
X Press the abutton to confir m. Menus and submenus
251On-boardcomputer and display s Z
Page 260 of 389
Displa
ymessages Possible causes/consequences and
M Solutions
!
Pa
rkingb rake See Owner'
sManual Th
ey ellow !warning lamp lights up.
The electric parkin gbrak eism alfunctioning.
To apply:
X Switc hoffthe ignition.
X Press the electric parking brake handle fo ratleast 10 seconds.
X Shif tthe transmission to P.
X Consult aqualified specialist worksho p. The yellow
!warnin glamp and the red !indicator lamp
are lit.
The electric parking brake is malfunctioning.
To release:
X Switch off the ignitio nand turn it back on.
X Releas ethe electric parkin gbrake manu ally.
or
X Release the electric parkin gbrake automatically (Y page 161).
If the yellow !warning lamp remains lit or continues to flash:
X Do not drive on.
X Consult aqualified specialist worksho p. The red
!indicator lam pflashes and the yellow !warning
lamp is lit.
The electric parkin gbrake is malfunctioning.
To rel ease:
X Switch off the ignitio nand turn it back on.
X Releas ethe electric parkin gbrake manu ally.
To apply:
X Switch off the ignitio nand turn it back on.
X Appl ythe electric parkin gbrake manu ally.
If the red !indicator lamp continues to flash:
X Do not drive on.
X Secur ethe vehicle against rolling away (Y page 338).
X Shif tthe transmission to P.
X Tur nthe front wheels towards the kerb.
X Consult aqualified specialist worksho p. Display messages
257On-boardcomputer and displays Z
Page 273 of 389

Displa
ymessages Possible causes/consequences and
M Solutions
Á
Ma
x. speed 20 km/h G
Risk of accident
Yo ua re exceedi ngthe speed permissible for the selected off-road
level.
In addition ,the vehicle level display appears between the vehicle
icon and the display message, and awarning tone sounds.
X Adjust your driving style to the altered handling characteristics.
X Only make sligh tsteering movement sand avoid fast steering
movements.
X Do not excee d20km/h unti lthe vehicle has reached off-road
level 2. G
Risk of accident
The Ac tiveCurve System is faulty. The vehicle's handling charac-
teristics are severely impaired.
In addition, the vehicle level displa yappears between the vehicle
icon and the display message, and awarning tone sounds.
X Do not exceed amaximum spee dof20k m/h.
X Adjus tyour drivin gstyle to the altered handling characteristics.
X Visit aqualified specialist worksho pimmediately. Á
Vehicle rising
max. 20 km/h Th
ev ehicle is being adjusted to off-road level 3. The display mes-
sage inform syou of the maximum speed permissible for off-road
leve l3.
X Do not exceed amaximum spee dof20k m/h. Á
20 km/h max. Yo
ua re driving in off- road level 3. The displ aymessage informs
yo uo fthe maximum speed permissible for off-road level 3.
X Do not exceed amaximum spee dof20k m/h. g
Lowering
max.
20 km/h Th
ev ehicle is being lowered from off-road level 3tooff-road level
2. Th edisplay message informs you of the maximum speed per-
missible for off- road level 3.
X Do not exceed 20 km/ huntil the vehicl ehas reached off-road
level 2. 8
Different. lock
sys. Malfunction The differential lock is malfunc
tioning.
X Do not exceed amaximum spee dof80k m/h.
X Have th evehicle checked at aqualified specialist workshop. 270
Display messagesOn-board computer and displays
Page 287 of 389
Warnin
gand indicator lamps in th einstrument cluster Seat belts
Problem Possible causes/consequence
sand M Solutions
7
Only for certain coun-
tries: the red seat belt
warning lamp lights up
for six seconds after
the engine starts. The seat belt warning lamp reminds the driver and fron
tpassenger
to fasten their seat belts.
X Fasten your seat belt (Y page 46).7
Only for cer
tain coun-
tries: the red seat belt
warnin glamp lights up
after the engine starts.
In addition, awarning
tone sounds for up to
six seconds. G
Risk of injury
The driver' sseat belt is not fastened.
X Fasten your seat belt (Y page 46).
The warning ton eceases. 7
The red seat belt warn-
ing lam
plights up after
the engine starts, as
soon as the driver's or
the front-passenger
door is closed. G
Risk of injury
The driver or front passenger has not fastened their seat belt.
X Fasten your seat belt (Y page 46).
The warnin glamp goes out. G
Risk of injury
There are object sonthe front-passenger seat.
X Remove the objec tsfrom th efront-passenger seat and stow
them in asecur eplace.
The warnin glamp goes out. 284
Warnin
gand indicator lam psin the instrument clusterOn-board compu tera nd displays
Page 288 of 389
Problem Possible causes/consequences and
M Solutions
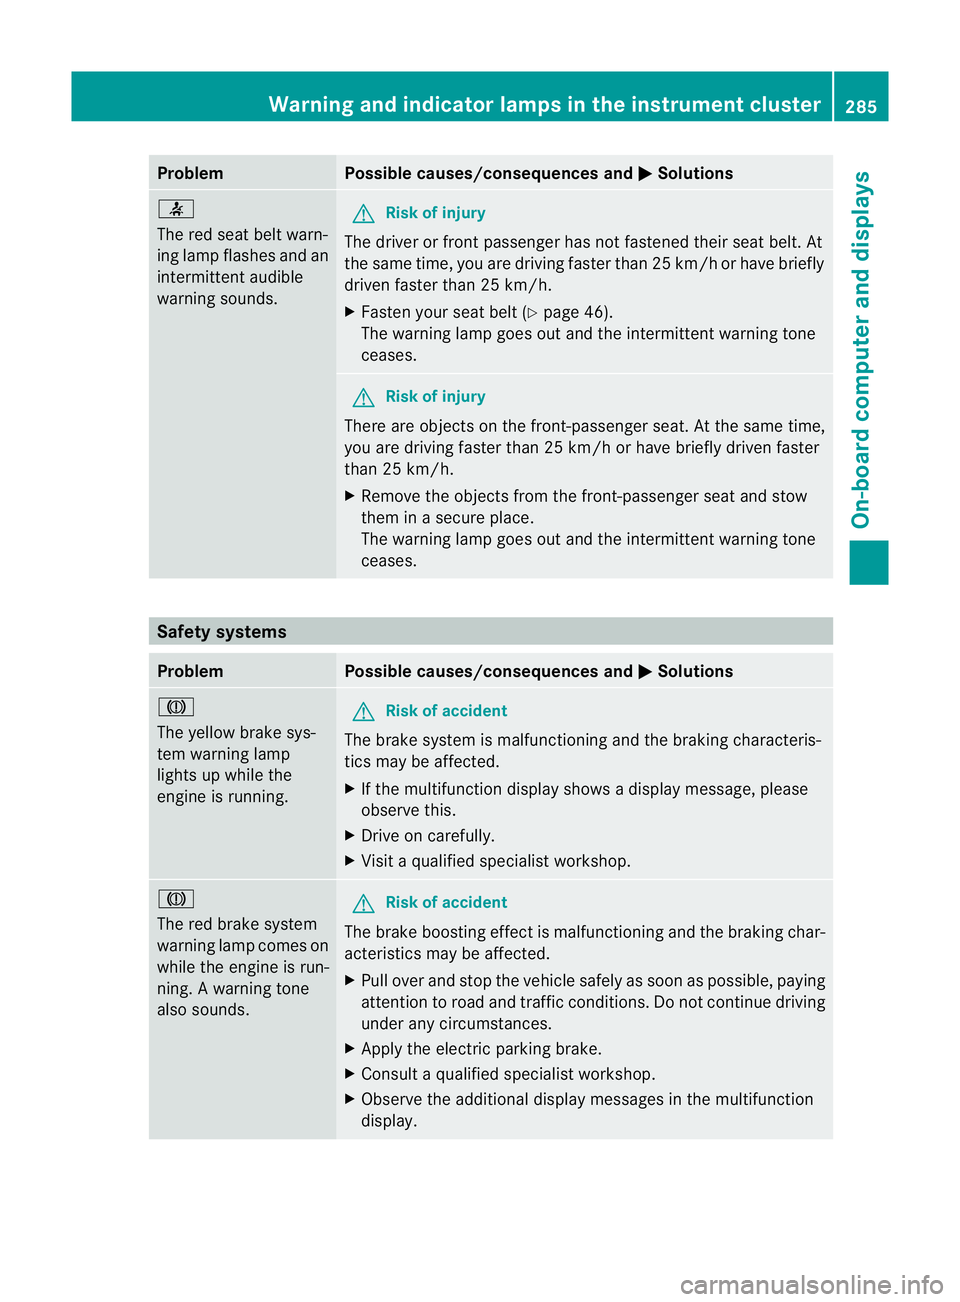
7
The red seat belt warn-
ing lam pflashes and an
intermitten taudible
warning sounds. G
Ris
kofi njury
The driver or fron tpassenger has not fastened their seat belt. At
th es am etime, yo uare dr ivingfaster than25k m/h or have briefly
driven faster than 25 km/h.
X Fasten your seat belt (Y page 46).
Th ew arning lamp goes out and the intermittent warning tone
ceases. G
Risk of injury
There are objects on the front-passenger seat. At the same time,
you are driving faster than 25 km/h or have briefly driven faster
than 25 km/h.
X Remove the objects from the front-passenger seat and stow
them in asecur eplace.
The warnin glamp goes out and the intermittent warning tone
ceases. Safety systems
Problem Possible causes/consequence
sand M Solutions
J
The yellow brak
esys-
tem warning lamp
lights up while the
engine is running. G
Risk of accident
The brake syste mism alfunctionin gand the braking characteris-
tics may be affected.
X If the multifunctio ndispla yshows adispla ymessage, please
observ ethis.
X Drive on carefully.
X Visit aqualified specialist workshop. J
The red brake system
warning lamp comes on
while the engine is run-
ning. Awarning tone
also sounds. G
Risk of accident
The brake boosting effect is malfunctionin gand the braking char-
acteristics may be affected.
X Pull over and sto pthe vehicle safely as soon as possible, paying
attention to roa dand traffic conditions. Do not continue driving
under any circumstances.
X Appl ythe electric parkin gbrake.
X Consult aqualified specialist workshop.
X Observe the additional displa ymessages in the multifunction
display. Wa
rning and indicator lamp sinthe instrument cluster
285On-boardcomputerand disp lays Z
Page 299 of 389
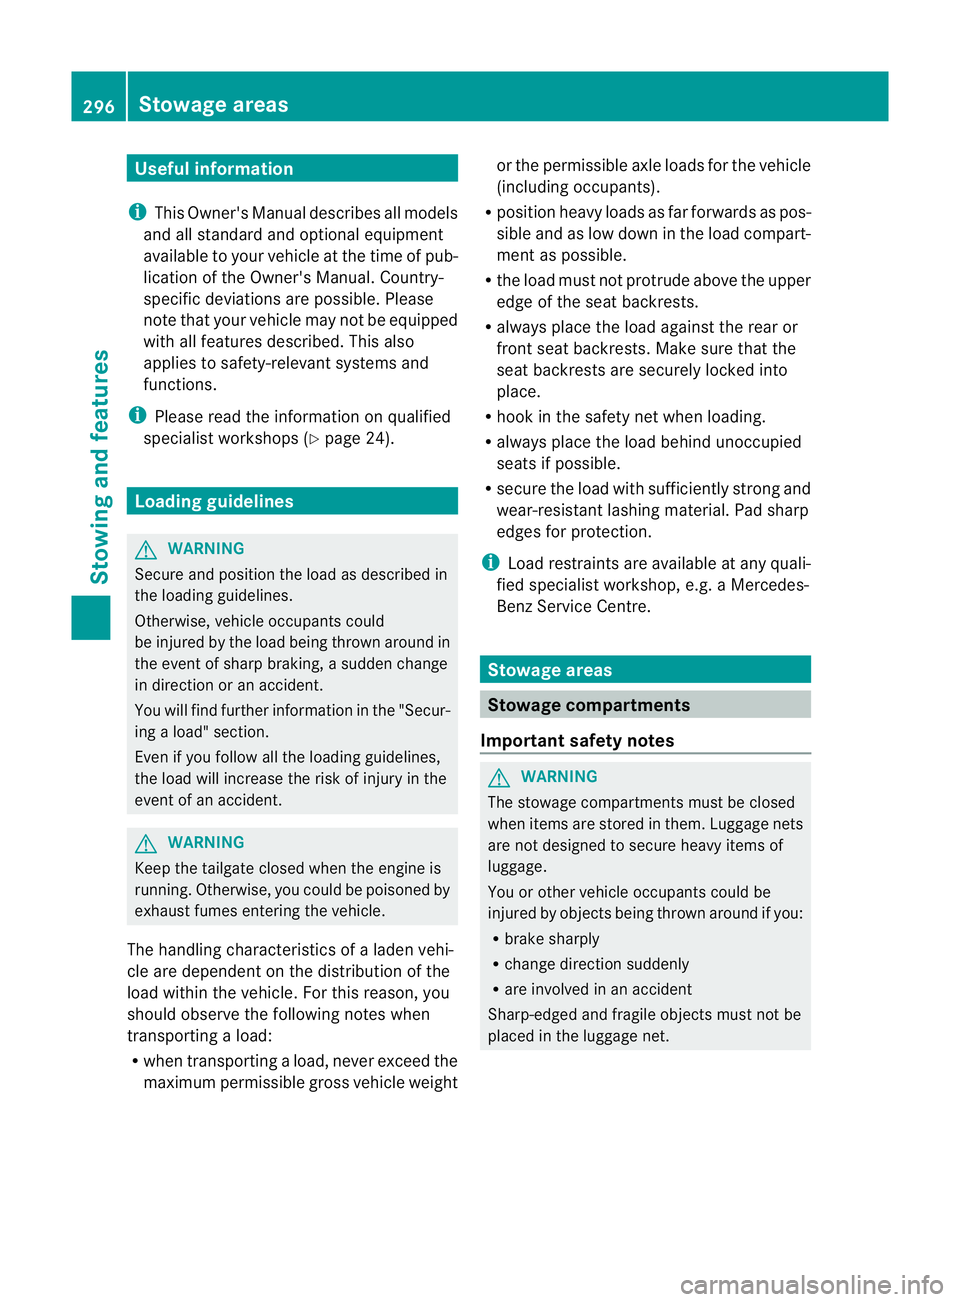
Usefu
linfor mati on
i This Owner's Manual describes all models
and all standard and optional equipment
available to your vehicle at the time of pub-
lication of the Owner's Manual. Country-
specific deviation sare possible .Please
not ethat your vehicle ma ynot be equipped
with all featur es described. This also
applies to safety-releva ntsystems and
functions.
i Please read the information on qualified
specialist workshops (Y page 24).Loading guidelines
G
WARNING
Secur eand position the load as described in
the loading guidelines.
Otherwise, vehicl eoccupan tscould
be injured by the loa dbeingthrown around in
th ee vent of sharp braking ,asudden change
in directio noranaccident.
You wil lfind further information in the "Secur-
ing aload" section.
Even if you follow all the loadin gguidelines,
the load will increase the risk of injury in the
event of an accident. G
WARNING
Keep the tailgate closed when the engine is
running. Otherwise, you could be poisoned by
exhaust fumes enterin gthe vehicle.
The handling characteristics of aladen vehi-
cle are dependent on the distribution of the
load within the vehicle. For this reason, you
should observe the following notes when
transporting aload:
R when transpor ting aload, never exceed the
maximum permissible gross vehicle weight or the permissible axle loads for the vehicle
(includin goccupants).
R position heavy loads as far forward saspos-
sible and as low down in the load compart-
men tasp ossible.
R the load must not protrude abov ethe upper
edge of the seat backrests.
R always plac ethe load against the rea ror
front seat backrests .Make sure that the
seat backrests are securely locked into
place.
R hook in the safety net when loading.
R always place the load behind unoccupied
seats if possible.
R secure the load with sufficiently stron gand
wear-resistant lashing material. Pad sharp
edges for protection.
i Load restraints are available at any quali-
fied specialis tworkshop, e.g. aMercedes-
Benz Servic eCentre. Stowage areas
Stowage compartments
Important safety notes G
WARNING
The stowage compartments must be closed
when item sare store dinthem. Luggage nets
ar en ot designed to secur eheavy item sof
luggage.
You or other vehicle occupant scould be
injure dbyo bjectsbeing thrown around if you:
R brak esharply
R change direction suddenly
R arei nvolved in an accident
Sharp-edge dand fragile object smust not be
placed in the luggag enet. 296
Stowage areasStowing and features
Page 301 of 389

Stowage compa
rtment/telephone com-
partment under the armrest
i Depending on the vehicle's equipment, a
USB port and an AUX-I Njack or aMedia
In terf ace are installed in the stowage com-
partment .AMedia In terface is auniversal
interface for portable audi oequipment, e.g.
for an iPod ®
or MP3 player (see the sepa-
rat eA udio or COMAND operating instruc-
tions).
i There is aremovable stowage tray in the
storage compartment, in which objects
such as an iPod ®
can be stored. X
To open: pull handle :upwards.
The armrest folds out.
Rea rstowage compartments Stowage compartment in the rear centre
cons ole X
To open: briefly pres sthe stowage com-
partment marking.
The stowage compartmen topens. i
Depending on the vehicle's equipmen t,
there may be ope nstowag espaces above
and below the stowage compartment. Luggage nets
G
WAR
NING
Only place lightweight obje ctsint he luggage
net .Don ot use it to transport heavy ,sharp-
edged or fragile objects. The luggag enet can-
not secur ethe objects sufficiently in the event
of an accident.
Luggage net sare locate dinthe front-
passenger footwell and on the bac kofthe
driver 'sand the front-passenger seat. Through-loading facility in the rear
compartment
The through-loading facility is opened from
the luggag ecompartmen t. X
Unlatch th erear seat back rests and tilt
them in the cargo/load position.
X Fold down the rea rseat armrest.
X Pull the centr ehead restraint on the rear
benc hseat int othe uppermost position
(Y page 94).
X Slide release cat ch: to the left and swing
flap ;to the left until it is lying on the rear
sid eoft he rea rbenc hseat. 298
Stowage areasStowing and fea
tures