2011 MERCEDES-BENZ M-CLASS SUV ECU
[x] Cancel search: ECUPage 176 of 389

vehicl
eisladen or towing atrailer, yo umust
select shift range 1,2or 3in good time. By
doing so, you wil lmake use of the braking
effect of the engine. This relieves the loa don
the brake syste mand prevents the brakes
from overheating and wearing too quickly. If
you need additiona lbraking, depress the
brake peda lrepeatedly rather than continu-
ously.
You can set avariable or permanent limit
speed:
R variable for speedlimits, e.g. in built-up
areas
R permanent for long-term spee drestric-
tions, e.g. when driv ingw ith winter tyres
fitted (Y page174)
i Thes pee dindicated in the spe edometer
ma ydiffer slightly from the limit speed
sto red.
Variable SPEEDTRONIC Cruise control lever
:
To acti vate or increase speed
; LIM indicator lamp
= To activate at the curren tspeed/last
stored speed
? To acti vate or reduce speed
A To switch between cruise control and var-
iable SPEEDTRONIC
B To deactivate variable SPEEDTRONIC
With the cruise control lever, you can operate
cruise control or DISTRONIC PLUS and vari-
able SPEEDTRONIC. X
To switch between variable SPEED-
TRONIC and cruise control/DISTRONIC
PLUS: press the cruise control lever in the
direction of arrow A.
LIM indicator lamp ;on the cruise control
lever indicates which function you have selec-
ted:
R LIM indicator lamp ; off:
cruise control
or DISTRONIC PLUS is selected.
R LIM indicator lamp ; on:
variable
SPEEDTRONIC is selected.
You can use the cruise control lever to limit
the speed to any speed above 30 km/ hwhile
the engin eisrunning.
Activating variable SPEEDTRONIC
You can use the cruise control lever to limit
the spee dtoany speed above 30 km/h while
the engine is running.
X Briefly pres sthe cruise con trollever
up : or down ?.
The curren tspeed is stored and shown in
the multifunction display.
The segment sinthe multifunction display
light up from the star tofthe scal euptot he
stored speed.
Activating at th ecurren tspeed/last
store dspeed G
WARNING
Only select astored speed if you know what
that speed is and whether it is suitable for the
current driving and traffic situation. Other-
wise ,sudden braking could endanger you or
others.
X Briefly pull the cruise control lever towards
you =.
Setting aspeed
X Press the cruise contro llev er up :for a
higher speed or down ?for alower speed.
X Keep th ecruis econtr ol leve rpresse duntil
the desired speed is reached. Drivin
gsystems
173Drivingand park ing Z
Page 182 of 389

not accelerate. Thi
sisbasedonthe current
map data in the navigation system. Example: roundabout
The current speed is maint
ained:
R approximatel y10second sbefore the
roundabout/T junction and for approx-
imatel y1.5 second swhend riving on the
roundabout
R approximatel y12second sbefore reaching
am otorwa yexita nd approximatel y4sec-
onds after the motorwa yexit
Afterwards ,the vehicle accelerates bac kto
the set speed you specified.
Stopping G
WARNING
Never get out of the vehicle when DISTRONIC
PLUS is activated.
DISTRONIC PLUS must also never be oper-
ated, activated or deactivated by apassenger
or from outside the vehicle.
DISTRONIC PLUS does not replace the elec-
tric parkin gbrake and mus tnot be used for
parking.
The DI STRONIC PLUS brakin geffect is can-
celle dand the vehicl ecan start movin gif:
R DISTRONIC PLUS is deactivated using the
cruis econtrol lever.
R you accelera te.
R there is amalfunction in the system or an
interruption in the power supply, e.g. bat-
tery failure. R
the electrical system in the engine com-
partment, the batter yorthe fuses ar etam-
pered with.
R the batter yisdisconnected.
If you wish to leave the vehicle or park it,
deactiva teDISTRONIC PLUS and secure the
vehicle agains trolling away.
If DI STRONIC PLUS detects that the vehicle
in fron tisstopping, it brakes your vehicle until
it is stationary.
Once your vehicle is stationary, it remains
stationary and you do not need to depress the
brake.
i After atime, the electric parkin gbrake
secure sthe vehicle and relieves the service
brake.
i Depending on the specifie dminimum dis-
tance, your vehicle will come to astandstill
at as ufficient distance behind the vehicle
in front .The specifie dminimum distance is
set using the control on the cruise control
lever.
The electric parkin gbrake secure sthe vehicle
automatically if DI STRONIC PLUS is activated
and:
R the driver's doo risopen and the driver's
seat belt is unfastened.
R the engine is switched off ,unles sitisa uto-
matically switched off by the ECO start/
stop function.
R as ystem fault occurs.
R the powe rsupply is not sufficient.
On steep uphill or downhill inclines or if there
is am alfunction, the transmission may also
be automatically shifted into position P. Driving systems
179Drivingand parking Z
Page 184 of 389
or
X
Briefl ypres sthe cruise con trol leve rinthe
direction of arrow =.
Variable SPE EDTRONIC is selected. LIM
indicator lamp ;in the cruise control lever
lights up.
When you deactivate DI STRONIC PLUS, the
DISTRONIC PLU Soff message is show
nin
the multifunction display for approximately
five seconds.
i The last speed stored remains stored until
you switch off the engine.
i DISTRONIC PLUS is not deactivated if you
depress the accelerator pedal. If you accel-
erate to overtake, DISTRONIC PLUS
adjusts the vehicle's speed to the last
speed stored after you have finished over-
taking.
DISTRONIC PLUS is automatically deactiva-
ted if:
R you engag ethe electric parkin gbrake or if
th ev ehicle is automatically secured with
the electric parking brake.
R you are driving slower than 25 km /hand
there is no vehicle in front ,orifthe vehicle
in front is no longer detec ted.
R ESP ®
intervenes or if you deactivat eESP®
.
R the transmission is in the P,Ror Nposition.
R the vehicle is near aradio telescop efacility
(Y page 380).
R you switch off the radar senso rsystem
(Y page 249).
R you pull the cruise control lever towards
you in order to pull away and the front-
passenger doo rorone of the rear doors is
open.
R you activate DSR.
R you activate off-road program 2onvehicles
with the ON&OFFROA Dpackage.
R the vehicle has skidded.
If DISTRONIC PLUS is deactivated, you will
hear awarning tone. The DISTRONICP LUS off message is show
ninthe multifunction
displa yfor approximately fiv eseconds.
In the Assistanc emenu (Y page 24 4)of the
on-boar dcompu ter,you can select the dis-
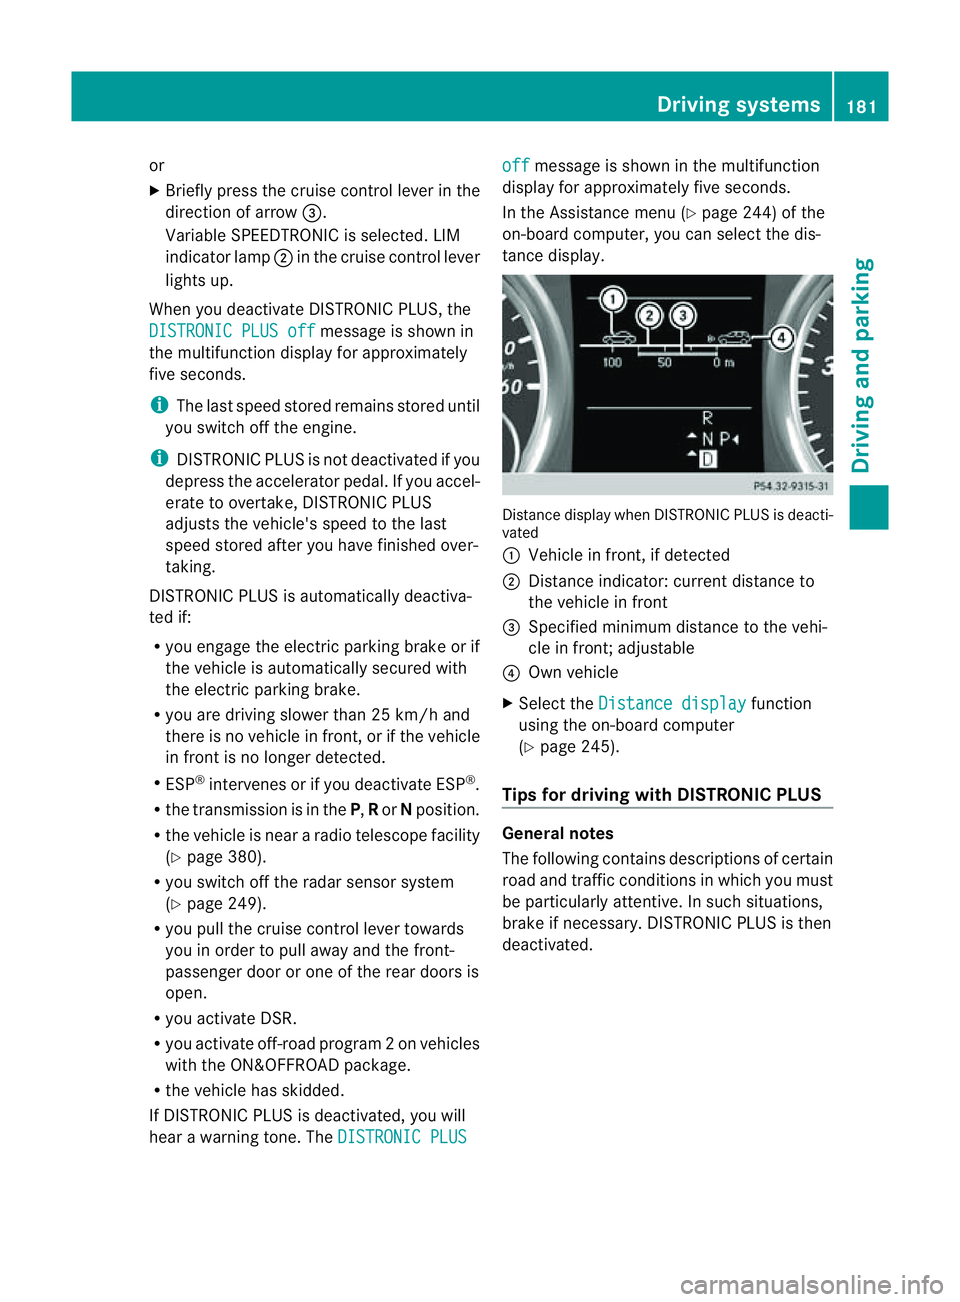
tanc edisplay. Distance display when DISTRONI
CPLUS is deacti-
vated
: Vehicl einfront, if detected
; Distance indicator: curre ntdistanc eto
the vehicle in front
= Specified minimum distanc etothe vehi-
cle in front; adjustable
? Own vehicle
X Select the Distancedisplay function
usin gthe on-boar dcompu ter
( Y page 24 5).
Tips for driving with DISTRO NICP LUS Genera
lnotes
The following contains descriptions of certain
road and traf ficc ondition sinwhich you must
be particularly attentive. In such situations,
brake if necessary. DI STRONIC PLUS is then
deactivated. Driving systems
181Drivingand park ing Z
Page 190 of 389
HOL
Dfunction
Gen eral notes Th
eH OLD function ca nassist the driver in the
foll owing situations:
R when pulling away, especially on steep
slopes
R when manoeuvrin gonsteep slopes
R when waiting in traffic
The vehicle is kept stationary without the
driver having to depress the brake pedal.
The braking effect is cancelled and the HOLD
function is deactivated when you depress the
accelerator peda ltop ull away.
Activation conditions You can activate the HOLD function if:
R the vehicle is stationary.
R the engine is running or if it has been auto-
matically switched off by the ECO start/
stop function.
R the driver' sdoor is closed or if your seat
belt is fastened.
R the electric parkin gbrake is released.
R thet ransmission is in position D,Ror N.
R DISTRONIC PLUS is deactivated.
Activatin gthe HOL Dfunction X
Make sure that th eactivation conditions
are met.
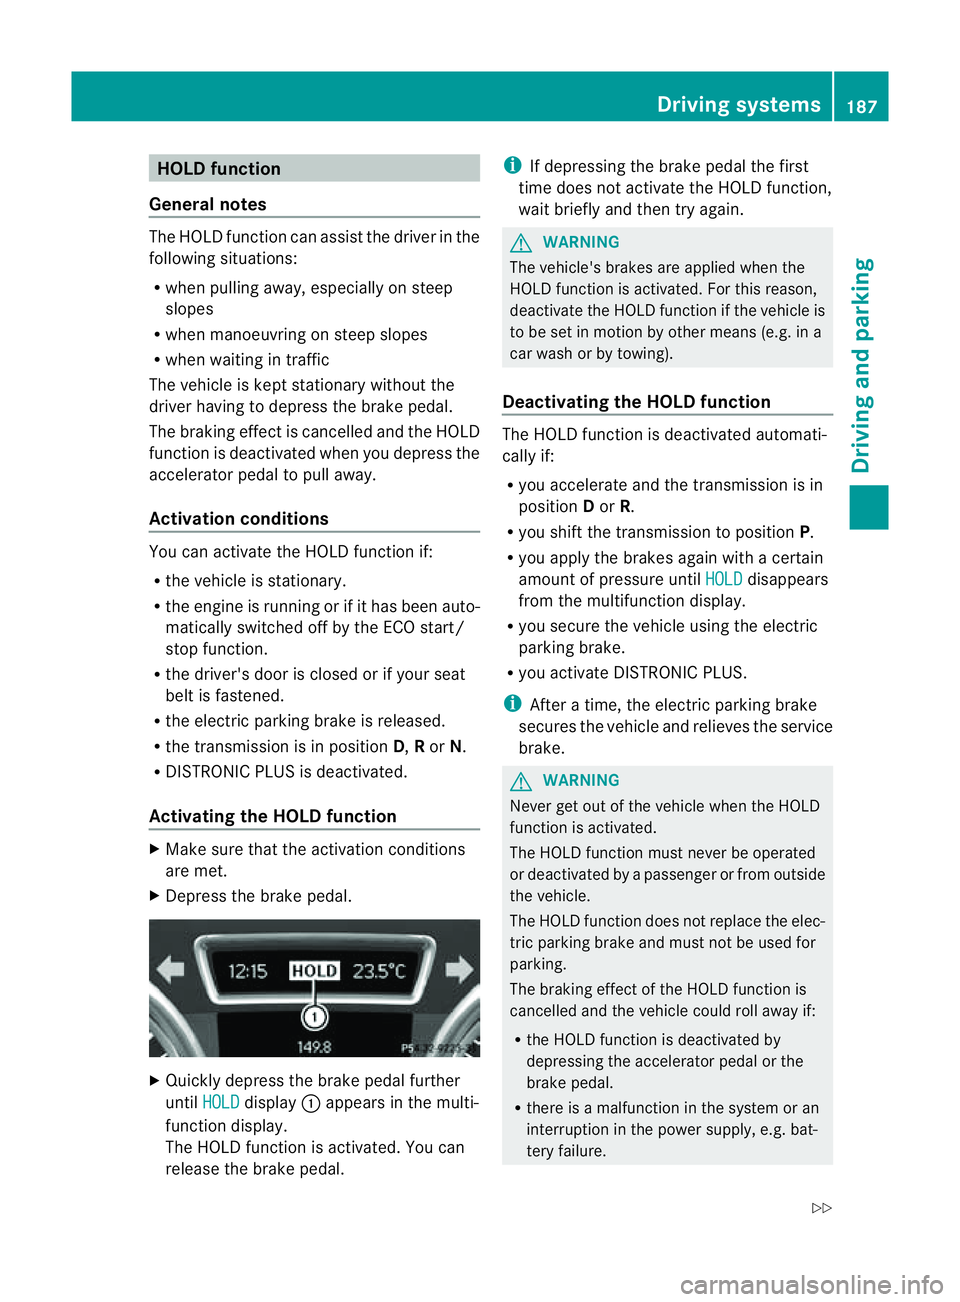
X Depress the brake pedal. X
Quickly depress the brake pedal further
until HOLD display
:appears in the multi-
function display.
Th eH OLD func tion is activated. You can
release the brake pedal. i
If depressing the brake pedal the first
tim edoes not activate the HOL Dfunction,
wait briefly and then try again. G
WARNING
The vehicle's brakes are applied when the
HOLD function is activated. For this reason,
deactivate the HOLD function if the vehicle is
to be set in motion by other means (e.g. in a
car wash or by towing).
Deactivating the HOLD function The HOLD function is deactivated automati-
cally if:
R you accelerate and the transmission is in
position Dor R.
R you shift the transmission to position P.
R you apply the brakes again with acertain
amount of pressur euntil HOLD disappears
from the multifunctio ndisplay.
R you secure the vehicle using the electric
parkin gbrake.
R yo ua ctivate DISTRONIC PLUS.
i After atime, the electric parkin gbrake
secure sthe vehicle and relieves the service
brake. G
WARNING
Never get out of the vehicle when the HOLD
func tion is activated.
The HOL Dfunction must never be operated
or deactivated by apassenger or from outside
the vehicle.
The HOLD function does not replace the elec-
tric parking brake and must not be used for
parking.
The braking effect of the HOLD function is
cancelled and the vehicle could roll away if:
R the HOLD function is deactivated by
depressing the accelerator pedal or the
brake pedal.
R there is amalfunction in the system or an
interruption in the power supply ,e.g. bat-
tery failure. Driving systems
187Drivingand parkin g
Z
Page 191 of 389
R
the electrica lsystem in thee ngine com-
partment, the battery or the fuses are tam-
pered with.
R the battery is disconnected.
If you leave the vehicl eorpark it, deactivate
the HOLD function and secure the vehicle
against rolling away.
The electric parking brake secures the vehicle
automatically if the HOLD function is activa-
ted and:
R the driver' sdoor is open and the driver's
seat belt is unfastened.
R the engin eisswitched off, unless it is auto-
matically switched off by the ECO start/
stop func tion.
R as ystem fault occurs.
R the powe rsupply is not sufficient.
On steep uphill or downhill inclines or if there
is am alfunction, the transmission may also
automatically be shifted into position P.AIRMATIC package
General notes AIRMATIC enables
asuspension tuning set-
ting to be selected and regulates the damping
behaviou rand level of your vehicle. The sys-
tem comprises aminimum of two compo-
nents. These are ADS (Adaptive Damping Sys-
tem) (Y page 188 )and level control
(Y page 189) .Your vehicle ma yalso be equip-
ped with the Active Curv eSystem
(Y page 188).
Observe the notes on driving with atrailer
(Y page 226).
ADS (Adaptive Damping System) General notes
ADS adapts th
edamping characteristic sto
the curren toperatin gand driving situation. Thi
sd epends on:
R your drivin gstyle
R the road surface conditions
R the AD Ssetting
R the vehicle level setting
Your selection remains stored even if you
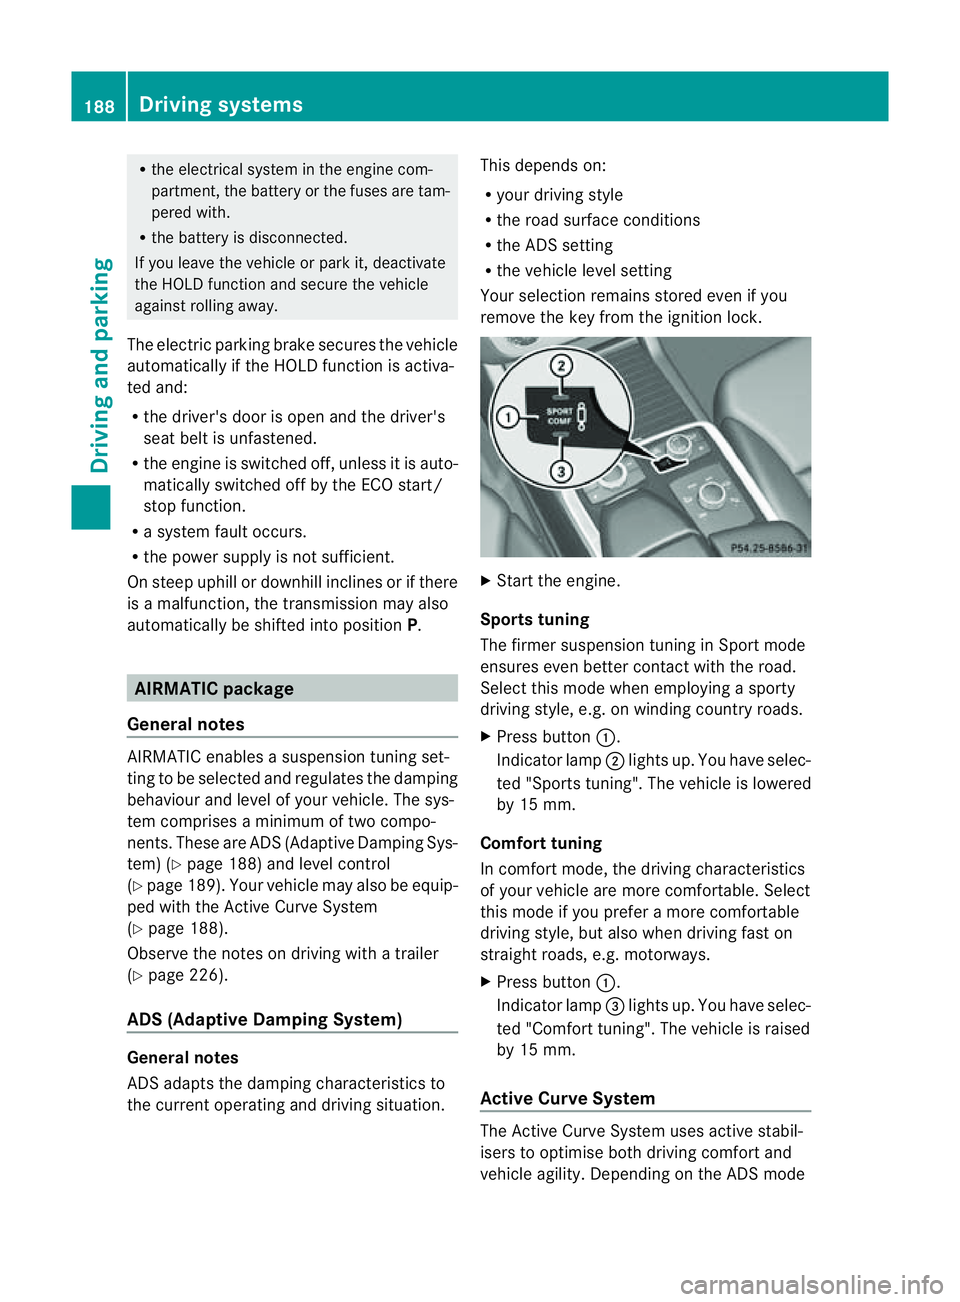
remov ethe key from the igni tion lock. X
Star tthe engine.
Sports tuning
The firmer suspension tunin ginSport mode
ensures even better contact with the road.
Select this mode when employing asporty
drivin gstyle, e.g. on winding country roads.
X Press button :.
Indicator lamp ;lights up. You have selec-
ted "Sports tuning". The vehicle is lowered
by 15 mm.
Comfort tuning
In comfort mode, the driving characteristics
of your vehicle are more comfortable. Select
this mode if you prefer amore com fortable
driving style ,but also when drivin gfast on
straight roads, e.g. motorways.
X Press button :.
Indicator lamp =lights up. You have selec-
ted "Comfort tuning". The vehicle is raised
by 15 mm.
Active Curve System The Active Curve System uses activ
estabil-
isers to optimis eboth drivin gcomfort and
vehicle agility. Depending on the AD Smode 188
Driving systemsDriving and parking
Page 192 of 389
selected (Y
page 188), the Ac tiveCurve Sys-
tem also changes the setting.
If you select ADS comfort mode:
R rolling movement is reduced in the event of
changing surface undulations.
R the roll angle when cornering is reduced.
R the driving style is agile.
If you select ADS sport mode:
R the roll angle is reduced significantly.
R the driving style is even more agile.
Leve lcontrol Import
ants afety notes
Leve lcontrol adapts the vehicle leve lauto-
matically to the current operating and driving
situation. This results in reduced fuel con-
sumption and improved handling.
If you select ADS comfort mode
(Y page 188), the vehicle is lowered to high-
spee dlevel as the speed increases. As the
vehicle decelerates, the vehicle is raised back
up to highway level.
If you select ADS sport mode (Y page 188),
the vehicle skips highway level and lowers
directly to high-speed level dependin gonthe
basic setting (Y page 189).
Make changes to the vehicle level while the
vehicle is in motion. This enables the vehicle
to adjust to the new level as quickly as pos-
sible.
The vehicle level ma ychange visibly if you
par kthe vehicle and the outside temperature
changes. If the temperature drops, the vehi-
cle level lowers; with an increase in temper-
ature, the vehicle level rises.
If you unlock the vehicle or open adoor, the
vehicle begins to compensat efor load dis-
crepancies while still parked. However, for
significant leve lchanges, e.g. after the vehi-
cle has been stationary for along period, the
engin emust be on. For safety reasons, the
vehicle is only lowered when the doors are
closed .Lowering is interrupted if adoor is opened; it con
tinues once the doo rhas been
closed. G
WARNING
Make sure that nobody is near the wheel arch
or vehicle underside when you make achange
to the vehicle level. Otherwise, you or others
ma ybet rapped. G
WARNING
Always select as lo wavehicle level as possi-
ble. If the vehicle level is high, the vehicle
centre of gravity shifts upwards. This increa-
ses the risk of the vehicle tipping over.
Adapt your driving style to suit the vehicle
level. ESP ®
cannot reduc ethe risk of an acci-
dent if you drive too fast. ESP ®
cannot over-
rid ethe laws of physics.
! When driving on extremel yrough terrain,
select ahigh vehicle level in good time.
Make sure there is always sufficient ground
clearance to prevent damage to the vehi-
cle.
For information abou tdriving off-roa d, see
( Y page 166).
Basic settings
The exten ttowhich the vehicle is rai sedor
lowered depends on the basic setting selec-
ted. Select raised level for off-road driving or
highway/high-spee dlevel for normal roads.
The indiv idua lvehicle levels differ from high-
way level as follows:
R Highway level: +/ –0mm
R High-speed level: –15 mm
R Raised level: +60 mm
Raise dlevel
Only select raise dlevel if this is appropriate
for the road conditions. Otherwise, fuel con-
sumption may increase and handling may be
affected. Driving systems
189Drivingand parking Z
Page 232 of 389

pling
atrailer. Th evehicle level could change
and you could endanger yourself or others.
Never press the ADS button or operate the
leve lcontrol while you are coupling up or
decoupling atrailer.
Steel-spring vehicles X
Make sure that th etransmission is in posi-
tion P.
X Engag ethe electric parkin gbrake.
X Positio nthe trailer level behind the vehicle.
X Coupl eupthe trailer.
X Establish the electrical con nection
betwee nthe vehicle and the trailer.
X Chec kthat the trailer lighting system is
working.
Vehicles wit hthe AIRMATIC package X
Make sure that th etransmission is in posi-
tion P.
X Engag ethe electric parkin gbrake.
X Start th eengine.
X Set the vehicl etohighway level
(Y page 189).
X Set the Adaptive Dampin gSystem (ADS )to
AUTO orCOMF(Y page 188).
X Switch off the engine.
X Close the doors and tailgate.
X Position the trailer level behind the vehicle.
X Couple up the trailer.
X Establish the electrical connection
betwee nthe vehicle and the trailer.
X Chec kthat the trailer lighting system is
working.
i If you hav ecoupled atrailer, th evehicle
will remain at highway level.
The vehicle automatically lowers to high-
way level if you driv efaster than 30 km/h
with atrailer. Th evehicle is not lowered to
high-speed level even if you are travelling
at higher speeds. This also applies when using accessories
that are plugged into the socket of the
trailer tow hitch (e.g. abicycle rack). Decoupling
atrailer
Important safety notes G
WARNING
Do not disconnect atrailer with an engaged
overru nbrake .Otherwise, you rhand could
becom etrapped between th ebumpe rand
drawbar. G
WARNING
As soo nasyou raise the trailer drawbar, the
unladen vehicle rises slightly .The vehicle then
lower stod riving level.
Make sure that nobod yisinthe vicinit yofthe
wheel arch or the underbody. You coul doth-
erwise trap yoursel forothers. G
WARNING
Th ev ehicle is lowered as soo nasyou discon-
nec tthe trailer cable. Make sur ethat nobody
is in the vicinit yofthe wheel arch or the
underbody. You coul dotherwis etrap yourse lf
or othe rs.
As soon as you decoupl ethe trailer ,the unla-
den vehicle rise sslightly. Make sure that you
or others are not injured in the process.
! Do not disconnect atrailer wit han
engaged overrun brake. Otherwise, your
vehicle could be damage dbythe rebound-
ing of the overru nbrake.
Steel-spring vehic les X
Ma ke sure that the transmission is in posi-
tion P.
X Engag ethe electric parkin gbrake.
X Secure th etrailer agains trollin gaway.
X Remove the trailer cable and decouple the
trailer. Towing
atrailer
229Driving andparki ng Z
Page 233 of 389
Vehicles with the AIRMATIC package
X
Make sure tha tthe transmission is in posi-
tion P.
X Engage the electric parkin gbrake.
X Start th eengine.
X Clos ethe doors and tailgate.
X Secur ethe trailer against rolling away.
X Remove the trailer cable and decouple the
trailer.
X Switc hoff th eengine. Folding in the ball coupling
i Fold the ball coupling back in if you are
not using the trailer tow hitch.
X Make sure that the vehicl eisstationary and
the trailer cables are disconnected.
X Place the protective cap on the ball cou-
pling.
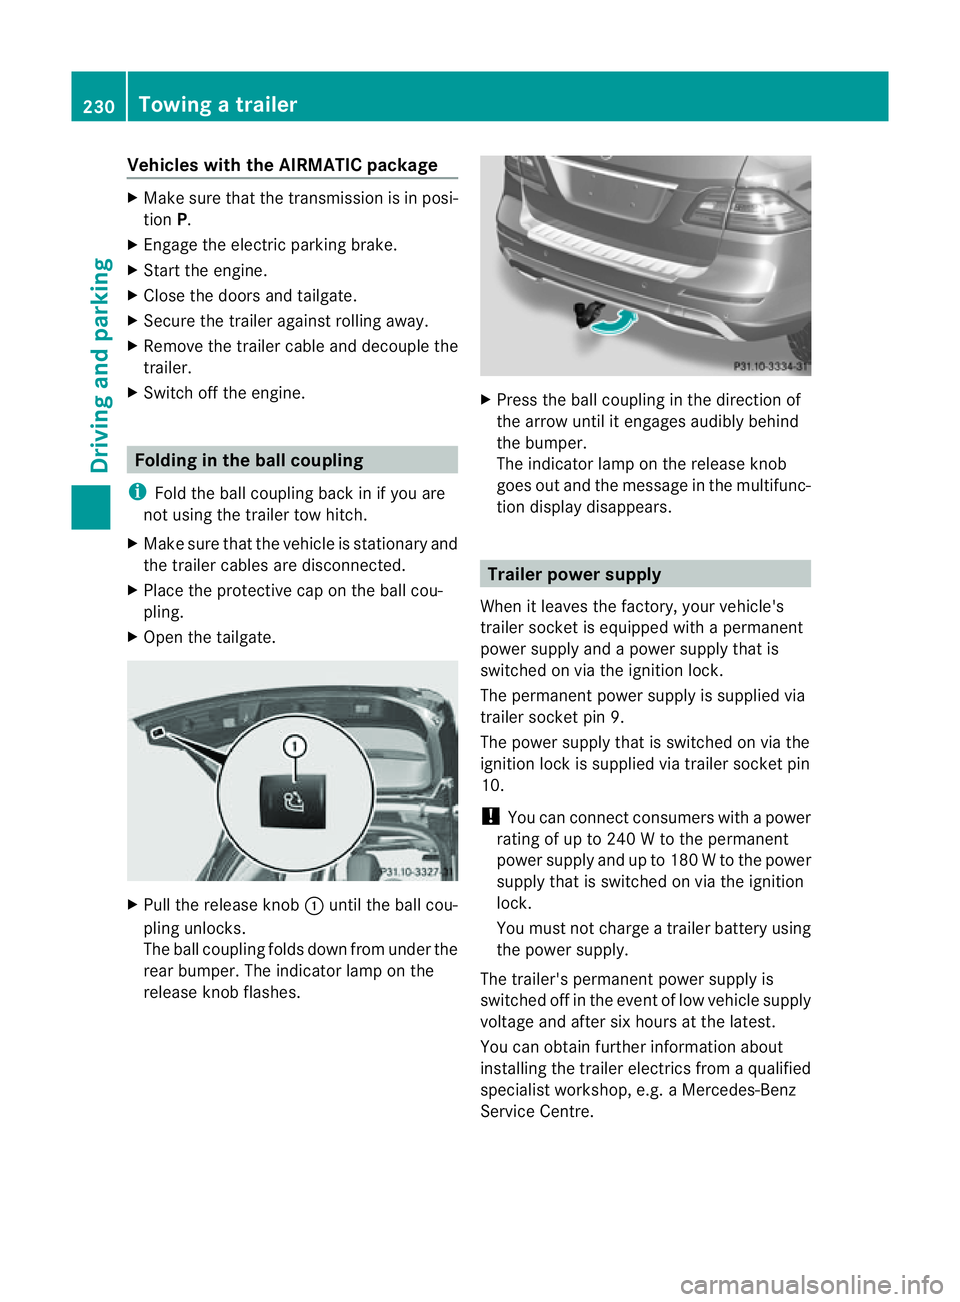
X Ope nthe tailgate. X
Pull the release knob :until the ball cou-
plin gunlocks.
The ball coupling folds dow nfrom under the
rea rbumper. The indicator lamp on the
release knob flashes. X
Press the ball coupling in the direction of
the arrow until it engage saudibly behind
the bumper.
The indicator lamp on the release knob
goes out and the messag einthe multifunc-
tion display disappears. Trailer power supply
When it leaves the factory ,your vehicle's
trailer socket is equipped with apermanent
power supply and apower supply that is
switched on via the ignition lock.
The permanen tpower supply is supplied via
trailer socket pin 9.
The power supply that is switched on via the
ignition lock is supplied via trailer socket pin
10.
! You can con nect consumers with apower
ratin gofupto2 40Wtot he permanent
power supply and up to 18 0Wto the power
supply that is switched on via the ignition
lock.
You must not charge atrailer battery using
th ep ower supply.
The trailer's permanen tpower supply is
switched off in the even toflow vehicle supply
voltage and after six hour satthe latest.
You can obtai nfurther information about
installing the trailer electrics from aqualified
specialist workshop, e.g. aMercedes-Benz
Ser vice Centre. 230
Towing
atrailerDriving and parking