2011 MERCEDES-BENZ M-CLASS SUV door lock
[x] Cancel search: door lockPage 103 of 389
Position of th
esteerin gwheel for driv-
ing Th
es teering whee lismoved to the previously
set position if:
R the driver's door is closed.
R you inser tthe key int othe ignition lock.
or
R you press the Star t/Stop butto nonce on
vehicles with KEYLESS-GO.
If you clos ethe driver's door with the key
inserted int othe ignition lock ,the steering
wheel is automatically moved to the previ-
ously set position.
The last position of the steering wheel is
stored when you switc hoff th eignition or
when you stor ethe setti ngwith the memory
function (Y page 103).
Crash-responsive EASY-EXIT fea tureIf th
ecrash-resp onsive EASY-EXIT feature is
trig gere dinana ccident,the steeri ngcolu mn
will mov eupwards when the driv er'sdoor is
opened. This occurs irrespective of the posi-
tion of the key in the ignition lock .This makes
it easier to exit the vehicle and rescue the
occupants.
The crash-responsive EASY-EXIT featur eis
only operational if the EASY-EXIT/ENTRY fea-
tur eisa ctivate dinthe on-boar dcomputer. Mirrors
Rear-view mirror
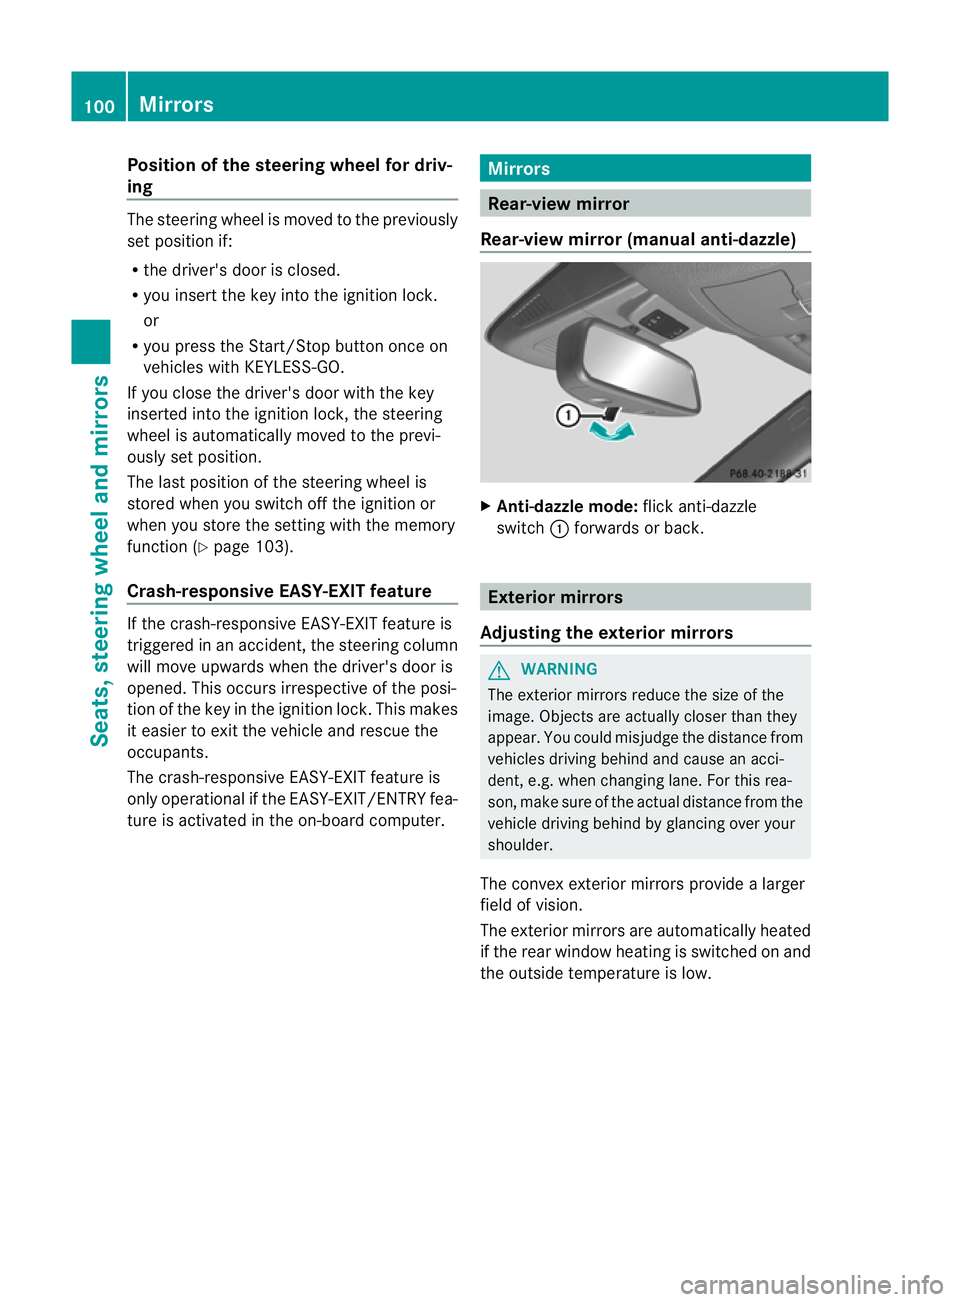
Rear-view mirror (manua lanti- daz zle) X
Anti-dazzle mode: flick anti-dazzle
switch :forward sorback. Exterior mirrors
Adjusting the exterior mirrors G
WARNING
The exterior mirrors reduce the size of the
image. Objects are actually closer than they
appear. You could misjudge the distance from
vehicles driving behind and cause an acci-
dent, e.g. when changing lane. For this rea-
son, make sure of the actual distance from the
vehicle driving behind by glancing over your
shoulder.
The convex exterior mirrors provide alarger
field of vision.
The exterior mirrors are automatically heated
if the rear window heating is switched on and
the outside temperature is low. 100
MirrorsSeats
,steering wheel and mirrors
Page 104 of 389
X
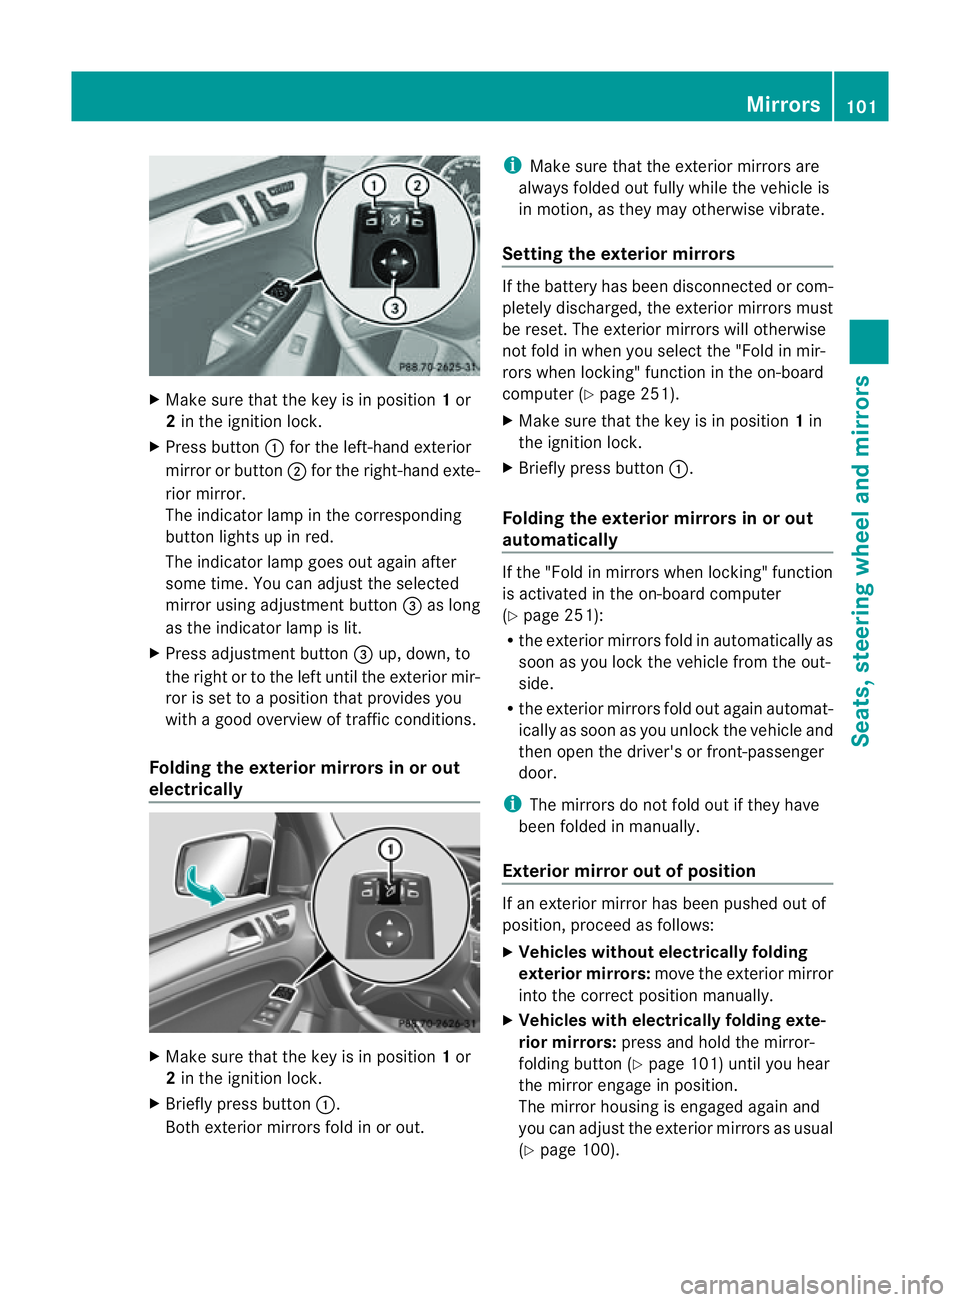
Make sur ethat the key is in position 1or
2 in the ignition lock.
X Press button :for the left-hand exterior
mirror or button ;for the right-hand exte-
rior mirror.
The indicator lam pint he corresponding
button lights up in red.
The indicator lam pgoes out again after
some time. You can adjust the selected
mirror using adjustment button =as long
as the indicator lam pislit.
X Press adjustment button =up, down, to
the right or to the left until the exterior mir-
ror is set to aposition that provides you
with agood overview of traffic conditions.
Folding th eexterior mir rors in or out
electrically X
Make sure that the key is in position 1or
2 in the ignitio nlock.
X Briefl ypres sbutton :.
Both exterior mirrors fold in or out. i
Make sure that the exterior mirrors are
always folded out fully while the vehicle is
in motion, as they may otherwis evibrate.
Setting the exterior mirrors If the battery has been disconnected or com-
pletely discharged, the exterior mirrors must
be reset. The exterior mirrors will otherwise
not fold in when you select the "Fold in mir-
rors when locking" func tion in the on-board
computer (Y page 251).
X Make sure that the key is in position 1in
the ignition lock.
X Briefl ypres sbutton :.
Folding the exterior mirrors in or out
automatically If the "Fold in mirrors when locking" function
is activated in the on-board computer
(Y page 251):
R the exterior mirrors fold in automatically as
soo nasyou lock the vehicle from the out-
side.
R the exterior mirror sfold out again automat-
ically as soon as you unloc kthe vehicle and
then open the driver's or front-passenger
door.
i The mirrors do not fol dout if they have
been folded in manually.
Exterior mirror out of position If an exterior mirror has been pushed out of
position, proceed as follows:
X Vehicles without electrically folding
exterior mirrors: move the exterior mirror
into the correct position manually.
X Vehicles with electrically folding exte-
rior mirrors: press and hold the mirror-
folding button (Y page 101)until you hear
the mirror engage in position.
The mirror housing is engaged agai nand
you can adjus tthe exterior mirrors as usual
(Y page 100). Mir
rors
101Seats ,steeri ngwheel and mirrors Z
Page 109 of 389
Usefu
linfor mati on
i This Owner's Manual describes all models
and all standard and optional equipment
available to your vehicle at the time of pub-
lication of the Owner's Manual. Country-
specific deviation sare possible .Please
not ethat your vehicle ma ynot be equipped
with all featur es described. This also
applies to safety-releva ntsystems and
functions.
i Please read the information on qualified
specialist workshops (Y page 24).Exterior lighting
Important safet
ynotes
Fo rreasons of safety, Mercedes-Ben zrecom-
mends that you driv ewith the lights switched
on even during the daytime. In some coun-
tries, operation of the headlamps varies due
to legal requirement sand self-imposed obli-
gations. Notes on driving abroad
Convert to symmetrical dipped beam
when driving abroad: switch the headlamps
to symmetrical dipped beam in countries in
which traffic drives on the opposite sid eofthe
roa dtot he country wher ethe vehicle is reg-
istered. This prevents glar etooncoming traf-
fic. Symmetrical lights do not illuminate as
large an area of the edg eofthe carriageway.
Convert the headlamps as close to the border
as possible before drivin ginthese countries
(Y page 24 7).
Convert to asymmetrical dipped beam
after returning: convert the headlamps back
to asymmetrical dipped beam as soon as pos-
sible after crossing the border when returning
(Y page 247).
If the headlamps are converted to symmetri-
cal dipped beam, the "motorway mode" and "extended range foglamps" function
s(Intelli-
gent Light Syste m)are not available. Light switch
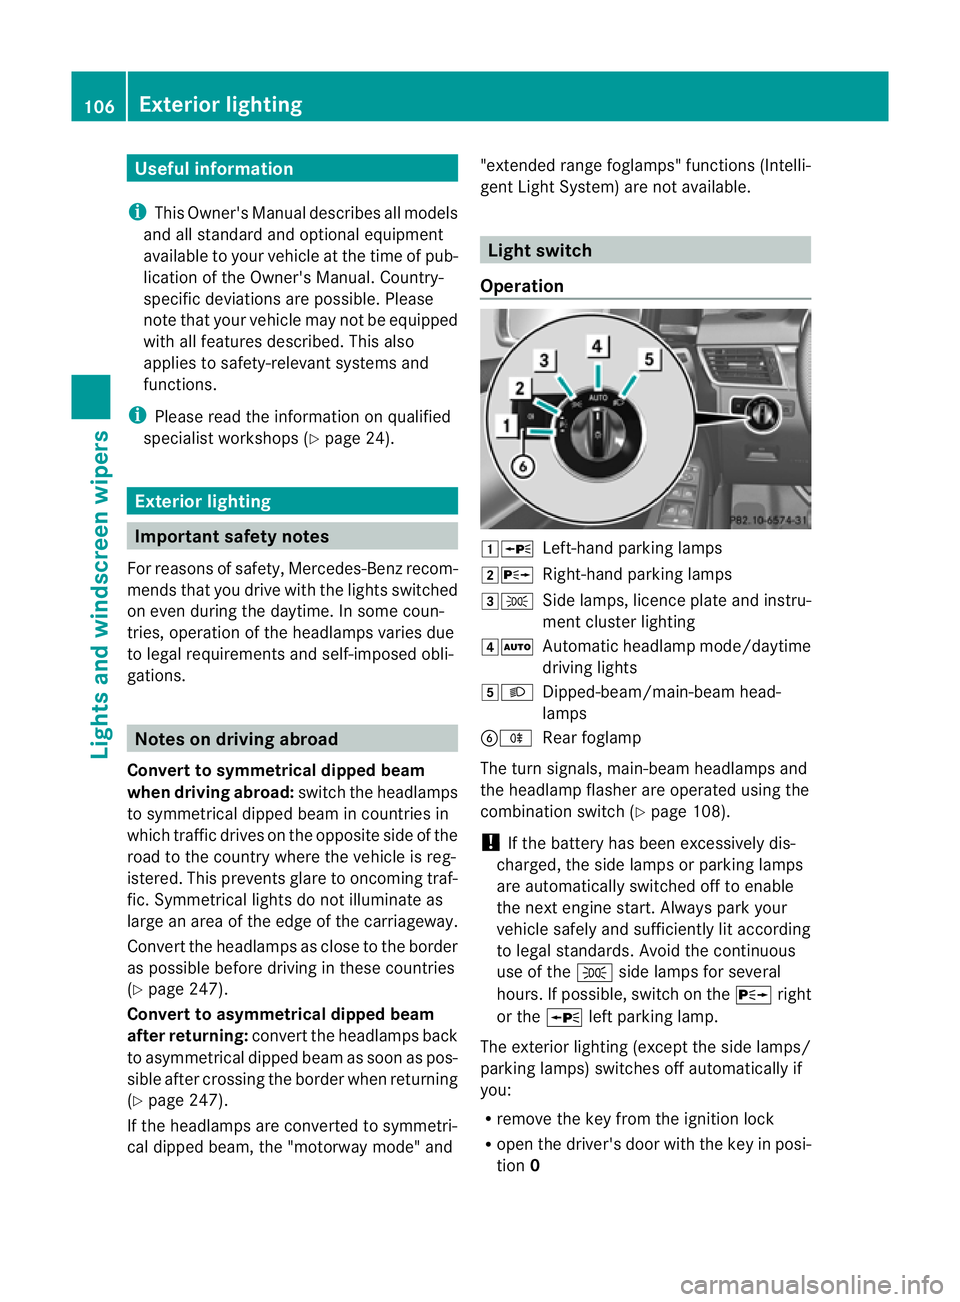
Operation 1W
Left-hand parkin glamps
2X Right-hand parkin glamps
3T Side lamps, licenc eplate and instru-
ment cluster lighting
4Ã Automatic headlamp mode/daytime
drivinglights
5L Dipped-beam/main-beam head-
lamps
BR Rear foglamp
The turn signals, main-beam headlamps and
the headlamp flasher are operated using the
combination switch (Y page 108).
! If the batter yhas been excessively dis-
charged, the side lamps or parkin glamps
are automatically switched off to enable
the nex tengine start. Alway sparky our
vehicl esafely and sufficiently li taccording
to lega lstandards. Avoi dthe contin uous
us eoft heT sidelam ps for several
hours. If possible, switch on the Xright
or the Wleft parking lamp.
The exter iorl igh ting (except the sid elam ps/
parking lamps )switches off automaticall yif
you:
R remove the key from the ignitio nlock
R ope nthe driver's door with the key in posi-
tion 0 106
Exterior lightingLights and windscreen wipers
Page 115 of 389

X
Drive with the headlamps switched on.
Th elevel of moisture diminishes, depend-
ing on the length of the journey and the
weather conditions (humidity and tem per-
ature).
If th elevel of moisture does not diminish:
X Have the headlamps checked at aquali fied
specialis tworkshop. Interior lighting
Overview of interior lighting
Overhead con
trol panel
: p To switch the left-hand front reading
lamp on/off
; c To switch the front interior lighting
on
= v To switch the rear interior lighting
on/off
? | To switch the front interior lighting/
automatic interior lighting control off
A p To switch the right-hand front read-
ing lamp on/off
B To switch the automatic interior lighting
control on Interio
rlighting control
Impor tant notes In order to prevent the vehicle'
sbattery from
discharging, the interior lighting functions are
automatically deactivated after some time except for when the key is in position
2in the
ignition lock.
The colour and brightness of the ambient
lighting may be set using the on-board com-
puter (Y page 248).
Automatic interior lighting control X
To switch on: set the rocker switch to
centre position B.
X To switch off: set the rocker switch to the
| position.
The interior lighting automatically switches
on if you:
R unlock the vehicle
R open adoor
R remove the key from the ignition lock
The interior light is activated for ashort while
when the key is removed from the ignition
lock .You can activate this delayed switch-off
using the on-boar dcomputer (Y page 249).
Manua linterior lighting control X
To switc hthe fron tinterior lighting on:
set the roc kers witch to the cposition.
X To switch the front interior lighting off:
set the rocker switch to the |position.
X To switch the rear interior lighting on/
off: press the ubutton.
X To switch the reading lamp son/off:
press the pbutton. Crash-responsive emergency lighting
The interior lightin gisactivate dautomatically
if the vehicle is involved in an accident.
X To switch off the crash-responsive
emergency lighting: press the hazard
warning lamp button.
or
X Lock and then unlock the vehicle using the
key. 112
Interior lightingLights and windscreen wipers
Page 121 of 389

Fitting th
ewiper blades
X Positio nthe new wiper blade in the retainer
on the wiper ar mand slide it into place in
the opposite direction to the arrow.
The wipe rblade audibly engages.
X Make sure that wiper blade is seated cor-
rectly.
X Fold the wiper arm back onto the wind-
screen.
Replacing the rear window wiper blade Removing the wiper blade
G
WARNING
The wiper arm could be set in motion and
injur eyou if the windscreen wiper sare
switched on.
Remove th ekey from the ignition lock before
replacing the wiper blade. X
Remov ethe key from the ignition lock.
X Fold wiper arm :away from the rea rwin-
dow until it engages.
X Position wiper blade ;atar ight angle to
wiper arm :.
X Hold wiper arm :and press wiper
blade ;in the direction of the arrow until
it releases.
X Remove wiper blade ;. Fitting the wiper blade
X
Place new wiper blade ;onto wiper
arm :.
X Hold wiper arm :and press wiper
blade ;in the opposite direction to the
arrow until it engages.
X Make sure that wiper blade ;is seated
correctly.
X Position wiper blade ;parallel to wiper
arm :.
X Fold wiper arm :back onto the rear win-
dow. Problems with the windscreen wipers
The windscreen wipers are obstructed Leaves or snow, for example, may be
obstructing the windscreen wiper movement.
The wiper motor has been deactivated.
X
For safety reasons, you should remov ethe
key from the ignition lock.
or
X Switc hoff th eengine using the Start/Stop
butto nand ope nthe driver's door.
X Remove the cause of the obstruction.
X Switc hthe windscreen wiper sback on.
The windscreen wipers are inoperative The windscreen wiper drive is malfunctioning.
X
Select another wiper spee donthe combi-
nation switch.
X Hav ethe windscreen wiper schecked at a
qualified specialist workshop.
Th es pra ynozzles are misaligned The windscreen washer fluid from the spray
nozzles no longer hits the centre of the wind-
screen. The spray nozzles are misaligned.
X Have the spray nozzles adjusted at aquali-
fied specialist workshop. 118
Windscreen wipersLights and windscreen wipers
Page 132 of 389
matically
,the indicator lam pint he d
button is not lit.
Outside air is added after about 30
minutes.
X To switch off: press thedbutton.
The indicator lam pint he d button goes
out.
i Air-recirculation mode deactivates auto-
matically:
R after approximately fiv eminutes at out-
side temperatures below approximately
5†
R after approximately five minutes if cool-
ing with air dehumidification is deactiva-
ted
R after approximately 30 minutes at out-
sid etemperatures above approximately
5†
R if you press the ¿/Ábutton and
switch on cooling with air dehumidifica-
tion Convenienc
eopening/closin gusing
th ea ir-recirculation button G
WARNING
Make sure that nobody can become trapped
between the side window and the door frame
as the side windows are opened and closed.
Make sure that all object sand bod yparts are
clear of the side windows when they are being
opened or closed. You or the objects could be
drawn in or become trapped between the side
window and the door fram easthe window
moves. If ther eisariskofe ntrapment, oper-
ate the Wswitchto move the side window
in the opposite direction.
Make sure that nobody can become trapped
as the sliding sunroof/panorama sliding sun-
roof is ope neda nd closed. If there is arisk of
entrapment, operat ethe 3 switchtom ove
the sliding sunroof/panorama sliding sunroof
in the opposit edirection. X
Convenience closing feature: press and
hold the dbutton until the side win-
dows and the sliding sunroof/panorama
sliding sunroof are closed.
The indicator lamp in the dbutton lights
up. Air-recirculation mode is activated.
X Convenience opening feature: press and
hold the dbutton until the side win-
dows and the sliding sunroof/panorama
sliding sunroof are opened. The side win-
dows and the sliding sunroof/panorama
sliding sunroof move back to their original
position.
The indicator lamp in the dbutton goes
out. Air-recirculation mode is deactivated.
i If you open the side windows or the sliding
sunroof/panorama sliding sunroof man-
ually after closin gthemw ith the conveni-
enc eclosing feature, they will remain in this
position when opened using the conveni-
enc eopening feature. Activating/deact
ivatingthe residual
heat function
It is possibl etomakeu se of the residual heat
of the engine to continue heatin gthe station-
ar yv ehicle for up to 30 minutes after the
engine has been switched off .The heating
tim edepends on the temperature that has
been set.
i The blower will run at alow speed regard-
less of the airflow setting.
i If you activate the residual heat func tion
at high temperatures, only the ven tilation
will be activated. The blower runs at
medium speed.
X Turn the key to position 0in the ignition
lock or remov eit.
X To activate: press theÌ/Á button.
The indicato rlamp in the Ì/Á but-
ton lights up. Operating the climate control system
129Climate control Z
Page 142 of 389
roa
ds. Othe rwise,you could dam aget he
drive train. Key positions
Key g
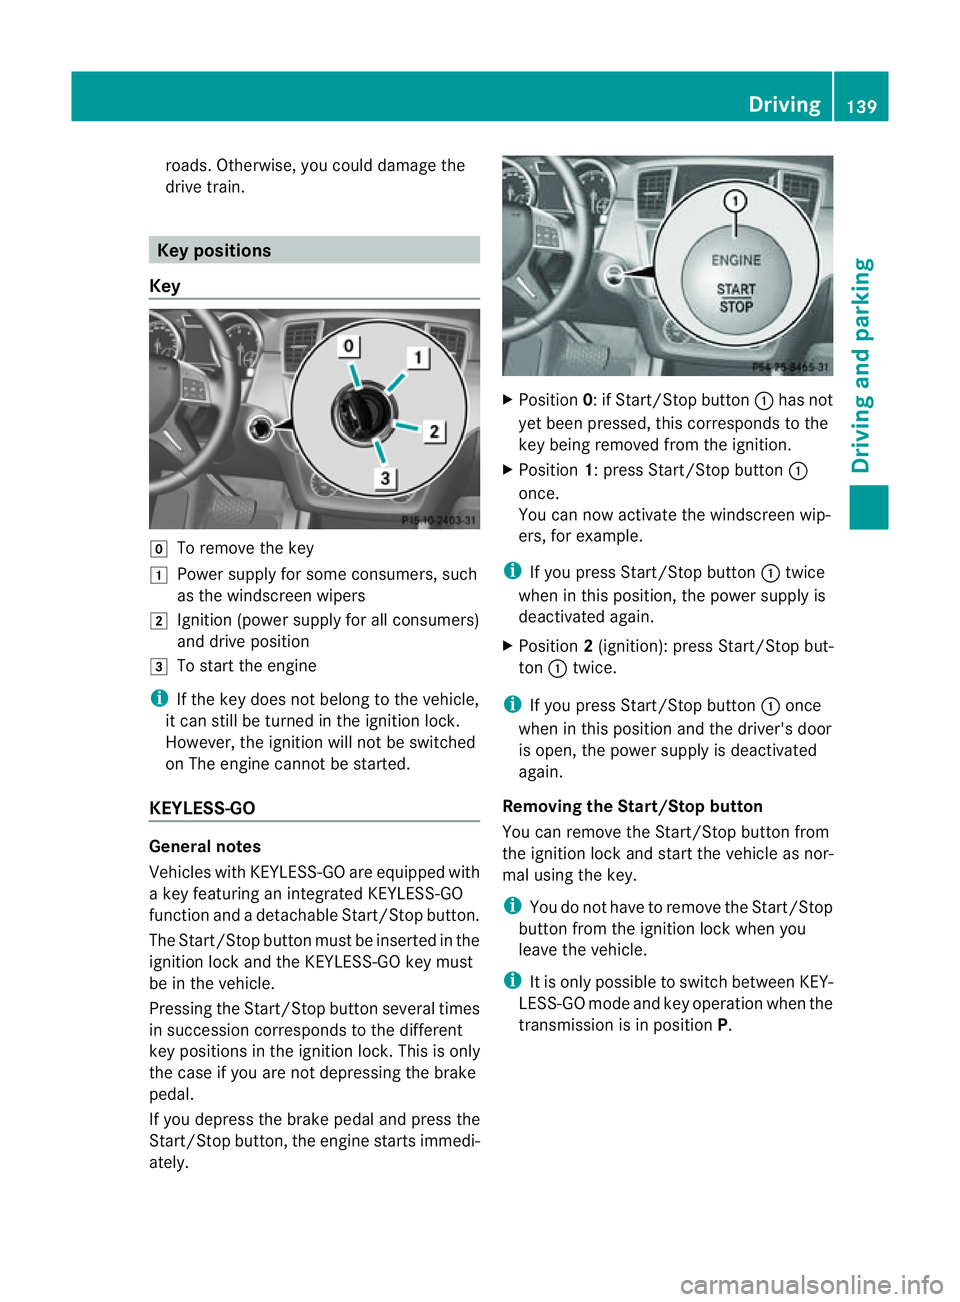
To remove the key
1 Power supply for some consumers, such
as the windscreen wipers
2 Ignition (power supply for all consumers)
and drive position
3 To start the engine
i If the key does not belong to the vehicle,
it can still be turned in the ignition lock.
However ,the igni tion will not be switched
on The engin ecannot be started.
KEYLESS-GO Genera
lnotes
Vehicles with KEYLESS-GO are equipped with
ak ey featuri ngan integrated KEYLESS-GO
function and adetachable Start /Stopbutton.
The Start/Stop button must be inserted in the
ignition lock and the KEYLESS-GO key must
be in the vehicle.
Pressi ngthe Start/Stop button several times
in successio ncorresponds to the different
key position sinthe igni tion lock .This is only
the case if you ar enot depressing the brake
pedal.
If you depress the brake pedal and press the
Start/S topb utton, the engine starts immedi-
ately. X
Position 0:ifStart/Stop button :has not
yet bee npressed, this correspond stothe
key being removed from the ignition.
X Position 1:pressStart/Stop button :
once.
You can now activate the windscreen wip-
ers, for example.
i If you press Start/Stop button :twice
when in this position, the powe rsupply is
deactivated again.
X Position 2(ignition): press Start/Stop but-
ton :twice.
i If you press Start/Stop button :once
when in this position and the driver' sdoor
is open, the power supply is deactivated
again.
Removing th eStart/Stop button
You can remove the Start/Stop butto nfrom
th ei gnition lock and star tthe vehicle as nor-
ma lusing the key.
i You do not hav etoremov ethe Star t/Stop
butto nfrom th eignition lock when you
leav ethe vehicle.
i It is only possible to switc hbetween KEY-
LE SS -GO mode and key operation whe nthe
transmission is in position P. Driving
139Drivingand park ing Z
Page 144 of 389
X
Depres sthe brake peda land kee pit
depressed.
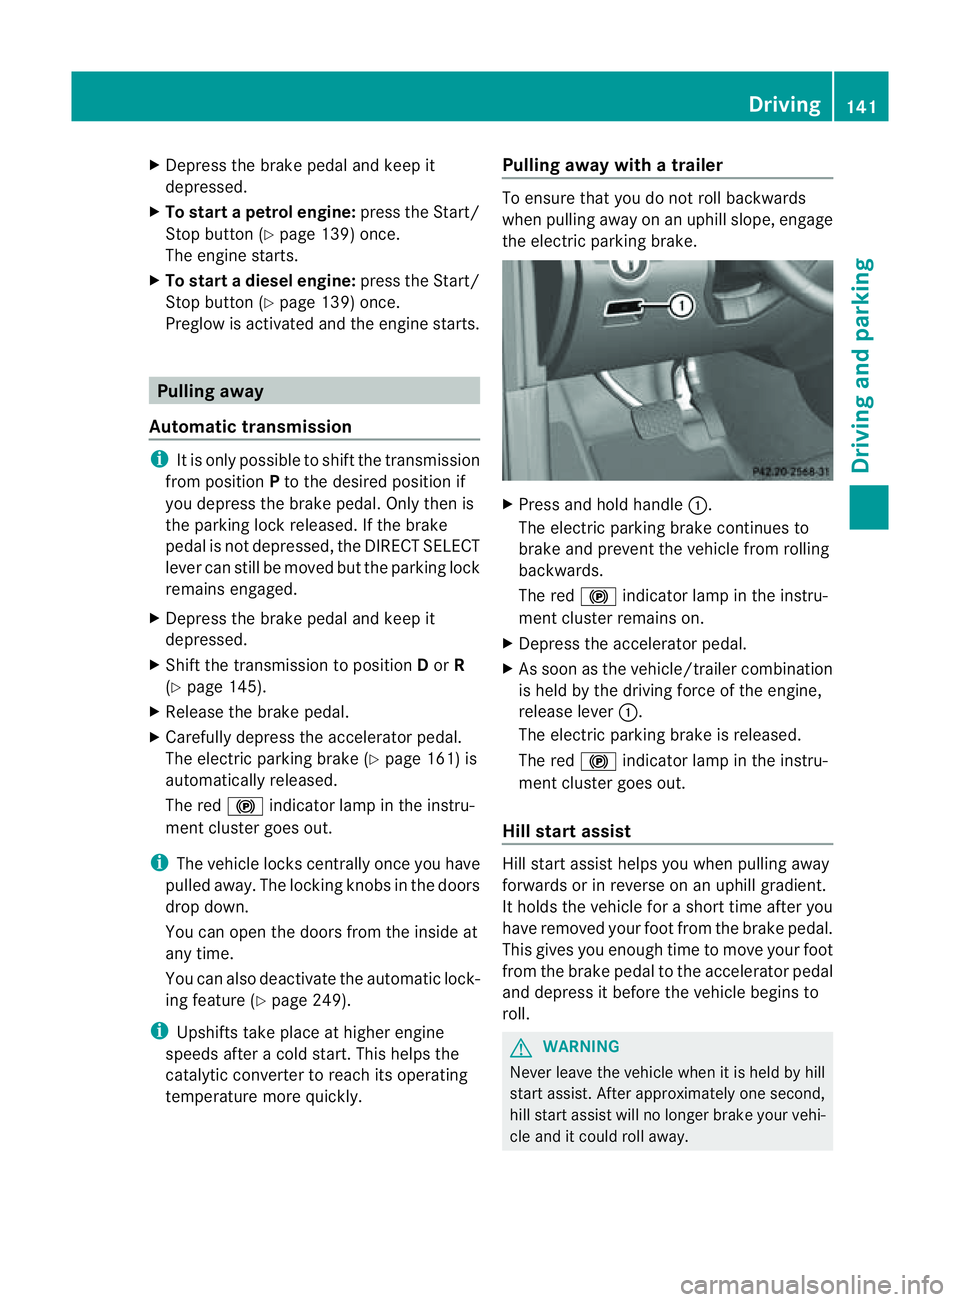
X To star tapetrol engine: press the Start/
Stop button (Y page 139) once.
The engin estarts.
X To start adiesel engine: press the Start/
Stop button (Y page 139)once.
Preglow is activated and the engin estarts. Pulling away
Automatic transmission i
It is only possible to shift the transmission
from position Pto the desired position if
you depress the brake pedal. Only then is
the parkin glock released. If the brake
pedal is not depressed, the DIREC TSELE CT
lever can still be move dbut the parking lock
remains engaged.
X Depress the brak epedal and keep it
depressed.
X Shift th etransmissio ntoposition Dor R
(Y page 145).
X Releas ethe brak epedal.
X Carefully depress th eaccele rator pedal.
The electric parki ngbrak e(Ypage 16 1)is
automatically released.
The red !indicator lamp in the instru-
ment cluster goes out.
i The vehicle locks centrally onc eyou have
pulled away .The lockin gknobs in the doors
drop down.
You can open the doors from the inside at
any time.
You can also deactivat ethe automatic lock-
ing featur e(Ypage 24 9).
i Upshif tstake place at higher engine
speeds after acold star t.This helps the
catalytic converter to reach its operating
temperature mor equickly. Pullin
gaway with atrailer To ensure that you do not roll backwards
when pulling away on an uphill slope, engage
the electric parking brake. X
Press and hol dhandle :.
The electric parking brake continues to
brake and prevent the vehicle from rolling
backwards.
The red !indicator lamp in the instru-
ment cluster remains on.
X Depress the accelerator pedal.
X As soon as the vehicle/trailer combination
is held by the driving force of the engine,
release lever :.
The electric parking brake is released.
The red !indicator lamp in the instru-
ment cluster goes out.
Hill star tassist Hill star
tassist helps you when pulling away
forwards or in reverse on an uphil lgradient.
It hold sthe vehicle for ashort tim eafter you
have removed you rfoot from the brake pedal.
This gives you enough tim etomove your foot
from the brake pedal to the accelerator pedal
and depress it befor ethe vehicle begin sto
roll. G
WARNING
Neve rleave the vehicle when it is held by hill
star tassist. Af tera pproximately one second,
hill start assist will no longer brak eyour vehi-
cle and it coul droll away. Driving
141Drivingand parking Z