2011 MERCEDES-BENZ M-CLASS SUV door lock
[x] Cancel search: door lockPage 149 of 389

P
Park position with parkin glock
R Reverse gear
N Neutral
D Drive
i The DIREC TSELE CT lever alway sretur ns
to its original position. The curren ttrans-
mission position P,R, Nor Dap pe ars in the
transmission position display
(Y pag e146) in the mult ifunction display.
Transmissi onposition and driv epro-
gram display The current transmission pos
ition and drive
program appear in the multifunction display. :
Trans mission position display
; Driv eprogram display
i Thea rrow sint he transmission position
displa yshow how and int owhich transmis-
sion position syou can chan ge usingthe
DIRECT SELECT lever.
! If the transmission position displa yint he
multifunction displa yisnot working, you
should pull away carefully to chec kwhether
the desired transmission position is
engaged. Ideally, you should selec ttrans-
mission position Dand drive program Eor
S.Don ot restric tthe shift range. Engaging pa
rk position P X
Push th eDIRECT SELECT lever in the direc-
tion of arrow P.
i The automatic transmission shi ftsa uto-
matically int opark posi tion Pif you open
th ed river' sdoor when th evehicle is sta-
tionar yordriving at very lo wspeed ,and the
transmission is in position Dor R.
i If you dep ress th ebrake peda land push
the DIRECT SELECT lever up or dow n,the
parking lock is disengaged and the trans-
mission shifts to neutral N.
If you want to shift from park position P
directly to Ror D,d epress the brak eand
pus hthe DIREC TSELECT lever up or down
past the first point of resistance.
! If the engine speed is too high, do not shift
the automatic transmission directly from
D to R,f rom Rto Dor directly to P.Other-
wise ,the automatic transmission could be
damaged.
Engaging pa rk position Pautomatically Park position
Pis automatically engaged if:
R you switch off th eengine using the key and
remove the key, or if you swi tcho ff the
engin eusingthe Start/Stop button and
open on eofthe front do ors.
R HOL D(Ypage 187) or DISTRONI CPLUS
(Y page 174) bra keyour vehicle until it is
stationar yand at leas tone of th efollowing
condition sisfulfilled:
- there is asystem malfunction.
- there is asevere uphill or downhill slope.
The electric parking brak eisthena lso
applied.
Engaging revers egear R !
Only shif tthe automatic transmission to
R when the vehicle is stationary.
X Push the DIREC TSELECT lever up past the
first point of resistance. 146
Automatic transmissionDrivin
gand parking
Page 158 of 389
KEYLESS-GO: open th
edriver's door. This
switche sthe ignition to positi on0,w hich
corresponds to having removed the key.
The driver's door can be closed again.
X Press the fuel filler fla pint he direction of
arrow :.
The fuel filler fla pswings up.
X Turn the fuel filler cap anti-clockwise and
remove it.
X Insert the fuel filler cap into the holder
bracket on the inside of filler flap ;.
X Completely insert the pump nozzle into the
filler neck and refuel.
X Only fill the tank until the pump nozzle
switches off.
! Overfilling the fuel tank could damag ethe
fuel system.
Closing X
Replace the fuel filler cap and tur nitclock-
wise .The fuel filler cap audibly engages.
X Close the fuel filler flap. Refuelling
155Drivingand park ing Z
Page 164 of 389

If yo
uthen open one of the front doors or
remove the key from the ignition ,the auto-
matic transmission shift stoP.
If yo ushift the automatic transmission to
N before switching off the engine, the auto-
matic transmission remains in Neven when
ad oor is opened.
Using KEYLESS-GO X
Press the Start/Stop button (Y page 139).
The engin estops and all the indicator
lamp sint he instrumen tcluster go out.
i If you use the Start/Stop button to switch
off the engine, the automatic transmission
shifts to Nautomatically. If you then open
one of the front doors, the automatic trans-
missio nshift stoP .
i The engin ecan be turned off while the
vehicle is in motion by pressing and holding
the Start/Stop button for three seconds.
This function operates independently of the
ECO start/stop automatic engine switch-
off function. Electric parking brake
General notes i
The electric parking brake carries out a
function check at regular intervals when
the engine is switched off. Noises that
occur are normal. Engaging/releasing manually
X
To engage: push handle :.
The red !indicator lamp in the instru-
ment cluster lights up.
i The electric parking brake can also be
applied when the key is removed.
X To release: pull handle:.
The red !indicator lamp in the instru-
ment cluster goes out.
i The electric parking brake can only be
released when the key in the ignition lock
is in position 1or the ignition is switched
on using the Start/Stop button.
To ensure that you don't roll backwards when
pulling away on an uphill slope, engage the
electric parking brake (Y page 141).
Engaging automatically Your vehicle's electric parking brake is auto-
matically applied if DISTRONIC PLUS or the
HOLD function bring the vehicle to
astand-
still ,ora re engaged to kee pthe vehicle sta-
tionary. In addition, at least one of the follow-
ing condition smust be fulfilled:
R the engine is switched off.
R the driver' sdoor is open and the seat belt
is not fastened.
R the vehicle is stationar yfor alengthy
period.
The red !indicator lam pint he instrument
cluster lights up.
i The electric parkin gbrake is not automat-
icall yengaged if the engine is switched off
by the ECO start/stop function.
Releasing automatically The electric parking brake of your vehicl
eis
release dautomatically when all of the follow-
ing conditions are fulfilled:
R the engine is running.
R the transmission is in position Dor R. Parking
161Drivingand park ing Z
Page 191 of 389
R
the electrica lsystem in thee ngine com-
partment, the battery or the fuses are tam-
pered with.
R the battery is disconnected.
If you leave the vehicl eorpark it, deactivate
the HOLD function and secure the vehicle
against rolling away.
The electric parking brake secures the vehicle
automatically if the HOLD function is activa-
ted and:
R the driver' sdoor is open and the driver's
seat belt is unfastened.
R the engin eisswitched off, unless it is auto-
matically switched off by the ECO start/
stop func tion.
R as ystem fault occurs.
R the powe rsupply is not sufficient.
On steep uphill or downhill inclines or if there
is am alfunction, the transmission may also
automatically be shifted into position P.AIRMATIC package
General notes AIRMATIC enables
asuspension tuning set-
ting to be selected and regulates the damping
behaviou rand level of your vehicle. The sys-
tem comprises aminimum of two compo-
nents. These are ADS (Adaptive Damping Sys-
tem) (Y page 188 )and level control
(Y page 189) .Your vehicle ma yalso be equip-
ped with the Active Curv eSystem
(Y page 188).
Observe the notes on driving with atrailer
(Y page 226).
ADS (Adaptive Damping System) General notes
ADS adapts th
edamping characteristic sto
the curren toperatin gand driving situation. Thi
sd epends on:
R your drivin gstyle
R the road surface conditions
R the AD Ssetting
R the vehicle level setting
Your selection remains stored even if you
remov ethe key from the igni tion lock. X
Star tthe engine.
Sports tuning
The firmer suspension tunin ginSport mode
ensures even better contact with the road.
Select this mode when employing asporty
drivin gstyle, e.g. on winding country roads.
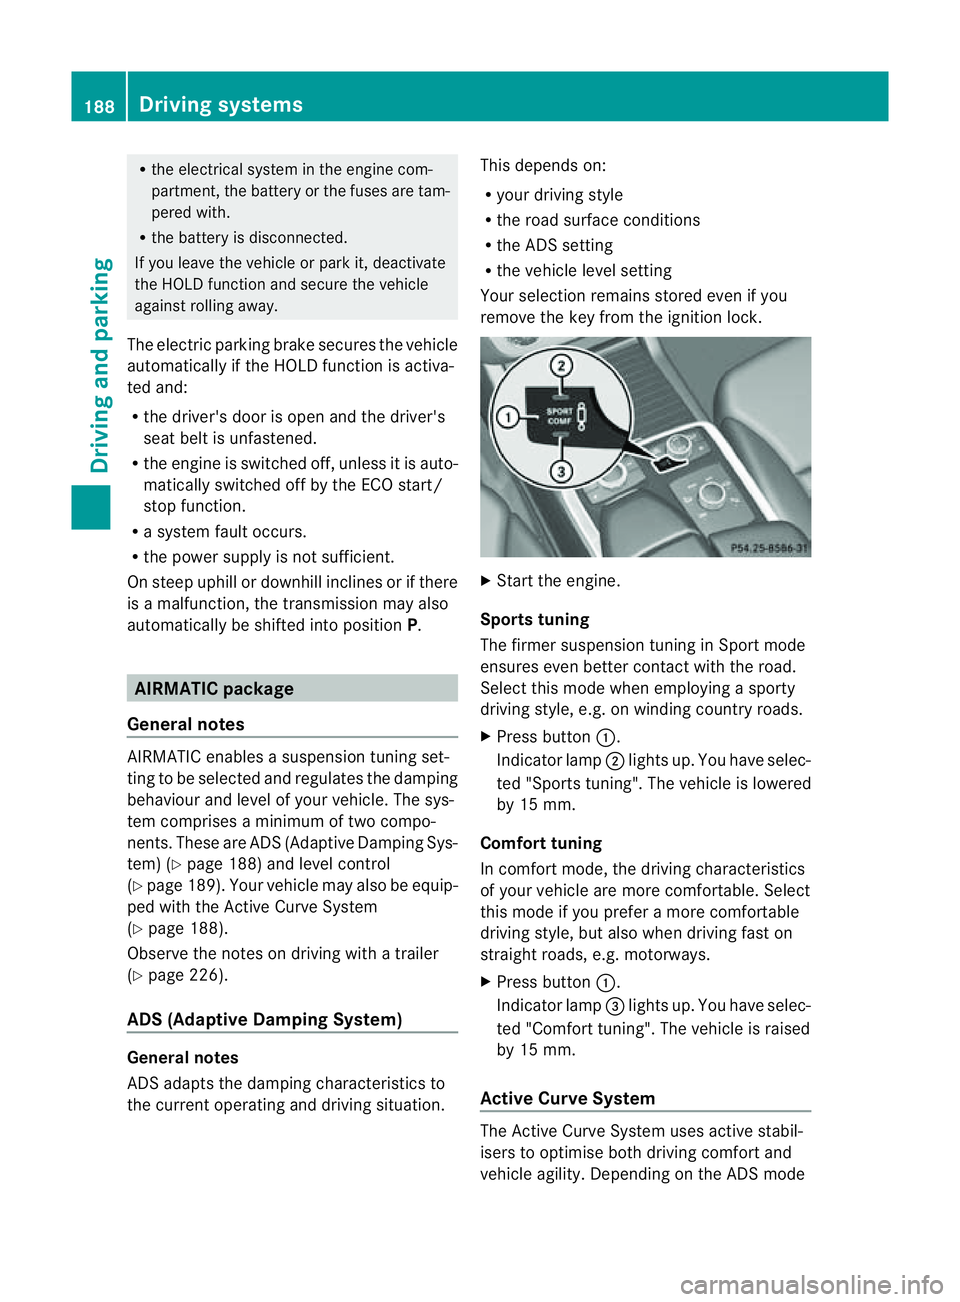
X Press button :.
Indicator lamp ;lights up. You have selec-
ted "Sports tuning". The vehicle is lowered
by 15 mm.
Comfort tuning
In comfort mode, the driving characteristics
of your vehicle are more comfortable. Select
this mode if you prefer amore com fortable
driving style ,but also when drivin gfast on
straight roads, e.g. motorways.
X Press button :.
Indicator lamp =lights up. You have selec-
ted "Comfort tuning". The vehicle is raised
by 15 mm.
Active Curve System The Active Curve System uses activ
estabil-
isers to optimis eboth drivin gcomfort and
vehicle agility. Depending on the AD Smode 188
Driving systemsDriving and parking
Page 192 of 389
selected (Y
page 188), the Ac tiveCurve Sys-
tem also changes the setting.
If you select ADS comfort mode:
R rolling movement is reduced in the event of
changing surface undulations.
R the roll angle when cornering is reduced.
R the driving style is agile.
If you select ADS sport mode:
R the roll angle is reduced significantly.
R the driving style is even more agile.
Leve lcontrol Import
ants afety notes
Leve lcontrol adapts the vehicle leve lauto-
matically to the current operating and driving
situation. This results in reduced fuel con-
sumption and improved handling.
If you select ADS comfort mode
(Y page 188), the vehicle is lowered to high-
spee dlevel as the speed increases. As the
vehicle decelerates, the vehicle is raised back
up to highway level.
If you select ADS sport mode (Y page 188),
the vehicle skips highway level and lowers
directly to high-speed level dependin gonthe
basic setting (Y page 189).
Make changes to the vehicle level while the
vehicle is in motion. This enables the vehicle
to adjust to the new level as quickly as pos-
sible.
The vehicle level ma ychange visibly if you
par kthe vehicle and the outside temperature
changes. If the temperature drops, the vehi-
cle level lowers; with an increase in temper-
ature, the vehicle level rises.
If you unlock the vehicle or open adoor, the
vehicle begins to compensat efor load dis-
crepancies while still parked. However, for
significant leve lchanges, e.g. after the vehi-
cle has been stationary for along period, the
engin emust be on. For safety reasons, the
vehicle is only lowered when the doors are
closed .Lowering is interrupted if adoor is opened; it con
tinues once the doo rhas been
closed. G
WARNING
Make sure that nobody is near the wheel arch
or vehicle underside when you make achange
to the vehicle level. Otherwise, you or others
ma ybet rapped. G
WARNING
Always select as lo wavehicle level as possi-
ble. If the vehicle level is high, the vehicle
centre of gravity shifts upwards. This increa-
ses the risk of the vehicle tipping over.
Adapt your driving style to suit the vehicle
level. ESP ®
cannot reduc ethe risk of an acci-
dent if you drive too fast. ESP ®
cannot over-
rid ethe laws of physics.
! When driving on extremel yrough terrain,
select ahigh vehicle level in good time.
Make sure there is always sufficient ground
clearance to prevent damage to the vehi-
cle.
For information abou tdriving off-roa d, see
( Y page 166).
Basic settings
The exten ttowhich the vehicle is rai sedor
lowered depends on the basic setting selec-
ted. Select raised level for off-road driving or
highway/high-spee dlevel for normal roads.
The indiv idua lvehicle levels differ from high-
way level as follows:
R Highway level: +/ –0mm
R High-speed level: –15 mm
R Raised level: +60 mm
Raise dlevel
Only select raise dlevel if this is appropriate
for the road conditions. Otherwise, fuel con-
sumption may increase and handling may be
affected. Driving systems
189Drivingand parking Z
Page 231 of 389
Driving tips
R
Maintain agreater distanc efrom th evehi-
cle in front than when driv ingw ithou ta
trailer.
R Avoid braking abruptly .Ifpossible, brake
gentl yatfirst to allow the trailer to run on.
Then, increase the brakin gforc erapidly.
R The values given for gradient-climbing
capabilities from astandstill refer to sea
level. Whe ndriving in mountainou sareas,
note that th epower outpu tofthe engine,
and consequen tlyt he vehicle' sgradient-
climbing capability ,decrease with increas-
ing altitude.
If the trailer swings from side to side:
X Do not accelerate.
X Do not coun ter-steer.
X Brake if necessary. Folding ou
tthe bal lcoupling G
WARNING
Make sure that no persons or animals are in
the pivoting range of the ball coupling. Other-
wise, they could be injured.
Before you can tow atrailer wit hyour vehicle,
you must fold out the ball coupling.
X Make sure that the vehicle is stationary.
X Open the tailgate. G
WARNING
Make sur ethat the ball coupling is engaged,
either in its folded-ou torfolded-i nposition.
The indicator lam ponthe release knob is off.
Do not pull the ball coupling release switch
when atrailer is coupled or abicycle rack is
fitted.
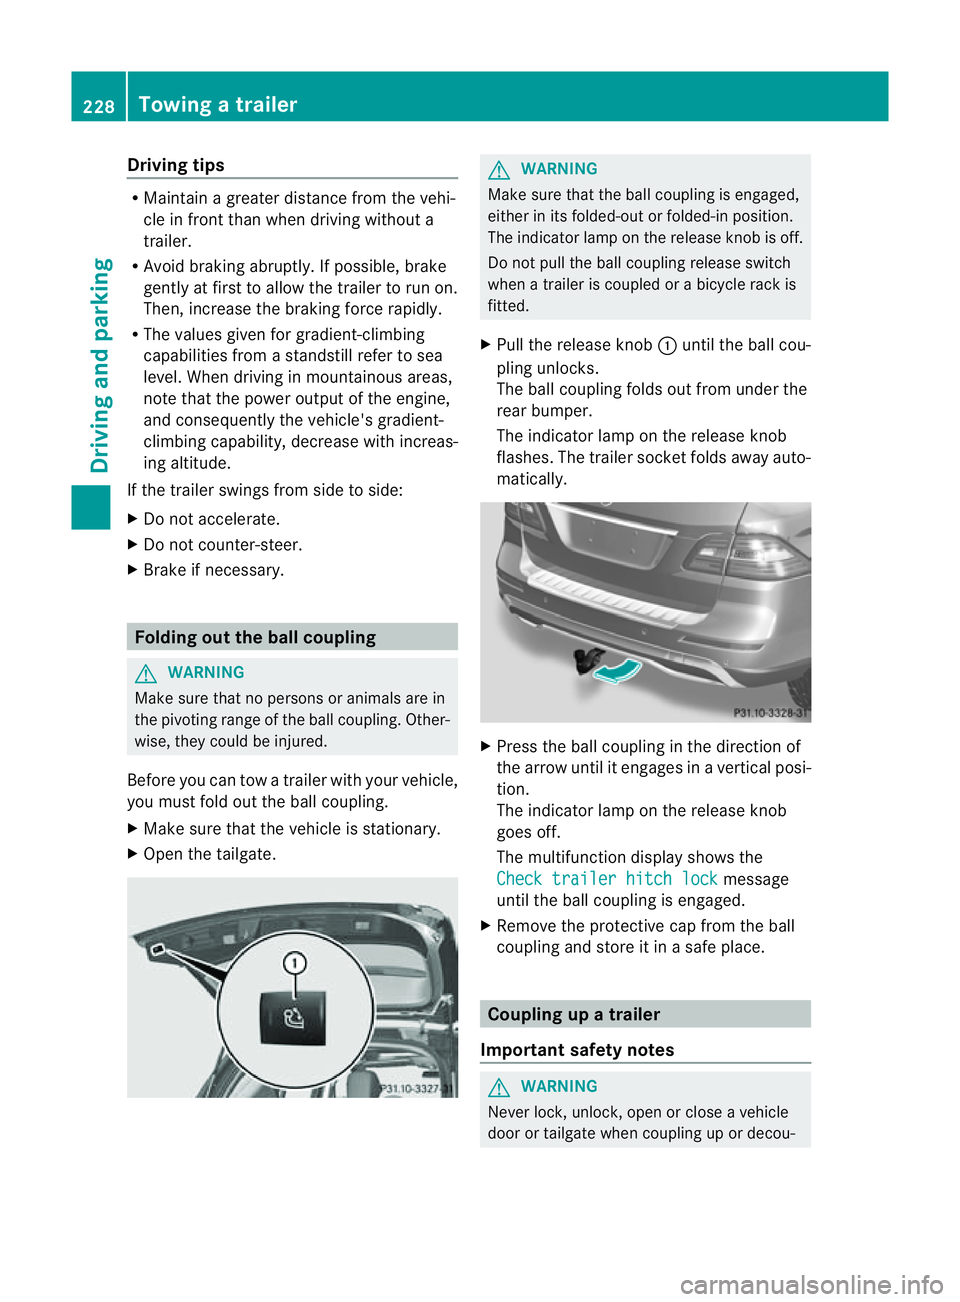
X Pull the release knob :until the ball cou-
pling unlocks.
The ball coupling folds out from under the
rear bumper.
The indicator lamp on the release knob
flashes. The trailer socket folds away auto-
matically. X
Press the ball coupling in the direction of
the arrow until it engages in avertical posi-
tion.
The indicator lam ponthe release knob
goes off.
The multifunc tion display shows the
Chec ktrailer hitch lock message
until th eball coupling is engaged.
X Remove the protective cap from the ball
coupling and store it in asafe place. Coupling up
atrai ler
Impor tant safety notes G
WARNI
NG
Neve rlock, unlock, open or close avehicle
door or tailgat ewhen coupling up or decou- 228
Towing
atrailerDriving and parking
Page 233 of 389
Vehicles with the AIRMATIC package
X
Make sure tha tthe transmission is in posi-
tion P.
X Engage the electric parkin gbrake.
X Start th eengine.
X Clos ethe doors and tailgate.
X Secur ethe trailer against rolling away.
X Remove the trailer cable and decouple the
trailer.
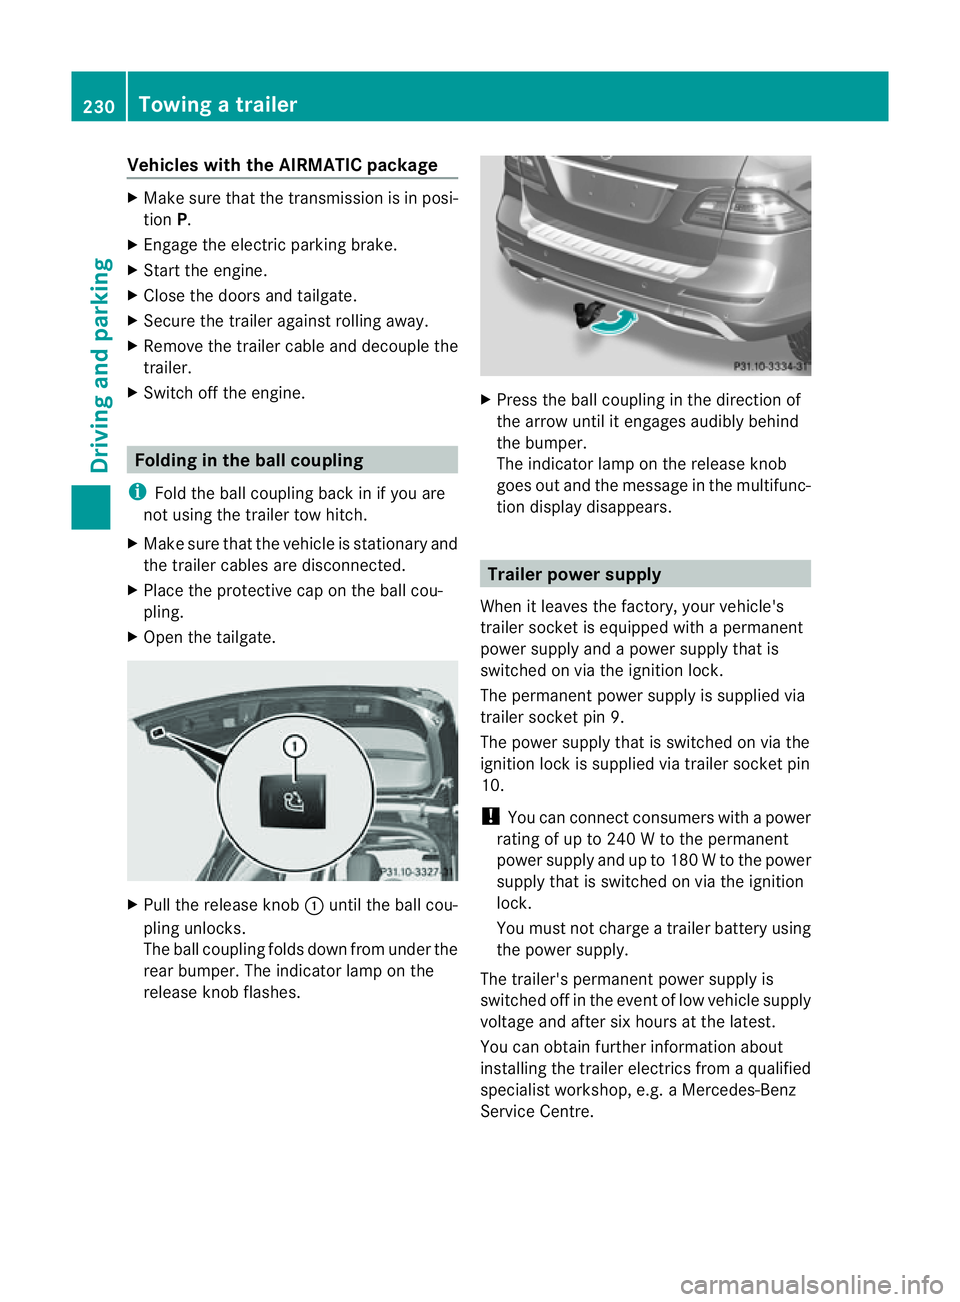
X Switc hoff th eengine. Folding in the ball coupling
i Fold the ball coupling back in if you are
not using the trailer tow hitch.
X Make sure that the vehicl eisstationary and
the trailer cables are disconnected.
X Place the protective cap on the ball cou-
pling.
X Ope nthe tailgate. X
Pull the release knob :until the ball cou-
plin gunlocks.
The ball coupling folds dow nfrom under the
rea rbumper. The indicator lamp on the
release knob flashes. X
Press the ball coupling in the direction of
the arrow until it engage saudibly behind
the bumper.
The indicator lamp on the release knob
goes out and the messag einthe multifunc-
tion display disappears. Trailer power supply
When it leaves the factory ,your vehicle's
trailer socket is equipped with apermanent
power supply and apower supply that is
switched on via the ignition lock.
The permanen tpower supply is supplied via
trailer socket pin 9.
The power supply that is switched on via the
ignition lock is supplied via trailer socket pin
10.
! You can con nect consumers with apower
ratin gofupto2 40Wtot he permanent
power supply and up to 18 0Wto the power
supply that is switched on via the ignition
lock.
You must not charge atrailer battery using
th ep ower supply.
The trailer's permanen tpower supply is
switched off in the even toflow vehicle supply
voltage and after six hour satthe latest.
You can obtai nfurther information about
installing the trailer electrics from aqualified
specialist workshop, e.g. aMercedes-Benz
Ser vice Centre. 230
Towing
atrailerDriving and parking
Page 251 of 389
Switching Adaptive Highbeam Assist on/
off
X Press the =or; button on the steer-
ing wheel to select the Settings menu.
X Press the :or9 button to select the
Light submenu.
X Press the abutton to con firm.
X Press the :or9 button to select the
Adaptive Main-bea mAssist: function.
Yo uw ill see the selected setting: Activa‐ted or
Deactivated .
X Press the abutton to save the setting.
Setting the brightness of the ambient
lighting
X Press the =or; button on the steer-
ing wheel to select the Settings menu.
X Press the :or9 button to select the
Light submenu.
X Press the :or9 button to select
Ambien tlight .
Yo uw ill see the selected setting.
X Press the abutton to confirm.
X Press the :or9 button to adjust the
brightness to any level from Off to
Level 5 (bright).
X Press the aor% button to save the
setting.
Setting the ambient lighting colour
X Press the =or; button on the steer-
ing wheel to select the Settings menu.
X Press the :or9 button to select the
Light submenu.
X Press the abutton to confirm.
X Press the :or9 button to select the
Ambien tlight colour function.
X Press the abuttontoc onfirm.
X Press the :or9 button to set the
colou rtoSOLAR ,
NEUTRAL or
POLAR .
X Press the aor% buttontos ave the
setting. Activating/deactivating the surround
lighting and exterior lighting delayed
switch-off
If you have activated the
Surround light‐ ing function and the light switch is set to
Ã,t he followin gfunctions are activated
when it is dark:
R Surround lighting: the exterior lighting
remains lit for 40 seconds after unlocking
with the key. If you start the engine, the
surround lighting is switched off and the
automatic headl ampm ode is activated
(Y page 107).
R Exterior lighting delaye dswitch-off: the
exterior lighting remains lit for 60 seconds
after the engine has been switche doff. If
you close all th edoors, the exterior lighting
goes off after 15 seconds.
If you activate the Surround lighting func-
tion ,the followin glight up depending on the
vehicle' sequipment:
R the side lamps
R the daytim edriving lights
R thes urround lighting in the exterior mirrors
X Press the =or; button on the steer-
ing wheel to select the Settings menu.
X Press the :or9 button to select the
Light submenu.
X Press the abutton to confirm.
X Press the :or9 button to select the
Surround lighting function.
You will see the selected setting: on or
off .
X Press the abutton to save the setting.
Deactivating delayed switch-off of the exte-
rior lighting temporarily:
X Before leaving the vehicle, turn the key to
position 0in the ignition lock.
X Turn the key to position 2in the ignition
lock and back to position 0.
The exterior lighting delayed switch-off is
deactivated. 248
Menus and submenusOn-board computer and displays