2011 MERCEDES-BENZ C-CLASS COUPE tow
[x] Cancel search: towPage 76 of 373

Vehicles with COMAND and navigation sys-
tem: the radar sensor system is switched off
automatically in the vicinity of radio telescope
facilities (Y page 363).
Vehicles without COMAND and a navigation
system and vehicles for Australia:t he radar
sensor system and on-board computer must
be switched off in the vicinity of radio tele-
scope facilities (Y page 226).
For PRE-SAFE ®
Brake to assist you when driv-
ing, the radar sensor system must be
switched on (Y page 226) and be opera-
tional.
Following damage to the front end of the vehi-
cle, have the configuration and operation of
the radar sensors checked at a qualified spe-
cialist workshop. This also applies to colli-
sions at slow speeds where there is no visible
damage to the front of the vehicle. Anti-theft systems
Immobiliser
The immobiliser prevents your vehicle from
being started without the correct key.
X To activate with the key: remove the key
from the ignition lock.
X To activate with KEYLESS-GO: switch the
ignition off and open the driver's door.
X To deactivate: switch on the ignition.
i The immobiliser is always deactivated
when you start the engine. ATA (Anti-Theft Alarm system)
Av isual and audible alarm is triggered if the
alarm system is primed and you open:
R a door
R the vehicle with the emergency key ele-
ment
R the boot lid
R the bonnet The alarm is not switched off, even if you
close the open door that has triggered it, for
example.
X
To prime: lock the vehicle with the key or
KEYLESS-GO.
Indicator lamp :flashes .The alarm sys-
tem is primed after approximately 15 sec-
onds.
X To deactivate: unlock the vehicle with the
key or KEYLESS-GO.
X To stop the alarm using the key: insert
the key into the ignition lock.
The alarm is switched off.
or
X Press the %or& button on the key.
The alarm is switched off.
X To stop the alarm using KEYLESS-GO:
grasp the outside door handle. The key
must be outside the vehicle.
The alarm is switched off.
or
X Press the Start/Stop button on the dash-
board. The key must be inside the vehicle.
The alarm is switched off. Tow-away protection
An audible and visual alarm is triggered if your
vehicle's angle of inclination is altered while
tow-away protection is primed. This occurs if
the vehicle is jacked up on one side, for exam-
ple. Anti-theft systems
73Safety Z
Page 77 of 373

X
To prime: lock the vehicle with the key or
KEYLESS-GO.
Tow-away protection is primed after
approximately 30 seconds.
X To deactivate: unlock the vehicle with the
key or KEYLESS-GO.
Tow-away protection is deactivated auto-
matically.
To prevent a false alarm, deactivate tow-away
protection manually if your vehicle:
R is being transported
R is being loaded onto a ferry or car trans-
porter, for example
R is parked on a movable surface, e.g .ina
split-level garage
Deactivating:
X Remove the key from the ignition lock. X
Press button :.
Indicator lamp ;lights up briefly.
X Lock the vehicle with the key or KEYLESS-
GO.
Tow-away protection is deactivated.
Tow-away protection remains deactivated
until:
R the vehicle is unlocked again.
R a door is opened and closed again.
R the vehicle is locked again. Interior motion sensor
If the interior motion sensor is primed, a vis-
ual and audible alarm is triggered if move- ment is detected in the vehicle interior while
the vehicle is locked. This occurs if someone
reaches into the vehicle interior, for example.
To activate:
X
Make sure that:
R
the side windows are closed.
R the panorama sliding sunroof is closed.
R there are no objects, e.g. mascots, hang-
ing on the rear-view mirror or on the grab
handles on the roof trim.
This will prevent false alarms.
X Lock the vehicle with the key or KEYLESS-
GO.
The interior motion sensor is primed after
approximately 30 seconds.
To switch off:
X Unlock the vehicle with the key or KEY-
LESS-GO.
The interior motion sensor is deactivated
automatically.
To prevent a false alarm, deactivate the inte-
rior motion sensor if you lock your vehicle
and:
R people or animals remain in the vehicle.
R the side windows remain open.
R the panorama sliding sunroof remains
open.
Deactivating:
X Remove the key from the ignition lock. X
Press button :.
Indicator lamp ;flashes briefly. 74
Anti-theft systemsSafety
Page 87 of 373

Unlocking and opening the doors
from the inside
For all countries except the United King-
dom: you can open a door from inside the
vehicle even if it has been locked.
Only for the United Kingdom: if the vehicle
has been locked with the key, the double lock
function is activated as standard. It is then
not possible to open the doors from inside the
vehicle. Deactivate the interior motion sensor
(Y page 74) before you lock the vehicle with
the key. The doors can then be opened from
the inside after the vehicle has been locked
from the outside with the key. X
Pull door handle ;.
If the door is locked, locking knob :pops
up. The door is unlocked and can be
opened. Centrally locking and unlocking the
vehicle from the inside
You can centrally lock or unlock the vehicle
from the inside.
The central locking/unlocking button does
not lock or unlock the fuel filler flap.
i You cannot unlock the vehicle centrally
from the inside if the vehicle has been
locked with the key or KEYLESS-GO.
i It is only possible to lock the vehicle cen-
trally if the front-passenger door is closed. X
To unlock: press button :.
X To lock: press button ;. Automatic locking feature
The vehicle is locked automatically when the
ignition is switched on and the wheels are
turning.
You could therefore be locked out when:
R the vehicle is being pushed.
R the vehicle is being towed.
R the vehicle is being tested on a dynamom-
eter. X
To deactivate: press and hold button :
for about five seconds until a tone sounds.
X To activate: press and hold button ;for
about five seconds until a tone sounds.
On vehicles with a luxury multifunction steer-
ing wheel, you can also activate and deacti-
vate the automatic locking via the on-board
computer (Y page 226).84
DoorsOpening and closing
Page 113 of 373

X
Press the Rbutton.
The yellow Rindicator lamp in the
instrument cluster lights up.
X To switch off the rear foglamp: press the
R button.
The yellow Rindicator lamp in the
instrument cluster goes out.
Vehicles with frontf oglamps: when the light
switch is in the Tposition, the rear fog-
lamp can only be switched on if the foglamps
(without dipped-beam headlamps) are
switched on.
Adjusting the headlam prange (halogen
headlamps) The headlamp range control allows you to
adjust the cone of light from the headlamps
to sui tthe vehicle load. Headlamp range control
g
Driver's seat and front-passenger seat
occupied
1 Driver's seat, front-passenger seat and
rear seats occupied
2 Driver's seat, front-passenger seat and
rear seats occupied, boot laden
3 Driver's and front-passenger seats occu-
pied and maximum permissible rear axle
load utilised, e.g. when towing a trailer
X Start the engine.
X Turn headlamp range control to the posi-
tion which corresponds to the load in your
vehicle. Headlampc
leaning system The headlamps are cleaned automatically if
the "Wipe with washer fluid" function is oper-
ated ten times while the lights are on and the
engine is running (Y page 118). When you
switch off the ignition, the automatic head-
lamp cleaning syste mis reset and counting is
resumed from 0. Combination switch
Turn signals :
Main-beam headlamps
; Turn signal, right
= Headlamp flasher
? Turn signal, left
X To indicate briefly: press the combination
switch briefly to the pressure point in the
direction of arrow ;or?.
The corresponding turn signal flashes three
times.
X To indicate: press the combination switch
beyond the pressure point in the direction
of arrow ;or?.
Main-beam headlamps X
To switch on the main-beam head-
lamps: turn the key in the ignition lock to
position 2or start the engine.
X Turn the light switch to LorÃ. 110
Exterior lightingLights and windscreen wipers
Page 138 of 373

Useful information
............................136
Running-in notes ............................... 136
Driving ............................................... 136
Manual transmission ........................144
Automatic transmission ...................145
Refuelling ........................................... 152
Parking ............................................... 158
Driving tips ........................................ 159
Driving systems ................................ 162
Trailer towing .................................... 199 135Driving and parking
Page 147 of 373

Problem Possible causes/consequences and
M Solutions
Vehicles with a petrol
engine:
The engine is not run-
ning smoothly and is
misfiring. There is a malfunction in the engine electronics or in a mechanical
component of the engine management system.
X
Only depress the accelerator pedal slightly.
X Have the cause rectified immediately at a qualified specialist
workshop, e.g. a Mercedes-Benz Service Centre.
Otherwise, non-combusted fuel may get into the catalytic con-
verter and damage it. The coolant tempera-
ture display is showing
more than 120 †. The
coolant warning lamp
may also be lit and a
warning tone may
sound. The coolant level is too low. The coolant is too hot and the engine
is no longer being cooled sufficiently.
X
Stop as soon as possible and allow the engine and the coolant
to cool down.
X Check the coolant level (Y page 303). Observe the warning
notes as you do so and top up the coolant if necessary. If the coolant level is correct, the engine radiator fan may be faulty.
The coolant is too hot and the engine is no longer being cooled
sufficiently.
X
At coolant temperatures under 120 †, drive on to the nearest
qualified specialist workshop, e.g. to a Mercedes-Benz Service
Centre.
X Avoid heavy loads on the engine as you do so, e.g. driving on
mountain roads and stop/start driving. Manual transmission
Gear lever
Gear lever
!
Only engage gear when the clutch pedal
is depressed.
! When shifting between 5thand 6thgear,
you should always push the gear lever all the way to the right. Otherwise, you could
shift unintentionally into
3rdor4th gear
and damage the transmission.
If you shift down at too high a speed (trans-
mission braking), this can cause the engine
to overrev, leading to engine damage.
Do not use the clutch bite point to keep the
vehicle stationary on uphill gradients.
There is otherwise a risk of damaging the
clutch.
! On long and steep downhill gradients,
especially if the vehicle is laden or towing
a trailer, you must shift into gear 1, 2or3
in good time. This uses the engine's braking
effect.T his relieves the load on the brake
system and prevents the brakes from over-
heating and wearing too quickly. 144
Manual transmissionDriving and parking
Page 149 of 373

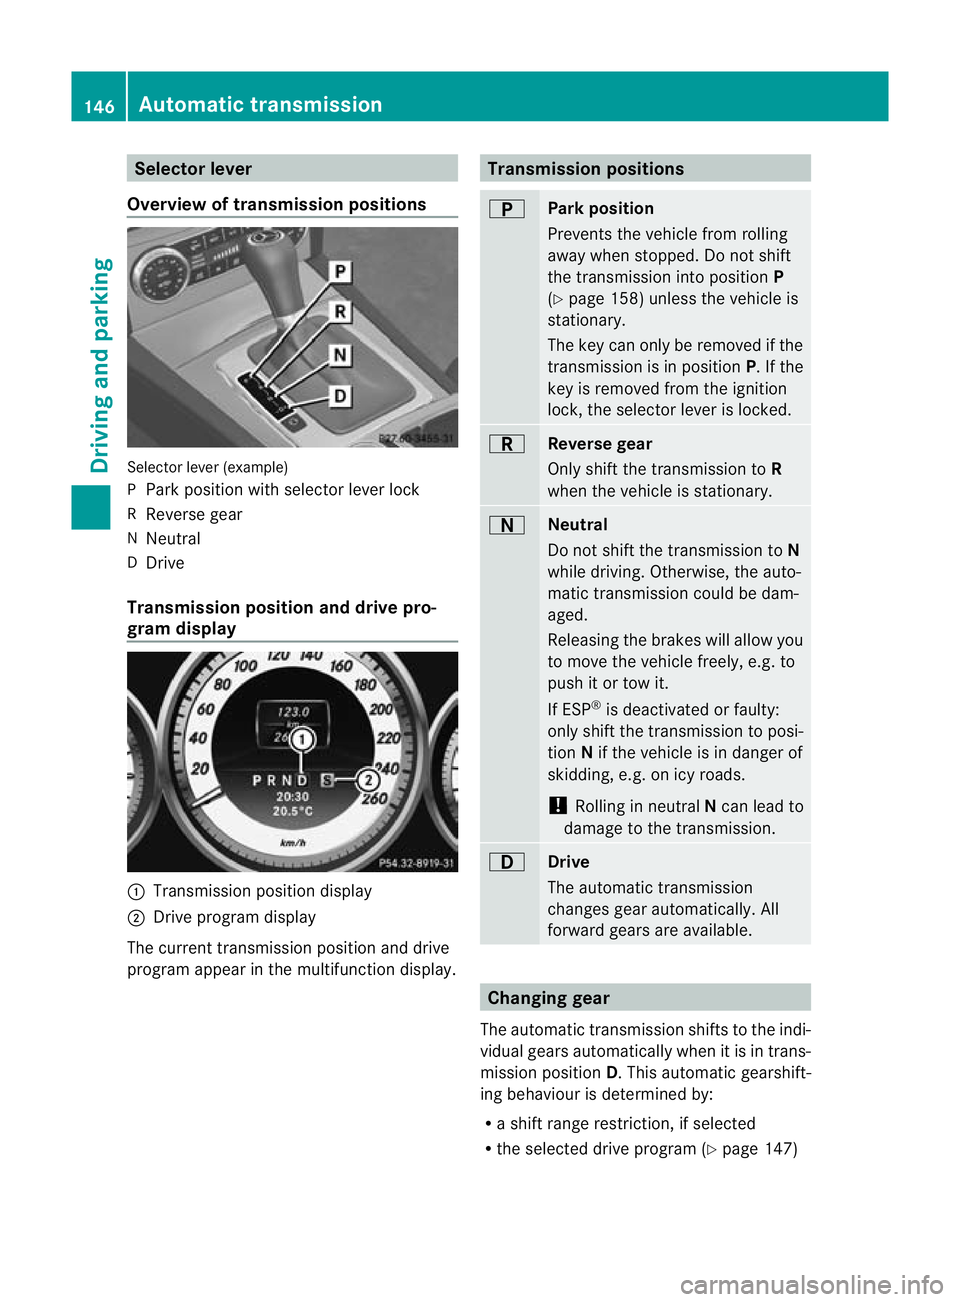
Selector lever
Overview of transmission positions Selector lever (example)
P
Park position with selector lever lock
R Reverse gear
N Neutral
D Drive
Transmission position and drive pro-
gram display :
Transmission position display
; Drive program display
The current transmission position and drive
program appear in the multifunction display. Transmission positions
B
Park position
Prevents the vehicle from rolling
away when stopped. Do not shift
the transmission into position
P
(Y page 158) unless the vehicle is
stationary.
The key can only be removed if the
transmission is in position P. If the
key is removed from the ignition
lock, the selector lever is locked. C
Reverse gear
Only shift the transmission to
R
when the vehicle is stationary. A
Neutral
Do not shift the transmission to
N
while driving. Otherwise, the auto-
matic transmission could be dam-
aged.
Releasing the brakes will allow you
to move the vehicle freely, e.g. to
push it or tow it.
If ESP ®
is deactivated or faulty:
only shift the transmission to posi-
tion Nif the vehicle is in danger of
skidding, e.g. on icy roads.
! Rolling in neutral Ncan lead to
damage to the transmission. 7
Drive
The automatic transmission
changes gear automatically. All
forward gears are available.
Changing gear
The automatic transmission shifts to the indi-
vidual gears automatically when it is in trans-
mission position D.This automatic gearshift-
ing behaviouri s determined by:
R a shift range restriction, if selected
R the selected drive program (Y page 147)146
Automatic transmissionDriving and parking
Page 150 of 373

R
the positio nofthe accelerator pedal
R the road speed Driving tips
Accelerator pedal position Your style of driving influences how the auto-
matic transmission shifts gear:
R little throttle: early upshifts
R more throttle: late upshifts
AMG vehicles When shifting down, the double-clutch func-
tion is active regardless of the currently selec-
ted drive program. The double-clutch function
reduces load change reactions and is condu-
cive to a sporty driving style. The sound gen-
erated by the double-clutchf unction depends
on the drive program selected.
Kickdown Use kickdown for maximum acceleration.
X Depress the accelerato rpedal beyond the
pressure point.
The transmission shifts to a lower gear
depending on the engine speed.
X Ease off the accelerator pedal once the
desired speed is reached.
The automatic transmission shifts back up.
Trailer towing X
Drive in the middle of the engine speed
range on uphill gradients.
X Shift down to shift range 3or
2(Y page 149) depending on the uphill or
downhill gradient, even if cruise control or
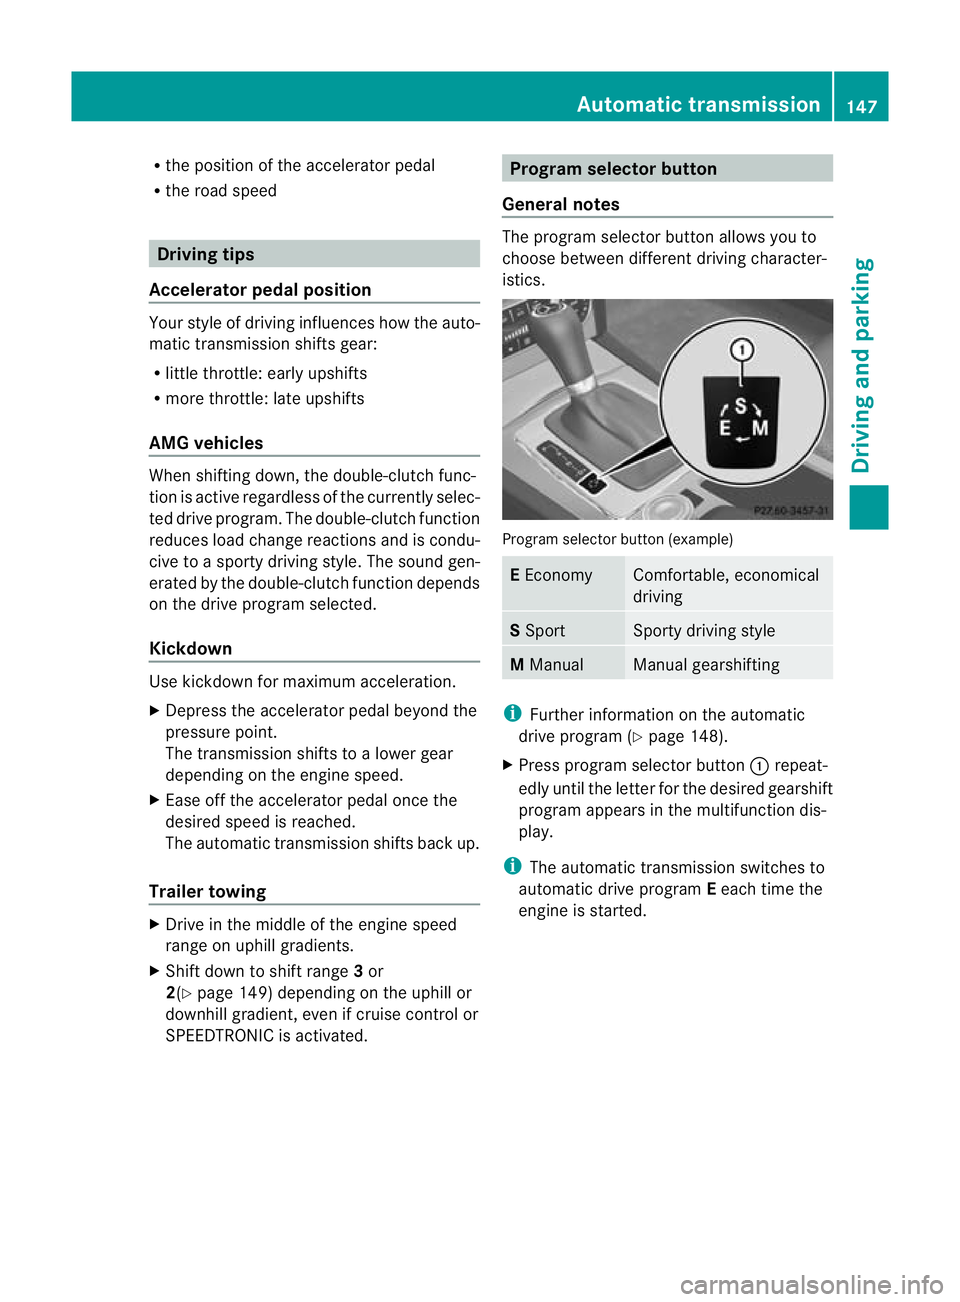
SPEEDTRONIC is activated. Program selector button
General notes The program selector button allows you to
choose between differen
tdriving character-
istics. Progra
mselector button (example) E
Economy Comfortable, economical
driving
S
Sport Sporty driving style
M
Manual Manual gearshifting
i
Further information on the automatic
drive program (Y page 148).
X Press program selecto rbutton :repeat-
edly until the lette rfor the desired gearshift
program appears in the multifunction dis-
play.
i The automatic transmission switches to
automatic drive program Eeach time the
engine is started. Automatic transmission
147Driving and parking Z