2011 MERCEDES-BENZ C-CLASS COUPE tow
[x] Cancel search: towPage 187 of 373
might therefore issue steering instructions
too soon. This may lead to a collision. For this
reason, you should avoid using Parking Guid-
ance in such situations. G
WARNING
Make sure that no persons or animals are in
the manoeuvring range. Otherwise, they
could be injured.
When PARKTRONIC is deactivated, Parking
Guidance is also unavailable.
Use Parking Guidance for parking spaces:
R that are parallel to the directio noftravel
R that are on straight roads, not bends
R that are on the same level as the road, i.e.
not on the pavement, for example. Parking
Guidance may not detect flat kerbs
Parking tips:
R on narrow roads, drive pastt he parking
space as close as possible.
R parking spaces that are littered, overgrown
or partially occupied by trailer drawbars
might be identified incorrectly or not at all.
R snowfall or heavy rain may lead to a parking
space being measured inaccurately.
R pay attention to the PARKTRONIC
(Y page 181) warning messages during the
parking procedure.
R when transporting a load which protrudes
from your vehicle, you must not use Parking
Guidance.
R never use Parking Guidance with snow
chains or an emergency spare wheel fitted.
R make sure that the tyre pressures are
always correct.T his hasadirec teffect on
the steering instructions.
R the way you rvehicle is positioned in the
parking space after parkin gis dependent
on various factors. These include the posi-
tion and shape of the vehicles parked in
front and behind it and the conditions of the
location. In some cases, Parking Guidance
may guide you too far or not far enough into
a parking space. In some cases, it may also lead you across or onto the kerb. If neces-
sary, cancel the parking procedure with
Parking Guidance.
! If unavoidable, you should drive over
obstacles such as kerbs slowly and not at
a sharp angle. Otherwise, you may damage
the wheels or tyres.
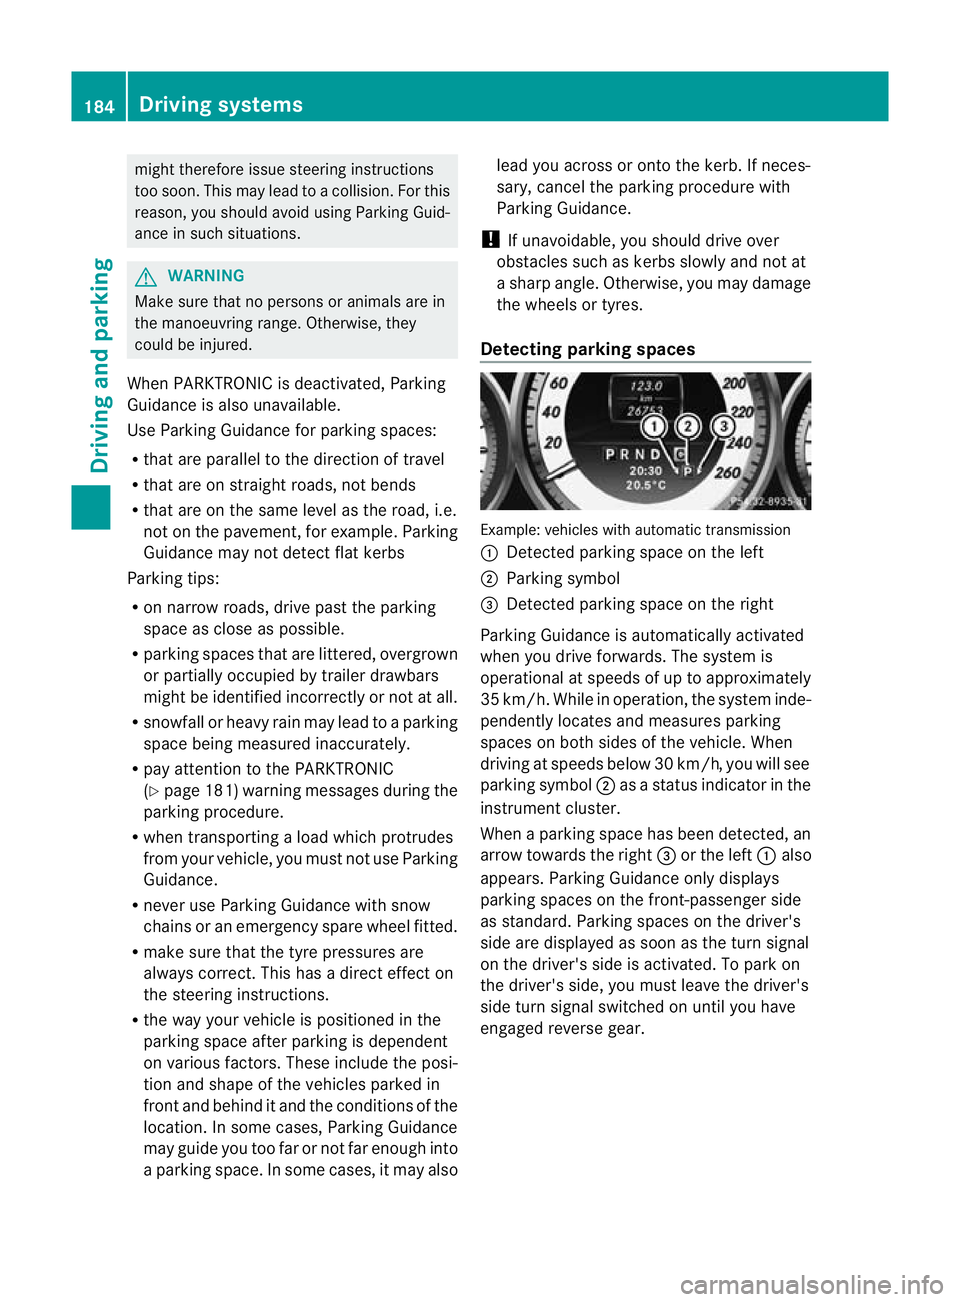
Detecting parking spaces Example: vehicles with automatic transmission
:
Detected parking space on the left
; Parking symbol
= Detected parking space on the right
Parking Guidance is automatically activated
when you drive forwards. The system is
operational at speeds of up to approximately
35 km/h. While in operation, the system inde-
pendently locates and measures parking
spaces on both sides of the vehicle. When
driving at speeds below 30 km/h, you will see
parking symbol ;as a status indicator in the
instrument cluster.
When a parking space has been detected, an
arrow towards the right =or the left :also
appears. Parking Guidance only displays
parking spaces on the front-passenger side
as standard. Parking spaces on the driver's
side are displayed as soon as the turn signal
on the driver's side is activated. To park on
the driver's side, you must leave the driver's
side turn signal switched on until you have
engaged reverse gear. 184
Driving systemsDriving and parking
Page 188 of 373
Parking Guidance will only detect parking
spaces:
R that are parallel to the direction of travel
R that are at least 1.5 m wide
R that are at least 1.3 m longer than your
vehicle
Ap arking space is displayed while you are
driving past it, and until you are approx-
imately 15 m away from it.
Parking G
WARNING
PARKTRONIC and Parking Guidance are
merely parking aids and may no tdetec tall
obstacles. They do not relieve you of the
responsibility of paying attention.
You are always responsible for safety and
must continue to pay attention to your imme-
diate surroundings when parking and
manoeuvring. You could otherwise endanger
yourself and others.
X Stop the vehicle when the parking space
symbol shows the desired parking space in
the instrument cluster.
X Vehicles with manual transmission :shift to
reverse gear.
Vehicles with automatic transmission: shift
into position R.
The following message appears in the mul-
tifunction display: Check vehicle sur‐ roundings Confirm with OK .
X Press the abutton on the multifunction
steering wheel to confirm.
The multifunction display switches to Park-
ing Guidance.
Depending on your distance from the park-
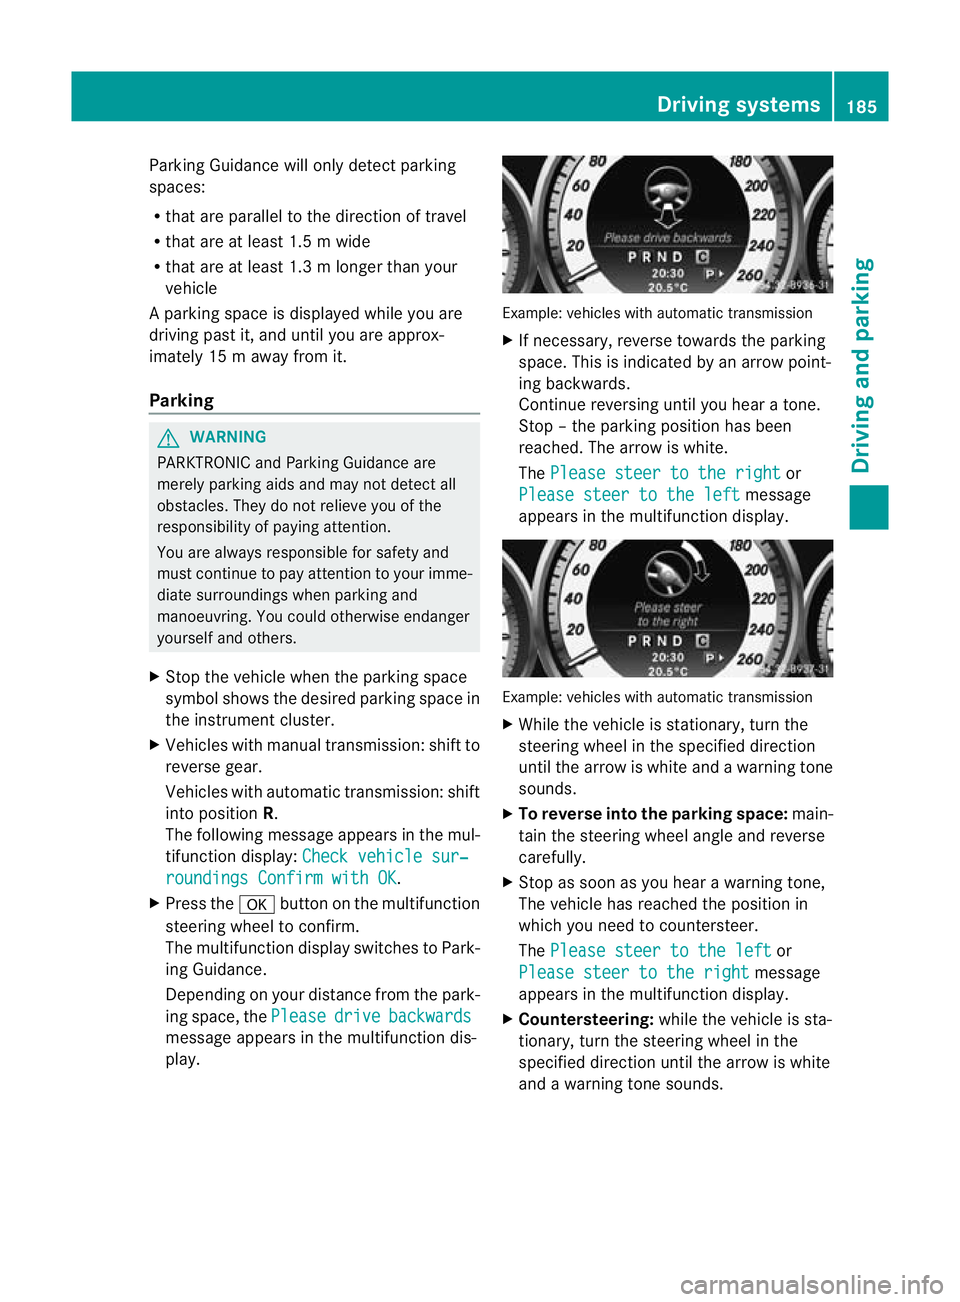
ing space, the Please drive backwards
message appears in the multifunction dis-
play. Example: vehicles with automatic transmission
X
If necessary, reverse towards the parking
space. This is indicated by an arrow point-
ing backwards.
Continue reversing until you hear a tone.
Stop –the parking position has been
reached. The arrow is white.
The Please steer to the right or
Please steer to the left message
appears in the multifunction display. Example: vehicles with automatic transmission
X
While the vehicle is stationary, turn the
steering wheel in the specified direction
until the arrow is white and a warning tone
sounds.
X To reverse into the parking space: main-
tain the steering wheel angle and reverse
carefully.
X Stop as soon as you hear a warning tone,
The vehicle has reached the position in
which you need to countersteer.
The Please steer to the left or
Please steer to the right message
appears in the multifunction display.
X Countersteering: while the vehicle is sta-
tionary, turn the steering wheel in the
specified direction until the arrow is white
and a warning tone sounds. Driving systems
185Driving and parking Z
Page 189 of 373
X
To reverse into the parking space: main-
tai nt he steering wheel angle and reverse
carefully.
X Stop as soon as you hear a warning tone,
at the latest when PARKTRONIC sounds the
continuous warning tone.
The Parking Guidance finished mes-
sage appears in the multifunction display
and a warning tone sounds. You may be
asked to steer in adifferent direction and
the nchange gear. In this case, further dis-
plays in the multifunction display will direct
you to the final position.
X Manoeuvre if necessary.
X Always observe the warning messages dis-
played by PARKTRONIC (Y page 181).
Cancelling Parking Guidance X
Press the PARKTRONIC button on the
centre console (Y page 182).
Parking Guidance is cancelled immediately
and PARKTRONIC is deactivated.
Parking Guidance is cancelled automatically
if it is no longer possible to guide you into the
parking space, or if a malfunction occurs.
The parking space symbol goes out and a
warning tone sounds. The Parking Guid‐ance cancelled message appears in the
multifunction display.
Trailer towing For vehicles with a trailer tow hitch, the min-
imum length for parking spaces is slightly
increased.
If you have attached a trailer to your vehicle,
you should not use Parking Guidance. When
the electrical connection is established
between your vehicle and the trailer, Parking
Guidance ceases to be available. PARK-
TRONIC is deactivated for the rear area. Reversing camera
Important safety notes The reversing camera is an optical parking
aid. It shows the area behind your vehicle in
the COMAND Online display.
G
WARNING
Make sure that no persons or animals are in
the manoeuvring range. Otherwise, they
could be injured.
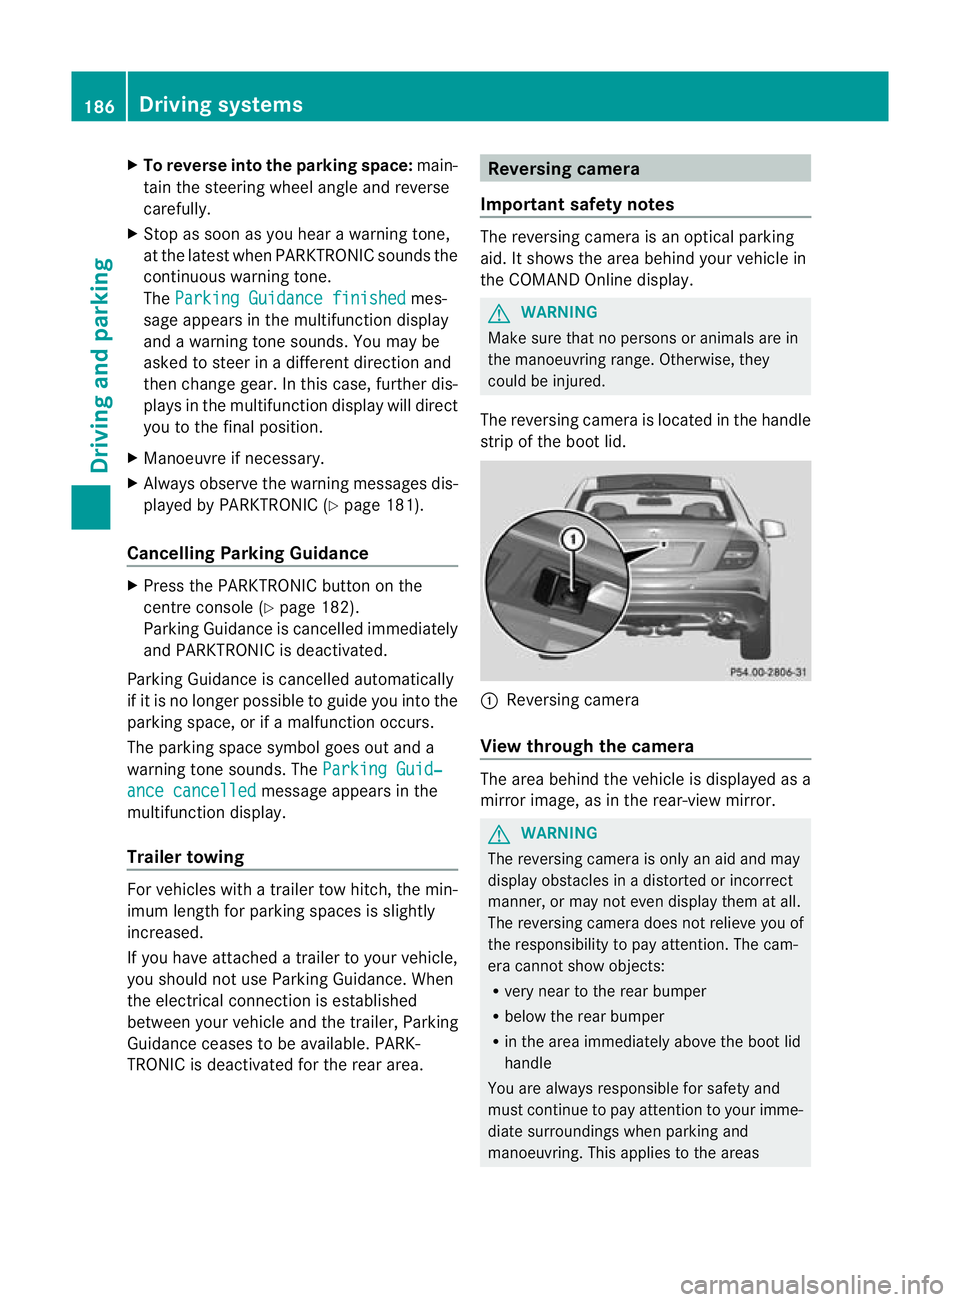
The reversing camera is located in the handle
strip of the boot lid. :
Reversing camera
View through the camera The area behind the vehicle is displayed as a
mirror image, as in the rear-view mirror.
G
WARNING
The reversing camera is only an aid and may
display obstacles in a distorted or incorrect
manner, or may not even display them at all.
The reversing camera does not relieve you of
the responsibility to pay attention. The cam-
era cannot show objects:
R very near to the rear bumper
R below the rear bumper
R in the area immediately above the boot lid
handle
You are always responsible for safety and
must continue to pay attention to your imme-
diate surroundings when parking and
manoeuvring. This applies to the areas 186
Driving systemsDriving and parking
Page 190 of 373
behind, in fron
tofand next to the vehicle. You
could otherwise endanger yoursel fand oth-
ers. G
WARNING
Unde rthe following circumstances, the
reversing camera will not function, or will
function in a limited manner:
R if the boot lid is open
R in heavy rain, snow or fog
R at night or in very dark places
R if the camera is exposed to very bright light
R if the area is lit by fluorescent light (the dis-
play may flicker)
R if there is a sudden change in temperature,
e.g. when driving into a heated garage in
winter
R if the camera lens is dirty or obstructed
R if the rear of your vehicle is damaged. In this
event, have the camera position and setting
checked at a qualified specialist workshop.
Mercedes-Ben zrecommends that you use
a Mercedes-Benz Service Centre for this
purpose.
Do not use the reversing camera in these
types of situation .You could otherwise injure
others or damage objects and your vehicle
while you are parking.
Activating the reversing camera X
Make sure that the key is in position 2in
the ignition lock.
X Make sure that the "Reversing camera"
function is selected in COMAND Online
(see the separate operating instructions for
COMAND Online).
X Engage reverse gear.
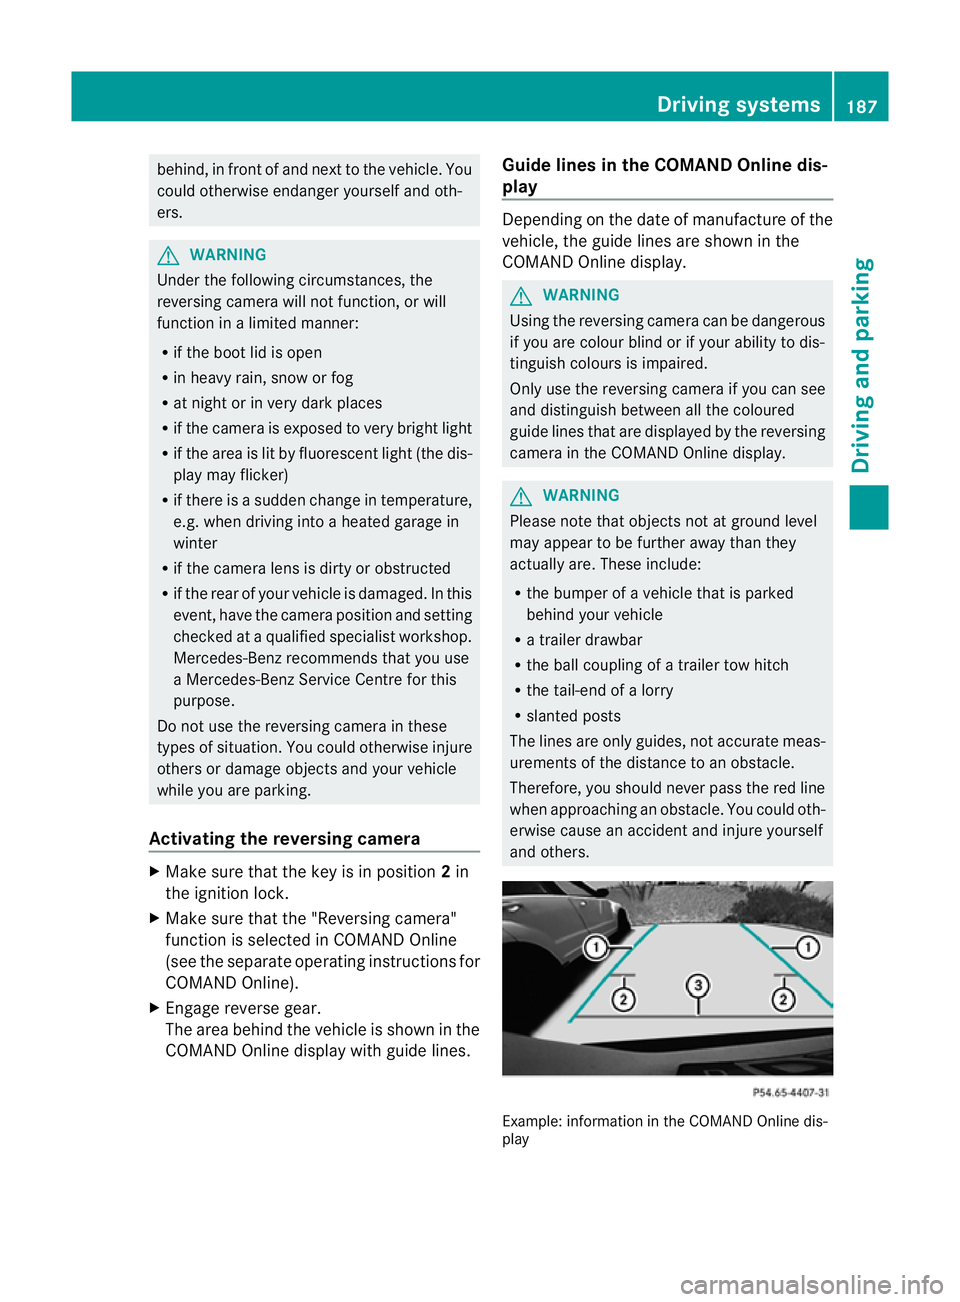
The area behind the vehicle is shown in the
COMAND Online display with guide lines. Guide lines in the COMAND Online dis-
play Depending on the date of manufacture of the
vehicle, the guide lines are shown in the
COMAND Online display.
G
WARNING
Using the reversing camera can be dangerous
if you are colour blind or if your ability to dis-
tinguish colours is impaired.
Only use the reversing camera if you can see
and distinguish between all the coloured
guide lines that are displayed by the reversing
camera in the COMAND Online display. G
WARNING
Please note that objects not at ground level
may appear to be further away than they
actually are. These include:
R the bumper of a vehicle that is parked
behind your vehicle
R a trailer drawbar
R the ball coupling of a trailer tow hitch
R the tail-end of a lorry
R slanted posts
The lines are only guides, not accurate meas-
urements of the distance to an obstacle.
Therefore, you should never pass the red line
when approaching an obstacle. You could oth-
erwise cause an accident and injure yourself
and others. Example: information in the COMAND Online dis-
play Driving systems
187Driving and parking Z
Page 193 of 373

Briefly showing detecte
dtraffic signs in
the multifunction display
When you activate the Speed Limi tAssist
warning function, a traffic sign indicating the
speed limit or end of speed limit zone :may
appearint he multifunction display. The traffic
sign appears for approximately five seconds
as soon as it is detected. Any other informa-
tion in the multifunction display is hidden for
this period.
X Activate the Speed Limit Assist warning
function using the on-board computer
(Y page 220).
Symbol ;appears.
Permanently showing detected traffic
signs in the multifunction display
If Speed Limit Assist is selected in the on-
board computer, a traffic sign indicating the
speed limit or end of a speed limit zone :
appears in the multifunction display as soon
as it is detected.
Traffic sign indicating aspeed limit :is gen-
erally displayed until:
R a traffic sign indicating the end of the speed
limit is detected.
R you make a turn.
R you leave or enter a city or town.
R the road type changes (e.g. motorway,
country road).
R you have travelled a certain minimum dis-
tance without the traffic sign being repea-
ted or detected again.
X Display Speed Limit Assist using the on-
board computer (Y page 220).
i You can also activate Speed Limit Assist
on COMAND Online. The maximum permis-
sible speed is then displayed in the
COMAND Online display; see the COMAND
Online operating instructions. Lane Tracking package
General notes The Lane Tracking package consists of Blind
Spot Assist (Y
page 190) and Lane Keeping
Assist (Y page 192).
Blind Spot Assist Important safety notes
Blind Spot Assist uses a radar senso rsystem
to monitor the areas on both sides of your
vehicle. Blind Spot Assis tprovides assistance
at speeds higher than 30 km/h. A warning
display in the exterior mirrors draws your
attention to detected vehicles in the moni-
tored area. If you then switch on the corre-
sponding turn signal to change lane, you will
also receive a visual and acoustic collision
warning. The Blind Spot Assist monitoring
system uses sensors in the rear bumper. G
WARNING
Blind Spot Assist is only an aid designed to
assist driving. It may fail to detect some vehi-
cles and is no substitute for attentive driving.
Blind Spot Assist cannot detect road and traf-
fic conditions. It may fail to detect narrow
vehicles, such as motorcycles or bicycles, or
only detect them too late.
Monitoring may be affected by dirty sensors,
strong spray or poor visibility caused by snow,
rain or mist, for example. In this case, vehicles
are detected late or not at all.
Always pay attention to traffic conditions and
yours urroundings. Otherwise, you may fail to
recognise dangers in time, cause an accident
and injure yourself and others.
The radar sensor system is automatically
deactivated near radio telescope facilities
(Y page 363).
For Blind Spo tAssist to assist you when driv-
ing, the radar sensor system must be activa-
ted (Y page 226) and operational. 190
Driving systemsDriving and parking
Page 195 of 373

from the side
.When you overtake a vehicle,
the warning only occurs if the difference in
speed is less than 12 km/h.
The yellow indicator lamp goes out if reverse
gear is engaged. Blind Spot Assist is then
deactivated.
The brightness of the indicator/warning
lamps is adjusted automatically according to
the ambient light. G
WARNING
Blind Spot Assist is not active at speeds below
30 km/h, and the indicator lamps in the exte-
rior mirrors are yellow.V ehicles in the moni-
toring range are then not indicated.
Always pay attention to traffic conditions and
your surroundings. Otherwise, you may fail to
recognise dangers in time, cause an accident
and injure yourself and others.
Collision warning
If a vehicle is detected in the monitoring range
of Blind Spot Assist and you switch on the turn
signal, a double warning tones ounds. Red
warning lamp :flashes. If the turn signal
remains on, detected vehicles are indicated
by the flashing of red warning lamp :.There
are no further warning tones.
Switching on Blind Spot Assist
X On vehicles without a navigation system,
make sure that the Becker ®
MAP PILOT is
connected; see the separate operating
instructions for Audio 20.
X Make sure that the radar sensor system
(Y page 226) and Blind Spot Assist
(Y page 222) are activated in the on-board
computer.
X Turn the key to position 2in the ignition
lock.
Warning lamps :light up red in the exte-
rior mirrors for approximately 1.5 seconds
and then turn yellow. Trailer towing
If you attach a trailer, make sure you have
correctly established the electrical connec-
tion. This can be accomplished by checking
the trailer lighting. In this event, Blind Spot
Assist is deactivated. The indicator lamp in
the exterior mirrors lights up yellow, and the
Blind Spot Assist currently unavail‐
able See Owner's Manual message
appears in the multifunction display.
i You can deactivate the indicator lamps in
the exterior mirrors.
To do so, switch off Blind Spot Assist if:
R the key is in position 2in the ignition
lock.
R the engine is not running.
R the electrical connection to the trailer
has been established.
Lane Keeping Assist Important safety notes
Lane Keeping Assist monitors the area in
front of your vehicle by means of a camera at
the top of the windscreen. Lane Keeping
Assist detects lane markings on the road and
warns you before you leave your lane unin-
tentionally. :
Lane Keeping Assist camera
If you have chosen the Display unit Speed-/odometer: (Y
page 223) function in
the on-board computer and select kmkm as
the unit of measurement, Active Lane Keep-
ing Assist is active from speeds of 60 km/h. 192
Driving systemsDriving and parking
Page 200 of 373

Trailer towing
If you attach a trailer, make sure you have
correctly established the electrical connec-
tion. This can be accomplished by checking
the traile rlighting. Active Blind Spot Assist is
the ndeactivated. The indicator lamp in the
exterior mirrors lights up yellow, and the
Active Blind Spot Assist currently unavailable See Owner's Manual mes-
sage appears in the multifunction display.
Active Lane Keeping Assist Important safety notes
Active Lane Keeping Assist monitors the area
in fron tofyour vehicle by means of a camera
at the top of the windscreen. Active Lane
Keeping Assist detects lane markings on the
road and warns you before you leave your
lane unintentionally. If you do not react to the
warning, a lane-correcting application of the
brakes can bring the vehicle back into the
original lane. :
Active Lane Keeping Assist camera
If you have selected the Display unitSpeed-/odometer: (Y
page 223) function in
the on-board computer and select kmkm as
the unit of measurement, Active Lane Keep-
ing Assist is active from speeds of 60 km/h.
If the miles display unit is selected, the assis-
tance range begins at 40 mph. G
WARNING
Active Lane Keeping Assist does not keep
your vehicle in its lane. It is only an aid and may detect the lane markings on the road
incorrectly or not at all.
The system may be impaired or may not func-
tion if:
R
several or no lane markings for a single lane
are present.
R there is poor visibility, e.g. due to insuffi-
cient illumination of the road, or due to
snow, rain, fog or spray.
R there is glare, e.g. from oncoming traffic,
the sun, or reflection from other vehicles.
R the windscreen is dirty, misted up or cov-
ered, for instance by a sticker, in the vicinity
of the camera.
R the lane markings are worn away, dark or
covered up, e.g. by dirt or snow.
R the distance to the vehicle in front is too
small and the lane markings thus cannot be
detected.
R the lane markings on the road are unclear,
e.g. near roadworks.
R the lane markings change quickly, e.g.
lanes branch off, cross one another or
merge.
R the road is narrow and winding.
Active Lane Keeping Assist cannot detect
road and traffic conditions. It is not a substi-
tute for attentive driving. You are responsible
for the vehicle's speed, braking in good time,
and steering correctly. Always adapt your
driving style to suit the prevailing road and
weather conditions. Always pay attention to
traffic conditions and your surroundings. Oth-
erwise, you may fail to recognise dangers in
time, cause an accident and injure yourself
and others.
Warning vibration in the steering wheel
A warning may be given if a front wheel
passes over a lane marking. You will be
warned by way of intermittent vibrations in
the steering wheel for up to 1.5 seconds.
In order that you are warned only when nec-
essary and in good time if you cross the lane Driving systems
197Driving and parking Z
Page 202 of 373
No lane-correcting brake application occurs
if:
R you clearly and actively steer, brake, or
accelerate.
R you cut the corner on a sharp bend.
R you have switched on the turn signals.
R a driving safety system intervenes, such as
ESP ®
, PRE-SAFE ®
Brake or Active Blind
Spot Assist.
R you have adopted a sporty driving style with
high cornering speeds or high rates of
acceleration.
R on vehicles with a trailer tow hitch, the
electrical connection to the trailer has been
correctly established.
R ESP ®
is deactivated.
R the transmission is not in position D.
R a loss of tyre pressure or a defective tyre
has been detected and displayed.
Active Lane Keeping Assist does not detect
road and traffic conditions. An inappropriate
brake application may be interrupted at any
time if:
R you steer slightly in the opposite direction.
R you use a turn signal.
R you clearly brake or accelerate.
Al ane-correcting brake applicatio nis inter-
rupted automatically if:
R a driving safety system intervenes, such as
ESP ®
, PRE-SAFE ®
Brake or Active Blind
Spot Assist.
R lane markings can no longer be recognised.
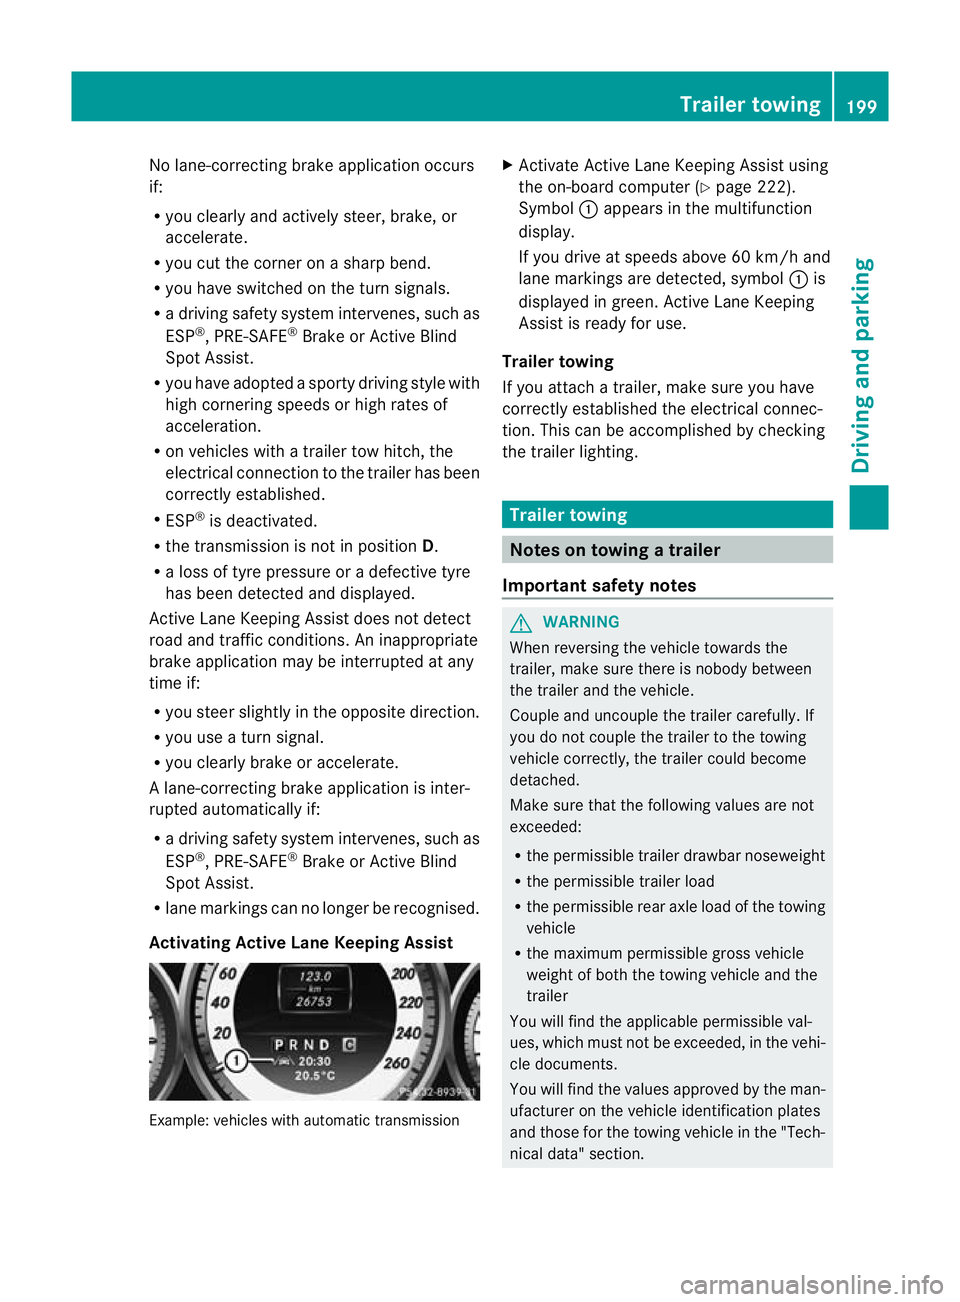
Activating Active Lane Keeping Assist Example: vehicles with automatic transmission X
Activate Active Lane Keeping Assist using
the on-board computer (Y page 222).
Symbol :appears in the multifunction
display.
If you drive at speeds above 60 km/h and
lane markings are detected, symbol :is
displayed in green. Active Lane Keeping
Assist is ready for use.
Trailer towing
If you attach a trailer, make sure you have
correctly established the electrical connec-
tion. This can be accomplished by checking
the trailer lighting. Trailer towing
Notes on towing
atrailer
Important safety notes G
WARNING
When reversing the vehicle towards the
trailer, make sure there is nobody between
the trailer and the vehicle.
Couple and uncouple the trailer carefully .If
you do no tcouple the trailer to the towing
vehicle correctly, the trailer could become
detached.
Make sure that the following values are not
exceeded:
R the permissible trailer drawbar noseweight
R the permissible trailer load
R the permissible rear axle load of the towing
vehicle
R the maximum permissible gross vehicle
weight of both the towing vehicle and the
trailer
You will find the applicable permissible val-
ues, which must not be exceeded, in the vehi-
cle documents.
You will find the values approved by the man-
ufacturer on the vehicle identification plates
and those for the towing vehicle in the "Tech-
nical data" section. Trailer towing
199Driving and parking Z