2011 MERCEDES-BENZ C-CLASS COUPE seat memory
[x] Cancel search: seat memoryPage 22 of 373

Seat
Seat backrest display message
(12-button multifunction steering
wheel) ............................................ 268
Seat backrest display message (4-
button multifunction steering
wheel) ............................................ 266
Seat belt
Activating/deactivating seat-belt
adjustment (12-button multifunc-
tion steering wheel) .......................228
Adjusting the driver's and front-
passenger sea tbelt ......................... 53
Belt force limiter .............................. 54
Belt tensioner .................................. 54
Cleaning ......................................... 311
Display message (12-button mul-
tifunctio nsteering wheel) ..............242
Display message (4-button multi-
function steering wheel) ................236
Fastening ......................................... 53
Important safety guidelines .............51
Rea rseat belt status indicator .........54
Releasing ......................................... 53
Warning lamp (function) ................... 54
Seat belts
Warning lamp ................................. 273
Seats
Adjusting (electrically). ....................98
Adjusting (manually and electri-
cally) ................................................ 98
Adjusting the 4-way lumba rsup-
por t.................................................. 99
Adjusting the head restraint ............98
Cleaning the cover .........................311
Correct driver's seat position ........... 96
Folding the backrests forward/
back ................................................ .99
Important safety notes ....................97
Seat heating problem ....................100
Seat ventilation problem ................101
Storing settings (memory func-
tion) ............................................... 105
Switching sea theating on/off .......100
Switching the sea tventilation on/
off .................................................. 100
Sensors (cleaning instructions) .......309 Service
see ASSYST PLUS service interval
display
Service menu (12-button multi-
function steering wheel) ..................222
Service products Brake fluid ..................................... 356
Coolant (engine) ............................ 356
Engine oil ....................................... 355
Fuel ................................................ 354
Important safety notes ..................353
Settings
Factory (12-button multifunction
steering wheel) .............................. 228
On-board computer (12-button
multifunctio nsteering wheel) ........223
Setting the air distribution ...............125
Setting the airflow ............................125
SETUP (on-board computer) .............229
Shifting to neutral (manual trans-
mission) ............................................. 145
Sidebag ................................................ 48
Side marker lamp Display message (12-button mul-
tifunctio nsteering wheel) ..............250
Display message (4-button multi-
function steering wheel) ................246
Side windows
Convenience closing ........................89
Convenience opening ......................88
Important safety notes ....................88
Opening/closing .............................. 88
Problem (malfunction) .....................90
resetting .......................................... 90
Sliding sunroof
see Panorama sliding sunroof
Snow chains ...................................... 338
Socket Centre console .............................. 292
Points to observe before use .........291
Rea rcompartmen t......................... 292
Spare wheel
Storage location ............................ 316
see Emergency spare wheel
Specialist workshop ............................ 26
Speed, controlling see Cruise control Index
19
Page 53 of 373

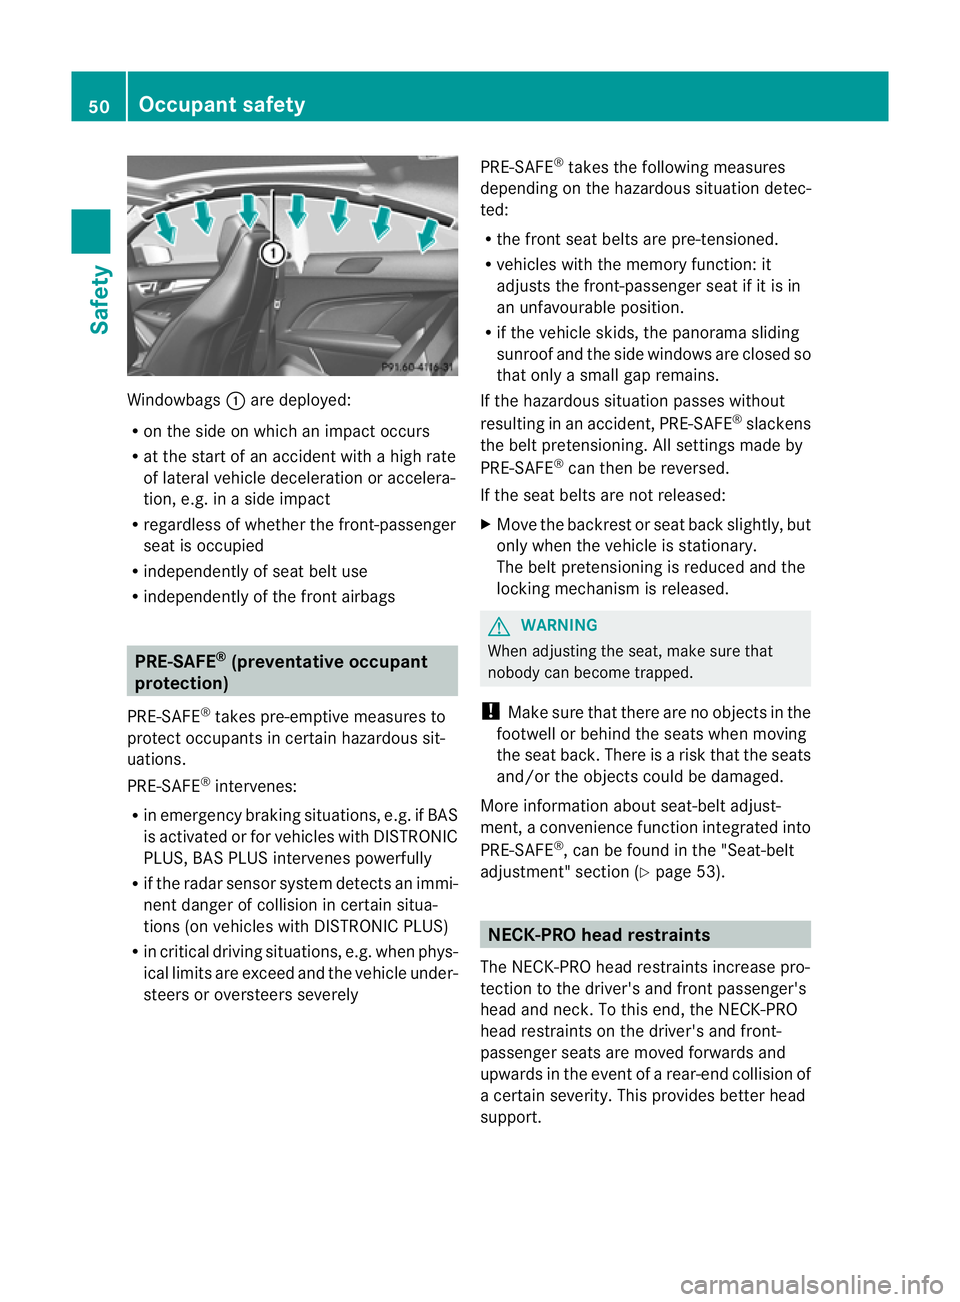
Windowbags
:are deployed:
R on the side on which an impact occurs
R at the start of an accident with a high rate
of lateral vehicle deceleration or accelera-
tion, e.g. in a side impact
R regardless of whether the front-passenger
seat is occupied
R independently of seat belt use
R independently of the fron tairbags PRE-SAFE
®
(preventative occupant
protection)
PRE-SAFE ®
takes pre-emptive measure sto
protect occupants in certain hazardous sit-
uations.
PRE-SAFE ®
intervenes:
R in emergency braking situations, e.g. if BAS
is activated or for vehicles with DISTRONIC
PLUS, BAS PLUS intervenes powerfully
R if the radar senso rsystem detects an immi-
nent danger of collision in certain situa-
tions (on vehicles with DISTRONIC PLUS)
R in critical driving situations, e.g. when phys-
ical limits are exceed and the vehicle under-
steers or oversteers severely PRE-SAFE
®
takes the following measures
depending on the hazardous situation detec-
ted:
R the fron tseat belts are pre-tensioned.
R vehicles with the memory function :it
adjusts the front-passenger seat if it is in
an unfavourable position.
R if the vehicle skids, the panorama sliding
sunroo fand the side windows are closed so
tha tonly a small gap remains.
If the hazardous situatio npasses without
resulting in an accident, PRE-SAFE ®
slackens
the belt pretensioning .All settings made by
PRE-SAFE ®
can then be reversed.
If the seat belts are not released:
X Move the backrest or seat back slightly, but
only when the vehicle is stationary.
The belt pretensioning is reduced and the
locking mechanis mis released. G
WARNING
When adjusting the seat, make sure that
nobody can become trapped.
! Make sure that there are no objects in the
footwell or behind the seats when moving
the seat back. There is a risk that the seats
and/or the objects could be damaged.
More information abouts eat-belt adjust-
ment ,aconvenience function integrated into
PRE-SAFE ®
, can be found in the "Seat-belt
adjustment" section (Y page 53). NECK-PRO head restraints
The NECK-PRO head restraints increase pro-
tection to the driver's and front passenger's
head and neck.T o this end, the NECK-PRO
head restraints on the driver's and front-
passenger seats are moved forwards and
upwards in the event of a rear-end collision of
a certain severity. This provides better head
support. 50
Occupant safetySafety
Page 100 of 373

in such a way that you have a good view of
road and traffic conditions.
X Vehicles with a memory function: save
the seat, steering wheel and exterior mirror
settings (Y page 105). Seats
Important safety notes
G
WARNING
The seats can still be adjusted when there is
no key in the ignition lock. For this reason,
children should never be left unsupervised in
the vehicle. They could adjust the seats and
become trapped. G
WARNING
Only adjust the driver's seat when the vehicle
is stationary. You will otherwise be distracted
from the road and traffic conditions and you
could lose control of the vehicle as a result of
the seat moving. This could cause an acci-
dent. G
WARNING
If you adjust the seat height carelessly, you or
others could be trapped and thereby injured.
Children in particular could unintentionally
press the buttons to electrically adjust the
seats and become trapped.
Take care that:
R while moving the seats, your hands do not
get under the lever assembly of the seat
adjustmen tsystem.
R children in the vehicle do no tslide their
hands under the levers. G
WARNING
Make sure that nobody can become trapped
when adjusting the seats.
Observe the notes on airbags.
Secure children as recommended; see the
"Children in the vehicle" section. G
WARNING
Make sure that the back of your head is sup-
ported at eye level by the central area of the
head restraint .Ifyour head is not supported
correctly by the head restraint, you could suf-
fer a severe neck injury in the event of an
accident .Never drive if the head restraints are
not engaged and set correctly. G
WARNING
As eat belt can only offer its intended degree
of protection when the backrest is almost ver-
tical and the occupant is sitting upright. Avoid
seat positions that do not allow the seat belt
to be routed correctly. Adjust the backrest so
that it is as upright as possible. Never travel
with the backrest reclined too far backwards.
You could otherwise be seriously or even
fatally injured in the event of an accident or
sudden braking.
! To avoid damage to the seats and the seat
heating, observe the following information:
R do not spill any liquids on the seats. If
liquid is spilled on the seats, dry them as
soon as possible.
R if the seat covers are damp or wet, do not
switch on the seat heating. The seat
heating should also not be used to dry
the seats.
R clean the seat covers as recommended;
see the "Interior care" section.
R do not transport heavy loads on the
seats. Do not place sharp objects on the
seat cushions, e.g. knives, nails or tools.
The seats should only be occupied by
passengers, if possible.
R when the seat heating is in operation, do
not cover the seats with insulating mate-
rials, e.g. blankets, coats, bags, seat cov-
ers, child seats or booster seats.
! When you move the seats, make sure that
there are no objects in the footwell or
behind the seats. Otherwise, you could
damage the seats and the objects. Seats
97Seats, steering wheel and mirrors Z
Page 101 of 373

i
Vehicles without the through-loading fea-
ture: the head restraints cannot be
removed from the rear compartment seats.
Please contact a Mercedes-Benz Service
Centre for more information.
i Related topics:
R Rearb ench seat through-loading feature Adjusting the seats manually and
electrically :
Backrest angle
; Seat height
= Seat cushion angle
? Seat fore-and-aft adjustment
i Adjust the seat cushion angle so that your
thighs are lightly supported.
Seat fore-and-aft adjustment X
Lift handle ?and slide the seat forwards
or backwards.
X Release lever ?again.
Make sure that you hear the seat engage in
position.
Seat cushion angle X
Turn handwheel =in the desired direction. Adjusting the seat electrically
:
Head restraint height
; Seat cushion angle
= Seat height
? Seat fore-and-aft adjustment
A Backrest angle
i Vehicles with memory function: if PRE-
SAFE ®
has been triggered, the front-
passenger seat will be moved to a better
position if it was previously in an unfavour-
able position. Adjusting the head restraints
Adjusting the head restraints manually Adjusting the head restraint height
X
To raise: pull the head restraint up to the
desired position.
X To lower: press release catch :and push
the head restraint down to the desired posi-
tion. 98
SeatsSeats, steering wheel and mirrors
Page 102 of 373

Adjusting the head restraints electri-
cally X
To adjust th ehead restraint height: slide
the switch for head restrain tadjustment
(Y page 98) up or down in the direction of
the arrow. Folding the front-seat backrests
forward/back
Important safety notes G
WARNING
Make sure that the backrest engages fully. If
the backrest is not engaged, the message:
Front right seat backrest not locked or
Front left seat backrest not locked appears in the multifunction display.
Stop the vehicle as soon as road and traffic
conditions permit and remove any objects
that are blocking the backrest. G
WARNING
Make sure that nobody can become trapped
when moving the seat. If there is a risk of
someone becoming trapped, press the seat
adjustment switch on the door.
Folding the backrest forwards With the EASY-ENTRY feature, the seat moves
forwards if you have folded the backrest for-
wards and the seat is in the rear half of the
adjustment range. This makes it easier for
passengers to get into and out of the rear
compartment.
The head restraint also lowers on vehicles
with electric seat adjustment. X
Vehicles without memory function:
release the head restraint if necessary and
push it down.
X Pull seat release handle :forwards and
fold the backrest forwards until the seat
backrest engages.
X Push the seat as far forwards as it will go.
X Vehicles with memory function: pull seat
release handle :forwards and fold the
backrest forwards as far as it will go.
The seat moves automatically to the fore-
most position.
Folding back the backrest X
Vehicles without memory function:
push the seat backrest back horizontally
until the seat reaches the position that was
previously set.
X Fold the seat backrest backwards until you
hear it engage. Do so in a smooth manner.
X After the seat backrest has been folded
back, chec kthe position of the head
restraint and set it to the correct position.
X Vehicles with memory function: swing
back the seat backrest.
The seat moves automatically to the stored
position. Adjusting the 4-way lumbar support
You can adjust the contour of the front seat
backrests individually to provide optimum
support for your back. Seats
99Seats, steering wheel and mirrors Z
Page 105 of 373

Adjusting the steering wheel electri-
cally
:
To adjust the steering wheel height
; To adjust the steering wheel position
(fore-and-aft adjustment)
i Related topics:
R EASY-ENTRY/EXIT feature
(Y page 102)
R Storing settings (Y page 105)EASY-ENTRY/EXIT feature
Important safety notes The EASY-ENTRY/EXIT feature makes getting
in and out of your vehicle easier.
You can activate and deactivate the EASY-
ENTRY/EXIT feature in the on-board com-
puter (Y page 228). G
WARNING
Make sure that nobody can become trapped
when you activate the EASY-ENTRY/EXIT fea-
ture.
If there is a risk of someone becoming trap-
ped, stop the adjustmen tprocedure. To halt
the procedure:
R press the steering column adjustment but-
ton.
R briefly press one of the memory function
position buttons.
The steering column stops moving immedi-
ately. Do not keep the memory function position
button pressed down, otherwise the memory
function will start and the steering wheel and
seat will begi nto move.
Never leave children unsupervised in the vehi-
cle. They could open the driver's door and
thereby unintentionally activate the EASY-
ENTRY feature and become trapped.
Position of the steering wheel when the
EASY-ENTRY/EXIT feature is active The steering wheel tilts upwards if you:
R
remove the key from the ignition lock
R open the driver's door and KEYLESS-GO is
in position 1
R open the driver's door and the key is in
position 0or 1in the ignition lock
i The steering wheel only moves upwards if
it has not already reached the upper end
stop.
If you insert the key into the ignition lock with
the driver's door closed, the steering wheel is
automatically moved to the previously set
position.
Position of the steering wheel for driv-
ing The steering wheel is moved to the previously
set position if:
R the driver's door is closed
R you insert the key into the ignition lock
or
R you press the Start/Stop button once on
vehicles with KEYLESS-GO.
If you close the driver's door with the key
inserted into the ignition lock, the steering
wheel is automatically moved to the previ-
ously set position.
The last position of the steering wheel is
stored after each manual setting or when you
store the setting with the memory function
(Y page 105). 102
Steering wheelSeats, steering wheel and mirrors
Page 108 of 373

X
Engage reverse gear.
The exterior mirror on the front-passenger
side moves to the prese tparking position.
X Use adjustment button =to adjust the
exterior mirror to a positio nthat allows you
to see the rear wheel and the kerb.
The parking position is stored.
i If you shift the transmission to another
position, the exterior mirror on the front-
passenger side returns to the driving posi-
tion.
i You can also store the parking position
using memory button M?.
X Make sure that the key is in position
2in the ignition lock.
X With the exterior mirror on the front-
passenger side activated, use adjust-
ment button =to adjust the exterior
mirror to a position which allows you
to see the rear wheel and the kerb.
X Press memory button M? and one of
the arrows on adjustment button =
within three seconds.
The parking position is stored if the
exterior mirror does not move.
If the mirror moves out of position, repeat
the steps.
Calling up astore dparking position set-
ting X
Tur nthe key to position 2in the ignition
lock.
X Adjust the exterior mirror on the front-
passenger side with the corresponding but-
ton (Y page 103).
X Engage reverse gear.
The exterior mirror on the front-passenger
side moves to the stored parking position. The exterior mirror on the front-passenger
side moves back to its original position:
R
as soon as you exceed a speed of
15 km/h
R about ten seconds after you have disen-
gaged reverse gear
R if you press button :for the exterior mir-
ror on the driver's side Memory functions
Storing settings
With the memory function, you can store up
to three different settings, e.g. for three dif-
ferent people.
The following settings are stored as a single
memory preset:
R position of the seat, backrest and head
restraint
R driver's side: steering wheel position
R driver's side: position of the exterior mir-
rors on the driver's and front-passenger
sides G
WARNING
The memory function can still be used when
the key has been removed. For this reason,
children should never be left unsupervised in
the vehicle. They could otherwise become
trapped when adjusting the seat or the steer-
ing wheel. G
WARNING
Only use the memory function on the driver's
side when the vehicle is stationary. Other-
wise, you could be distracted from the traffic
conditions by the steering wheel and seat
moving of their own accord, and as a result
cause an accident. Memory functions
105Seats, steering wheel and mirrors Z
Page 109 of 373

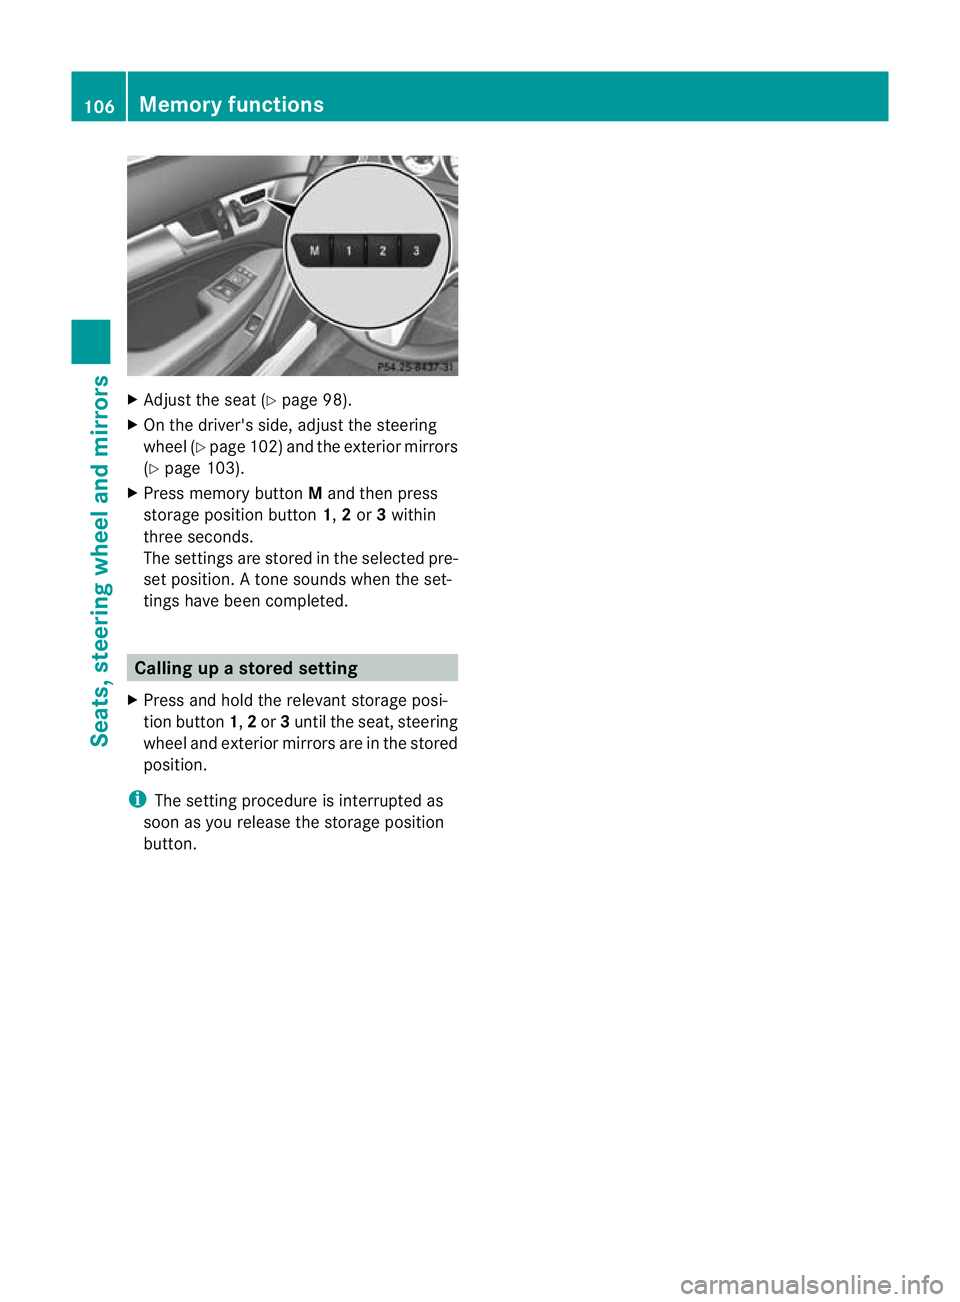
X
Adjust the sea t(Ypage 98).
X On the driver's side, adjust the steering
wheel (Y page 102 )and the exterio rmirrors
(Y page 103).
X Press memory button Mand the npress
storage position button 1,2or 3within
three seconds.
The settings are stored in the selected pre-
set position. Atone sounds when the set-
tings have been completed. Calling up
astore dsetting
X Press and hold the relevant storage posi-
tio nb utton 1,2or 3until the seat, steering
wheel and exterio rmirrors are in the stored
position.
i The setting procedure is interrupted as
soon as you release the storage position
button. 106
Memory functionsSeats, steering wheel and mirrors