2011 MERCEDES-BENZ C-CLASS COUPE fold seats
[x] Cancel search: fold seatsPage 22 of 373

Seat
Seat backrest display message
(12-button multifunction steering
wheel) ............................................ 268
Seat backrest display message (4-
button multifunction steering
wheel) ............................................ 266
Seat belt
Activating/deactivating seat-belt
adjustment (12-button multifunc-
tion steering wheel) .......................228
Adjusting the driver's and front-
passenger sea tbelt ......................... 53
Belt force limiter .............................. 54
Belt tensioner .................................. 54
Cleaning ......................................... 311
Display message (12-button mul-
tifunctio nsteering wheel) ..............242
Display message (4-button multi-
function steering wheel) ................236
Fastening ......................................... 53
Important safety guidelines .............51
Rea rseat belt status indicator .........54
Releasing ......................................... 53
Warning lamp (function) ................... 54
Seat belts
Warning lamp ................................. 273
Seats
Adjusting (electrically). ....................98
Adjusting (manually and electri-
cally) ................................................ 98
Adjusting the 4-way lumba rsup-
por t.................................................. 99
Adjusting the head restraint ............98
Cleaning the cover .........................311
Correct driver's seat position ........... 96
Folding the backrests forward/
back ................................................ .99
Important safety notes ....................97
Seat heating problem ....................100
Seat ventilation problem ................101
Storing settings (memory func-
tion) ............................................... 105
Switching sea theating on/off .......100
Switching the sea tventilation on/
off .................................................. 100
Sensors (cleaning instructions) .......309 Service
see ASSYST PLUS service interval
display
Service menu (12-button multi-
function steering wheel) ..................222
Service products Brake fluid ..................................... 356
Coolant (engine) ............................ 356
Engine oil ....................................... 355
Fuel ................................................ 354
Important safety notes ..................353
Settings
Factory (12-button multifunction
steering wheel) .............................. 228
On-board computer (12-button
multifunctio nsteering wheel) ........223
Setting the air distribution ...............125
Setting the airflow ............................125
SETUP (on-board computer) .............229
Shifting to neutral (manual trans-
mission) ............................................. 145
Sidebag ................................................ 48
Side marker lamp Display message (12-button mul-
tifunctio nsteering wheel) ..............250
Display message (4-button multi-
function steering wheel) ................246
Side windows
Convenience closing ........................89
Convenience opening ......................88
Important safety notes ....................88
Opening/closing .............................. 88
Problem (malfunction) .....................90
resetting .......................................... 90
Sliding sunroof
see Panorama sliding sunroof
Snow chains ...................................... 338
Socket Centre console .............................. 292
Points to observe before use .........291
Rea rcompartmen t......................... 292
Spare wheel
Storage location ............................ 316
see Emergency spare wheel
Specialist workshop ............................ 26
Speed, controlling see Cruise control Index
19
Page 62 of 373

G
WARNING
Ac hild restraint system secured by the ISOFIX
child seat securing system does not provide
sufficient protection for children weighing
more than 22 kg. For this reason, do not
secure children weighing more than 22 kg in
a child restraint system secured by the ISOFIX
child seat securing system. If the child weighs
more than 22 kg, secure the child restraint
system using a three-point seat belt. G
WARNING
The child restraint system cannot perform its
protective function if it is not correctly fitted
to a suitable vehicle seat. The child cannot be
restrained in the event of an accident, heavy
braking or sudden changes of direction. The
child could be seriously or even fatally injured.
For this reason, when fitting a child restraint
system, observe the manufacturer's installa-
tion instructions and the correct use of the
child restraint system.
For reasons of safety, only use child restraint
systems with the ISOFIX child seat securing
system on the rear seats.
We recommend that you use the ISOFIX child
restraint systems that have been recommen-
ded for Mercedes-Benz.
An incorrectly fitted child restraint system
could come loose and seriously or even fatally
injure the child or other vehicle occupants.
When fitting the child restraint system, always
make sure that it is engaged correctly in the
securing rings on both sides. G
WARNING
Please note that if child restraint systems, or
their retaining systems, are damaged or sub-
jected to a load in an accident, they may not
be able to provide their protective function.
This could result in serious or even fatal inju-
ries to the secured child in the event of an
accident, heavy braking or a sudden change
in direction.
For this reason, have child restraint systems
and their anchorages which have been dam- aged or subjected to a load in an accident
checked immediately at a qualified specialist
workshop.
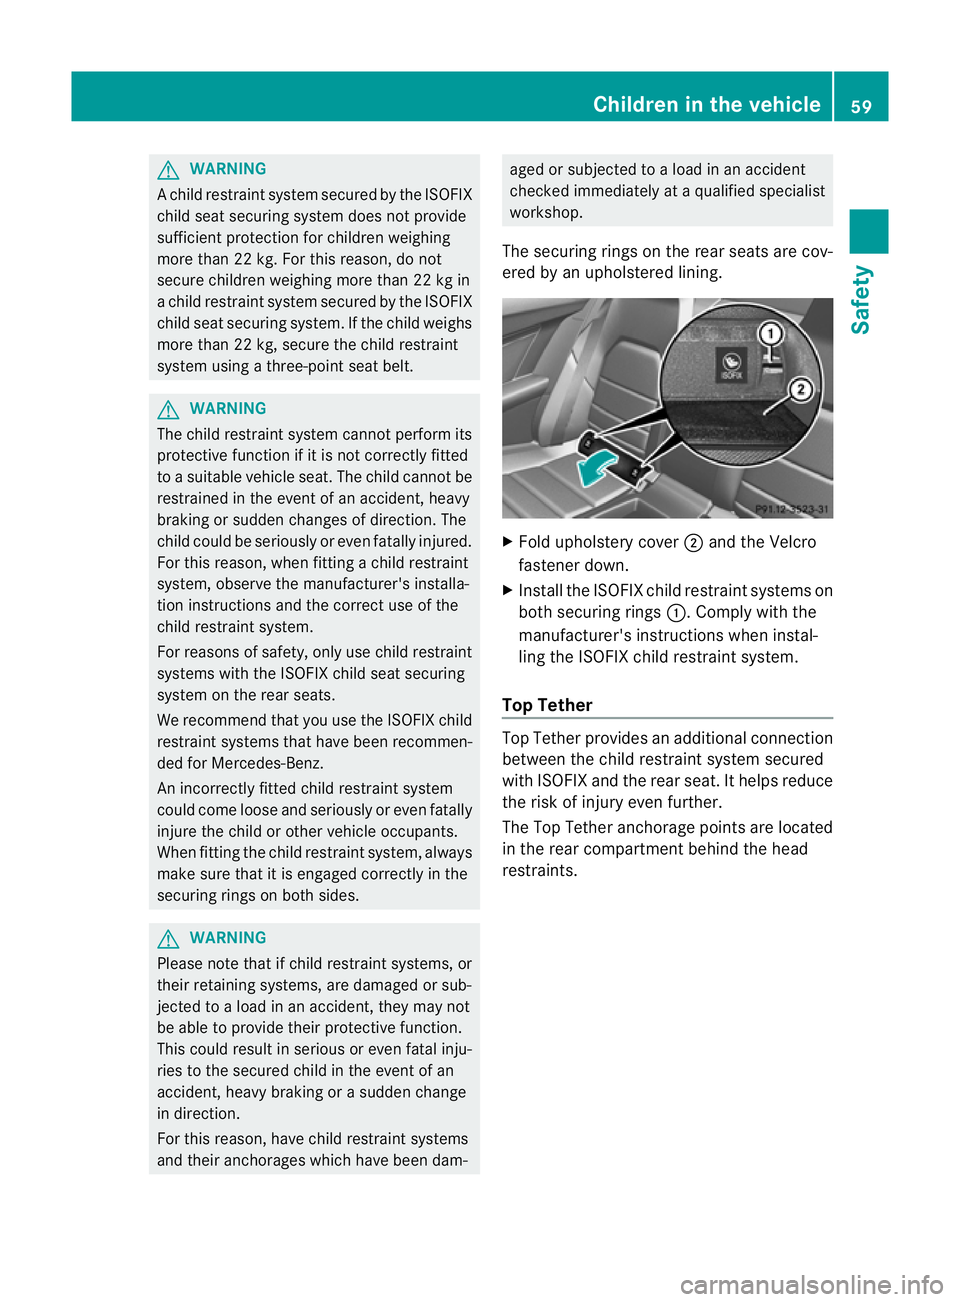
The securing rings on the rear seats are cov-
ered by an upholstered lining. X
Fold upholstery cover ;and the Velcro
fastener down.
X Install the ISOFIX child restraint systems on
both securing rings :.Comply with the
manufacturer's instructions when instal-
ling the ISOFIX child restraint system.
Top Tether Top Tether provides an additional connection
between the child restraint system secured
with ISOFIX and the rear seat. It helps reduce
the risk of injury even further.
The Top Tether anchorage points are located
in the rear compartment behind the head
restraints. Children in the vehicle
59Safety Z
Page 102 of 373

Adjusting the head restraints electri-
cally X
To adjust th ehead restraint height: slide
the switch for head restrain tadjustment
(Y page 98) up or down in the direction of
the arrow. Folding the front-seat backrests
forward/back
Important safety notes G
WARNING
Make sure that the backrest engages fully. If
the backrest is not engaged, the message:
Front right seat backrest not locked or
Front left seat backrest not locked appears in the multifunction display.
Stop the vehicle as soon as road and traffic
conditions permit and remove any objects
that are blocking the backrest. G
WARNING
Make sure that nobody can become trapped
when moving the seat. If there is a risk of
someone becoming trapped, press the seat
adjustment switch on the door.
Folding the backrest forwards With the EASY-ENTRY feature, the seat moves
forwards if you have folded the backrest for-
wards and the seat is in the rear half of the
adjustment range. This makes it easier for
passengers to get into and out of the rear
compartment.
The head restraint also lowers on vehicles
with electric seat adjustment. X
Vehicles without memory function:
release the head restraint if necessary and
push it down.
X Pull seat release handle :forwards and
fold the backrest forwards until the seat
backrest engages.
X Push the seat as far forwards as it will go.
X Vehicles with memory function: pull seat
release handle :forwards and fold the
backrest forwards as far as it will go.
The seat moves automatically to the fore-
most position.
Folding back the backrest X
Vehicles without memory function:
push the seat backrest back horizontally
until the seat reaches the position that was
previously set.
X Fold the seat backrest backwards until you
hear it engage. Do so in a smooth manner.
X After the seat backrest has been folded
back, chec kthe position of the head
restraint and set it to the correct position.
X Vehicles with memory function: swing
back the seat backrest.
The seat moves automatically to the stored
position. Adjusting the 4-way lumbar support
You can adjust the contour of the front seat
backrests individually to provide optimum
support for your back. Seats
99Seats, steering wheel and mirrors Z
Page 106 of 373

Mirrors
Rear-view mirror
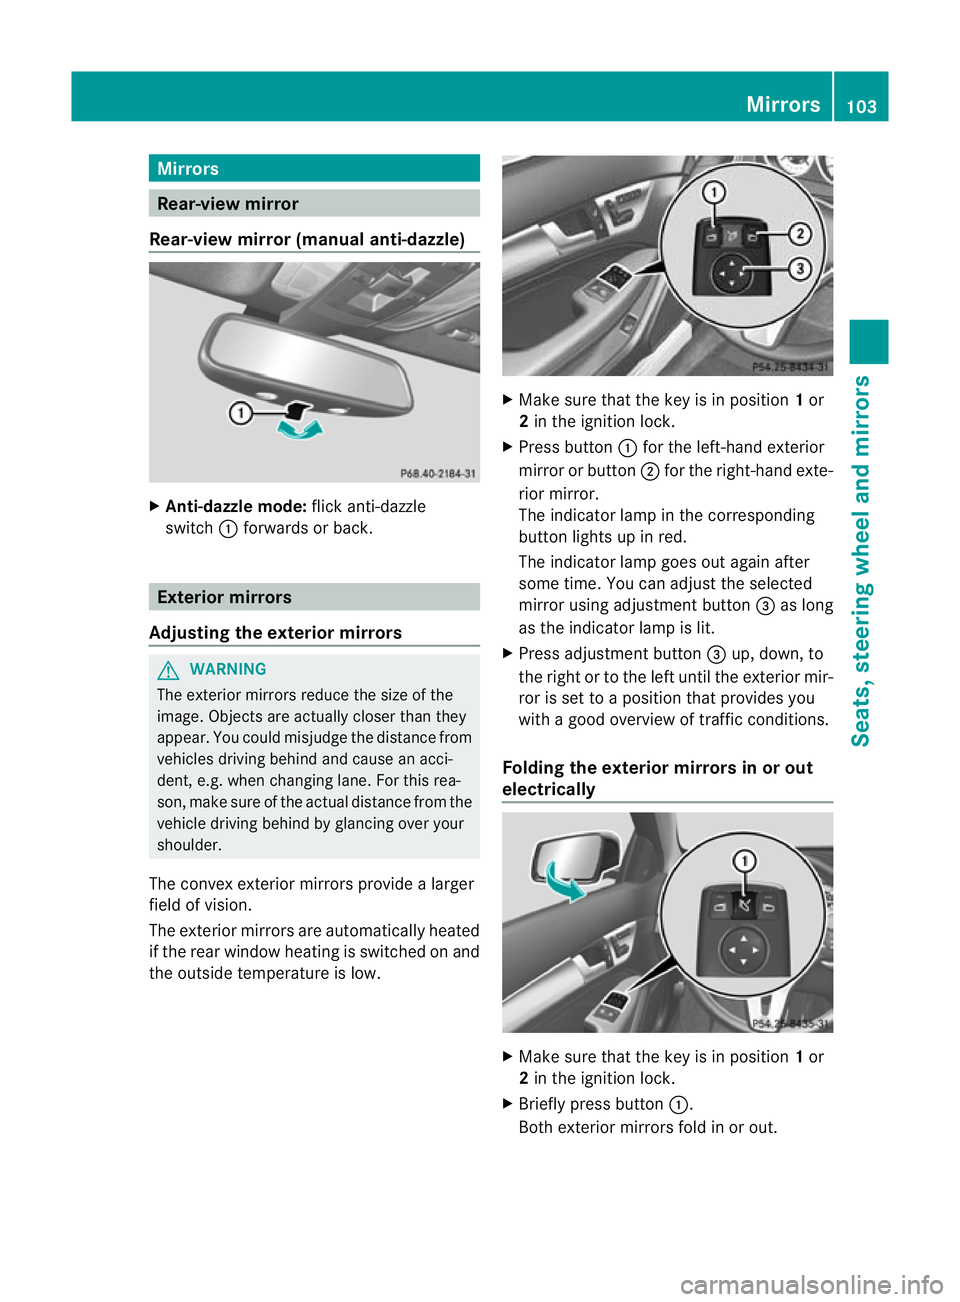
Rear-view mirror (manual anti-dazzle) X
Anti-dazzle mode: flick anti-dazzle
switch :forwards or back. Exterior mirrors
Adjusting the exterior mirrors G
WARNING
The exterior mirrors reduce the size of the
image. Objects are actually closer than they
appear. You could misjudge the distance from
vehicles driving behind and cause an acci-
dent, e.g. when changing lane .For this rea-
son, make sure of the actual distance from the
vehicle driving behind by glancing over your
shoulder.
The convex exterior mirrors provide a larger
field of vision.
The exterior mirrors are automatically heated
if the rear window heating is switched on and
the outside temperature is low. X
Make sure that the key is in position 1or
2 in the ignition lock.
X Press button :for the left-hand exterior
mirror or button ;for the right-hand exte-
rior mirror.
The indicator lamp in the corresponding
button lights up in red.
The indicator lamp goes out again after
some time. You can adjust the selected
mirror using adjustment button =as long
as the indicator lamp is lit.
X Press adjustmen tbutton =up, down, to
the right or to the left until the exterio rmir-
ror is set to a position that provides you
with a good overview of traffic conditions.
Folding the exterior mirrors in or out
electrically X
Make sure that the key is in position 1or
2 in the ignition lock.
X Briefly press button :.
Both exterior mirrors fold in or out. Mirrors
103Seats, steering wheel and mirrors Z
Page 107 of 373

i
Make sure that the exterior mirrors are
always folded out fully while the vehicle is
in motion, as they may otherwise vibrate.
Setting the exterior mirrors If the battery has been disconnected or com-
pletely discharged, the exterior mirrors must
be reset. The exterior mirrors will otherwise
not fold in when you select the "Fold in mir-
rors when locking" function in the on-board
computer (Y page 228).
X Make sure that the key is in position 1in
the ignition lock.
X Briefly press button :.
Folding the exterior mirrors in or out
automatically If the "Fold in mirrors when locking" function
is activated in the on-board computer
(Y
page 228):
R the exterior mirrors fold in automatically as
soon as you lock the vehicle from the out-
side.
R the exterior mirrors fold out again automat-
ically as soon as you unlock the vehicle and
then open the driver's or front-passenger
door.
i The mirrors do not fold out if they have
been folded in manually.
Exterior mirror out of position If an exterior mirror has been pushed out of
position, proceed as follows:
X Vehicles without electrically folding
exterior mirrors: move the exterior mirror
into the correct position manually.
X Vehicles with electrically folding exte-
rior mirrors: press the mirror-folding but-
ton (Y page 103) repeatedly until you hear
the mirror engage in position.
The mirror housing is engaged again and
you can adjust the exterior mirrors as usual
(Y page 103). Automatic anti-dazzle mirrors
G
WARNING
If incident light from headlamps is prevented
from striking the sensor in the rear-view mir-
ror, for instance, by luggage piled too high in
the vehicle, the mirror's automatic anti-dazzle
function will not operate.
Incident light could then blind you. This may
distract you from the traffic conditions and,
as a result, you may cause an accident.
The rear-view mirror and the exterior mirror
on the driver's side automatically go into anti-
dazzle mode if the ignition is switched on and
incident light from headlamps strikes the sen-
sor in the rear-view mirror.
The mirrors do not go into anti-dazzle mode if
reverse gear is engaged. Parking position for the exterior mir-
ror on the front-passenger side
Setting and storing the parking position You can position the front-passenger side
exterior mirror in such a way that you can see
the rear wheel on that side as soon as you
engage reverse gear. You can store this posi-
tion.
X
Make sure that the vehicle is stationary and
that the key is in position 2in the ignition
lock.
X Press button ;for the exterior mirror on
the front-passenger side. 104
MirrorsSeats, steering wheel and mirrors