2011 MERCEDES-BENZ C-CLASS COUPE length
[x] Cancel search: lengthPage 117 of 373

X
Drive with the headlamps switched on.
The level of moisture diminishes, depend-
ing on the length of the journey and the
weather conditions (humidity and temper-
ature).
If the level of moisture does not diminish:
X Have the headlamps checked at a qualified
specialis tworkshop. Interior lighting
Overview of interior lighting
:
u To switch the rear interior lighting
on/off
; | To switch the automatic interior
lighting control on/off
= p To switch the right-hand front read-
ing lamp on/off
? c To switch the front interior lighting
on/off
A p To switch the left-hand front reading
lamp on/off Interior lighting control
Important notes In order to prevent the vehicle's battery from
discharging, the interior lighting functions are
automatically deactivated after some time
except for when the key is in position
2in the
ignition lock. Automatic interior lighting control X
To switch on/off: press the|button.
When the automatic interior lighting con-
trol is activated, the button is flush with the
overhead control panel.
The interior lighting automatically switches
on if you:
R unlock the vehicle
R open a door
R remove the key from the ignition lock
The interior light is activated for a short while
when the key is removed from the ignition
lock. You can activate this delayed switch-off
using the on-board computer (Y page 225).
Manual interior lighting control X
To switch the interior lighting on/off:
press the cbutton.
X To switch the reading lamps on/off:
press the pbutton. Crash-responsive emergency lighting
The interior lighting is activated automatically
if the vehicle is involved in an accident.
X To switch off the crash-responsive
emergency lighting: press the hazard
warning lamp button.
or
X Lock and then unlock the vehicle using the
key. Changing bulbs
Important safety notes
Xenon bulbs If your vehicle is equipped with xenon bulbs,
you can recognise this by the following: the
cone of light from the xenon bulbs moves
from the top to the bottom and back again
when you start the engine. For this to be114
Changing bulbsLights and windscreen wipers
Page 189 of 373

X
To reverse into the parking space: main-
tai nt he steering wheel angle and reverse
carefully.
X Stop as soon as you hear a warning tone,
at the latest when PARKTRONIC sounds the
continuous warning tone.
The Parking Guidance finished mes-
sage appears in the multifunction display
and a warning tone sounds. You may be
asked to steer in adifferent direction and
the nchange gear. In this case, further dis-
plays in the multifunction display will direct
you to the final position.
X Manoeuvre if necessary.
X Always observe the warning messages dis-
played by PARKTRONIC (Y page 181).
Cancelling Parking Guidance X
Press the PARKTRONIC button on the
centre console (Y page 182).
Parking Guidance is cancelled immediately
and PARKTRONIC is deactivated.
Parking Guidance is cancelled automatically
if it is no longer possible to guide you into the
parking space, or if a malfunction occurs.
The parking space symbol goes out and a
warning tone sounds. The Parking Guid‐ance cancelled message appears in the
multifunction display.
Trailer towing For vehicles with a trailer tow hitch, the min-
imum length for parking spaces is slightly
increased.
If you have attached a trailer to your vehicle,
you should not use Parking Guidance. When
the electrical connection is established
between your vehicle and the trailer, Parking
Guidance ceases to be available. PARK-
TRONIC is deactivated for the rear area. Reversing camera
Important safety notes The reversing camera is an optical parking
aid. It shows the area behind your vehicle in
the COMAND Online display.
G
WARNING
Make sure that no persons or animals are in
the manoeuvring range. Otherwise, they
could be injured.
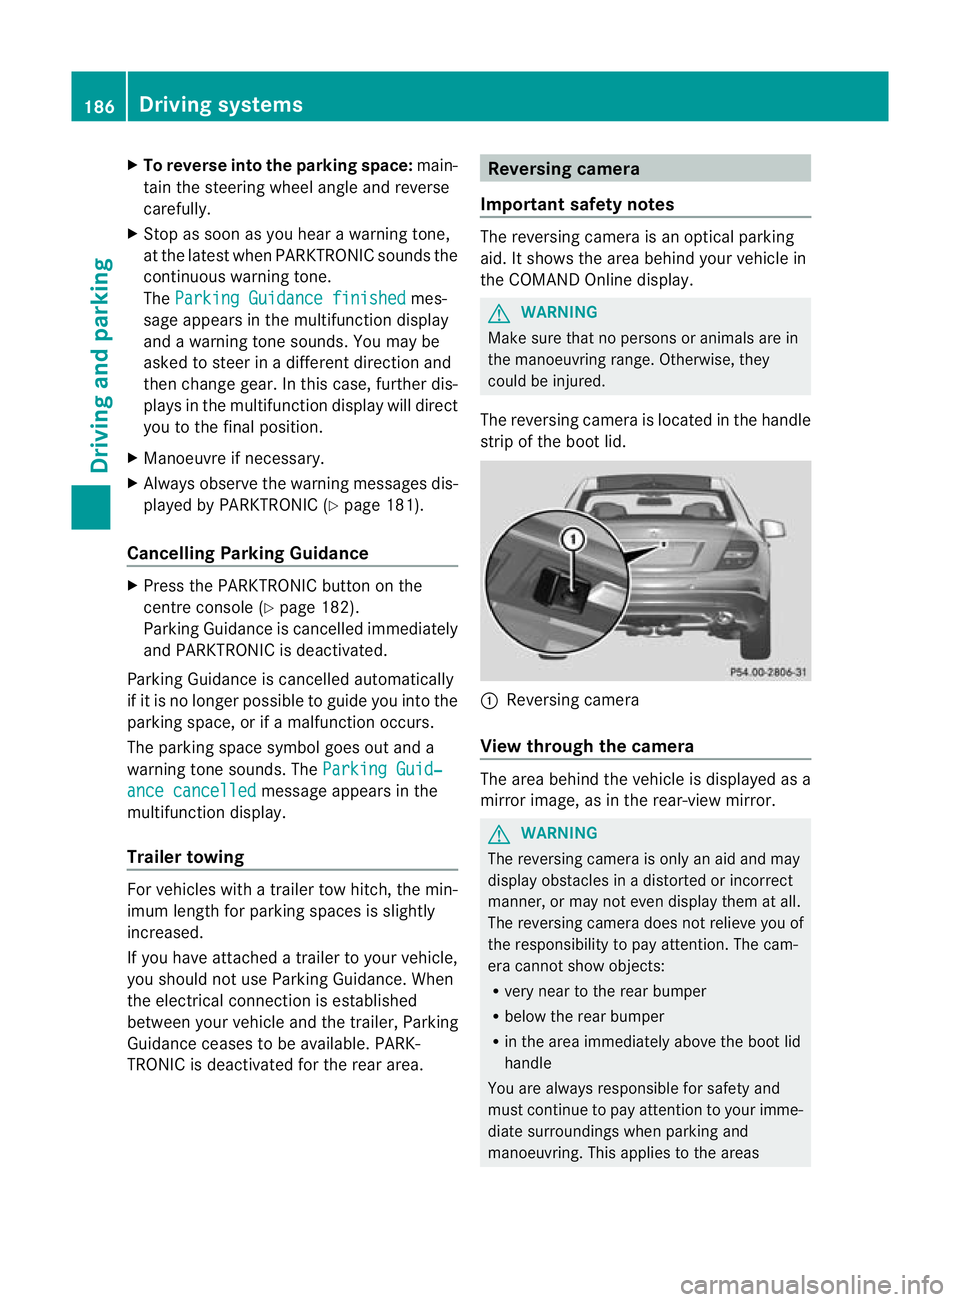
The reversing camera is located in the handle
strip of the boot lid. :
Reversing camera
View through the camera The area behind the vehicle is displayed as a
mirror image, as in the rear-view mirror.
G
WARNING
The reversing camera is only an aid and may
display obstacles in a distorted or incorrect
manner, or may not even display them at all.
The reversing camera does not relieve you of
the responsibility to pay attention. The cam-
era cannot show objects:
R very near to the rear bumper
R below the rear bumper
R in the area immediately above the boot lid
handle
You are always responsible for safety and
must continue to pay attention to your imme-
diate surroundings when parking and
manoeuvring. This applies to the areas 186
Driving systemsDriving and parking
Page 223 of 373

second. After a short time, the rapid scroll
speeds up.
Rapid scrolling stops when you release the
button or reach the end of the list.
X If only one telephone number is stored
for a name: press the6ora button
to start dialling.
or
X If there is more than one number for a
particular name: press the6ora
button to display the numbers.
X Press the 9or: button to select the
number you want to dial.
X Press the 6ora button to start dial-
ling.
or
X If you do not want to make a call: press
the ~ or% button.
Redialling The on-board computer saves the last names
or numbers dialled in the redial memory.
X Press the =or; button on the steer-
ing wheel to select the Tel menu.
X Press the 6button to switch to the
redial memory.
X Press the 9or: button to select the
desired name or number.
X Press the 6ora button to start dial-
ling.
or
X If you do not want to make a call: press
the ~ or% button. Assistance menu
Introduction In the
Assist. menu you can:
R display Speed Limit Assist and activate/
deactivate the message function of Speed
Limit Assist
R show the distance display
R activate/deactivate ESP ®
R activate/deactivate PRE-SAFE ®
Brake
R activate/deactivate ATTENTION ASSIST
R activate/deactivate Blind Spot Assist or
Active Blind Spot Assist
R activate/deactivate Lane Keeping Assist or
Active Lane Keeping Assist
Speed Limit Assist Displaying Speed Limit Assist
In the
Speed Lim. Asst. function, a detec-
ted speed limit is displayed under certain
conditions (Y page 189).
X Press =or; on the steering wheel
to select the Assist. menu.
X Press 9or: to select Speed Lim.
Asst. .
X Press a.
The multifunction display shows Speed
Limit Assist.
Activating/deactivating the Speed Limit
Assist message function
You can set Speed Limit Assist (Y page 189)
to display a detected speed limit automati-
cally for five seconds. Other messages in the
multifunction display will be faded out for this
length of time. 220
Displays and operation (12-button multifunction steering wheel)On-board computer and displays
Page 234 of 373

=
Average speed
? Distance covered
A Top speed
Lap evaluation This functio
nis only available if you have
stored at least two laps and have stopped the
RACETIMER.
X Press =or; on the steering wheel
to select the AMG menu.
X Press the 9button repeatedly until the
lap evaluation is shown.
Each lap is shown in a separate submenu.
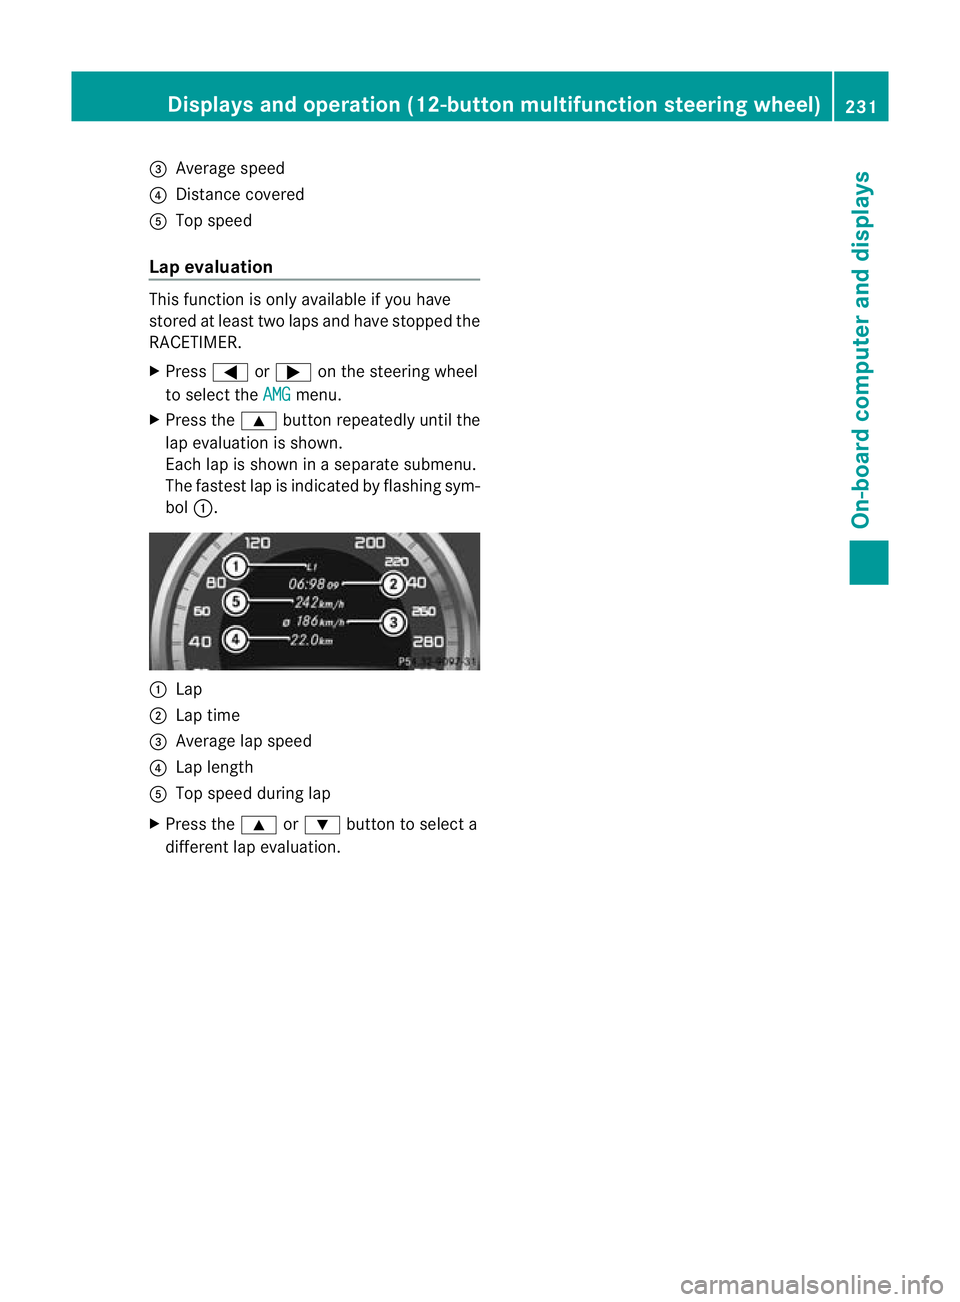
The fastest lap is indicated by flashing sym-
bol :. :
Lap
; Lap time
= Average lap speed
? Lap length
A Top speed during lap
X Press the 9or: button to select a
different lap evaluation. Displays and operation (12-button multifunction steering wheel)
231On-board computer and displays Z
Page 328 of 373

You must not exceed a maximum speed of
80 km/h. G
WARNING
The handling characteristics of your vehicle
deteriorate in run-flat mode, for example:
R when cornering
R when braking
R when accelerating rapidly
Adapt your driving style accordingly and avoid
sudden changes in direction and sudden
acceleration, as well as driving over obstacles
(i.e. kerbs, potholes), and driving off-road.
This is particularly the case when the vehicle
is heavily laden.
The maximum permissible distance that can
be drive ninrun-flat mode depends to a large
extent on the loads placed on the vehicle .It
can be shorter due to hig hspeeds, a heavy
load, sudden changes in direction, the road
surface condition, outside temperature, etc.,
or further if you drive carefully and conserva-
tively.
Do not continue to drive in run-flat mode if:
R you hear banging noises.
R the vehicle starts to shake.
R you see smoke and smell rubber.
R ESP ®
is intervening constantly.
R there are tears in the sidewalls of the tyre.
After driving in run-flat mode, you must have
the wheel(s) checked for damage at a quali-
fied specialist workshop which has the nec-
essary specialist knowledge and tools to carry
out the work required. The faulty tyre must be
replaced in every case.
Mercedes-Benz recommends that you use a
Mercedes-Benz Service Centre for this pur-
pose. In particular, work relevant to safety or
on safety-related systems must be carried out
at a qualified specialist workshop.
i When replacing one or all tyres, make
sure that you only use tyres marked
MOExtended and of the specified size for
the vehicle. i
Vehicles with MOExtended tyres are not
equipped with a TIREFIT kit at the factory.
It is therefore recommended that you addi-
tionally equip your vehicle with a TIREFIT kit
if you fit tyres that do not feature run-flat
properties, e.g. winter tyres. A TIREFIT kit
can be obtained from a Mercedes-Benz
Service Centre. Battery
Important safety notes
In order for the battery to achieve the maxi-
mum possible service life, it must always be
sufficiently charged.
Have the battery charge checked more fre-
quently if you use the vehicle mainly for short
trips or if you leave it standing idle for a
lengthy period.
Only replace a battery with a battery that has
been recommended by Mercedes-Benz.
Consult a Mercedes-Benz Service Centre if
you wish to leave your vehicle parked up for
a long period of time. G
WARNING
Comply with safety precautions and take pro-
tective measures when handling batteries. Risk of explosion
Fire, naked flames and
smoking are prohibited
when handling the battery.
Avoid creating sparks.
Battery acid is caustic.
Avoid contact with the skin,
eyes or clothing.
Wear suitable protective
clothing, in particular
gloves, an apron and a face
mask.
Immediately rinse acid
splashes off with clean Battery
325Breakdown assistance
Z
Page 332 of 373

Jump-starting
G
WARNING
There is a risk of acid burns when jump-starting a vehicle due to the gases which escape from
the battery. Do not lean over the battery while the engine is being jump-started. G
WARNING
Gases escaping from the battery during jump-starting may cause minor explosions. Avoid cre-
ating sparks. Keep naked flames away from the battery, and do not smoke.
Comply with safety precautions when handling batteries. You will find these under "Battery" in
the index.
! Avoid repeated and lengthy starting attempts. Otherwise, non-combusted fuel may dam-
age the catalytic converter 13
and create a risk of fire.
Do not use a rapid-charging device to start the engine.
Make sure the jump leads are not damaged.
Make sure the jump leads are not touching any other metal objects when they are connected
to the battery.
If your vehicle's battery is discharged, the engine can be jump-started from another vehicle
or from a second battery using jump leads.
Observe the following points:
X The battery is not accessible in all vehicles. If the other vehicle's battery is not accessible,
jump-start the vehicle using a second battery or ajump-starting device.
X Only jump-start the vehicle when the engine is cold and the catalyti cconverter system has
cooled down 14
.
X Do not start the engine if the battery is frozen. Let the battery thaw first.
X Jump-starting may only be performed from batteries with a nominal voltage of 12 V.
X Only use jump leads which have a sufficient cross-section and insulated terminal clamps.
X Make sure that the jump leads cannot come into contact with parts, such as the pulley or
the fan. These parts move when the engine is started and while it is running.
X If the battery is fully discharged, leave the battery that is being used to jump-start connected
for a few minutes before attempting to start.T his charges the empty battery a little.
i Jump leads and further information about jump-starting can be obtained from any
Mercedes-Benz Service Centre, for example.
X Make sure that the two vehicles do not touch.
X Apply the parking brake firmly.
X Manual transmission: engage neutral.
X Automatic transmission: move the selector lever toP.
X Switch off all electrical consumers (e.g. radio, blower, etc.).
X Open the bonnet (Y page 301).
13 Only vehicles with a petrol engine.
14 Only vehicles with a petrol engine. Jump-starting
329Breakdown assistance Z
Page 360 of 373

http://bevo.mercedes-benz.com
.You can
also consult a Mercedes-Benz Service
Centre.
! Always use a suitable coolant mixture,
even in countries where high temperatures
prevail.
Otherwise, the cooling system will not be
sufficiently protected from corrosion, and
the boiling point will be too low.
If antifreeze/corrosion inhibitor is present in
the correc tconcentration, the boiling point of
the coolant will be around 130 †.
The antifreeze/corrosion inhibitor concentra-
tion in the engine cooling system should:
R be at least 50%. This will protec tthe engine
cooling system against freezing down to
around -37 †.
R not exceed 55% (antifreeze protection
down to -45 †); otherwise, heat will not be
dissipated as effectively.
If the vehicle has lost coolant, top it up with
equal amounts of water and antifreeze/cor-
rosion inhibitor. Mercedes-Benz recom-
mends an antifreeze/corrosion inhibitor
which has been approved for Mercedes-Benz.
! The engine cooling system is filled with
coolant that must be renewed after 15
years, or after 250,000 km at the latest. Vehicle data
Vehicle data, C 180 BlueEFFICIENCY
Vehicle dimensions
Vehicle length
(ECE)
4590 mm
Vehicle width
including exterior
mirrors
1997 mm Vehicle dimensions
Vehicle width with-
out exterior mir-
rors
1770 mm
Vehicle height
31 1406 mm
Wheelbase
2760 mm
Vehicle weight
32 Unladen weight (in
accordance with
EC Directive), man-
ual transmission
Unladen weight (in
accordance with
EC Directive), auto-
matic transmis-
sion
The unladen weight includes the driver
(68 kg), luggage (7 kg) and all fluids (fuel
tan
k90% full). Items of optional equipment
increase the unladen weight and reduce the
maximum payload. Maximum roof
load
100 kg
Maximum boot
load
100 kg
Vehicle-specifi
cweight information can be
found on the vehicle identification plate
(Y page 352). 31
The values specified may differ from the actual values, depending on the tyres, load, optional equipment
and the state of the suspension.
32 Missing values were not available at the time of going to print. Vehicle data
357Technical data Z
Page 361 of 373

Vehicle data, C 250 BlueEFFICIENCY
Vehicle dimensions
Vehicle length
(ECE)
4590 mm
Vehicle width
including exterior
mirrors
1997 mm
Vehicle width with-
out exterior mir-
rors
1770 mm
Vehicle height
33 1406 mm
Wheelbase
2760 mm
Vehicle weight
34 Unladen weight (in
accordance with
EC directive)
The unladen weight includes the driver
(68 kg), luggage (7 kg) and all fluids (fuel
tank 90% full) .Items of optional equipment
increase the unladen weight and reduce the
maximum payload. Maximum roof
load
100 kg
Maximum boot
load
100 kg
Vehicle-specifi
cweight information can be
found on the vehicle identification plate
(Y page 352). Vehicle data, C 350 BlueEFFICIENCY
Vehicle dimensions
Vehicle length
(ECE)
4590 mm
Vehicle width
including exterior
mirrors
1997 mm
Vehicle width with-
out exterior mir-
rors 1770 mm
Vehicle height
35 1406 mm
Wheelbase
2760 mm
Vehicle weight
36 Unladen weight (in
accordance with
EC directive)
The unladen weight includes the driver
(68 kg), luggage (7 kg) and all fluids (fuel
tank 90% full). Items of optional equipment
increase the unladen weight and reduce the
maximum payload. Maximum roof
load
100 kg
Maximum boot
load
100 kg
Vehicle-specific weight information can be
found on the vehicle identification plate
(Y
page 352). 33
The values specified may differ from the actual values, depending on the tyres, load, optional equipment
and the state of the suspension.
34 Missing values were not available at the time of going to print.
35 The values specified may differ from the actual values, depending on the tyres, load, optional equipment
and the state of the suspension.
36 Missing values were not available at the time of going to print. 358
Vehicle dataTechnical data