Page 4581 of 5598
SE-122
< REMOVAL AND INSTALLATION >
SECOND SEAT
1. Headrest RH 2. Headrest holder (free) 3. Headrest holder (locked)
4. Seatback trim 5. Seatback pad 6. Seat cushion trim
7. Seat cushion pad 8.Seat cushion heater unit
*9. Seat cushion under cover
10. Seat cushion hinge cover RH 11. Seat hinge cover RH 12. Seat cushion hinge cover LH
13. Seat harness assembly 14. Seat cushion carpet 15. Seat belt buckle anchor bolt
16. Seat belt buckle 17. Reclining inner cover (outside) 18. Seatback frame
JMJIA4580GB
Revision: 2010 May2011 QX56
Page 4583 of 5598
SE-124
< REMOVAL AND INSTALLATION >
SECOND SEAT
1. Headrest 2. Headrest holder (free) 3. Headrest holder (locked)
4. Seatback trim 5. Seatback pad 6. Seat cushion heater unit
7. Seat cushion trim 8. Seat cushion pad 9. Seat cushion under cover
10. Seat hinge assembly RH 11. Seat cushion hinge cover RH 12. Seat hinge cover LH
13. Seat cushion hinge cover LH 14. Seat hinge assembly LH 15. Seat harness assembly
16. Seat cushion carpet 17. Anchor bolt 18. Seat belt buckle
JMJIA4581GB
Revision: 2010 May2011 QX56
Page 4584 of 5598

SECOND SEATSE-125
< REMOVAL AND INSTALLATION >
C
DE
F
G H
I
K L
M A
B
SE
N
O P
Removal and InstallationINFOID:0000000006217430
REMOVAL
CAUTION:
When removing and installing, use shop cloths to protect parts from damage.
When removing and installing, 2 workers ar e required so as to prevent it from dropping.
1. Remove the headrest.
2. Remove the seat hinge cover.
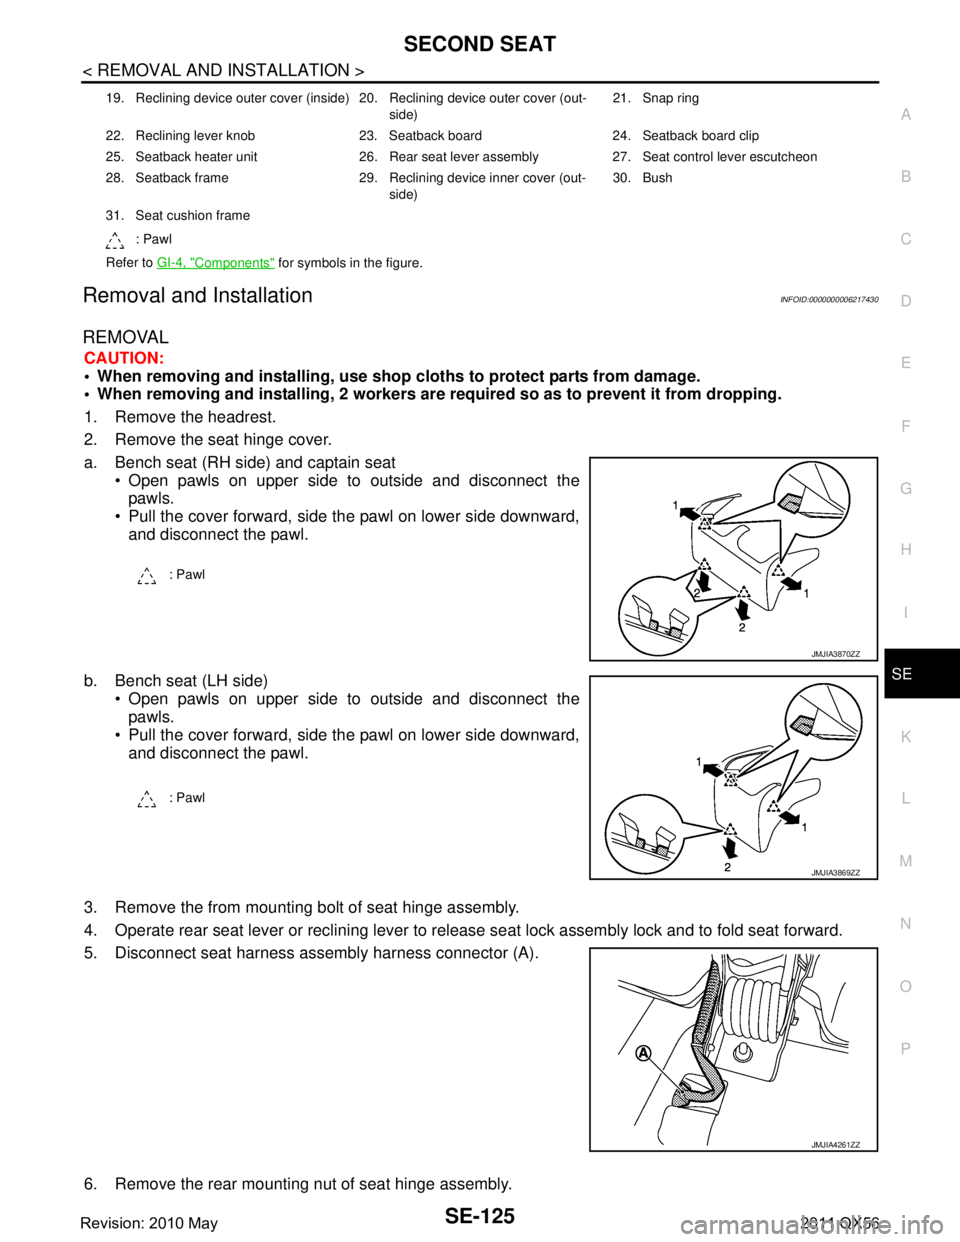
a. Bench seat (RH side) and captain seat Open pawls on upper side to outside and disconnect thepawls.
Pull the cover forward, side the pawl on lower side downward, and disconnect the pawl.
b. Bench seat (LH side) Open pawls on upper side to outside and disconnect thepawls.
Pull the cover forward, side the pawl on lower side downward,
and disconnect the pawl.
3. Remove the from mounting bolt of seat hinge assembly.
4. Operate rear seat lever or reclining lever to releas e seat lock assembly lock and to fold seat forward.
5. Disconnect seat harness assembly harness connector (A).
6. Remove the rear mounting nut of seat hinge assembly.
19. Reclining device outer cover (inside) 20. Reclining device outer cover (out- side)21. Snap ring
22. Reclining lever knob 23. Seatback board 24. Seatback board clip
25. Seatback heater unit 26. Rear seat lever assembly 27. Seat control lever escutcheon
28. Seatback frame 29. Reclining device inner cover (out- side)30. Bush
31. Seat cushion frame : Pawl
Refer to GI-4, "
Components" for symbols in the figure.
: Pawl
JMJIA3870ZZ
: Pawl
JMJIA3869ZZ
JMJIA4261ZZ
Revision: 2010 May2011 QX56
Page 4593 of 5598
SE-134
< REMOVAL AND INSTALLATION >
SECOND SEAT
3. Remove the retainer (A) of the armrest trim. Remove the arm-rest trim from the armrest pad and frame.
ASSEMBLY
Assemble in the reverse order of disassembly.
AdjustmentINFOID:0000000006217434
ADJUSTMENT
SEATBACK CONTROL WIRE
Adjust in accordance with the following procedures when installing the seatback control wire of the 2nd seat.
1. Tilt the seatback forward and set the seatback to the 1st lock position.
2. Install the seatback control wire (1) so that it is not slack.
3. Set the clearance of portion (A) to 2 mm (0.079 in) and tighten the bolt (B).
4. Operate the rear seat leve r assembly and fold the seat.
5. Set the seat to the seating posit ion and check that the seat locks.
SEAT CUSHION CONTROL WIRE
JMJIA4075ZZ
JMJIA4136ZZ
Revision: 2010 May2011 QX56
Page 4596 of 5598
THIRD SEATSE-137
< REMOVAL AND INSTALLATION >
C
DE
F
G H
I
K L
M A
B
SE
N
O P
THIRD SEAT
Exploded ViewINFOID:0000000006217435
1. Headrest RH 2. Headrest holder (free) 3. Headrest holder (locked)
4. Seatback silencer RH 5. Seatback trim 6. Seatback pad
7. Seat harness RH 8. Seat bracket assembly RH 9. Seat cushion trim
JMJIA4258GB
Revision: 2010 May2011 QX56
Page 4601 of 5598
SE-142
< REMOVAL AND INSTALLATION >
SECOND SEAT POWER UNLOCK SWITCH
SECOND SEAT POWER UNLOCK SWITCH
Removal and InstallationINFOID:0000000006217439
REMOVAL
CAUTION:
When removing and installing, use shop cloths to protect from damage.
1. Remove cluster lid C lower. Refer to IP-14, "
Removal and Installation".
2. Remove second seat power unlock switch from cluster lid C lower using flat-bladed screwdriver.
INSTALLATION
Install in the reverse order of removal.
Revision: 2010 May2011 QX56
Page 4607 of 5598
SE-148
< REMOVAL AND INSTALLATION >
CLIMATE CONTROLLED SEAT BLOWER FILTER
CLIMATE CONTROLLED SEAT BLOWER FILTER
SEAT CUSHION
SEAT CUSHION : Removal and InstallationINFOID:0000000006217445
REMOVAL
CAUTION:
When removing and installing, use shop cloths to protect parts from damage.
1. Remove the seat.
2. Turn blower filter counter counterclockwise and remo ve it from climate controlled seat cushion blower
motor.
INSTALLATION
Install in the reverse order of removal.
SEATBACK
SEATBACK : Removal and InstallationINFOID:0000000006217446
REMOVAL
CAUTION:
When removing and installi ng, use shop cloths to protect parts from damage.
1. Remove the seatback board.
2. Turn blower filter counter counterclockwise and re move it from climate controlled seat blower motor.
INSTALLATION
Install in the reverse order of removal.
Revision: 2010 May2011 QX56
Page 4608 of 5598

SEC-1
BODY EXTERIOR, DOORS, ROOF & VEHICLE SECURITY
C
D
E
F
G H
I
J
L
M
SECTION SEC
A
B
SEC
N
O P
CONTENTS
SECURITY CONTROL SYSTEM
WITH INTELLIGE NT KEY SYSTEM
PRECAUTION ................ ...............................
5
PRECAUTIONS .............................................. .....5
Precaution for Supplemental Restraint System
(SRS) "AIR BAG" and "SEAT BELT PRE-TEN-
SIONER" ............................................................. ......
5
Precaution Necessary for Steering Wheel Rota-
tion after Battery Disconnect .....................................
5
Precaution for Procedure without Cowl Top Cover ......6
SYSTEM DESCRIPTION ..............................7
COMPONENT PARTS ................................... .....7
Component Parts Location .................................. ......7
Component Description .............................................8
A/T Shift Selector (Detention Switch) ........................8
BCM ..........................................................................8
ECM ..........................................................................9
IPDM E/R ..................................................................9
NATS Antenna Amp. .................................................9
TCM ..........................................................................9
Combination Meter ....................................................9
Door Switch ...............................................................9
Hood Switch ..............................................................9
Inside Key Antenna ...................................................9
Intelligent Key ............................................................9
Push-button Ignition Switch .....................................10
Remote Keyless Entry Receiver .............................10
Security Indicator Lamp ..........................................10
Starter Control Relay ...............................................10
Starter Relay ...........................................................10
Steering Lock Relay ................................................10
Steering Lock Unit ...................................................10
Stop Lamp Switch ...................................................10
Transmission Range Switch ....................................10
Vehicle Information Display .....................................11
SYSTEM .............................................................12
INTELLIGENT KEY SYSTEM/ENGINE START
FUNCTION ............................................................. ....
12
INTELLIGENT KEY SYSTEM/ENGINE START
FUNCTION : System Diagram ................................
12
INTELLIGENT KEY SYSTEM/ENGINE START
FUNCTION : System Description ............................
12
INFINITI VEHICLE IMMOBILIZER SYSTEM-NATS ....14
INFINITI VEHICLE IMMOBILIZER SYSTEM-
NATS : System Diagram .........................................
15
INFINITI VEHICLE IMMOBILIZER SYSTEM-
NATS : System Description .....................................
15
VEHICLE SECURITY SYSTEM .................................17
VEHICLE SECURITY SYSTEM : System Dia-
gram .................................................................... ....
17
VEHICLE SECURITY SYSTEM : System Descrip-
tion ...........................................................................
18
DIAGNOSIS SYSTEM (BCM) ...........................21
COMMON ITEM ..................................................... ....21
COMMON ITEM : CONSULT-III Function (BCM -
COMMON ITEM) .....................................................
21
INTELLIGENT KEY ................................................ ....22
INTELLIGENT KEY : CONSULT-III Function
(BCM - INTELLIGENT KEY) ....................................
22
THEFT ALM ........................................................... ....26
THEFT ALM : CONSULT-III Function (BCM -
THEFT) ................................................................ ....
26
IMMU ...................................................................... ....27
IMMU : CONSULT-III Function (BCM - IMMU) ........27
DIAGNOSIS SYSTEM (IPDM E/R) ...................28
CONSULT-III Function (IPDM E/R) .........................28
ECU DIAGNOSIS INFORMATION ..............30
ECM, IPDM E/R, BCM .......................................30
List of ECU Reference ......................................... ....30
Revision: 2010 May2011 QX56