2011 INFINITI QX56 lock
[x] Cancel search: lockPage 4407 of 5598
![INFINITI QX56 2011 Factory Service Manual
PRECAUTIONSSCS-47
< PRECAUTION > [AIR LEVELIZER CONTROL SYSTEM]
C
D
F
G H
I
J
K L
M A
B
SCS
N
O P
PRECAUTION
PRECAUTIONS
Precaution for Supplemental Restraint System (SRS) "AIR BAG" and "SEAT BELT
INFINITI QX56 2011 Factory Service Manual
PRECAUTIONSSCS-47
< PRECAUTION > [AIR LEVELIZER CONTROL SYSTEM]
C
D
F
G H
I
J
K L
M A
B
SCS
N
O P
PRECAUTION
PRECAUTIONS
Precaution for Supplemental Restraint System (SRS) "AIR BAG" and "SEAT BELT](/manual-img/42/57033/w960_57033-4406.png)
PRECAUTIONSSCS-47
< PRECAUTION > [AIR LEVELIZER CONTROL SYSTEM]
C
D
F
G H
I
J
K L
M A
B
SCS
N
O P
PRECAUTION
PRECAUTIONS
Precaution for Supplemental Restraint System (SRS) "AIR BAG" and "SEAT BELT
PRE-TENSIONER"
INFOID:0000000006256135
The Supplemental Restraint System such as “A IR BAG” and “SEAT BELT PRE-TENSIONER”, used along
with a front seat belt, helps to reduce the risk or severi ty of injury to the driver and front passenger for certain
types of collision. This system includes seat belt switch inputs and dual stage front air bag modules. The SRS
system uses the seat belt switches to determine the front air bag deployment, and may only deploy one front
air bag, depending on the severity of a collision and whether the front occupants are belted or unbelted.
Information necessary to service the system safely is included in the “SRS AIR BAG” and “SEAT BELT” of this
Service Manual.
WARNING:
To avoid rendering the SRS inoper ative, which could increase the risk of personal injury or death in
the event of a collision that would result in air ba g inflation, all maintenance must be performed by
an authorized NISSAN/INFINITI dealer.
Improper maintenance, including in correct removal and installation of the SRS, can lead to personal
injury caused by unintentional act ivation of the system. For removal of Spiral Cable and Air Bag
Module, see the “SRS AIR BAG”.
Do not use electrical test equipm ent on any circuit related to the SRS unless instructed to in this
Service Manual. SRS wiring harnesses can be identi fied by yellow and/or orange harnesses or har-
ness connectors.
PRECAUTIONS WHEN USING POWER TOOLS (AIR OR ELECTRIC) AND HAMMERS
WARNING:
When working near the Air Bag Diagnosis Sensor Unit or other Air Bag System sensors with the
ignition ON or engine running, DO NOT use air or electric power tools or strike near the sensor(s)
with a hammer. Heavy vibration could activate the sensor(s) and deploy the air bag(s), possibly
causing serious injury.
When using air or electric power tools or hammers , always switch the ignition OFF, disconnect the
battery, and wait at least 3 minutes before performing any service.
Precaution Necessary for Steering Wh eel Rotation after Battery Disconnect
INFOID:0000000006256137
NOTE:
Before removing and installing any control units, first tu rn the push-button ignition switch to the LOCK posi-
tion, then disconnect both battery cables.
After finishing work, confirm that all control unit connectors are connected properly, then re-connect both
battery cables.
Always use CONSULT-III to perform self-diagnosis as a part of each function inspection after finishing work.
If a DTC is detected, perform trouble diagnos is according to self-diagnosis results.
For vehicle with steering lock unit, if the battery is disconnected or discharged, the steering wheel will lock and
cannot be turned.
If turning the steering wheel is required with the batte ry disconnected or discharged, follow the operation pro-
cedure below before starting the repair operation.
OPERATION PROCEDURE
1. Connect both battery cables. NOTE:
Supply power using jumper cables if battery is discharged.
2. Turn the push-button ignition switch to ACC position. (At this time, the steering lock will be released.)
3. Disconnect both battery cables. The steering lock wil l remain released with both battery cables discon-
nected and the steering wheel can be turned.
4. Perform the necessary repair operation.
Revision: 2010 May2011 QX56
Page 4408 of 5598
![INFINITI QX56 2011 Factory Service Manual
SCS-48
< PRECAUTION >[AIR LEVELIZER CONTROL SYSTEM]
PRECAUTIONS
5. When the repair work is completed, re-connect bot
h battery cables. With the brake pedal released, turn
the push-button ignition swi INFINITI QX56 2011 Factory Service Manual
SCS-48
< PRECAUTION >[AIR LEVELIZER CONTROL SYSTEM]
PRECAUTIONS
5. When the repair work is completed, re-connect bot
h battery cables. With the brake pedal released, turn
the push-button ignition swi](/manual-img/42/57033/w960_57033-4407.png)
SCS-48
< PRECAUTION >[AIR LEVELIZER CONTROL SYSTEM]
PRECAUTIONS
5. When the repair work is completed, re-connect bot
h battery cables. With the brake pedal released, turn
the push-button ignition switch from ACC position to ON position, then to LOCK position. (The steering
wheel will lock when the push-button igniti on switch is turned to LOCK position.)
6. Perform self-diagnosis check of all control units using CONSULT-III.
Precaution for Procedure without Cowl Top CoverINFOID:0000000006256139
When performing the procedure after removing cowl top cover, cover
the lower end of windshield with urethane, etc.
Precaution for Air Levelizer Control SystemINFOID:0000000006256038
Never allow water and dust to enter the inside of air compressor.
Never disassemble the vehicle height sensor.
PIIB3706J
Revision: 2010 May2011 QX56
Page 4457 of 5598
![INFINITI QX56 2011 Factory Service Manual
AIR COMPRESSOR/AIR TUBESCS-97
< REMOVAL AND INSTALLATION > [AIR LEVELIZER CONTROL SYSTEM]
C
D
F
G H
I
J
K L
M A
B
SCS
N
O P
Completely engage hooks on frame when installing bracket.
Install exhau INFINITI QX56 2011 Factory Service Manual
AIR COMPRESSOR/AIR TUBESCS-97
< REMOVAL AND INSTALLATION > [AIR LEVELIZER CONTROL SYSTEM]
C
D
F
G H
I
J
K L
M A
B
SCS
N
O P
Completely engage hooks on frame when installing bracket.
Install exhau](/manual-img/42/57033/w960_57033-4456.png)
AIR COMPRESSOR/AIR TUBESCS-97
< REMOVAL AND INSTALLATION > [AIR LEVELIZER CONTROL SYSTEM]
C
D
F
G H
I
J
K L
M A
B
SCS
N
O P
Completely engage hooks on frame when installing bracket.
Install exhaust tube (1) according to the figure.
Perform inspection after installation. Rfer to SCS-97, "
Inspection".
InspectionINFOID:0000000006256103
INSPECTION AFTER REMOVAL
Check area 8 mm (0.31 in) from front end of air tubes for damage and burrs.
INSPECTION AFTER INSTALLATION
Lightly pull air tubes and check that it is locked.
Apply some soapy water to each joint. Check that ther e is no leakage of air after the activation of the air
compressor during “Active Test” of CONSULT-III.
CAUTION:
Never allow soapy water to ente r the inside of air compressor.
JSEIA0241ZZ
JSEIA0242ZZ
Revision: 2010 May2011 QX56
Page 4460 of 5598

SE-1
BODY INTERIOR
C
DE
F
G H
I
K L
M
SECTION SE
A
B
SE
N
O P
CONTENTS
SEAT
PRECAUTION ................ ...............................4
PRECAUTIONS .............................................. .....4
Precaution for Supplemental Restraint System
(SRS) "AIR BAG" and "SEAT BELT PRE-TEN-
SIONER" ............................................................. ......
4
Service Notice ...........................................................4
Precaution for Work ..................................................4
PREPARATION ............................................6
PREPARATION .............................................. .....6
Commercial Service Tool .................................... ......6
CLIP LIST ............................................................7
Clip List ............................................................... ......7
SYSTEM DESCRIPTION ..............................8
COMPONENT PARTS ................................... .....8
POWER SEAT SYSTEM .............................................8
POWER SEAT SYSTEM : Component Parts Lo-
cation ................................................................... ......
8
POWER SEAT SYSTEM : Component Descrip-
tion ...................................................................... ......
8
LUMBAR SUPPORT SYSTEM .............................. ......8
LUMBAR SUPPORT SYSTEM : Component
Parts Location ..................................................... ......
9
LUMBAR SUPPORT SYSTEM : Component De-
scription .....................................................................
9
SECOND SEAT POWER UNLOCK SYSTEM ....... ......9
SECOND SEAT POWER UNLOCK SYSTEM :
Component Parts Location ......................................
10
SECOND SEAT POWER UNLOCK SYSTEM :
Component Description ...........................................
10
THIRD SEAT SEATBACK POWER FOLDING
SYSTEM ................................................................ ....
10
THIRD SEAT SEATBACK POWER FOLDING
SYSTEM : Component Parts Location ....................
11
THIRD SEAT SEATBACK POWER FOLDING
SYSTEM : Component Description ..................... ....
11
FRONT HEATED SEAT SYSTEM ......................... ....12
FRONT HEATED SEAT SYSTEM : Component
Parts Location ..........................................................
12
FRONT HEATED SEAT SYSTEM : Component
Description ...............................................................
12
SECOND HEATED SEAT SYSTEM ...................... ....13
SECOND HEATED SEAT SYSTEM : Component
Parts Location ..........................................................
13
SECOND HEATED SEAT SYSTEM : Component
Description ...............................................................
13
CLIMATE CONTROLLED SEAT SYSTEM ...............13
CLIMATE CONTROLLED SEAT SYSTEM : Com-
ponent Parts Location .......................................... ....
14
CLIMATE CONTROLLED SEAT SYSTEM : Com-
ponent Description ...................................................
14
SYSTEM ............................................................16
POWER SEAT SYSTEM ....... .....................................16
POWER SEAT SYSTEM : Syst em Description .......16
LUMBAR SUPPORT SYSTEM .............................. ....16
LUMBAR SUPPORT SYSTEM : System Descrip-
tion ...........................................................................
16
SECOND SEAT POWER UNLOCK SYSTEM ...........16
SECOND SEAT POWER UNLOCK SYSTEM :
System Description .............................................. ....
16
THIRD SEAT SEATBACK POWER FOLDING
SYSTEM .....................................................................
16
THIRD SEAT SEATBACK POWER FOLDING
SYSTEM : System Description ............................ ....
16
FRONT HEATED SEAT SYSTEM ......................... ....16
FRONT HEATED SEAT SYSTEM : System De-
scription ...................................................................
16
SECOND HEATED SEAT SYSTEM ...................... ....16
Revision: 2010 May2011 QX56
Page 4461 of 5598

SE-2
SECOND HEATED SEAT SYSTEM : System De-
scription ..................................................................
16
CLIMATE CONTROLLED SEAT SYSTEM ........... ...17
CLIMATE CONTROLLED SEAT SYSTEM : Sys-
tem Diagram ........................................................ ...
17
CLIMATE CONTROLLED SEAT SYSTEM : Sys-
tem Description .................................................... ...
17
CLIMATE CONTROLLED SEAT SYSTEM : Fail-
safe .........................................................................
17
ECU DIAGNOSIS INFORMATION ..............20
CLIMATE CONTROLLED SEAT CONTROL
UNIT ................................................................ ...
20
Reference Value .................................................. ...20
Fail-safe ..................................................................21
WIRING DIAGRAM .....................................24
POWER SEAT CONTROL SYSTEM (PAS-
SENGER SIDE) ............................................... ...
24
Wiring Diagram .................................................... ...24
LUMBAR SUPPORT SYSTEM ..........................28
Wiring Diagram .................................................... ...28
SECOND SEAT POWER UNLOCK SYSTEM ...33
Wiring Diagram .......................................................33
THIRD SEAT SEATBACK POWER FOLDING
SYSTEM .......................................................... ...
39
Wiring Diagram .................................................... ...39
FRONT HEATED SEAT SYSTEM .....................45
Wiring Diagram .................................................... ...45
SECOND HEATED SEAT SYSTEM ..................50
Wiring Diagram .................................................... ...50
CLIMATE CONTROLLED SEAT SYSTEM .......55
Wiring Diagram .................................................... ...55
BASIC INSPECTION ...................................66
DIAGNOSIS AND REPAIR WORK FLOW ..... ...66
Work Flow ............................................................ ...66
DTC/CIRCUIT DIAGNOSIS ...................... ...67
POWER SUPPLY AND GROUND CIRCUIT .. ...67
CLIMATE CONTROLLED SEAT CONTROL UNIT ...67
CLIMATE CONTROLLED SEAT CONTROL UNIT
: Diagnosis Procedure ............................................
67
CLIMATE CONTROLLED SEAT CONTROL UNIT
: Component Inspection ..........................................
70
CLIMATE CONTROLLED SEAT SWITCH ........72
Component Function Check .............................. ...72
Diagnosis Procedure ..............................................72
Component Inspection ............................................74
SEATBACK THERMAL ELECTRIC UNIT ........75
Component Function Check ............................... ...75
Diagnosis Procedure ...............................................75
SEATBACK THERMAL ELECTRIC UNIT
SENSOR ............................................................
77
Component Function Check ............................... ...77
Diagnosis Procedure ...............................................77
Component Inspection ............................................78
SEAT CUSHION THERMAL ELECTRIC UNIT ...79
Component Function Check ............................... ...79
Diagnosis Procedure ...............................................79
SEAT CUSHION THERMAL ELECTRIC UNIT
SENSOR ............................................................
81
Component Function Check ............................... ...81
Diagnosis Procedure ...............................................81
Component Inspection ............................................82
CLIMATE CONTROLLED SEATBACK
BLOWER MOTOR .............................................
83
Component Function Check ............................... ...83
Diagnosis Procedure ...............................................83
CLIMATE CONTROLLED SEAT CUSHION
BLOWER MOTOR .............................................
86
Component Function Check ............................... ...86
Diagnosis Procedure ...............................................86
CLIMATE CONTROLLED SEAT SWITCH IN-
DICATOR ...........................................................
89
Component Function Check ............................... ...89
Diagnosis Procedure ...............................................89
CLIMATE CONTROLLED SEAT BLOWER
FILTER ...............................................................
91
SEATBACK BLOWER MOTOR ............................. ...91
SEATBACK BLOWER MOTOR : Diagnosis Pro-
cedure .....................................................................
91
SEAT CUSHION BLOWER MOTOR ..................... ...91
SEAT CUSHION BLOWER MOTOR : Diagnosis
Procedure ...............................................................
91
SYMPTOM DIAGNOSIS ............................92
CLIMATE CONTROLLED SEAT DOES NOT
OPERATE. ...................................................... ...
92
Diagnosis Procedure ............................................ ...92
TEMPERATURE ADJUSTMENT IS IMPOSSI-
BLE ....................................................................
94
SEATBACK ............................................................ ...94
SEATBACK : Diagnosis Procedure ........................94
SEAT CUSHION ..................................................... ...94
SEAT CUSHION : Diagnosis Procedure .................94
Revision: 2010 May2011 QX56
Page 4462 of 5598

SE-3
C
DE
F
G H
I
K L
M A
B
SE
N
O P
CLIMATE CONTROLLED SEAT ACTIVATES
ONCE BUT STOPS IMMEDIATELY .............. ....
96
SEATBACK BLOWER MOTOR ............................ ....96
SEATBACK BLOWER MOTOR : Description .........96
SEATBACK BLOWER MOTOR : Diagnosis Pro-
cedure .....................................................................
96
SEAT CUSHION BLOWER MOTOR ..................... ....96
SEAT CUSHION BLOWER MOTOR : Description ....96
SEAT CUSHION BLOWER MOTOR : Diagnosis
Procedure ................................................................
96
SEAT SWITCH INDICATOR IS NOT ILLUMI-
NATED IN HEAT OR COOL POSITION ............
98
Diagnosis Procedure ........................................... ....98
SQUEAK AND RATTLE TROUBLE DIAG-
NOSES ...............................................................
99
Work Flow ........................................................... ....99
Inspection Procedure ............................................101
Diagnostic Worksheet ...........................................103
REMOVAL AND INSTALLATION .............105
FRONT SEAT ................................................. ..105
Exploded View .................................................... ..105
Removal and Installation .......................................112
SEATBACK ........................................................... ..114
SEATBACK : Disassembly and Assembly ............114
SEAT CUSHION .................................................... ..115
SEAT CUSHION : Disassembly and Assembly ....116
CLIMATE CONTROLLED SEAT UNIT ................. ..117
CLIMATE CONTROLLED SEAT UNIT : Disas-
sembly and Assembly ...........................................
117
HEADREST (WITH HEADREST DISPLAY ONLY) ..117
HEADREST (WITH HEADREST DISPLAY
ONLY) : Disassembly and Assembly ....................
117
SECOND SEAT ................................................120
Exploded View .................................................... ..120
Removal and Installation ..................................... ..125
SEATBACK ............................................................ ..126
SEATBACK : Disassembly and Assembly ............126
SEAT CUSHION .................................................... ..130
SEAT CUSHION : Disassembly and Assembly .....130
ARMREST .............................................................. ..133
ARMREST : Disassembly and Assembly ..............133
Adjustment .............................................................134
THIRD SEAT ...................................................137
Exploded View .......................................................137
Removal and Installation .......................................138
Disassembly and Assembly ...................................139
POWER SEAT SWITCH .................................141
Removal and Installation .......................................141
SECOND SEAT POWER UNLOCK SWITCH .142
Removal and Installation .......................................142
THIRD SEAT RECLINING SWITCH ...............143
Removal and Installation .......................................143
THIRD SEAT FOLD DOWN SWITCH .............144
Removal and Installation .......................................144
FRONT HEATED SEAT SWITCH ...................145
Removal and Installation .......................................145
SECOND HEATED SEAT SWITCH ................146
Removal and Installation .......................................146
CLIMATE CONTROLLED SEAT SWITCH .....147
Removal and Installation .......................................147
CLIMATE CONTROLLED SEAT BLOWER
FILTER ............................................................
148
SEAT CUSHION .................................................... ..148
SEAT CUSHION : Removal and Installation .........148
SEATBACK ............................................................ ..148
SEATBACK : Removal and Installation .................148
Revision: 2010 May2011 QX56
Page 4468 of 5598

COMPONENT PARTSSE-9
< SYSTEM DESCRIPTION >
C
DE
F
G H
I
K L
M A
B
SE
N
O P
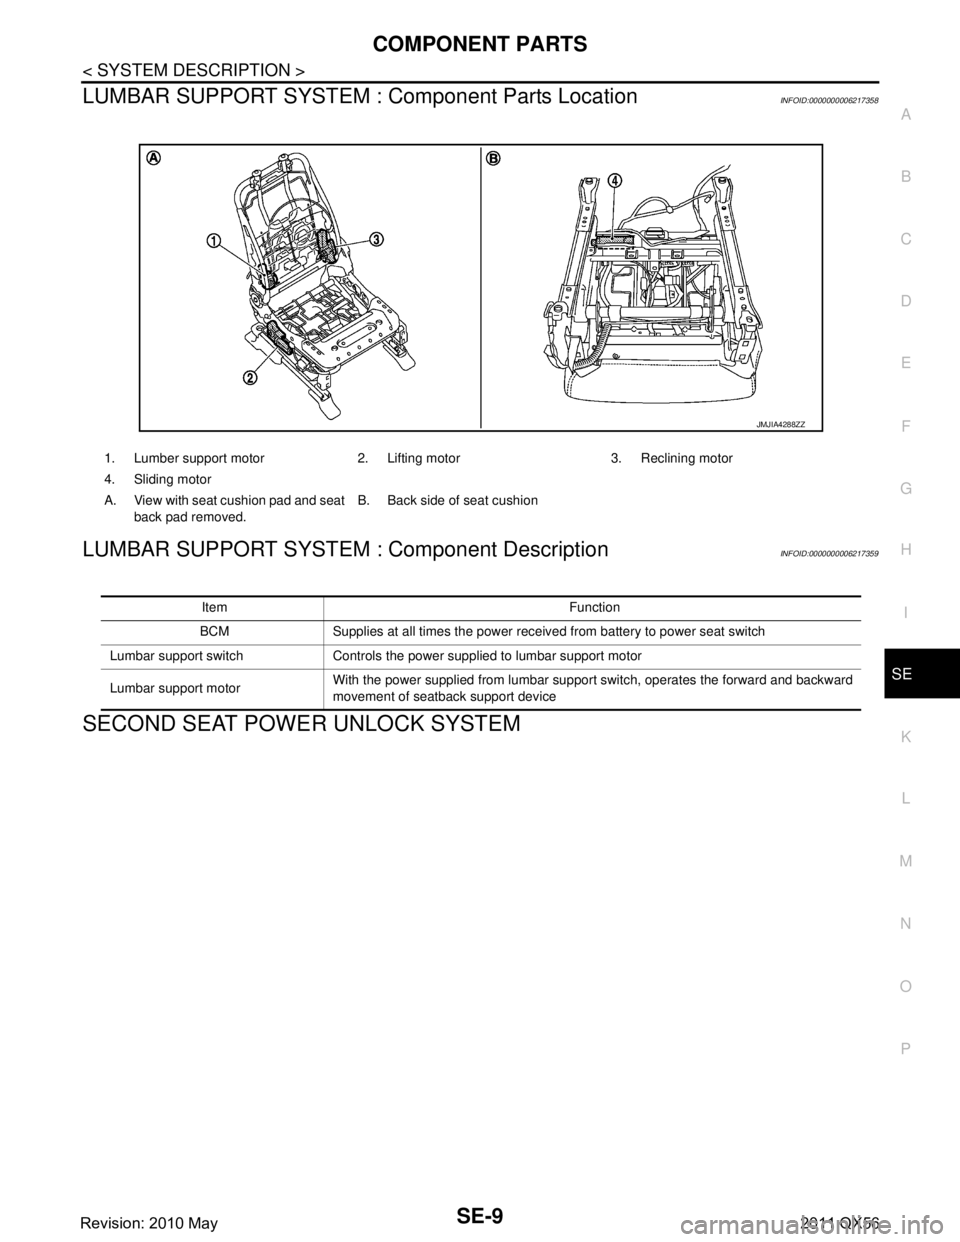
LUMBAR SUPPORT SYSTEM : Component Parts LocationINFOID:0000000006217358
LUMBAR SUPPORT SYSTEM : Component DescriptionINFOID:0000000006217359
SECOND SEAT POWER UNLOCK SYSTEM
1. Lumber support motor 2. Lifting motor 3. Reclining motor
4. Sliding motor
A. View with seat cushion pad and seat
back pad removed. B. Back side of seat cushion
JMJIA4288ZZ
Item Function
BCM Supplies at all times the power received from battery to power seat switch
Lumbar support switch Controls the power supplied to lumbar support motor
Lumbar support motor With the power supplied from lumbar support switch, operates the forward and backward
movement of seatback support device
Revision: 2010 May2011 QX56
Page 4469 of 5598

SE-10
< SYSTEM DESCRIPTION >
COMPONENT PARTS
SECOND SEAT POWER UNLOCK SYST EM : Component Parts Location
INFOID:0000000006217360
SECOND SEAT POWER UNLOCK SYSTEM : Component DescriptionINFOID:0000000006217361
THIRD SEAT SEATBACK POWER FOLDING SYSTEM
1. Power unlock motor RH 2. Power unlock relay RH 3. Second seat power unlock switch RH
4. Second seat power unlock switch LH 5. Power unlock motor LH 6. Power unlock relay LH
A. View with seat cushion pad and seat
back pad removed. B. View with seat cushion pad and seat
back pad removed.
JMJIA4221ZZ
Item Function
Second seat unlock switch supplies power supply to power unlock relay and operates power unlock system. Power unlock relay Supplies battery power supply to motor when receiving power supply from power unlock switch.
Power unlock motor Releases lock when receiving battery power supply from power unlock relay.
Revision: 2010 May2011 QX56