2011 INFINITI QX56 ABS
[x] Cancel search: ABSPage 4266 of 5598
REAR SHOCK ABSORBERRSU-11
< REMOVAL AND INSTALLATION >
C
DF
G H
I
J
K L
M A
B
RSU
N
O P
Inadvertent piping removal causes fluid to splatter.
2. Remove tires with power tool. Refer to WT-64, "
Removal and Installation".
3. Remove height sensor from rear lower link (right side). Refer to EXL-136, "
Removal and Installation".
4. Remove vehicle height sensor from rear lower link (left side). Refer to SCS-98, "
Removal and Installa-
tion".
5. Remove air tube from shock absorber assembly. Refer to SCS-95, "
Removal and Installation".
6. Remove middle tube assembly from shock absorber assembly. (With HBMC) Refer to SCS-44, "
REAR
TUBE ASSEMBLY : Removal and Installation".
7. Remove shock absorber mounting bolt (lower side).
8. Remove piston rod lock nut.
9. Remove bracket, bushings, and shock absorber. (With HBMC)
10. Remove washers, bushings, and shock absorber. (Without HBMC)
11. Perform inspection after removal. Refer to RSU-11, "
Inspection and Adjustment".
INSTALLATION
Note the following, and install in the reverse order of removal.
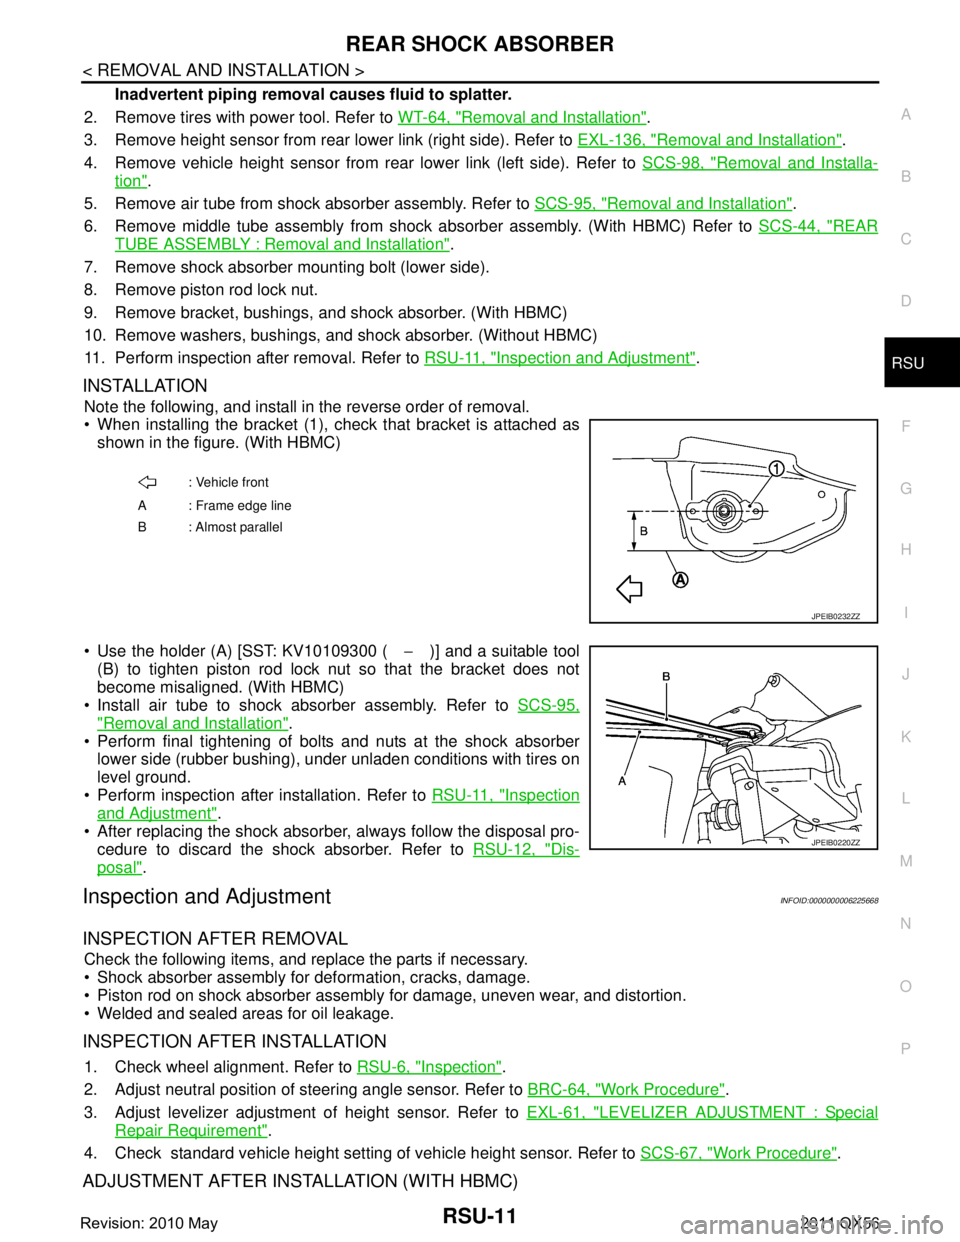
When installing the bracket (1), check that bracket is attached as
shown in the figure. (With HBMC)
Use the holder (A) [SST: KV10109300 ( −)] and a suitable tool
(B) to tighten piston rod lock nut so that the bracket does not
become misaligned. (With HBMC)
Install air tube to shock absorber assembly. Refer to SCS-95,
"Removal and Installation".
Perform final tightening of bolts and nuts at the shock absorber
lower side (rubber bushing), under unladen conditions with tires on
level ground.
Perform inspection after installation. Refer to RSU-11, "
Inspection
and Adjustment".
After replacing the shock absorber, always follow the disposal pro- cedure to discard the shock absorber. Refer to RSU-12, "
Dis-
posal".
Inspection and AdjustmentINFOID:0000000006225668
INSPECTION AFTER REMOVAL
Check the following items, and replace the parts if necessary.
Shock absorber assembly for deformation, cracks, damage.
Piston rod on shock absorber assembly for damage, uneven wear, and distortion.
Welded and sealed areas for oil leakage.
INSPECTION AFTER INSTALLATION
1. Check wheel alignment. Refer to RSU-6, "Inspection".
2. Adjust neutral position of steering angle sensor. Refer to BRC-64, "
Work Procedure".
3. Adjust levelizer adjustment of height sensor. Refer to EXL-61, "
LEVELIZER ADJUSTMENT : Special
Repair Requirement".
4. Check standard vehicle height setting of vehicle height sensor. Refer to SCS-67, "
Work Procedure".
ADJUSTMENT AFTER INSTALLATION (WITH HBMC)
: Vehicle front
A : Frame edge line
B: Almost parallel
JPEIB0232ZZ
JPEIB0220ZZ
Revision: 2010 May2011 QX56
Page 4267 of 5598
RSU-12
< REMOVAL AND INSTALLATION >
REAR SHOCK ABSORBER
Bleed air from the HBMC. Refer to SCS-18, "Work Procedure".
DisposalINFOID:0000000006225669
WITHOUT HBMC
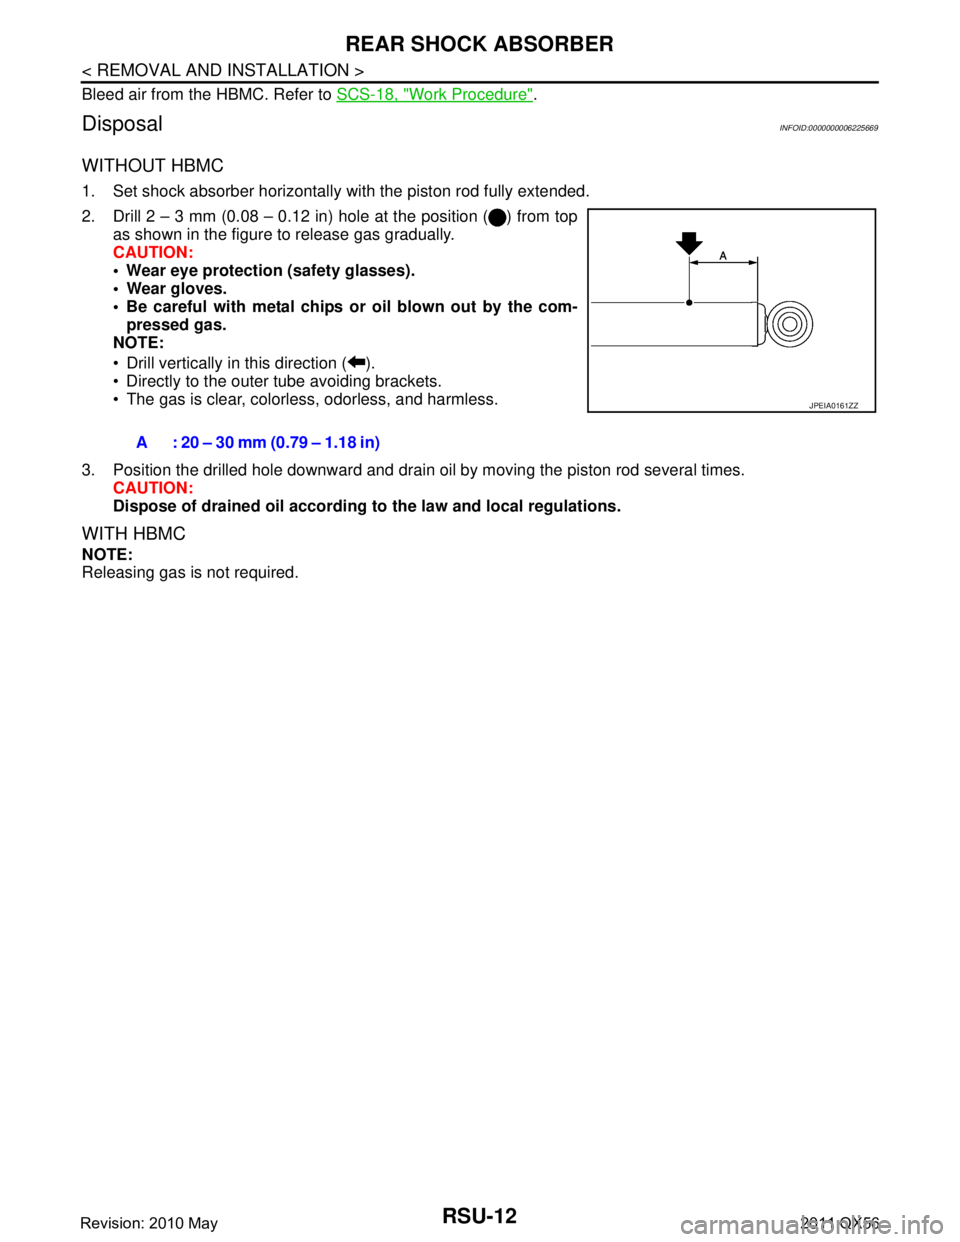
1. Set shock absorber horizontally with the piston rod fully extended.
2. Drill 2 – 3 mm (0.08 – 0.12 in) hole at the position ( ) from top
as shown in the figure to release gas gradually.
CAUTION:
Wear eye protection (safety glasses).
Wear gloves.
Be careful with metal chips or oil blown out by the com-pressed gas.
NOTE:
Drill vertically in this direction ( ).
Directly to the outer tube avoiding brackets.
The gas is clear, colorless, odorless, and harmless.
3. Position the drilled hole downward and drain oil by moving the piston rod several times. CAUTION:
Dispose of drained oil according to the law and local regulations.
WITH HBMC
NOTE:
Releasing gas is not required.A : 20 – 30 mm (0.79 – 1.18 in)
JPEIA0161ZZ
Revision: 2010 May2011 QX56
Page 4270 of 5598
FRONT LOWER LINKRSU-15
< REMOVAL AND INSTALLATION >
C
DF
G H
I
J
K L
M A
B
RSU
N
O P
FRONT LOWER LINK
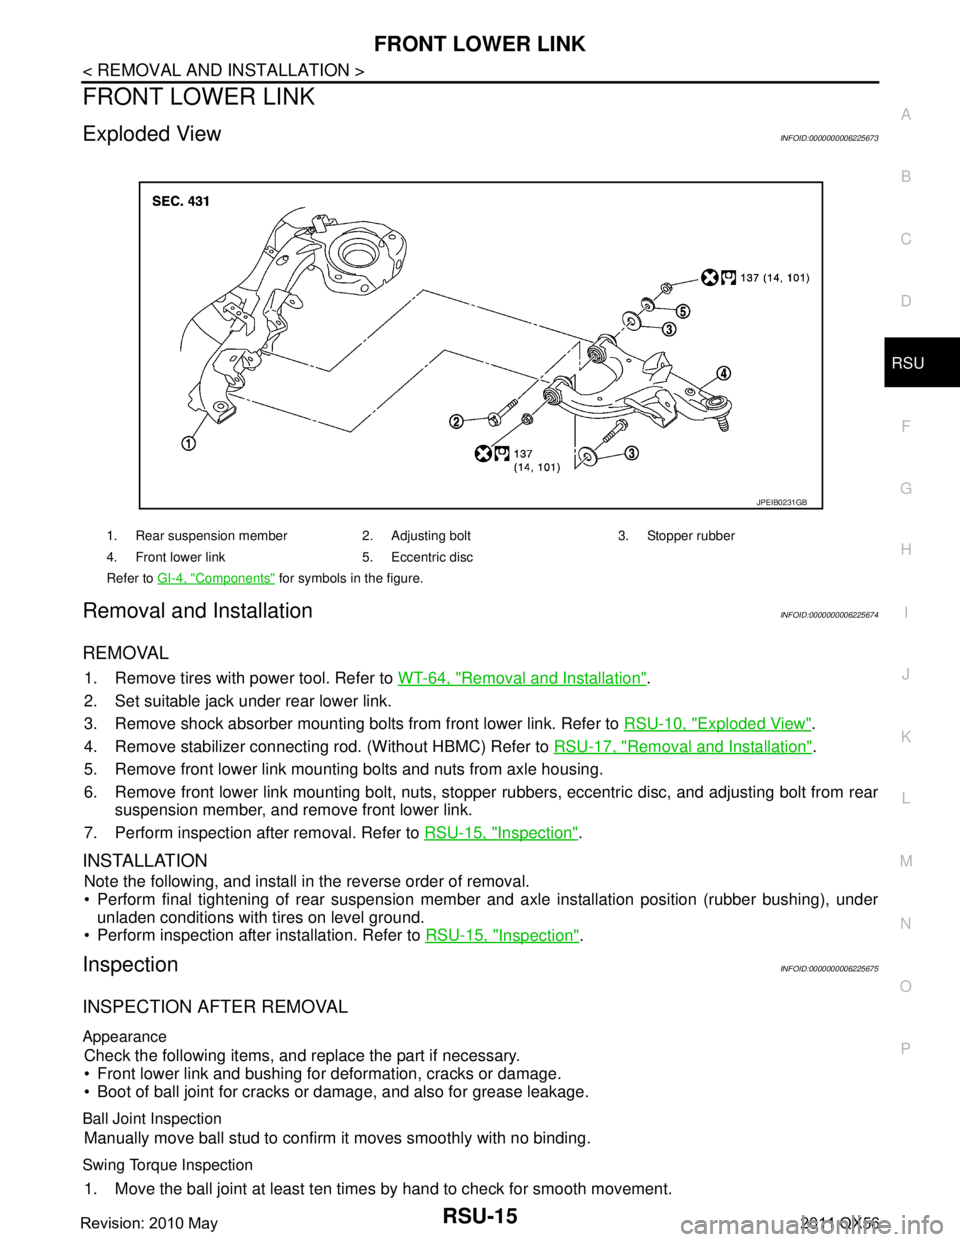
Exploded ViewINFOID:0000000006225673
Removal and InstallationINFOID:0000000006225674
REMOVAL
1. Remove tires with power tool. Refer to WT-64, "Removal and Installation".
2. Set suitable jack under rear lower link.
3. Remove shock absorber mounting bolts from front lower link. Refer to RSU-10, "
Exploded View".
4. Remove stabilizer connecting rod. (Without HBMC) Refer to RSU-17, "
Removal and Installation".
5. Remove front lower link mounting bolts and nuts from axle housing.
6. Remove front lower link mounting bolt, nuts, stopper rubbers, eccentric disc, and adjusting bolt from rear
suspension member, and remove front lower link.
7. Perform inspection after removal. Refer to RSU-15, "
Inspection".
INSTALLATION
Note the following, and install in the reverse order of removal.
Perform final tightening of rear suspension mem ber and axle installation position (rubber bushing), under
unladen conditions with tires on level ground.
Perform inspection after installation. Refer to RSU-15, "
Inspection".
InspectionINFOID:0000000006225675
INSPECTION AFTER REMOVAL
Appearance
Check the following items, and replace the part if necessary.
Front lower link and bushing for deformation, cracks or damage.
Boot of ball joint for cracks or damage, and also for grease leakage.
Ball Joint Inspection
Manually move ball stud to confirm it moves smoothly with no binding.
Swing Torque Inspection
1. Move the ball joint at least ten times by hand to check for smooth movement.
1. Rear suspension member 2. Adjusting bolt 3. Stopper rubber
4. Front lower link 5. Eccentric disc
Refer to GI-4, "
Components" for symbols in the figure.
JPEIB0231GB
Revision: 2010 May2011 QX56
Page 4273 of 5598
RSU-18
< UNIT REMOVAL AND INSTALLATION >
REAR SUSPENSION MEMBER
UNIT REMOVAL AND INSTALLATION
REAR SUSPENSION MEMBER
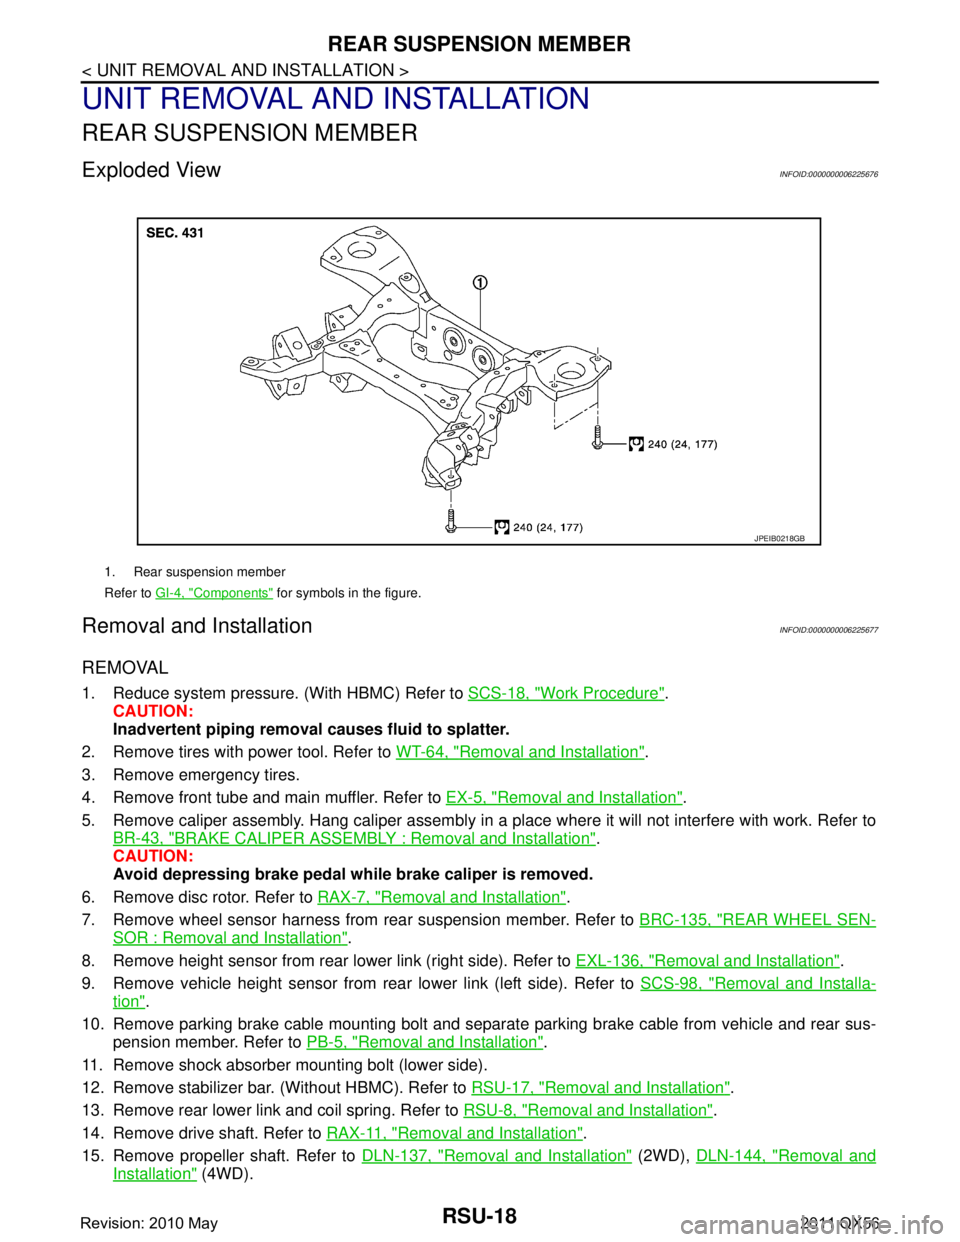
Exploded ViewINFOID:0000000006225676
Removal and InstallationINFOID:0000000006225677
REMOVAL
1. Reduce system pressure. (With HBMC) Refer to SCS-18, "Work Procedure".
CAUTION:
Inadvertent piping removal causes fluid to splatter.
2. Remove tires with power tool. Refer to WT-64, "
Removal and Installation".
3. Remove emergency tires.
4. Remove front tube and main muffler. Refer to EX-5, "
Removal and Installation".
5. Remove caliper assembly. Hang caliper assembly in a place where it will not interfere with work. Refer to BR-43, "
BRAKE CALIPER ASSEMBLY : Removal and Installation".
CAUTION:
Avoid depressing brake pedal wh ile brake caliper is removed.
6. Remove disc rotor. Refer to RAX-7, "
Removal and Installation".
7. Remove wheel sensor harness from rear suspension member. Refer to BRC-135, "
REAR WHEEL SEN-
SOR : Removal and Installation".
8. Remove height sensor from rear lower link (right side). Refer to EXL-136, "
Removal and Installation".
9. Remove vehicle height sensor from rear lower link (left side). Refer to SCS-98, "
Removal and Installa-
tion".
10. Remove parking brake cable mounting bolt and separa te parking brake cable from vehicle and rear sus-
pension member. Refer to PB-5, "
Removal and Installation".
11. Remove shock absorber mounting bolt (lower side).
12. Remove stabilizer bar. (Without HBMC). Refer to RSU-17, "
Removal and Installation".
13. Remove rear lower link and coil spring. Refer to RSU-8, "
Removal and Installation".
14. Remove drive shaft. Refer to RAX-11, "
Removal and Installation".
15. Remove propeller shaft. Refer to DLN-137, "
Removal and Installation" (2WD), DLN-144, "Removal and
Installation" (4WD).
1. Rear suspension member
Refer to GI-4, "
Components" for symbols in the figure.
JPEIB0218GB
Revision: 2010 May2011 QX56
Page 4302 of 5598
COMPONENT PARTSSBC-5
< SYSTEM DESCRIPTION >
C
DE
F
G
I
J
K L
M A
B
SBC
N
O P
SYSTEM DESCRIPTION
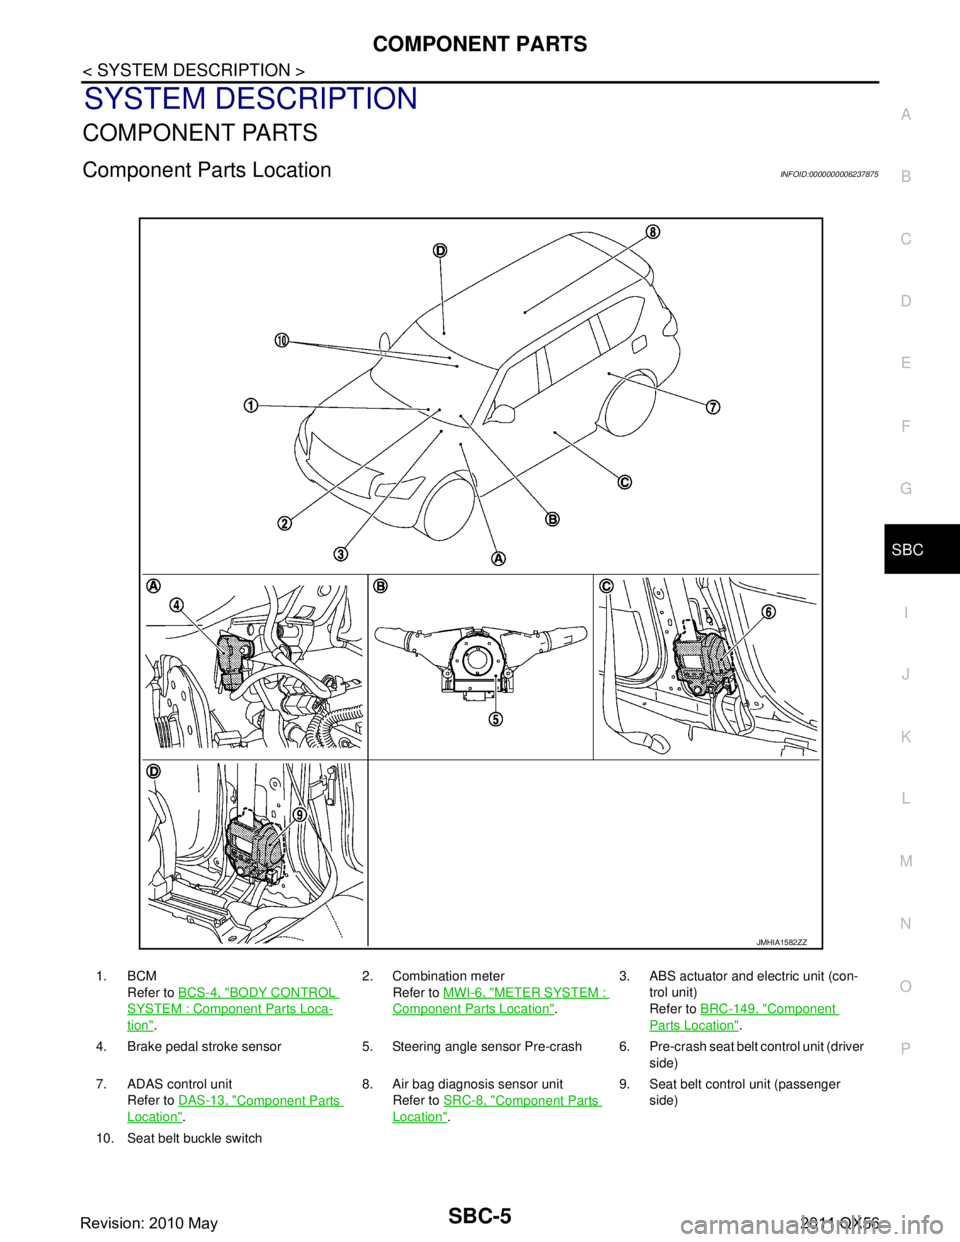
COMPONENT PARTS
Component Parts LocationINFOID:0000000006237875
1. BCM Refer to BCS-4, "
BODY CONTROL
SYSTEM : Componen t Parts Loca-
tion". 2. Combination meter
Refer to MWI-6, "
METER SYSTEM :
Component Parts Location". 3. ABS actuator and electric unit (con-
trol unit)
Refer to BRC-149, "Component
Parts Location".
4. Brake pedal stroke sensor 5. Steering angle sensor Pre-crash 6. Pre-crash seat belt control unit (driver side)
7. ADAS control unit Refer to DAS-13, "
Component Parts
Location". 8. Air bag diagnosis sensor unit
Refer to SRC-8, "
Component Parts
Location". 9. Seat belt control unit (passenger
side)
10. Seat belt buckle switch
JMHIA1582ZZ
Revision: 2010 May2011 QX56
Page 4303 of 5598

SBC-6
< SYSTEM DESCRIPTION >
COMPONENT PARTS
Component Description
INFOID:0000000006237876
A. View with instrument driver lower cov- er removed B. Combination switch C. View with center pillar lower garnish
removed (driver side)
D. View with center pillar lower garnish re- moved (passenger side)
Component Function
ABS actuator and electric unit (control unit) ABS operation signal is rece
ived from ABS actuator and el ectric unit (control unit)
via CAN communication.
ADAS control unit Intelligent brake assistance operation signal is received from ADAS control unit
via CAN communication.
Air bag diagnosis sensor unit Detects a collision and supplies power supply for deployment to air bag module
and pre-tensioner seat belt.
Performs the deploy judgement of passenger air bag based on the information from Occupant Detection System control unit
BCM Ignition ON signal, sleep/wake up signal, and door switch signal are received
from BCM via CAN communication.
Brake pedal stroke sensor It changes voltage according to brake pedal depressed amount and sends the
signal to pre-crash seat belt control unit.
There are 2 signals (brake pedal stroke sensor 1 and 2) sent from the brake
pedal stroke sensor. Pre-crash seat belt control unit judges the stroke amount
and the speed of the brake pedal according to the voltage of the signal sent by
each side.
Combination meter Transmits vehicle speed signal to pre-crash seat belt control unit (driver side).
Turns the seat belt warning lamp ON when the seat belt is unfastened.
Occupant detection system control unit Judges the passenger seat condition based on the information from occupant de-
tection unit.
Pre-crush seat belt control unit (driver side) Total control of pre-crash seat belt system is operated according to transmit sig-
nal.
Driver seat belt retractor integrates pre-crash seat belt control unit (driver side), driver seat belt motor, and tension reducer.
Seat belt motor operates each operation of pull, return, and hold.
Pre-crush seat belt control unit (passenger side) Control of passenger pre-crash seat belt is operated according to transmit sig-
nal.
Passenger seat belt retractor integrates pre-crash seat belt control unit (driver seat), driver seat belt motor, and tension reducer.
Seat belt motor operates each operation of pull, return, and hold.
Seat belt buckle switch (driver side) Fastening or not fastening of seat belt is judged. This judgment is used for con-
trol of driver pre-crash seat belt system.
Seat belt warning lamp on combination meter turns ON when seat belt is not fastened while ignition switch is ON.
The seat belt buckle switch is installed in the seat belt buckle.
Seat belt buckle switch (passenger side) Fastening or not fastening of seat belt is judged. This judgment is used to con-
trol passenger pre-crash seat belt system.
The seat belt buckle switch is installed in the seat belt buckle.
Steering angle sensor Steering angle sensor signal, steering angle speed signal, steering angle sensor
neutral position adjustment completion signal, and steering angle sensor mal-
function signal are received via CAN communication.
Revision: 2010 May2011 QX56
Page 4304 of 5598
SYSTEMSBC-7
< SYSTEM DESCRIPTION >
C
DE
F
G
I
J
K L
M A
B
SBC
N
O P
SYSTEM
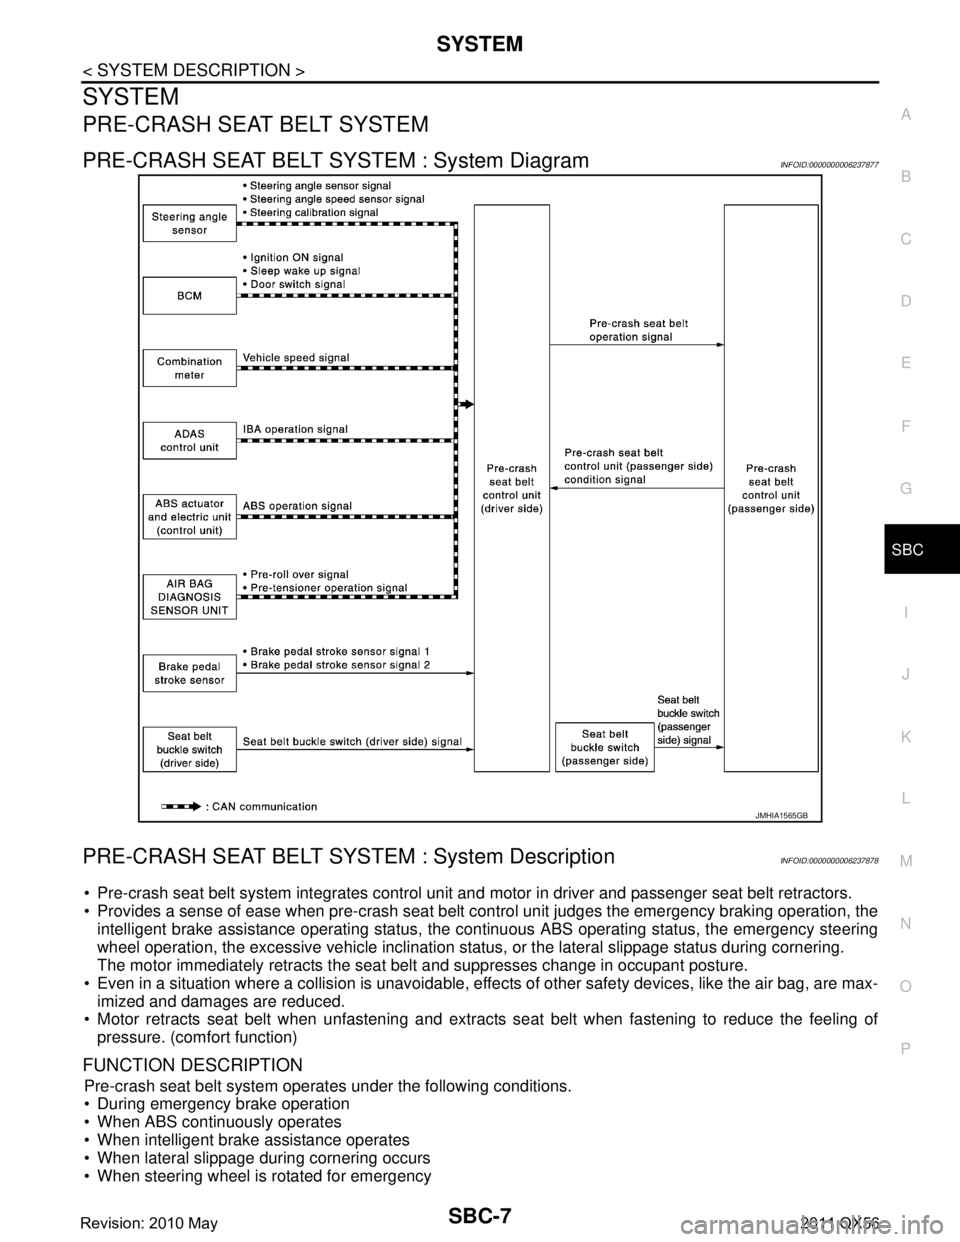
PRE-CRASH SEAT BELT SYSTEM
PRE-CRASH SEAT BELT SYSTEM : System DiagramINFOID:0000000006237877
PRE-CRASH SEAT BELT SYSTEM : System DescriptionINFOID:0000000006237878
Pre-crash seat belt system integrates control unit and motor in driver and passenger seat belt retractors.
Provides a sense of ease when pre-crash seat belt c ontrol unit judges the emergency braking operation, the
intelligent brake assistance operating status, the c ontinuous ABS operating status, the emergency steering
wheel operation, the excessive vehicle inclination stat us, or the lateral slippage status during cornering.
The motor immediately retracts the seat belt and suppresses change in occupant posture.
Even in a situation where a collision is unavoidable, effe cts of other safety devices, like the air bag, are max-
imized and damages are reduced.
Motor retracts seat belt when unfastening and extrac ts seat belt when fastening to reduce the feeling of
pressure. (comfort function)
FUNCTION DESCRIPTION
Pre-crash seat belt system operat es under the following conditions.
During emergency brake operation
When ABS continuously operates
When intelligent brake assistance operates
When lateral slippage during cornering occurs
When steering wheel is rotated for emergency
JMHIA1565GB
Revision: 2010 May2011 QX56
Page 4305 of 5598
SBC-8
< SYSTEM DESCRIPTION >
SYSTEM
When the vehicle inclined excessively
When comfort function operates
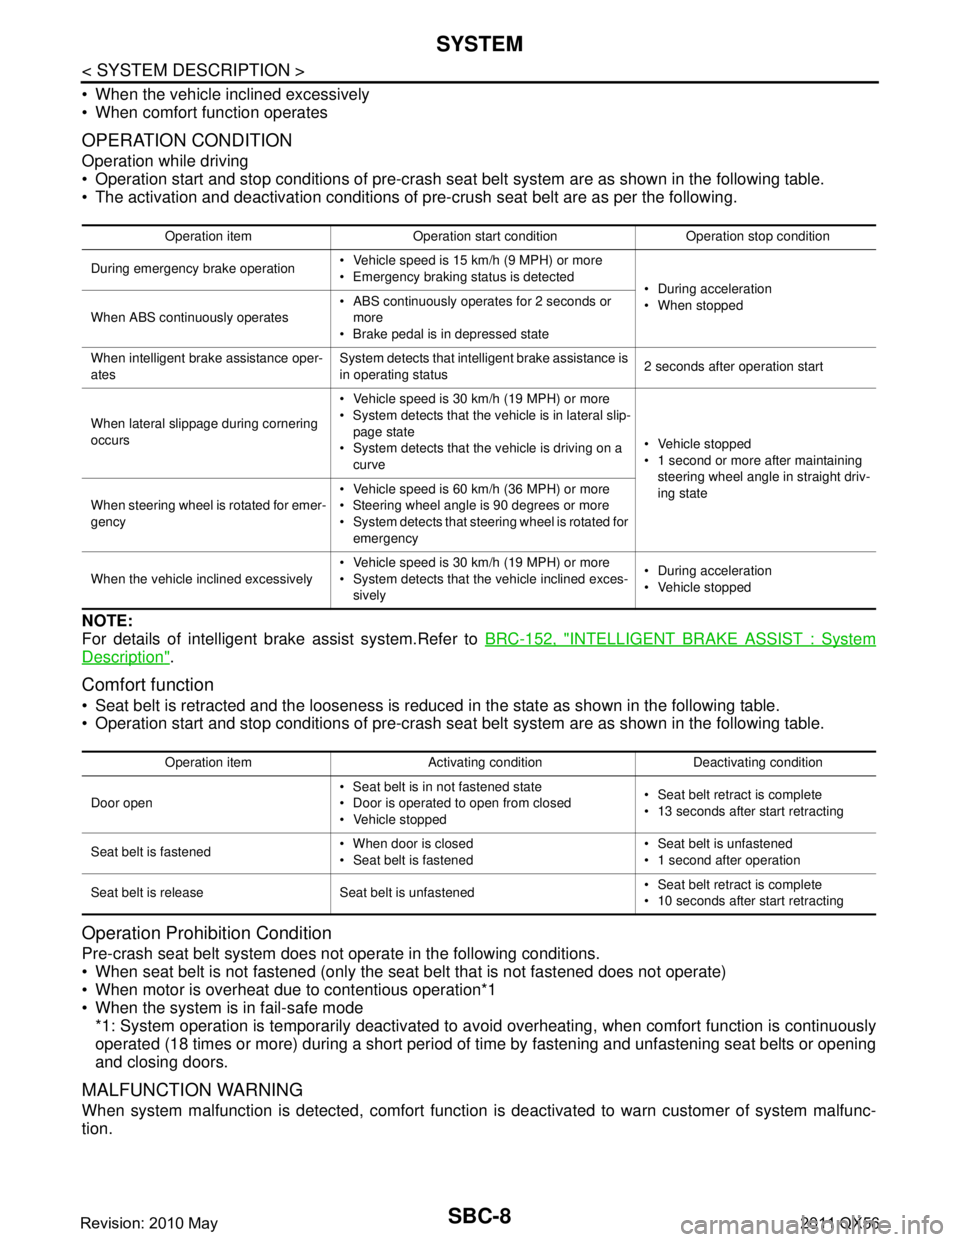
OPERATION CONDITION
Operation while driving
Operation start and stop conditions of pre-crash seat belt system are as shown in the following table.
The activation and deactivation conditions of pre-crush seat belt are as per the following.
NOTE:
For details of intelligent brake assist system.Refer to BRC-152, "
INTELLIGENT BRAKE ASSIST : System
Description".
Comfort function
Seat belt is retracted and the looseness is reduced in the state as shown in the following table.
Operation start and stop conditions of pre-crash seat belt system are as shown in the following table.
Operation Prohibition Condition
Pre-crash seat belt system does not operate in the following conditions.
When seat belt is not fastened (only the seat belt that is not fastened does not operate)
When motor is overheat due to contentious operation*1
When the system is in fail-safe mode *1: System operation is temporarily deactivated to av oid overheating, when comfort function is continuously
operated (18 times or more) during a short period of time by fastening and unfastening seat belts or opening
and closing doors.
MALFUNCTION WARNING
When system malfunction is detected, comfort function is deactivated to warn customer of system malfunc-
tion.
Operation item Operation start condition Operation stop condition
During emergency brake operation Vehicle speed is 15 km/h (9 MPH) or more
Emergency braking status is detected
During acceleration
When stopped
When ABS continuously operates ABS continuously operates for 2 seconds or
more
Brake pedal is in depressed state
When intelligent brake assistance oper-
ates System detects that intelligent brake assistance is
in operating status
2 seconds after operation start
When lateral slippage during cornering
occurs Vehicle speed is 30 km/h (19 MPH) or more
System detects that the vehicle is in lateral slip-
page state
System detects that the vehicle is driving on a curve Vehicle stopped
1 second or more after maintaining
steering wheel angle in straight driv-
ing state
When steering wheel is rotated for emer-
gency Vehicle speed is 60 km/h (36 MPH) or more
Steering wheel angle is 90 degrees or more
System detects that steering wheel is rotated for
emergency
When the vehicle inclined excessively Vehicle speed is 30 km/h (19 MPH) or more
System detects that the vehicle inclined exces-
sively During acceleration
Vehicle stopped
Operation item Activating condition Deactivating condition
Door open Seat belt is in not fastened state
Door is operated to open from closed
Vehicle stopped Seat belt retract is complete
13 seconds after start retracting
Seat belt is fastened When door is closed
Seat belt is fastened Seat belt is unfastened
1 second after operation
Seat belt is release Seat belt is unfastened Seat belt retract is complete
10 seconds after start retracting
Revision: 2010 May2011 QX56