2011 INFINITI QX56 ECU
[x] Cancel search: ECUPage 3364 of 5598
FRONT DOOR FINISHERINT-15
< REMOVAL AND INSTALLATION >
C
DE
F
G H
I
K L
M A
B
INT
N
O P
Seat memory switch. Refer to ADP-137, "Removal and Installation".
Front door inside handle. Refer to DLK-241, "
INSIDE HANDLE : Removal and Installation".
INSTALLATION
Note the following items, and install in the reverse order of removal.
CAUTION:
Visually check the clips, pawls an d metal clip for deformation and damage during installation.
Replace with new ones if necessary.
When installing fron t door finisher, check that clips, pawls and metal clip are securely fitted in body
panel holes, and press them in.
Revision: 2010 May2011 QX56
Page 3366 of 5598
REAR DOOR FINISHERINT-17
< REMOVAL AND INSTALLATION >
C
DE
F
G H
I
K L
M A
B
INT
N
O P
REMOVAL
1. Fully open door window.
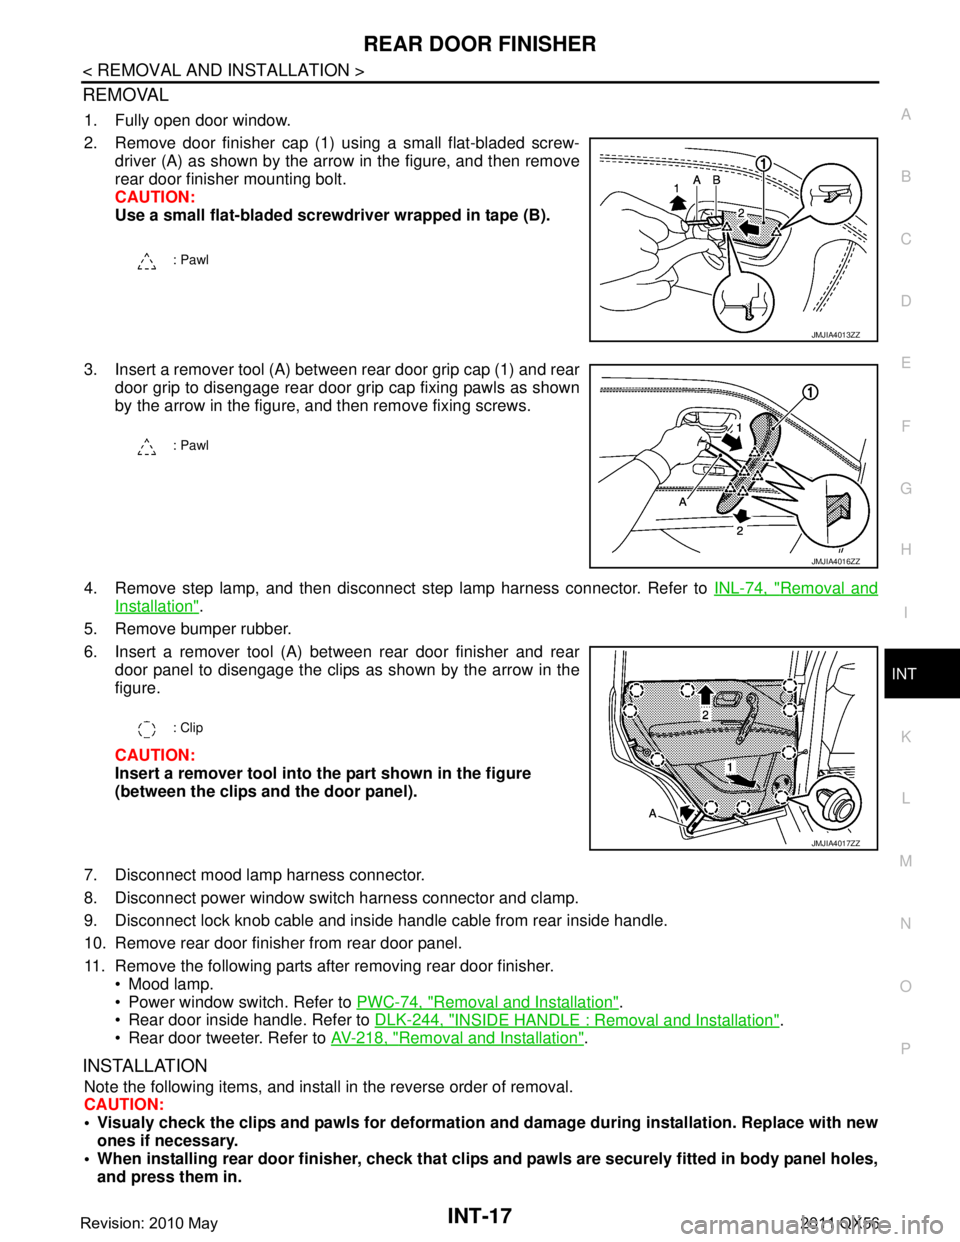
2. Remove door finisher cap (1) using a small flat-bladed screw- driver (A) as shown by the arrow in the figure, and then remove
rear door finisher mounting bolt.
CAUTION:
Use a small flat-bladed screwdriver wrapped in tape (B).
3. Insert a remover tool (A) between rear door grip cap (1) and rear door grip to disengage rear door grip cap fixing pawls as shown
by the arrow in the figure, and then remove fixing screws.
4. Remove step lamp, and then disconnect step lamp harness connector. Refer to INL-74, "
Removal and
Installation".
5. Remove bumper rubber.
6. Insert a remover tool (A) between rear door finisher and rear door panel to disengage the clips as shown by the arrow in the
figure.
CAUTION:
Insert a remover tool into the part shown in the figure
(between the clips and the door panel).
7. Disconnect mood lamp harness connector.
8. Disconnect power window switch harness connector and clamp.
9. Disconnect lock knob cable and inside handle cable from rear inside handle.
10. Remove rear door finisher from rear door panel.
11. Remove the following parts after removing rear door finisher. Mood lamp.
Power window switch. Refer to PWC-74, "
Removal and Installation".
Rear door inside handle. Refer to DLK-244, "
INSIDE HANDLE : Removal and Installation".
Rear door tweeter. Refer to AV-218, "
Removal and Installation".
INSTALLATION
Note the following items, and install in the reverse order of removal.
CAUTION:
Visualy check the clips and pawls for deformation and damage during installation. Replace with new
ones if necessary.
When installing rear door finish er, check that clips and pawls are secu rely fitted in body panel holes,
and press them in.
: Pawl
JMJIA4013ZZ
: Pawl
JMJIA4016ZZ
: Clip
JMJIA4017ZZ
Revision: 2010 May2011 QX56
Page 3368 of 5598
BODY SIDE TRIMINT-19
< REMOVAL AND INSTALLATION >
C
DE
F
G H
I
K L
M A
B
INT
N
O P
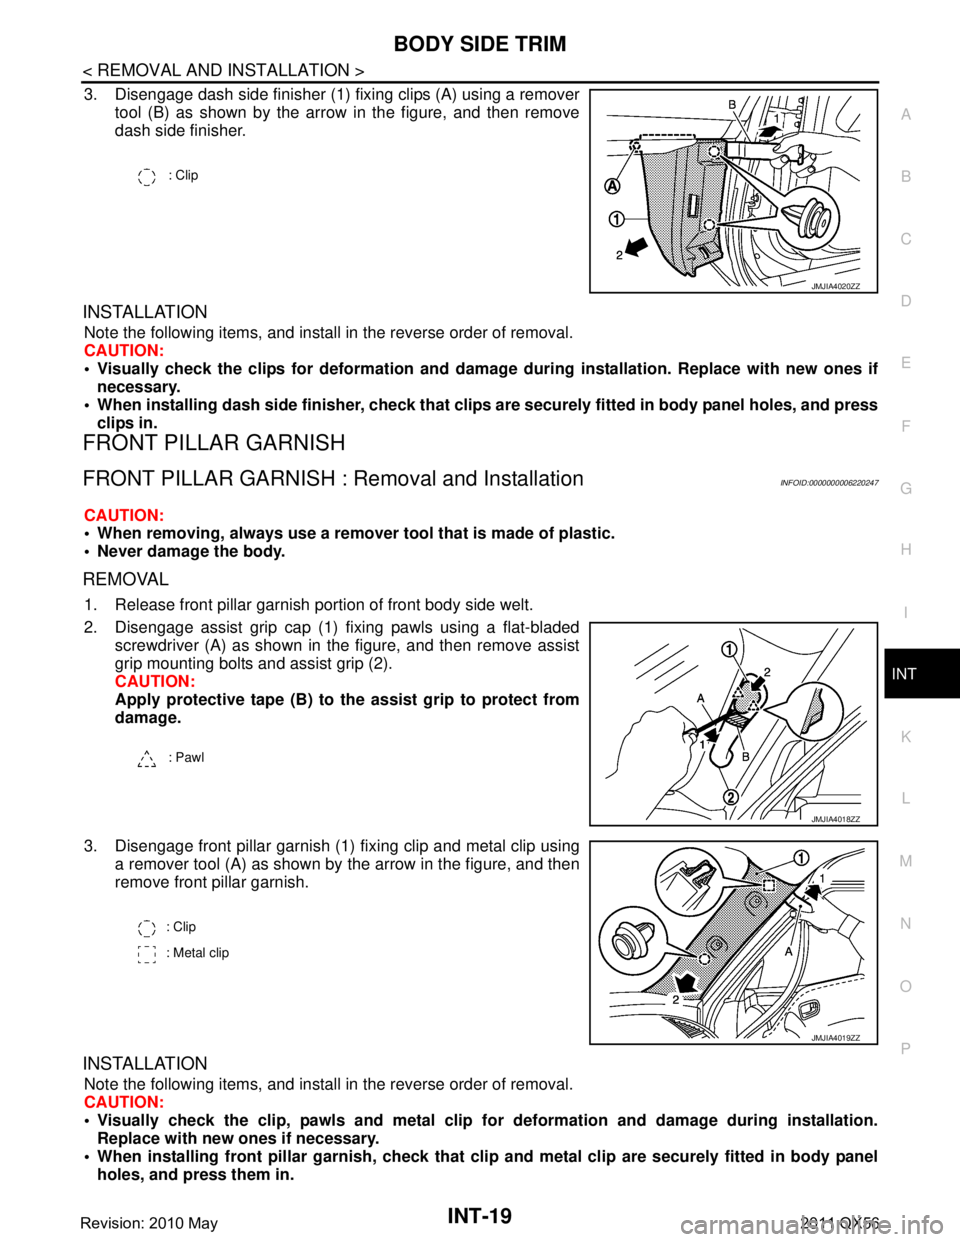
3. Disengage dash side finisher (1) fixing clips (A) using a remover tool (B) as shown by the arrow in the figure, and then remove
dash side finisher.
INSTALLATION
Note the following items, and install in the reverse order of removal.
CAUTION:
Visually check the clips for deformation and dama ge during installation. Replace with new ones if
necessary.
When installing dash si de finisher, check that clips are securely fitted in body panel holes, and press
clips in.
FRONT PILLAR GARNISH
FRONT PILLAR GARNISH : Removal and InstallationINFOID:0000000006220247
CAUTION:
When removing, always use a remover tool that is made of plastic.
Never damage the body.
REMOVAL
1. Release front pillar garnish portion of front body side welt.
2. Disengage assist grip cap (1) fixing pawls using a flat-bladed screwdriver (A) as shown in the figure, and then remove assist
grip mounting bolts and assist grip (2).
CAUTION:
Apply protective tape (B) to the assist grip to protect from
damage.
3. Disengage front pillar garnish (1) fixing clip and metal clip using a remover tool (A) as shown by the arrow in the figure, and then
remove front pillar garnish.
INSTALLATION
Note the following items, and install in the reverse order of removal.
CAUTION:
Visually check the clip, pawls a nd metal clip for deformation and damage during installation.
Replace with new ones if necessary.
When installing front pillar garn ish, check that clip and metal clip are securely fitted in body panel
holes, and press them in.
: Clip
JMJIA4020ZZ
: Pawl
JMJIA4018ZZ
: Clip
: Metal clip
JMJIA4019ZZ
Revision: 2010 May2011 QX56
Page 3370 of 5598
BODY SIDE TRIMINT-21
< REMOVAL AND INSTALLATION >
C
DE
F
G H
I
K L
M A
B
INT
N
O P
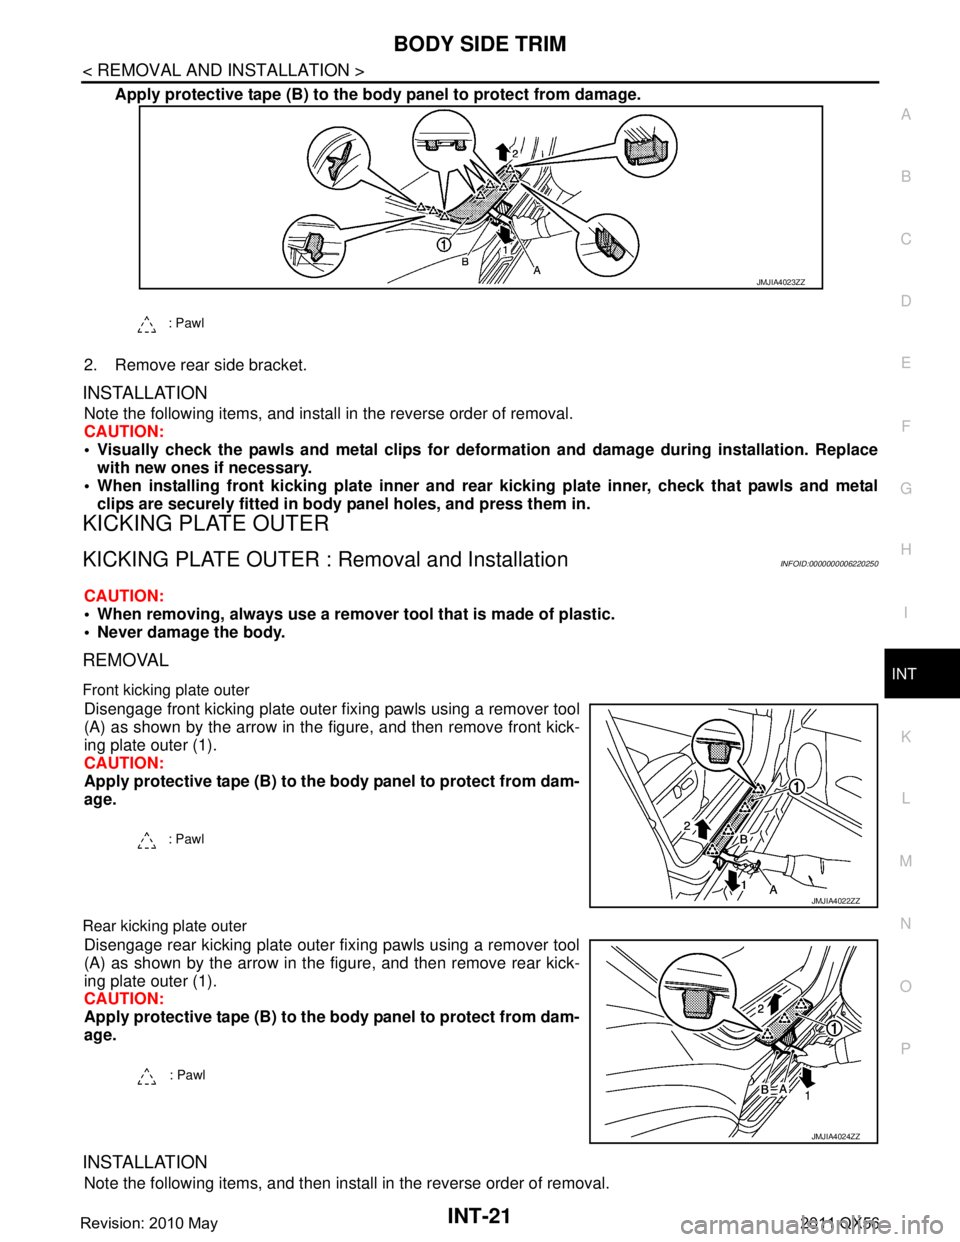
Apply protective tape (B) to the body panel to protect from damage.
2. Remove rear side bracket.
INSTALLATION
Note the following items, and install in the reverse order of removal.
CAUTION:
Visually check the pawls and metal clips for defo rmation and damage during installation. Replace
with new ones if necessary.
When installing front ki cking plate inner and rear kicking plat e inner, check that pawls and metal
clips are securely fitted in body panel holes, and press them in.
KICKING PLATE OUTER
KICKING PLATE OUTER : Removal and InstallationINFOID:0000000006220250
CAUTION:
When removing, always use a remover tool that is made of plastic.
Never damage the body.
REMOVAL
Front kicking plate outer
Disengage front kicking plate outer fixing pawls using a remover tool
(A) as shown by the arrow in the figure, and then remove front kick-
ing plate outer (1).
CAUTION:
Apply protective tape (B) to the body panel to protect from dam-
age.
Rear kicking plate outer
Disengage rear kicking plate outer fixing pawls using a remover tool
(A) as shown by the arrow in the figure, and then remove rear kick-
ing plate outer (1).
CAUTION:
Apply protective tape (B) to the body panel to protect from dam-
age.
INSTALLATION
Note the following items, and then install in the reverse order of removal.
: Pawl
JMJIA4023ZZ
: Pawl
JMJIA4022ZZ
: Pawl
JMJIA4024ZZ
Revision: 2010 May2011 QX56
Page 3371 of 5598
INT-22
< REMOVAL AND INSTALLATION >
BODY SIDE TRIM
CAUTION:
Visually check the pawls for deformation and damage during installation. Replace with new ones if
necessary.
When installing front kicking pl ate outer and rear kicking plate outer, check that pawls are securely
fitted in body panel ho les, and press them in.
CENTER PILLAR LOWER GARNISH
CENTER PILLAR LOWER GARNISH : Removal and InstallationINFOID:0000000006220251
CAUTION:
Never damage the body.
REMOVAL
1. Remove front kicking plate inner and rear kicking plate inner. Refer to INT-20, "KICKING PLATE INNER :
Removal and Installation".
2. Slide front seat assembly to the frontmost position.
3. Remove seat belt outer anchor. Refer to SB-6, "
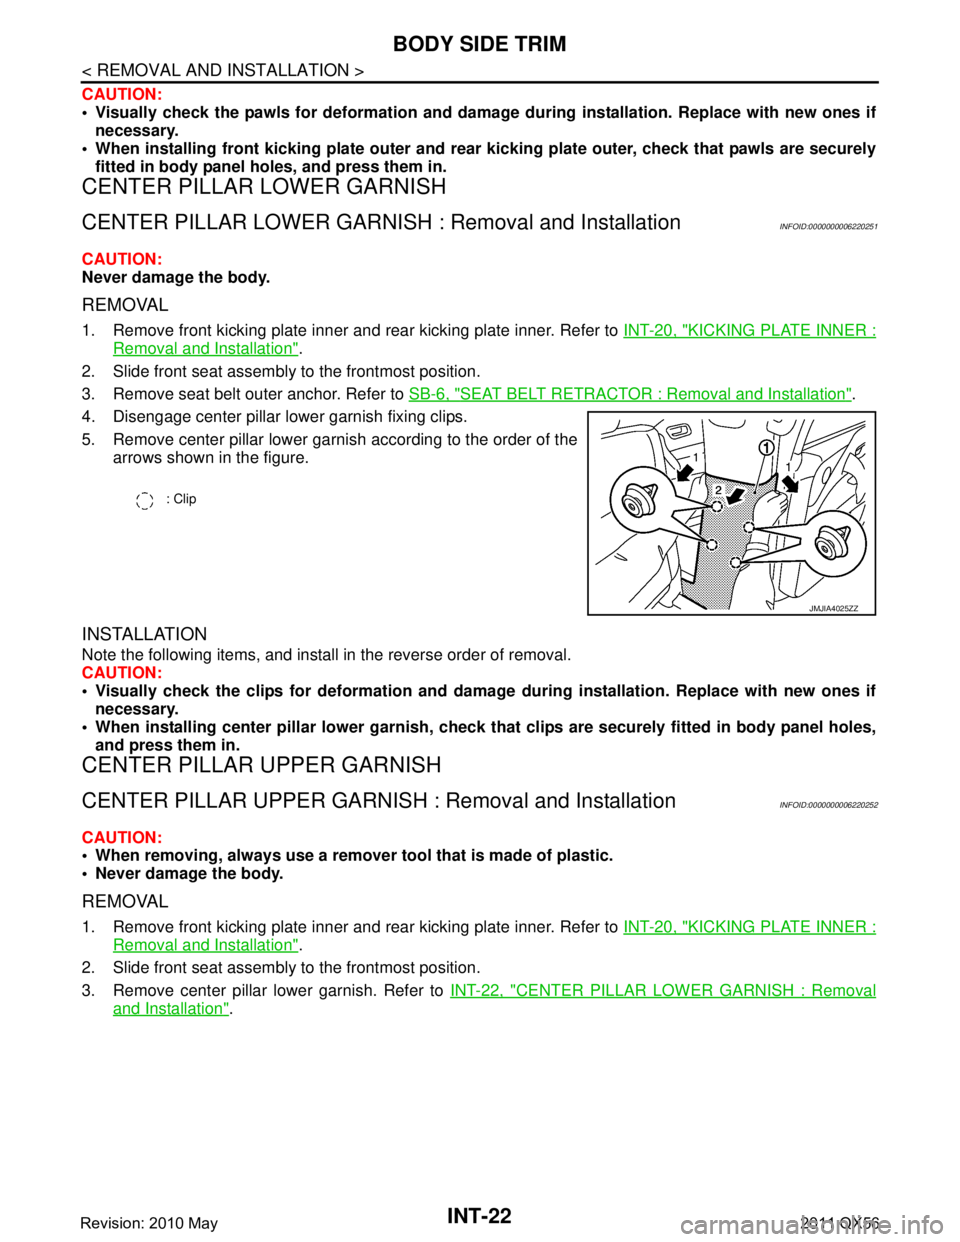
SEAT BELT RETRACTOR : Removal and Installation".
4. Disengage center pillar lower garnish fixing clips.
5. Remove center pillar lower garnish according to the order of the arrows shown in the figure.
INSTALLATION
Note the following items, and install in the reverse order of removal.
CAUTION:
Visually check the clips for deformation and dama ge during installation. Replace with new ones if
necessary.
When installing center pillar lowe r garnish, check that clips are secu rely fitted in body panel holes,
and press them in.
CENTER PILLAR UPPER GARNISH
CENTER PILLAR UPPER GARNISH : Removal and InstallationINFOID:0000000006220252
CAUTION:
When removing, always use a remover tool that is made of plastic.
Never damage the body.
REMOVAL
1. Remove front kicking plate inner and rear kicking plate inner. Refer to INT-20, "KICKING PLATE INNER :
Removal and Installation".
2. Slide front seat assembly to the frontmost position.
3. Remove center pillar lower garnish. Refer to INT-22, "
CENTER PILLAR LOWER GARNISH : Removal
and Installation".
: Clip
JMJIA4025ZZ
Revision: 2010 May2011 QX56
Page 3372 of 5598
BODY SIDE TRIMINT-23
< REMOVAL AND INSTALLATION >
C
DE
F
G H
I
K L
M A
B
INT
N
O P
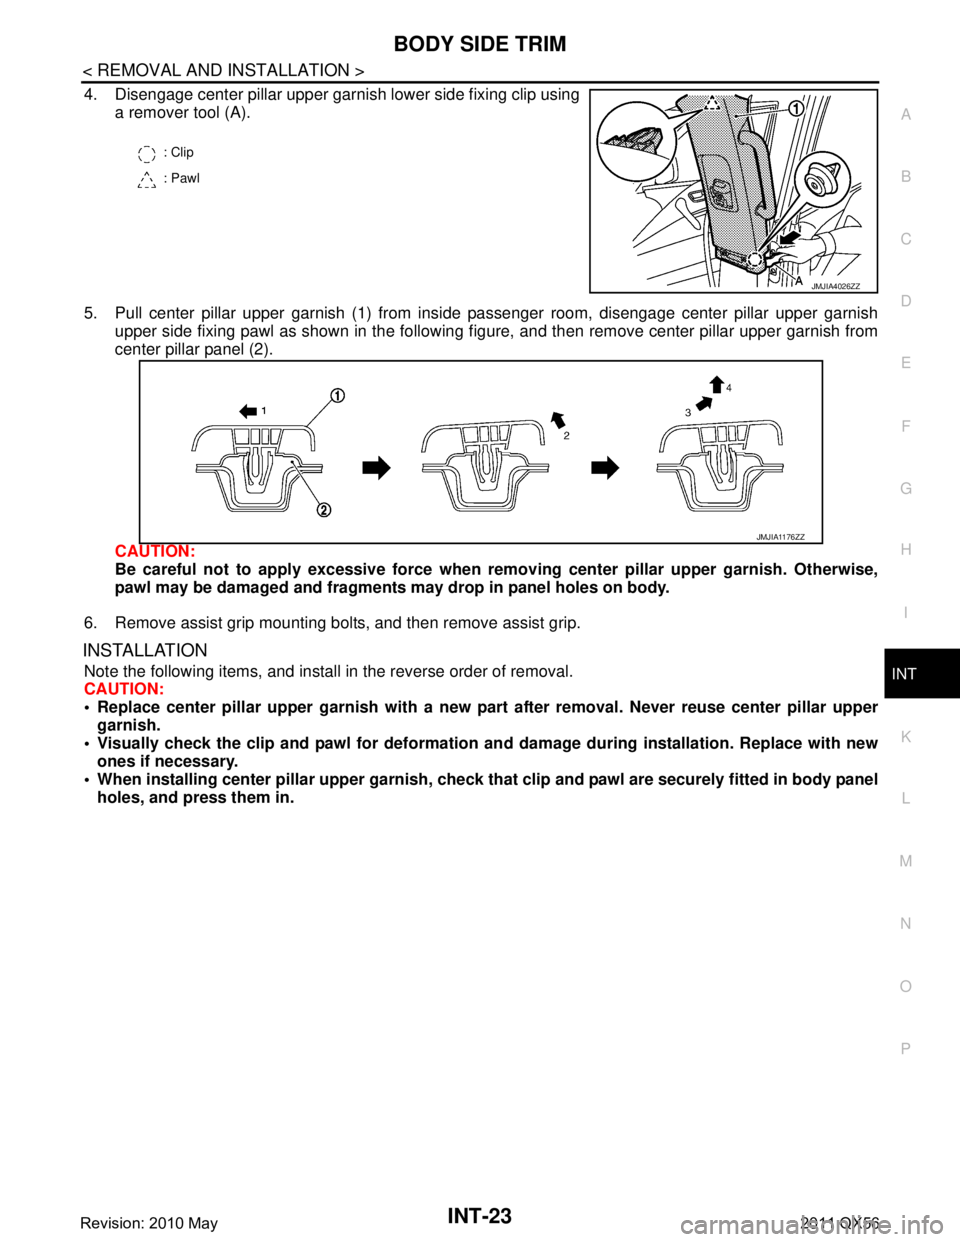
4. Disengage center pillar upper garnish lower side fixing clip using a remover tool (A).
5. Pull center pillar upper garnish (1) from inside passenger room, disengage center pillar upper garnish upper side fixing pawl as shown in the following figur e, and then remove center pillar upper garnish from
center pillar panel (2).
CAUTION:
Be careful not to apply excessive force when remo ving center pillar upper garnish. Otherwise,
pawl may be damaged and fragments may drop in panel holes on body.
6. Remove assist grip mounting bolts, and then remove assist grip.
INSTALLATION
Note the following items, and install in the reverse order of removal.
CAUTION:
Replace center pillar upper garnish with a new part after removal. Never reuse center pillar upper
garnish.
Visually check the clip and pawl for deformation an d damage during installation. Replace with new
ones if necessary.
When installing center pill ar upper garnish, check that clip and pawl are securely fitted in body panel
holes, and press them in.
: Clip
: Pawl
JMJIA4026ZZ
JMJIA1176ZZ
Revision: 2010 May2011 QX56
Page 3384 of 5598
LUGGAGE FLOOR TRIMINT-35
< REMOVAL AND INSTALLATION >
C
DE
F
G H
I
K L
M A
B
INT
N
O P
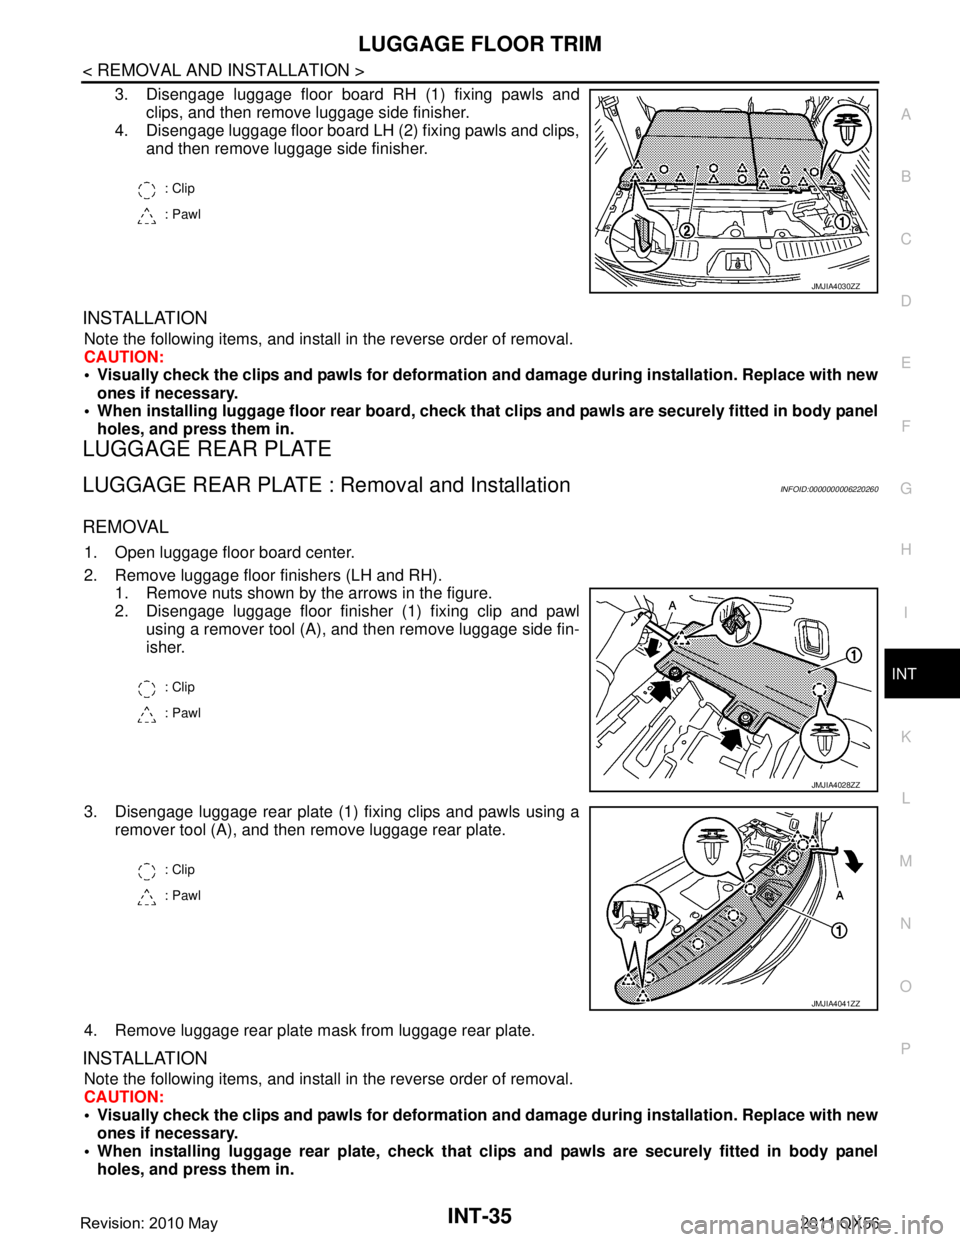
3. Disengage luggage floor board RH (1) fixing pawls and clips, and then remove luggage side finisher.
4. Disengage luggage floor board LH (2) fixing pawls and clips,
and then remove luggage side finisher.
INSTALLATION
Note the following items, and install in the reverse order of removal.
CAUTION:
Visually check the clips and pawls for deformation and damage during installation. Replace with new
ones if necessary.
When installing luggage floor rear board, check that clips and pawls are securely fitted in body panel
holes, and press them in.
LUGGAGE REAR PLATE
LUGGAGE REAR PLATE : Removal and InstallationINFOID:0000000006220260
REMOVAL
1. Open luggage floor board center.
2. Remove luggage floor finishers (LH and RH).
1. Remove nuts shown by the arrows in the figure.
2. Disengage luggage floor finisher (1) fixing clip and pawl
using a remover tool (A), and then remove luggage side fin-
isher.
3. Disengage luggage rear plate (1) fixing clips and pawls using a remover tool (A), and then remove luggage rear plate.
4. Remove luggage rear plate mask from luggage rear plate.
INSTALLATION
Note the following items, and install in the reverse order of removal.
CAUTION:
Visually check the clips and pawls for deformation and damage during installation. Replace with new
ones if necessary.
When installing luggage rear plate, check that cl ips and pawls are securely fitted in body panel
holes, and press them in.
: Clip
: Pawl
JMJIA4030ZZ
: Clip
: Pawl
JMJIA4028ZZ
: Clip
: Pawl
JMJIA4041ZZ
Revision: 2010 May2011 QX56
Page 3386 of 5598
LUGGAGE FLOOR TRIMINT-37
< REMOVAL AND INSTALLATION >
C
DE
F
G H
I
K L
M A
B
INT
N
O P
Visually check the clips and pawls for deformation and damage during installation. Replace with new
ones if necessary.
When installing luggage side lo wer finisher, check that clips and pawls are securely fitted in body
panel holes, and press them in.
REAR PILLAR FINISHER
REAR PILLAR FINISHER : Removal and InstallationINFOID:0000000006220262
REMOVAL
1. Remove luggage side lower finisher. INT-36, "LUGGAGE SIDE LOWER FINISHER : Removal and Instal-
lation".
2. Disengage lower side of rear pillar finisher fixing clip.
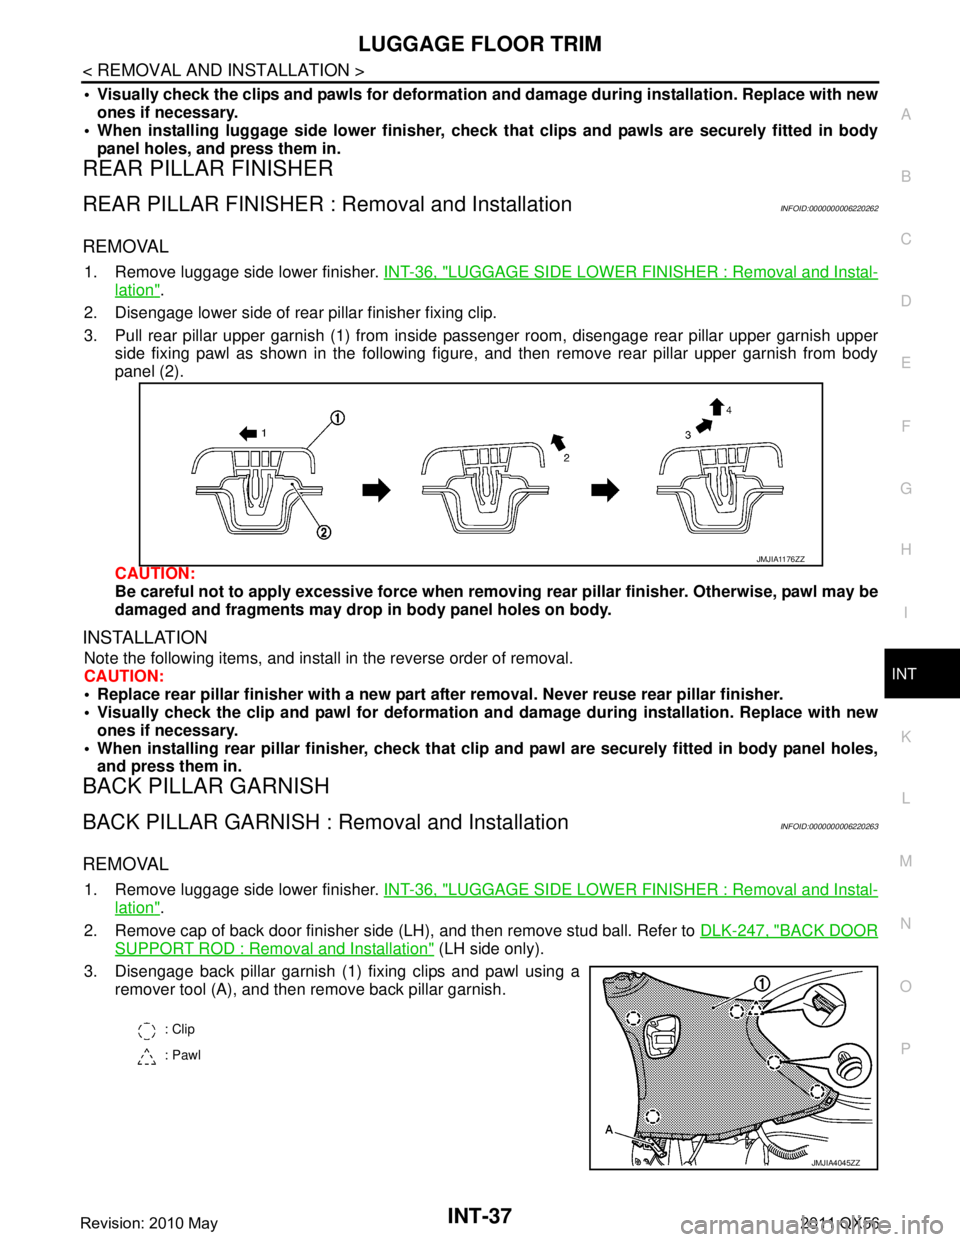
3. Pull rear pillar upper garnish (1) from inside passenger room, disengage rear pillar upper garnish upper side fixing pawl as shown in the following figure, and then remove rear pillar upper garnish from body
panel (2).
CAUTION:
Be careful not to apply excessive force when removing rear pillar finisher. Otherwise, pawl may be
damaged and fragments may drop in body panel holes on body.
INSTALLATION
Note the following items, and install in the reverse order of removal.
CAUTION:
Replace rear pillar finisher wi th a new part after removal. Never reuse rear pillar finisher.
Visually check the clip and pawl for deformation an d damage during installation. Replace with new
ones if necessary.
When installing rear pillar finisher, check that cl ip and pawl are securely fitted in body panel holes,
and press them in.
BACK PILLAR GARNISH
BACK PILLAR GARNISH : Removal and InstallationINFOID:0000000006220263
REMOVAL
1. Remove luggage side lower finisher. INT-36, "LUGGAGE SIDE LOWER FINISHER : Removal and Instal-
lation".
2. Remove cap of back door finisher side (LH), and then remove stud ball. Refer to DLK-247, "
BACK DOOR
SUPPORT ROD : Removal and Installation" (LH side only).
3. Disengage back pillar garnish (1) fixing clips and pawl using a remover tool (A), and then remove back pillar garnish.
JMJIA1176ZZ
: Clip
: Pawl
JMJIA4045ZZ
Revision: 2010 May2011 QX56