2011 INFINITI QX56 ECU
[x] Cancel search: ECUPage 3740 of 5598

OUTSIDE MIRRORMIR-35
< REMOVAL AND INSTALLATION >
C
DE
F
G H
I
J
K
M A
B
MIR
N
O P
9. Remove fixing screws (A), (B) and then remove power fold unit (2) from bracket (1).
ASSEMBLY
Assemble in the reverse order of disassembly.
GLASS MIRROR
GLASS MIRROR : Removal and InstallationINFOID:0000000006257239
REMOVAL
1. Remove door mirror assembly from front door. Refer to MIR-32, "DOOR MIRROR ASSEMBLY : Removal
and Installation".
2. Remove glass mirror. 1. Place the glass mirror upward.
2. Put a strip of protective tape (B) on housing assembly.
3. As shown in the figure, insert a small flat-bladed screwdriver (A) between glass mirror (1) and actuator (2). Push up both
pawls simultaneously to remove glass mirror lower half side.
NOTE:
Insert flat-bladed screwdriver into recesses, and push up
while rotating (twisting) to make work easier.
4. Remove terminals (A) of mi rror heater attachment from
glass mirror (1) if equipped.
3. Lightly lift up lower side of glass mirror, and detach both pawls of upper side as if pulling it out to disas- semble glass mirror from actuator.
NOTE:
Be careful not to allow grease on sealing agent in center of mirror or back side of glass mirror.
INSTALLATION
Note the following item, and then install in the reverse order n the reverse order of disassembly.
CAUTION:
After installation, visually check that pawls are securely engaged.
DOOR MIRROR COVER
JMLIA0924ZZ
JMLIA0158ZZ
JMLIA0908ZZ
Revision: 2010 May2011 QX56
Page 3741 of 5598

MIR-36
< REMOVAL AND INSTALLATION >
OUTSIDE MIRROR
DOOR MIRROR COVER : Re moval and Installation
INFOID:0000000006257240
CAUTION:
Never damage the mirror bodies.
REMOVAL
1. Remove the glass mirror. Refer to MIR-35, "GLASS MIRROR : Removal and Installation".
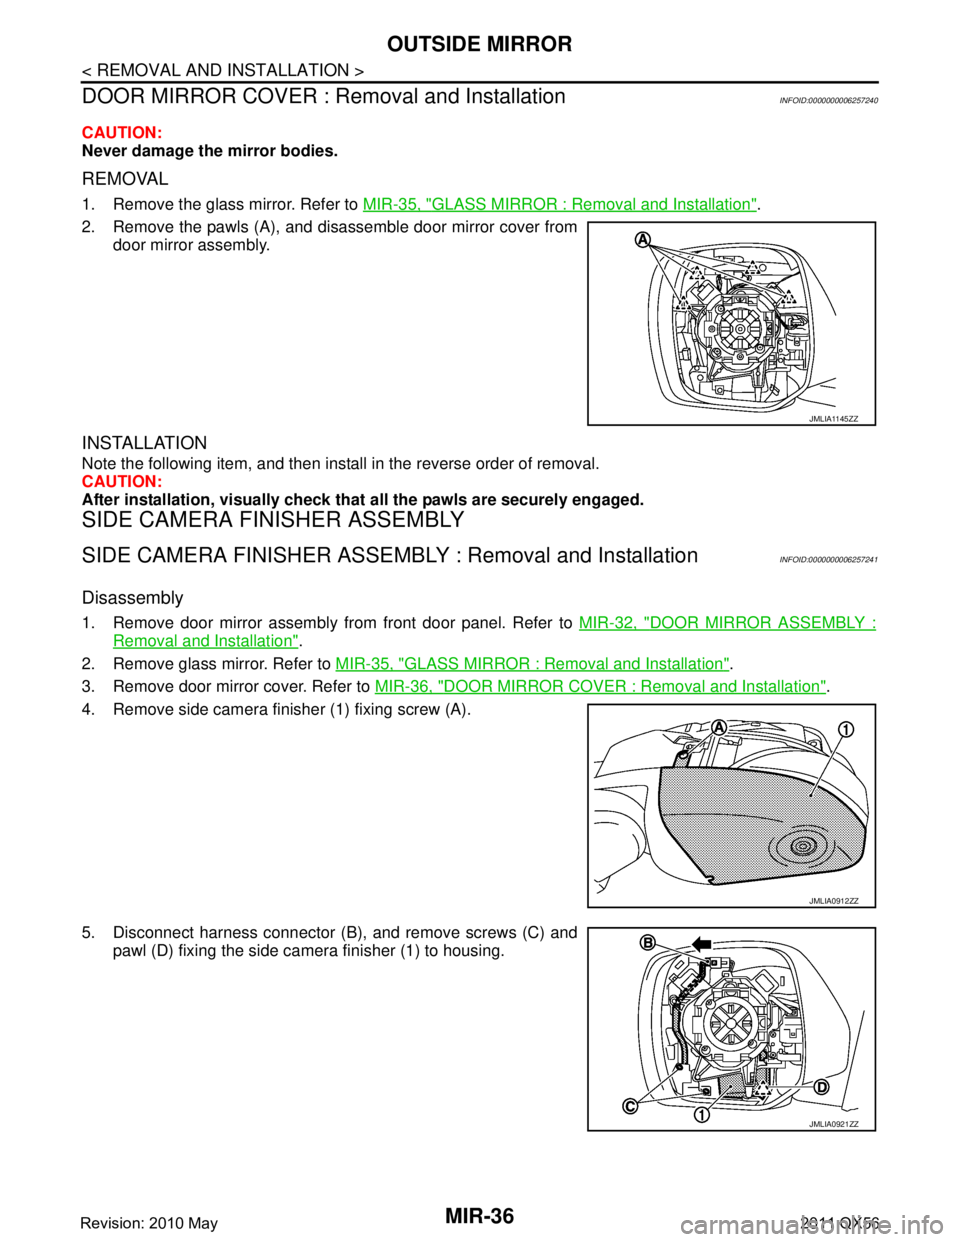
2. Remove the pawls (A), and disassemble door mirror cover from door mirror assembly.
INSTALLATION
Note the following item, and then install in the reverse order of removal.
CAUTION:
After installation, visually check that all the pawls are securely engaged.
SIDE CAMERA FINISHER ASSEMBLY
SIDE CAMERA FINISHER ASSEMBLY : Removal and InstallationINFOID:0000000006257241
Disassembly
1. Remove door mirror assembly from front door panel. Refer to MIR-32, "DOOR MIRROR ASSEMBLY :
Removal and Installation".
2. Remove glass mirror. Refer to MIR-35, "
GLASS MIRROR : Removal and Installation".
3. Remove door mirror cover. Refer to MIR-36, "
DOOR MIRROR COVER : Removal and Installation".
4. Remove side camera finisher (1) fixing screw (A).
5. Disconnect harness connector (B), and remove screws (C) and pawl (D) fixing the side camera finisher (1) to housing.
JMLIA1145ZZ
JMLIA0912ZZ
JMLIA0921ZZ
Revision: 2010 May2011 QX56
Page 3745 of 5598

MWI-2
DIAGNOSIS SYSTEM (COMBINATION
METER) ..............................................................
29
On Board Diagnosis Function .............................. ...29
CONSULT-III Function ...........................................30
ECU DIAGNOSIS INFORMATION ..............35
COMBINATION METER ................................. ...35
Reference Value .................................................. ...35
Fail-Safe .................................................................42
DTC Index ..............................................................43
IPDM E/R ...........................................................44
List of ECU Reference ......................................... ...44
WIRING DIAGRAM .....................................45
METER SYSTEM ............................................ ...45
Wiring Diagram .................................................... ...45
CLOCK ...............................................................55
Wiring Diagram .................................................... ...55
BASIC INSPECTION ...................................57
DIAGNOSIS AND REPAIR WORKFLOW
(METER SYSTEM ) .......................................... ...
57
Work flow ............................................................. ...57
DTC/CIRCUIT DIAGNOSIS ...................... ...59
U1000 CAN COMM CIRCUIT ......................... ...59
Description ........................................................... ...59
DTC Logic ...............................................................59
Diagnosis Procedure .............................................59
U1010 CONTROL UNIT (CAN) .........................60
Description ........................................................... ...60
DTC Logic ...............................................................60
Diagnosis Procedure ..............................................60
B2205 VEHICLE SPEED ...................................61
Description ........................................................... ...61
DTC Logic ...............................................................61
Diagnosis Procedure .............................................61
B2267 ENGINE SPEED .....................................62
Description ........................................................... ...62
DTC Logic ...............................................................62
Diagnosis Procedure ..............................................62
B2268 WATER TEMP ........................................63
Description ........................................................... ...63
DTC Logic ...............................................................63
Diagnosis Procedure ..............................................63
POWER SUPPLY AND GROUND CIRCUIT .....64
COMBINATION METER ........................................ ...64
COMBINATION METER : Diagnosis Procedure ....64
TRIP RESET AND ILLUMINATION CON-
TROL SWITCH SIGNAL CIRCUIT ....................
65
Diagnosis Procedure ............................................ ...65
Component Inspection ............................................66
TRIP COMPUTER SWITCH SIGNAL CIRCUIT
...
67
Diagnosis Procedure ............................................ ...67
Component Inspection ............................................68
FUEL LEVEL SENSOR SIGNAL CIRCUIT .......69
Component Function Check ................................ ...69
Diagnosis Procedure ..............................................69
Component Inspection ............................................70
OIL PRESSURE SWITCH SIGNAL CIRCUIT ...71
Component Function Check ...................................71
Diagnosis Procedure ...............................................71
Component Inspection ............................................71
WASHER LEVEL SWITCH SIGNAL CIRCUIT ...73
Diagnosis Procedure ............................................ ...73
Component Inspection ............................................73
A/C AUTO AMP. CONNECTION RECOGNI-
TION SIGNAL CIRCUIT ....................................
74
Diagnosis Procedure ........................................... ...74
SYMPTOM DIAGNOSIS ............................75
THE FUEL GAUGE INDICATOR DOES NOT
OPERATE ....................................................... ...
75
Description ........................................................... ...75
Diagnosis Procedure ...............................................75
THE TRIP RESET AND ILLUMINATION CON-
TROL SWITCH IS INOPERATIVE ....................
76
Description ........................................................... ...76
Diagnosis Procedure ...............................................76
THE TRIP COMPUTER SWITCH IS INOPER-
ATIVE .................................................................
77
Description ........................................................... ...77
Diagnosis Procedure ...............................................77
THE OIL PRESSURE WARNING LAMP
DOES NOT TURN ON .................................... ...
78
Description ........................................................... ...78
Diagnosis Procedure ...............................................78
THE OIL PRESSURE WARNING LAMP
DOES NOT TURN OFF .................................. ...
79
Description ........................................................... ...79
Diagnosis Procedure ...............................................79
THE PARKING BRAKE RELEASE WARNING
CONTINUES DISPLAYING, OR DOES NOT
DISPLAY ............................................................
80
Description ........................................................... ...80
Diagnosis Procedure ...............................................80
Revision: 2010 May2011 QX56
Page 3778 of 5598

MWI
COMBINATION METERMWI-35
< ECU DIAGNOSIS INFORMATION >
C
DE
F
G H
I
J
K L
M B A
O P
ECU DIAGNOSIS INFORMATION
COMBINATION METER
Reference ValueINFOID:0000000006221721
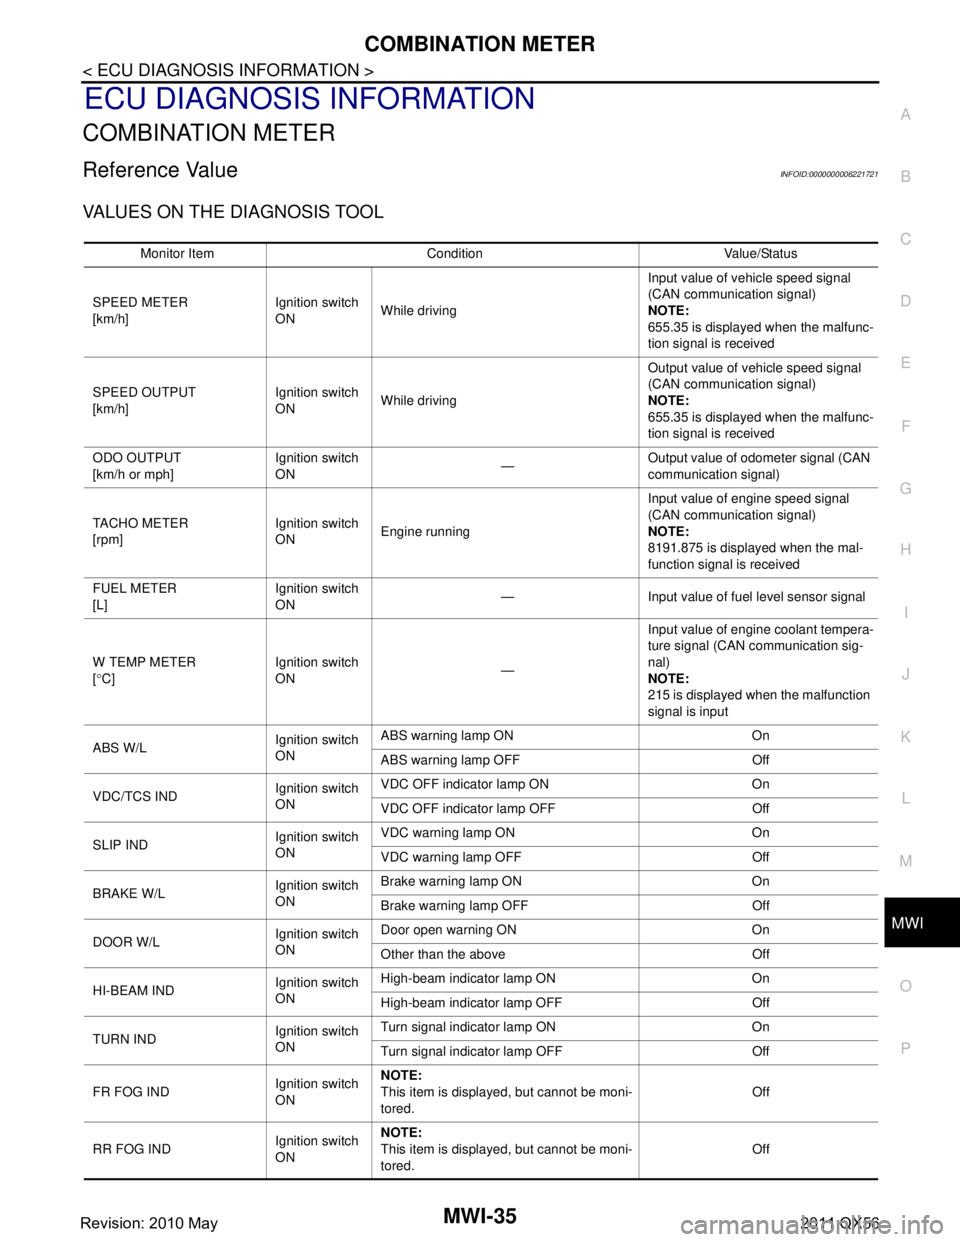
VALUES ON THE DIAGNOSIS TOOL
Monitor Item Condition Value/Status
SPEED METER
[km/h] Ignition switch
ON
While driving Input value of vehicle speed signal
(CAN communication signal)
NOTE:
655.35 is displayed when the malfunc-
tion signal is received
SPEED OUTPUT
[km/h] Ignition switch
ON
While driving Output value of vehicle speed signal
(CAN communication signal)
NOTE:
655.35 is displayed when the malfunc-
tion signal is received
ODO OUTPUT
[km/h or mph] Ignition switch
ON
—Output value of odometer signal (CAN
communication signal)
TACHO METER
[rpm] Ignition switch
ON
Engine running Input value of engine speed signal
(CAN communication signal)
NOTE:
8191.875 is displayed when the mal-
function signal is received
FUEL METER
[L] Ignition switch
ON
— Input value of fuel level sensor signal
W TEMP METER
[ ° C] Ignition switch
ON
—Input value of engine coolant tempera-
ture signal (CAN communication sig-
nal)
NOTE:
215 is displayed when the malfunction
signal is input
ABS W/L Ignition switch
ONABS warning lamp ON On
ABS warning lamp OFF Off
VDC/TCS IND Ignition switch
ONVDC OFF indicator lamp ON On
VDC OFF indicator lamp OFF Off
SLIP IND Ignition switch
ONVDC warning lamp ON On
VDC warning lamp OFF Off
BRAKE W/L Ignition switch
ONBrake warning lamp ON On
Brake warning lamp OFF Off
DOOR W/L Ignition switch
ONDoor open warning ON On
Other than the above Off
HI-BEAM IND Ignition switch
ONHigh-beam indicator lamp ON On
High-beam indicator lamp OFF Off
TURN IND Ignition switch
ONTurn signal indicator lamp ON On
Turn signal indicator lamp OFF Off
FR FOG IND Ignition switch
ONNOTE:
This item is displayed, but cannot be moni-
tored.
Off
RR FOG IND Ignition switch
ONNOTE:
This item is displayed, but cannot be moni-
tored.
Off
Revision: 2010 May2011 QX56
Page 3779 of 5598

MWI-36
< ECU DIAGNOSIS INFORMATION >
COMBINATION METER
LIGHT INDIgnition switch
ONTail lamp indicator lamp ON On
Tail lamp indicator lamp OFF Off
OIL W/L Ignition switch
ONOil pressure warning lamp ON On
Oil pressure warning lamp OFF Off
MIL Ignition switch
ONMalfunction indicator lamp ON On
Malfunction indicator lamp OFF Off
GLOW IND Ignition switch
ONNOTE:
This item is displayed, but cannot be moni-
tored.
Off
CRUISE IND Ignition switch
ONCRUISE indicator ON On
CRUISE indicator OFF Off
SET IND Ignition switch
ONSET indicator ON On
SET indicator OFF Off
CRUISE W/L Ignition switch
ONCRUISE warning lamp ON On
CRUISE warning lamp OFF Off
BA W/L Ignition switch
ONIBA OFF indicator lamp ON On
IBA OFF indicator lamp OFF Off
ATC/T-AMT W/L Ignition switch
ONA/T check warning lamp ON On
A/T check warning lamp OFF Off
ATF TEMP W/L Ignition switch
ONNOTE:
This item is displayed, but cannot be moni-
tored.
Off
4WD W/L Ignition switch
ON4WD warning lamp ON On
4WD warning lamp OFF Off
FUEL W/L Ignition switch
ONDuring low fuel warning indication On
Other than the above Off
WASHER W/L Ignition switch
ONDuring low washer flui
d warning indication On
Other than the above Off
AIR PRES W/L Ignition switch
ONLow tire pressure
warning lamp ON On
Low tire pressure warning lamp OFF Off
KEY G/Y W/L Ignition switch
ONKEY warning lamp (Green/Yellow) ON On
KEY warning lamp (Green/Yellow) OFF Off
KEY KNOB W/L Ignition switch
ONNOTE:
This item is displayed, but cannot be moni-
tored.
Off
AFS OFF IND Ignition switch
ONAFS OFF indicator lamp ON On
AFS OFF indicator lamp OFF Off
DDS W/L Ignition switch
ONNOTE:
This item is displayed, but cannot be moni-
tored.
Off
LANE W/L
Ignition switch
ONLane departure warning lamp ON On
Lane departure warning lamp OFF Off
LDP IND Ignition switch
ONLDP ON indicator lamp ON On
LDP ON indicator lamp OFF Off
AT P W / L Ignition switch
ONATP warning lamp ON On
ATP warning lamp OFF Off
Monitor Item Condition Value/Status
Revision: 2010 May2011 QX56
Page 3780 of 5598

MWI
COMBINATION METERMWI-37
< ECU DIAGNOSIS INFORMATION >
C
DE
F
G H
I
J
K L
M B A
O P
DCA IND Ignition switch
ONNOTE:
This item is displayed, but cannot be moni-
tored.
Off
CHECK SUS IND Ignition switch
ONCK SUSP indicator lamp ON On
CK SUSP indicator lamp OFF Off
LCD Ignition switch
ON
During engine start in
formation indication B&P I
Ignition switch
ACC During engine start in
formation indication B&P N
Ignition switch
LOCK During key ID warning indication ID NG
Ignition switch
LOCK During steering lock information indication ROTAT
Ignition switch
LOCK During P position warning indication SFT P
Ignition switch
LOCK During Intelligent Key insert information in-
dication
INSRT
Ignition switch
LOCK During Intelligent Key low battery warning
indication
BATT
Ignition switch
ON During take away warning indication NO KY
Ignition switch
LOCK During key warning indication OUTKY
Ignition switch
ON During ACC warning indication LK WN
ACC TARGET Ignition switch
ONDuring vehicle ahead detection indicator in-
dication
On
Other than the above Off
ACC DISTANCE Ignition switch
ONWhen following distance set to “LONG” LONG
When following distance set to “MIDDLE” MID
When following distance set to “SHORT” SHORT
Set distance indicator not displayed Off
ACC OWN VHL Ignition switch
ONDuring own vehicle indicator indication On
Other than the above Off
ACC SET SPEED Ignition switch
ONDuring set vehicle speed indicator not dis-
played
Off
During set vehicle speed indicator dis-
played Indicates the set vehicle speed
ACC UNIT Ignition switch
ONSet vehicle speed indicator unit display ON On
Set vehicle speed indicator unit display OFF Off
Monitor Item Condition Value/Status
Revision: 2010 May2011 QX56
Page 3781 of 5598

MWI-38
< ECU DIAGNOSIS INFORMATION >
COMBINATION METER
SHIFT INDIgnition switch
ONDuring the indication of “P” by shift position
indicator
P
During the indication of “R” by shift position
indicator R
During the indication of “N” by shift position
indicator N
During the indication of “D” by shift position
indicator D
During the indication of “M1” by shift posi-
tion indicator M1
During the indication of “M2” by shift posi-
tion indicator M2
During the indication of “M3” by shift posi-
tion indicator M3
During the indication of “M4” by shift posi-
tion indicator M4
During the indication of “M5” by shift posi-
tion indicator M5
During the indication of “M6” by shift posi-
tion indicator M6
During the indication of “M7” by shift posi-
tion indicator M7
4WD IND Ignition switch
ON4WD shift switch in AUTO position AUTO
4WD shift switch in 4H position LOCK
4WD shift switch in 4L position LOCK/4Lo
BSW IND Ignition switch
ONNOTE:
This item is displayed, but cannot be moni-
tored.
Off
BSW W/L Ignition switch
ONBSW warning lamp ON On
BSW warning lamp OFF Off
AT S MODE SW Ignition switch
ONSnow mode switch ON On
Snow mode switch OFF Off
M RANGE SW Ignition switch
ONSelector lever in manual mode position On
Other than the above Off
NM RANGE SW Ignition switch
ONSelector lever in manual mode position Off
Other than the above On
AT SFT UP SW Ignition switch
ONSelector lever in + position On
Other than the above Off
AT SFT DWN SW Ignition switch
ONSelector lever in – position On
Other than the above Off
PKB SW Ignition switch
ONParking brake switch ON On
Parking brake switch OFF Off
BUCKLE SW Ignition switch
ONDriver seat belt not fastened On
Driver seat belt fastened Off
BRAKE OIL SW Ignition switch
ONBrake fluid level switch ON On
Brake fluid level switch OFF Off
A/C AMP CONN Ignition switch
ONNOTE:
This item is displayed, but cannot be moni-
tored.
Off
Monitor Item Condition Value/Status
Revision: 2010 May2011 QX56
Page 3782 of 5598

MWI
COMBINATION METERMWI-39
< ECU DIAGNOSIS INFORMATION >
C
DE
F
G H
I
J
K L
M B A
O P
NOTE:
Some items are not available according to vehicle specification.
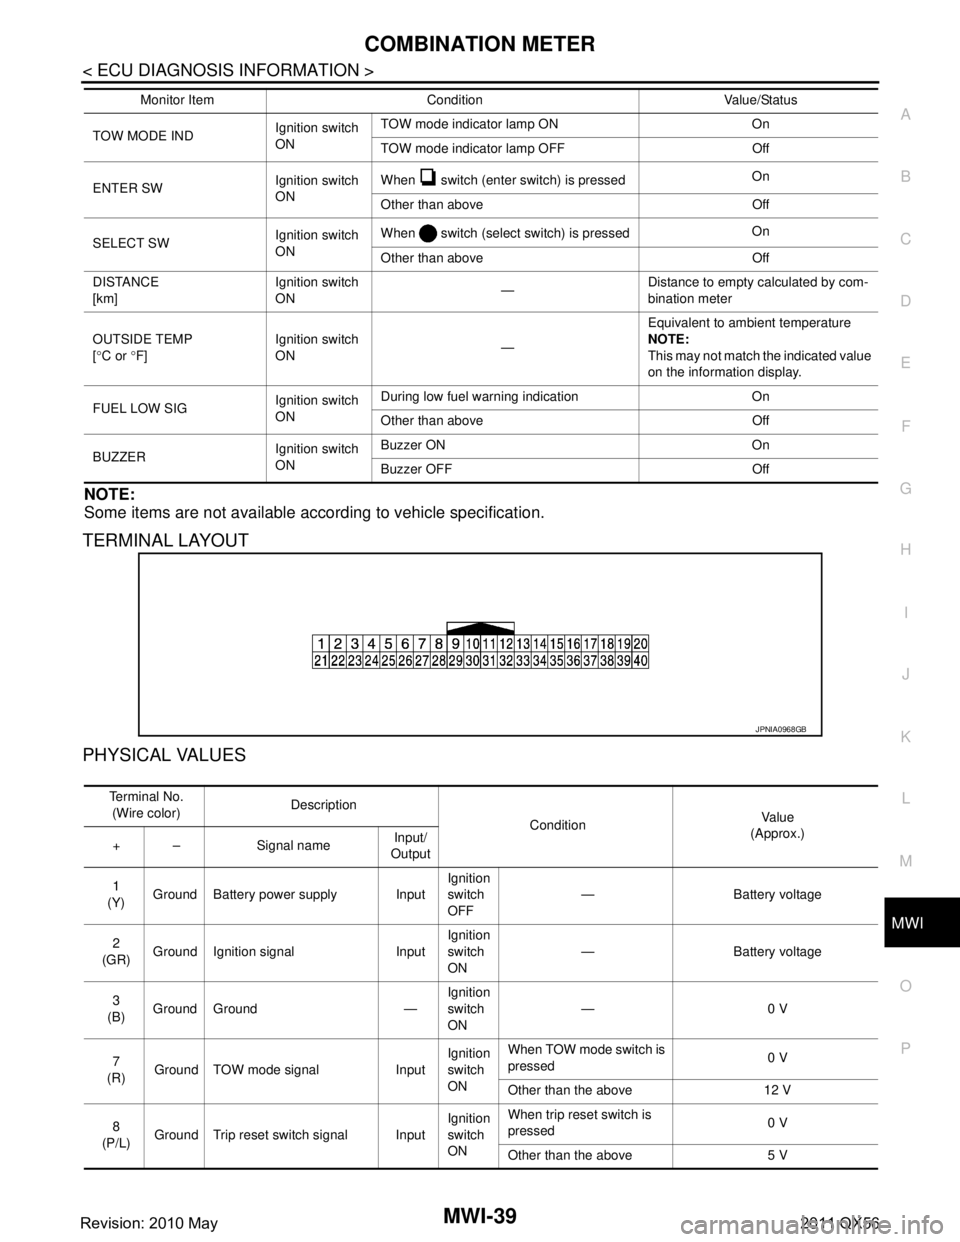
TERMINAL LAYOUT
PHYSICAL VALUES
TOW MODE IND Ignition switch
ONTOW mode indicator lamp ON On
TOW mode indicator lamp OFF Off
ENTER SW Ignition switch
ONWhen switch (enter switch) is pressed
On
Other than above Off
SELECT SW Ignition switch
ONWhen switch (select switch) is pressed
On
Other than above Off
DISTANCE
[km] Ignition switch
ON
—Distance to empty calculated by com-
bination meter
OUTSIDE TEMP
[ ° C or °F] Ignition switch
ON
—Equivalent to ambient temperature
NOTE:
This may not match the indicated value
on the information display.
FUEL LOW SIG Ignition switch
ONDuring low fuel warning indication On
Other than above Off
BUZZER Ignition switch
ONBuzzer ON On
Buzzer OFF Off
Monitor Item Condition Value/Status
JPNIA0968GB
Te r m i n a l N o .
(Wire color) Description
ConditionVa l u e
(Approx.)
+ – Signal name Input/
Output
1
(Y) Ground Battery power supply Input Ignition
switch
OFF— Battery voltage
2
(GR) Ground Ignition signal Input Ignition
switch
ON
— Battery voltage
3
(B) Ground Ground — Ignition
switch
ON—0 V
7
(R) Ground TOW mode signal Input Ignition
switch
ONWhen TOW mode switch is
pressed
0 V
Other than the above 12 V
8
(P/L) Ground Trip reset switch signal Input Ignition
switch
ONWhen trip reset switch is
pressed
0 V
Other than the above 5 V
Revision: 2010 May2011 QX56